
Background
It was Christmas 2018 and my wife Helen hands me over an envelope with an unexpected gift: two hours tuition with Alex Mustard (on land). Alex was travelling and I was busy with work so I only managed to get the session arranged in spring 2019. At that time I had just returned from a Hammerhead expedition in the Bahamas.
Prior to boarding the boat I did two days diving at Blue Heron bridge. I must admit shooting macro is not my favourite discipline but the shots were very disappointing: they all looked flat fish ID style images of various critters on the sea bed.
I showed the images to Alex who gave me a session on inward lighting for macro and we took several shots of coffee mugs or other widgets on his kitchen table. I wish I had had that session before going on that trip, but things never quite work as you would think.
Since then, I have done mostly wide angle with the occasional macro or fish portrait. I have not really had the chance to give this technique a proper go. Inward lighting for macro requires to position your strobes behind the subject or in line with it and this is sometimes not exactly practical. The same technique, that had been initially introduced by Martin Edge, can be applied, with some changes, to close focus wide angle images.
Inward Lighting Diving in Italy
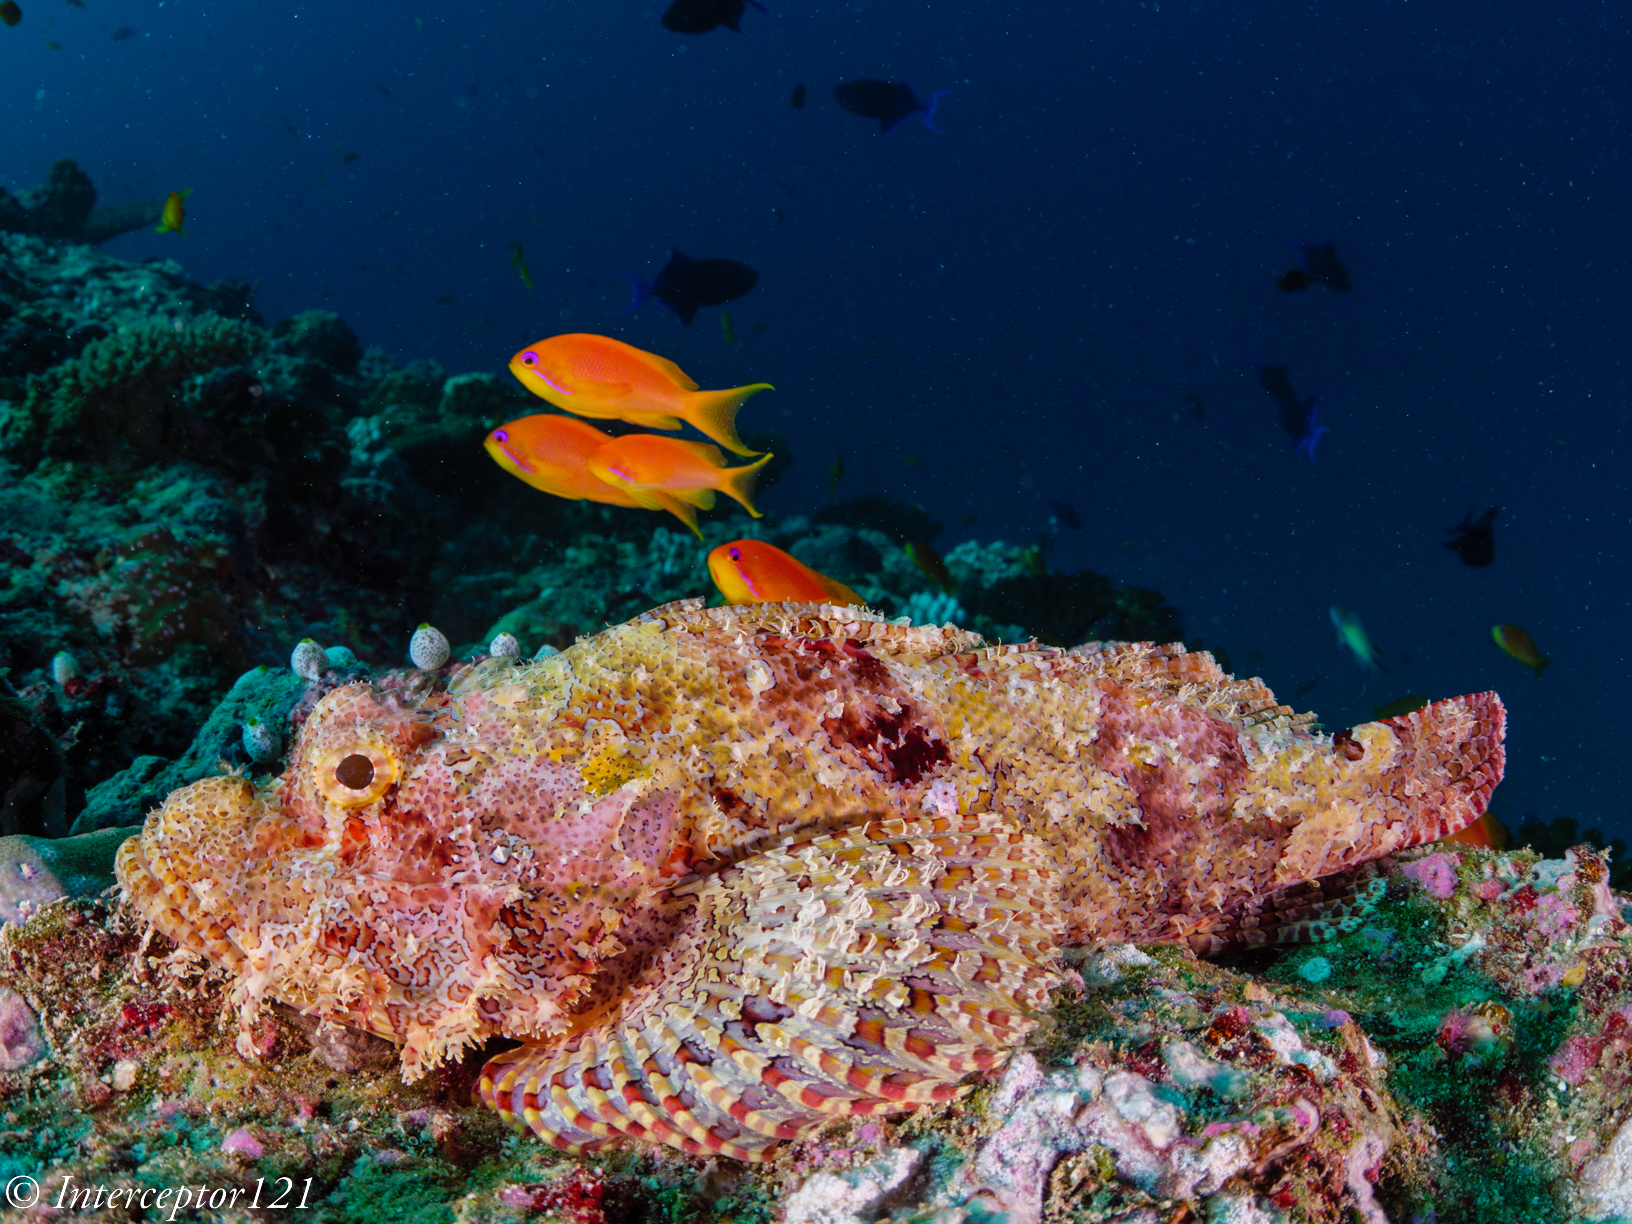
During this summer I had the opportunity to visit the Sorrento Peninsula again and dive with the friends at Punta Campanella Diving Centre. On day one of diving, the plan was to visit the dive site called Banco di Santa Croce, a group of offshore pinnacles ranging from 12 to 50 meters depth where there is abundance of groupers, rockfish, anthias occasional eagle rays and plenty of gorgonians. Usually, the visibility is terrible in the first meters and then clears up after the thermocline around 15 meters, however, on the day the visibility was pretty bad until around 30 meters. After a set of pretty deep gorgonian shots and seeing that the groupers were very un-cooperative, I went above the thermocline on the shallower pinnacle to see what I could shoot. Visibility was pretty bad with murky green water and a high number of suspended particles and I had an 8-15mm zoom fisheye on my Panasonic GH5M2 (similar to a Tokina lens on APSC). All of a sudden, I see a large “scorfano” (rockfish a variety of scorpion fish) swimming over the reef to change its resting location.

I take the first shot trying to minimise backscatter.
While the backscatter control worked reasonably well, I was faced with another fish ID style fish portrait with some ugly background: an overall anonymous shot, at least for my tastes. At this point I thought of giving inward lighting another go even though I had a zoom fisheye lens and was attempting some kind of fish portrait, with the ambient around the fish looking quite ugly.
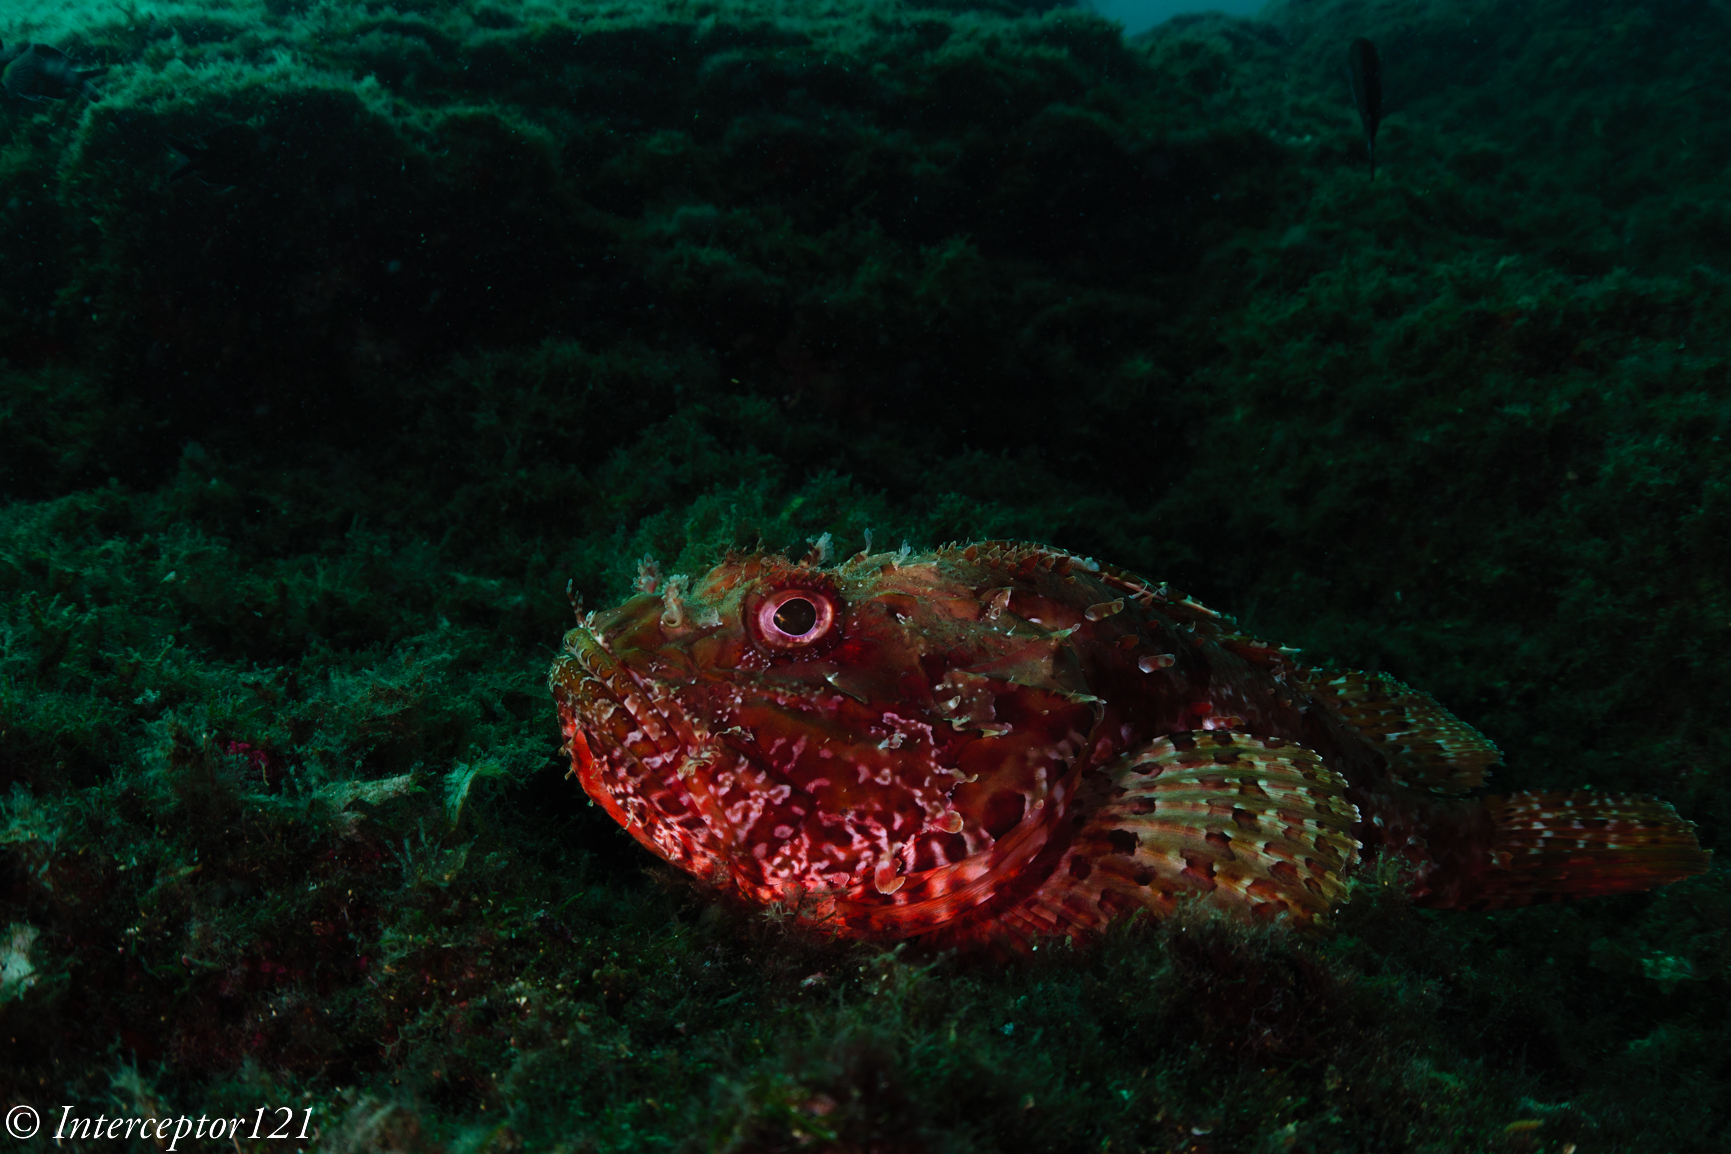
I moved the strobes in line with the focal plane of the camera pointing right at the handles and started with the strobes wide, getting closer to the housing until I got the level of light I wanted.
First attempt was quite dark but the image started to look more interesting.
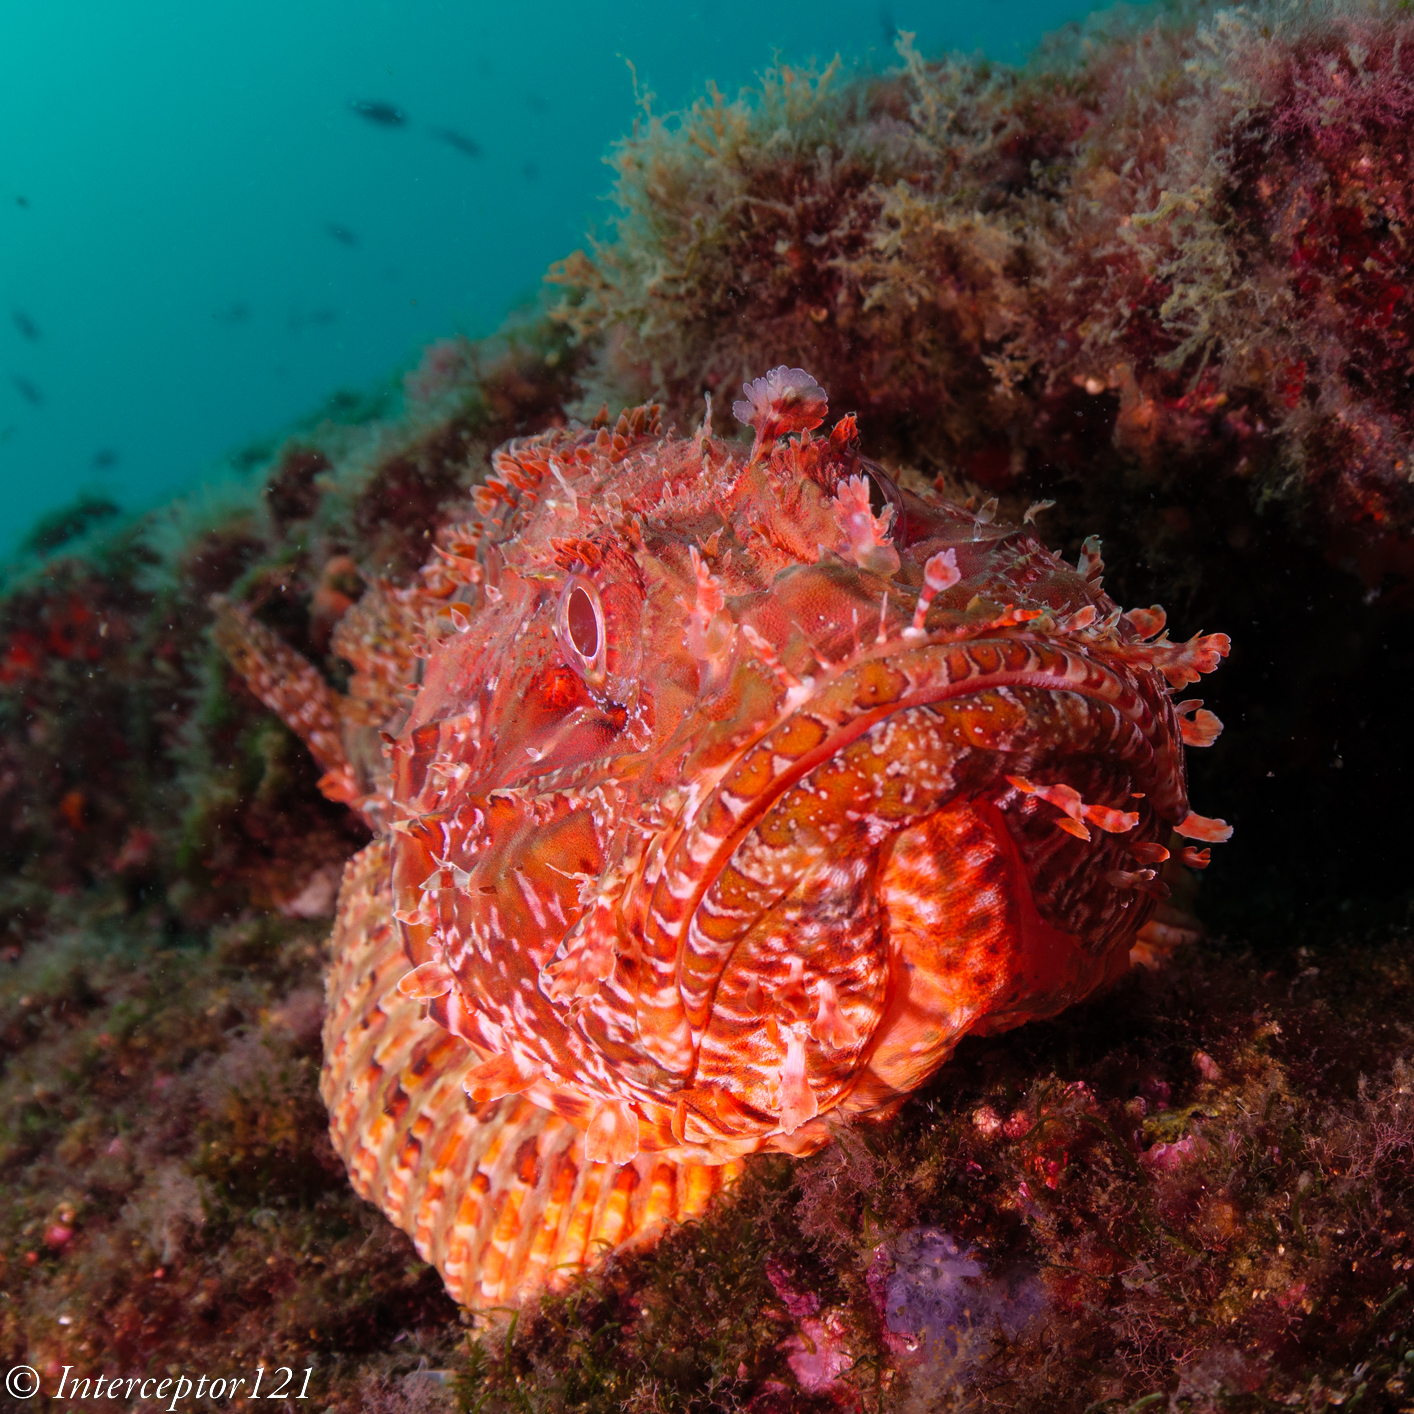
Eventually I got the light I wanted on the fish

now it was the time to make the image more interesting, trying to get some attitude out of this cooperative rockfish.
After a few attempts I managed to get the shot I wanted before the fish decided to swim away in a position no longer suitable for the composition I wanted.

As you can see, I kept quite a low f/number I wanted to make sure only the fish head was sharp and limit the depth of field through the frame. This is a fisheye zoom at 15mm on micro four thirds so f/5.6 still has some depth of field but not too much. In my opinion the position of inward strobes works particularly well with subjects that have depth and are not flat on the focal plane of the camera like in this example. The lighting creates very strong shadows and texture that gives the fish an attitude.
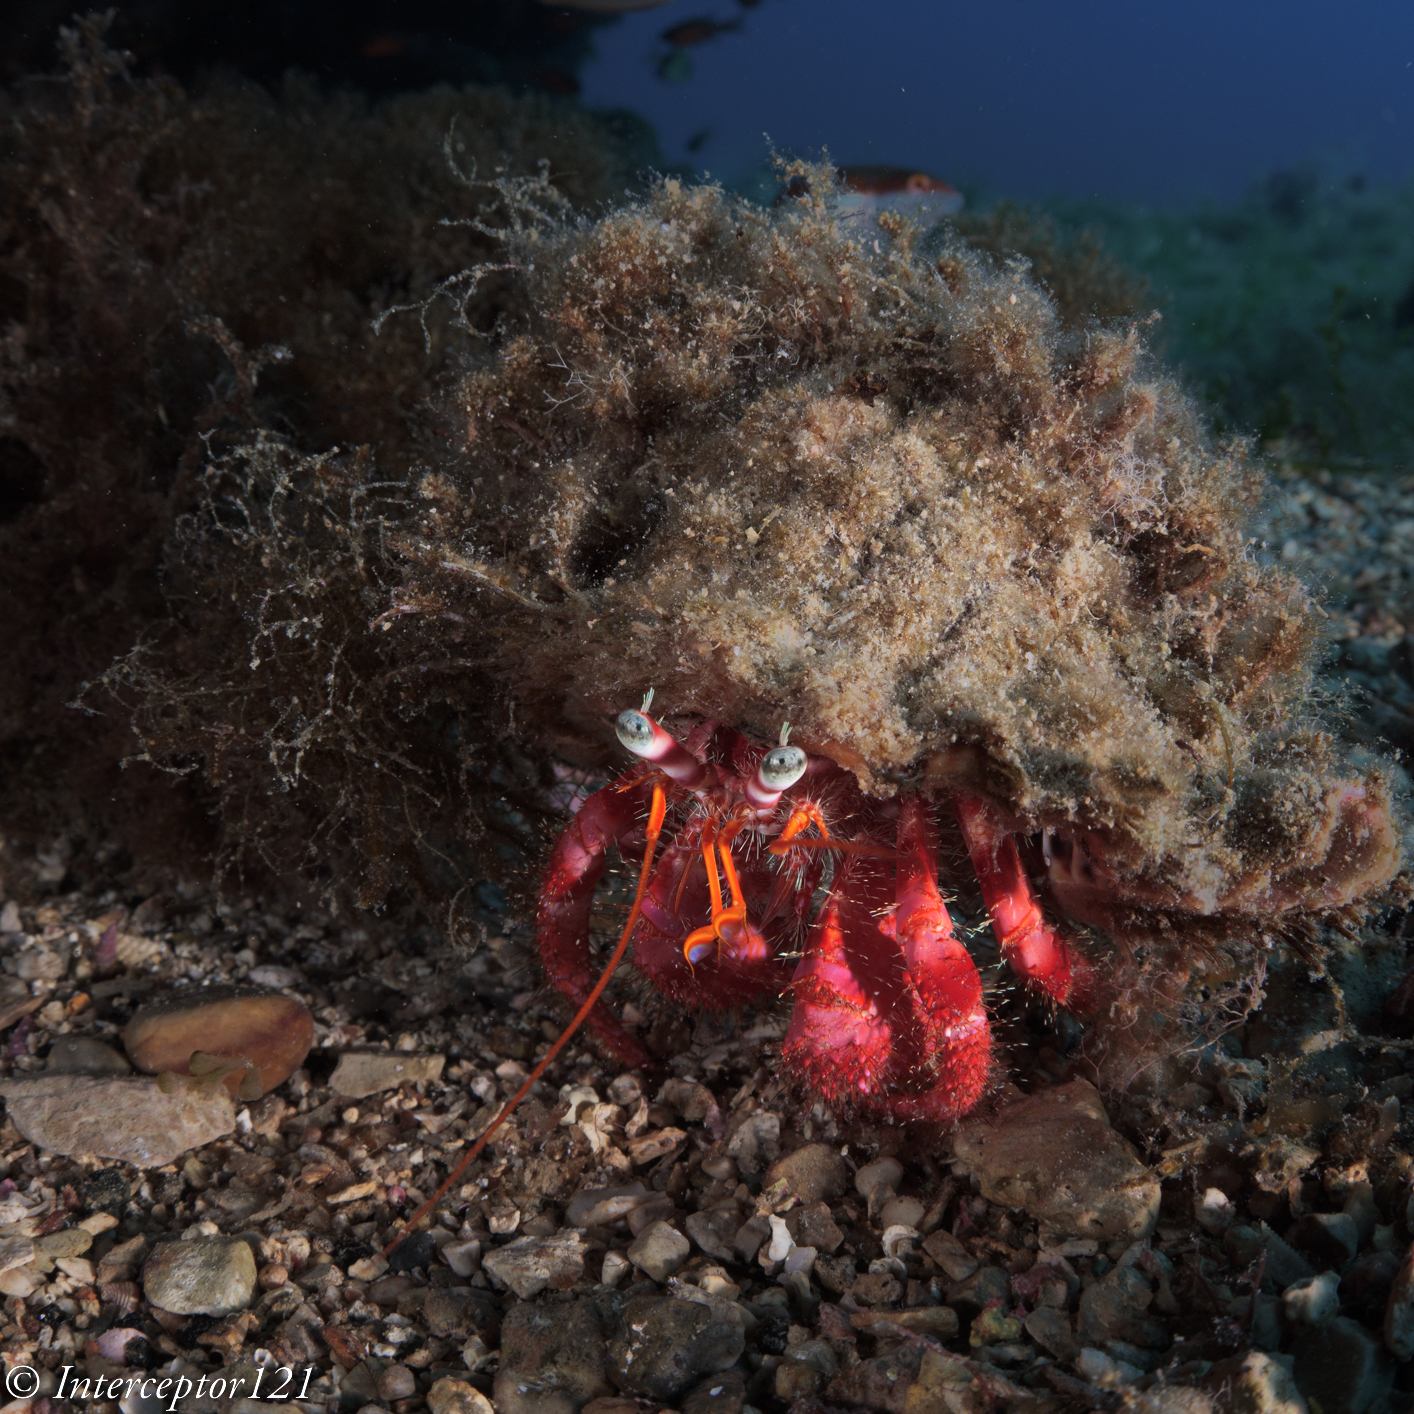
A few days later I am on another dive site shooting wide angle again and I notice a large hermit crab on the seafloor. I try a crossed strobe shot and with my horror I notice many large particles backscattering over the black background.
I change the strobe position for inward lighting wide angle and place myself so I would get some blue water in the background that would reduce the contrast of the particles.
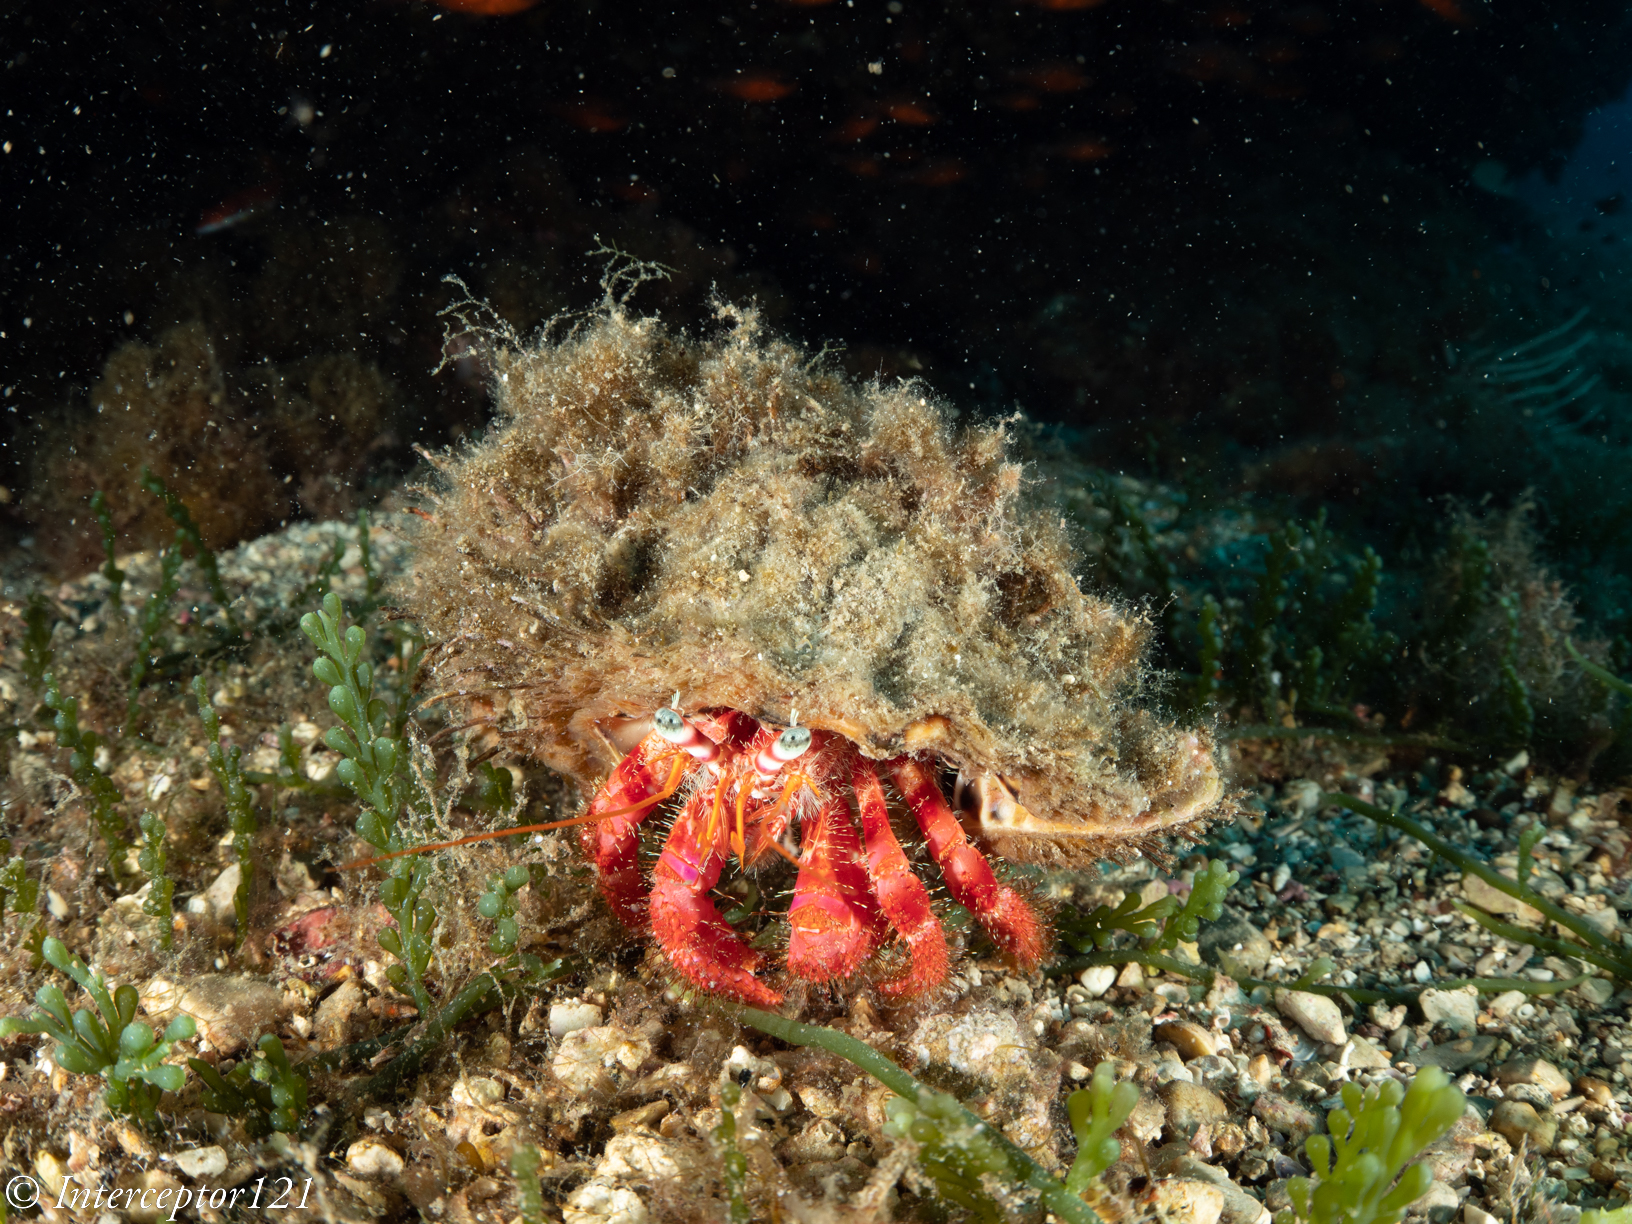
The first repositioning works well: I get strong shadows and light more from one side as I wanted.
Then the hermit decides to go for a wander, first it is repositioned so that I get a more frontal shot.

Then it literally legs it so I get a shot that for me is quite funny, as you can see a group of breams swimming in the other direction against the blue water.

This technique has resulted in a few shots that are above average certainly not outstanding but decisively different that bring out the character of both critters in my opinion.
Technical Explanation
I want to try and provide some details and technical explanation of what I think is happening with the strobe positioning and the subject.
This is a standard position for close up frontal shots.

From the diagram you can see that the area where the lens and the strobes beams overlap can generate backscatter. As the strobes are aligned with the lens the phenomena can be really strong, as demonstrated in the first hermit crab shot.
There are two issues with this positioning: first if the subject is sitting on the sea bed and you cannot get water behind you will see the background no matter how fast the shutter speed goes. Moreover If you try to close the aperture you will need to increase strobe power which will result in more backscatter.
This is a position that I use for inward lighting when I use a wide-angle lens.
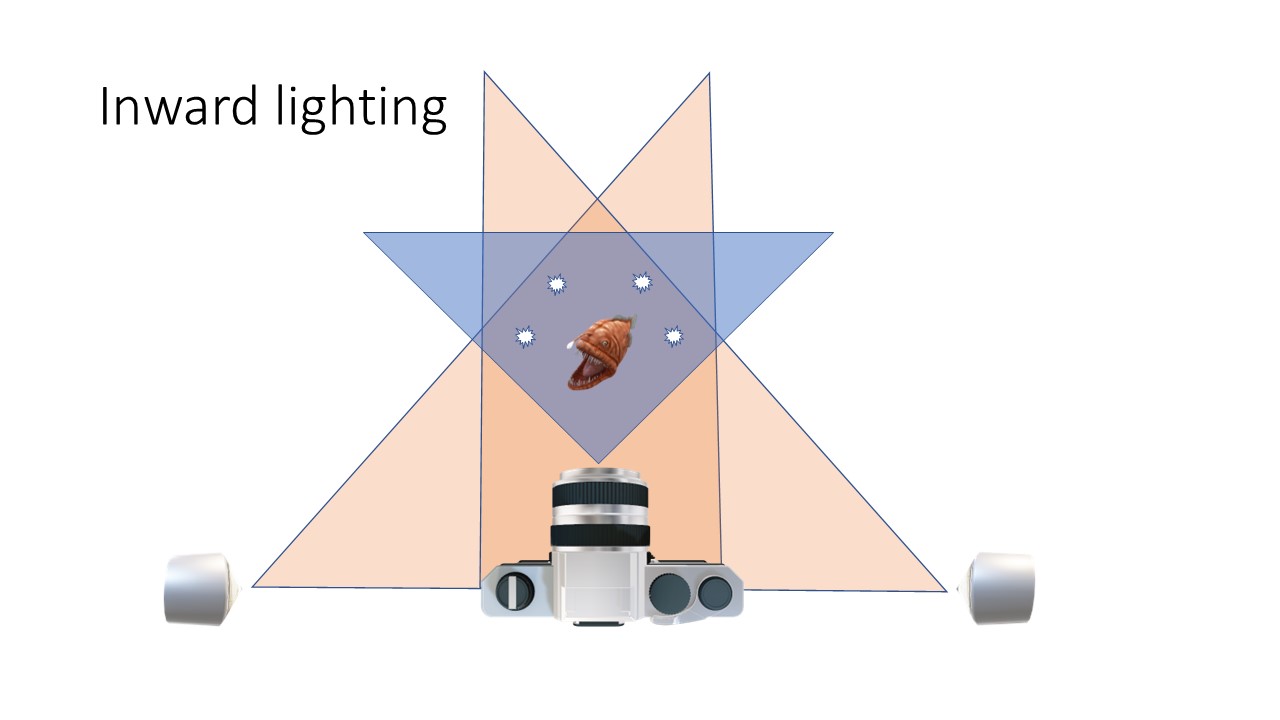
You can notice a few things. First is that the subject is only hit by the edges of the beam and only from one side of the strobe so the intensity of the light is greatly reduced. This can be a challenge if you have a true fisheye as you will need to have really strong strobes as you place them further away from you to cover a wider area.
The second Is that the light beams are pointed to each other which in turn means strong shadows and a lot of texture on your subject.
Thirdly any suspended particles will reflect away from the incident angle of the lens resulting in attenuation, but of course not elimination, of backscatter effects.
Finally, the area behind the subject is not covered by the strobes at all and lends itself to either dark background or ambient light as in my two examples in this article.
Here are some additional tips on the strobes; settings. I personally use diffusers in this set up otherwise the position of the strobes needs to go forward and this can create backscatter at the edges or you could even see the strobes in the frame. Second you need several attempts to work out the distance vs power vs aperture equation. If you are interested in a dark background you need to increase the shutter speed as far as you can but on the other end control the aperture so you get the visual effect you want, in my case open so that the background is not sharp in focus. If you want to have the blue water background in the shot then you need to reduce the shutter speed and increase the aperture so you get plenty of depth of field to show as much as possible of the environment, this may result in your strobes working at full power just to paint your subject enough to standout. It takes a while to work out how to proceed and it is better to decide at the outset how you want to compose the shot so that you do not spend too much time doing trial and error as your subject may decide to leave the scene and interrupt the cooperation.
Post processing
I believe image editing is almost as important as making an image so I have included some post processing tips trying not to get too technical. To simplify, I will only say that the camera captures a lot more information than your image preview or your raw converter show when you import your images. Some of the inward lighting shots may look initially really dark, especially those at fast shutter speed. Do not despair if your camera has good ability to preserve colours in the shadows you still have an outstanding image potentially sitting there, so unless you did not get your focus right do not delete immediately images that appear underexposed.
The second suggestion is to avoid pressing the Auto button on your photo editing program because that will balance the exposure across the entire scene and take away any character from your image.
Generally inward images like the ones I have shot look fairly dark straight out of camera and you do not want to compensate exposure. My recommendation is to use a mask on the subject and adjust exposure very slightly and only if you got it very wrong. Instead pull up the whites and the highlights to make your subject stand out. I avoid any change of clarity, sharpening etc: the images have minimal, but selective, processing.
Another crucial consideration is that because you are using only the very edge of your strobe beams, the colour rendering index and warmth of your strobes may end up far away from normal conditions and using the white balance picker may result in strange effect as the lighting is not even across the frame. I recommend you increase the colour temperature and tint until you get something that you are happy with instead of going for recipes.
At the very end see if you want to clone out debris or some residual backscatter, this technique needs you to get very close to the subject and due to the strobe position backscatter on the focus point is minimised however it could still happen on the sides of the frame.
For what concerns cropping in a specific aspect ratio there is no hard and fast rule: I tend to shoot those close ups at 1:1 lately if the subject is somehow rounded but can go 16:9 if it is a fish sitting sideways on the seabed. Generally, I decide on the crop very early in the process but the good thing is that, as you will just make minor adjustment with masks on the subject, cropping will not change anything.
Closing notes
I have used a Panasonic GH5M2 with a Canon 8-15mm and Metabones smart adapter. My rig set up is described on this link. An APSC camera with a Tokina 10-17mm or a camera with a wet optics WWL-1 or similar or even WACP is adequate for shots like those described in this article. A full fisheye will have a much wider field of view and your subject may look very small or you may not be able to illuminate it correctly, a WAM (wide angle macro) solution may be better but that is an entirely different technique. I use a set of Sea and Sea YS-D2 despite the reputation for low reliability they have worked fine for everything I do until now. I am also convinced that shots like those described in this article can be taken with any camera type as long as you know how to and have adequate lenses and field craft, so if you have read up to now I recommend you give it a go and try and apply my suggestions adjusting the to your taste.
