Category Archives: Sunbursts

Challenges of high dynamic range underwater scenes

A recent discussion on wetpixel with regards to mirrorless cameras vs DSLR seemed to highlight that electronic viewfinders are a major limitation vs optical viewfinders in high dynamic range scenes.

In reality an optical viewfinder does not have dynamic range is just the projection of what the camera lens is seeing through a mirror while an electronic viewfinder is a small screen limited to the 10 stops of dynamic range of the camera jpeg engine.

So there is no doubt that in certain cases the eye and the brain do a better job than a screen to manage certain scenes however to say that this is a limitation that cannot be overcome is a real stretch especially as now most images are taken with mirrorless cameras and have high dynamic range.

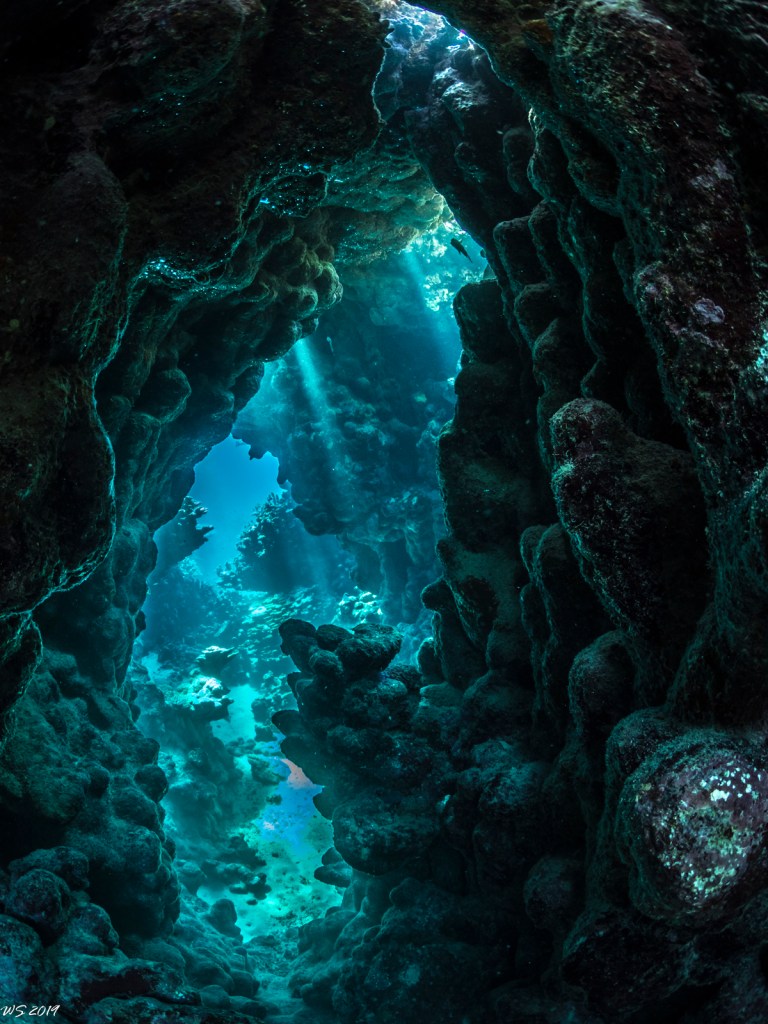
During my last Red Sea adventure I spent almost an entire dive shooting sunbursts. Sunburst can be tricky this is an excerpt from Alex Mustard Underwater Photography Masterclass

“At depth the overexposure at the edge of the sun ball is only in the blue channel, which creates an ugly cyan halo around the sun.”

Other situations for ideal sunburst are calm waters which I did not really have during my trip.

So possibly I had the worst conditions and most challenging for my camera, as you know I shoot a Panasonic GH5M2 and the micro four third format is frequently labelled as having very low dynamic range.

During lockdown I have practiced a lot of landscape and night photography and many sunrise and sunsets and I have learnt that actually my camera has a lot to offer if I do not fully trust the exposure tools.

The camera lies to you

The image displayed in camera and in the EVF is an output of the JPEG photo setting of the camera and shows what the manufacturer believes it is an optimal image. RAW converter do exactly the same thing and apply corrections to the raw data to show what they think looks good as a starting point for editing.

Red – LR Default

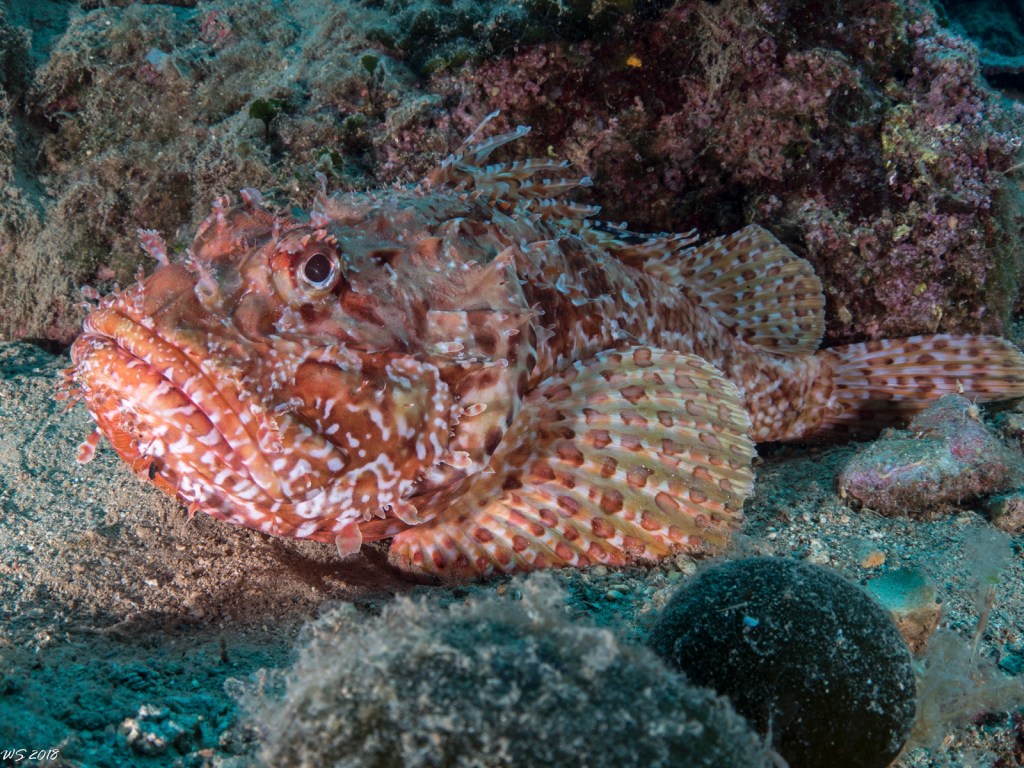
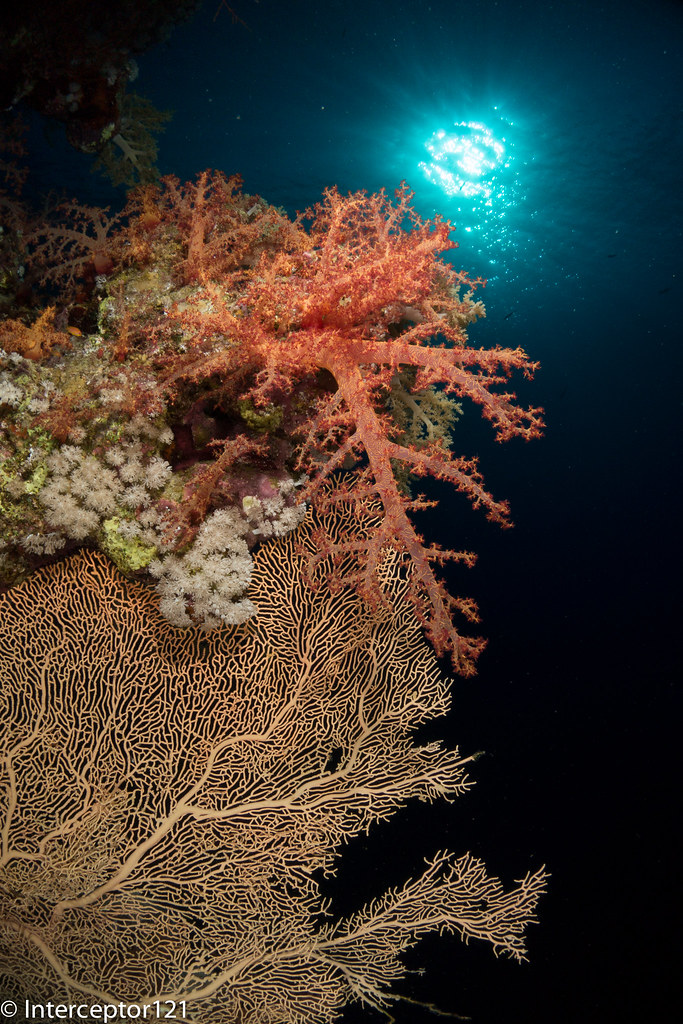
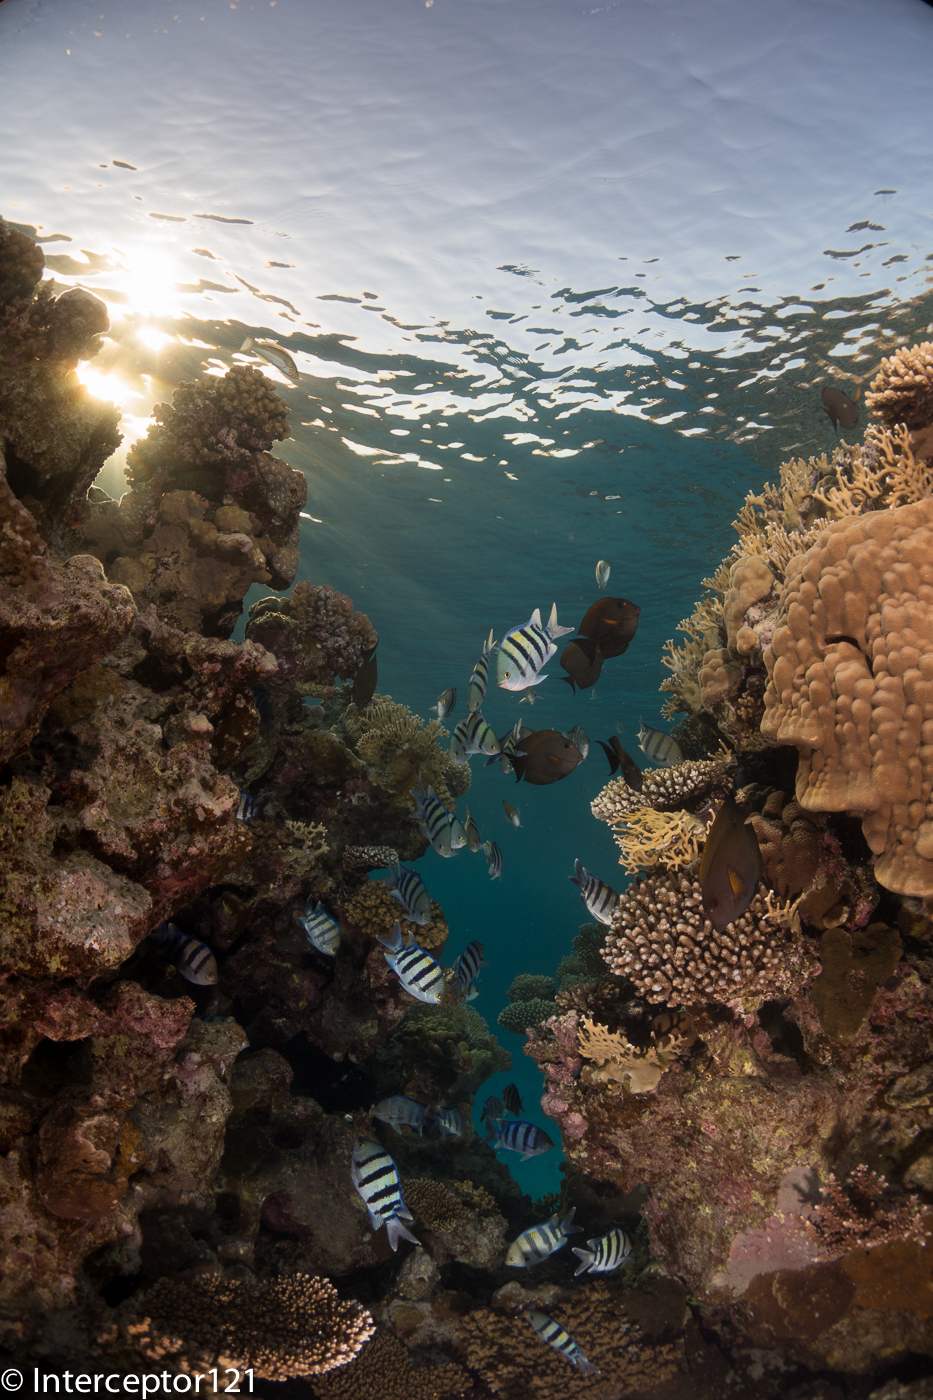
This image taken at around 18 meters so fairly deep shows a moderately clipped sunball in what was not calm surface water and a fairly dark foreground despite the strobe fired on the coal.

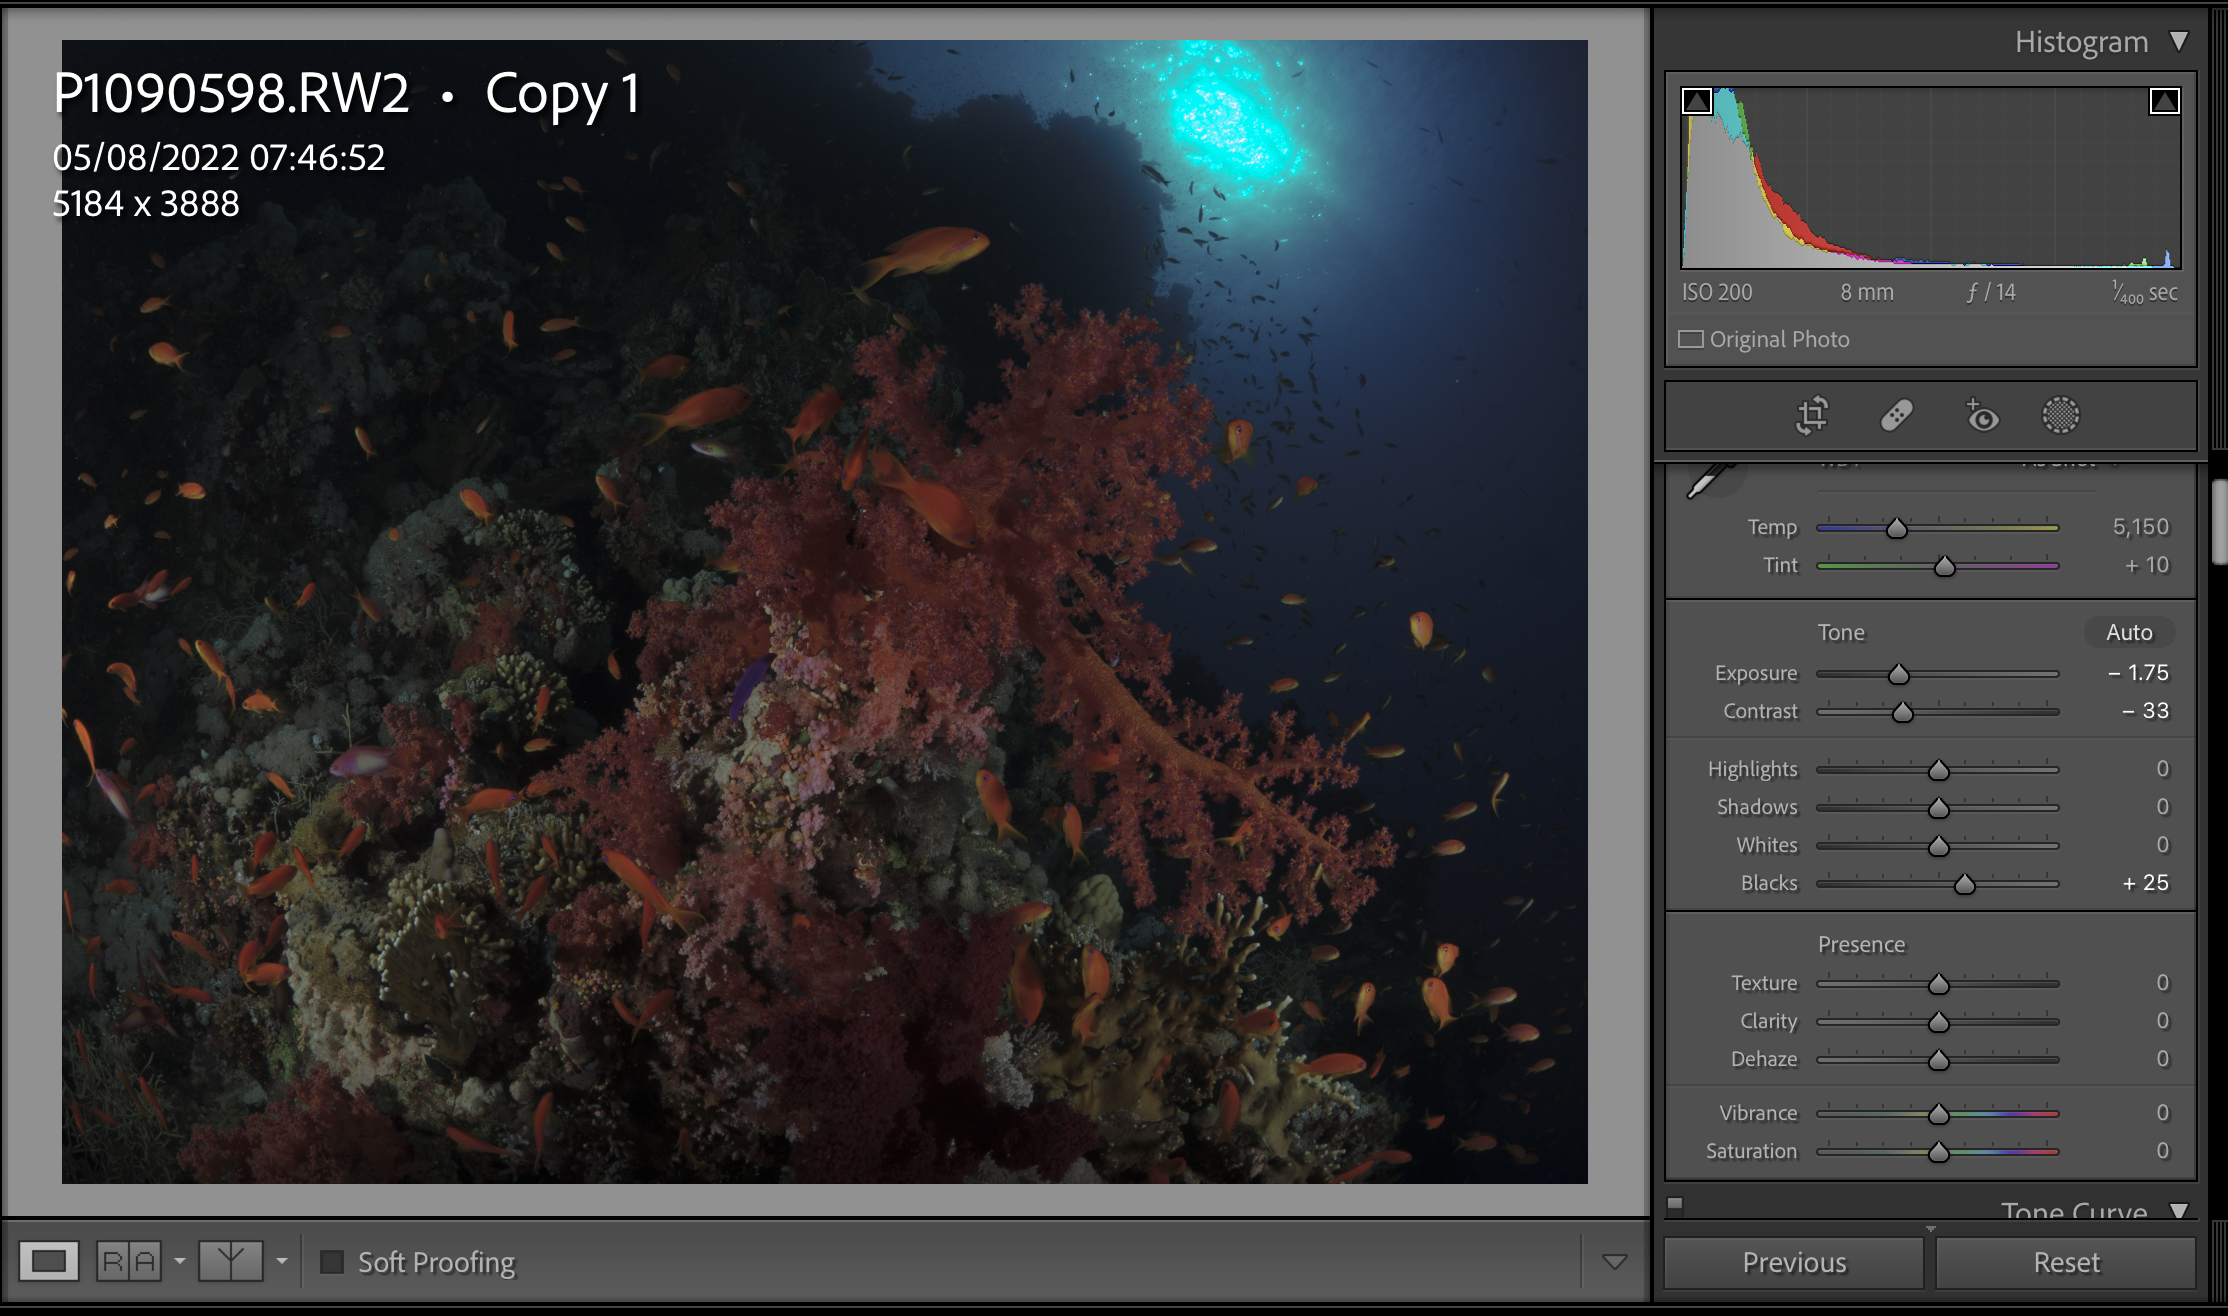
This image is instead the camera RAW data very close to linear and without correction. Note the cyan sunball and the very dark foreground.

RAW Linear data

This does look really dark indeed and to be frank the camera sees a lot in the dark.

The important part though is that this image is not clipped in the highlights and the darks are not crushed either.

The image can therefore be rescued to produce a decent result.

Red – Edited

Is this image as pretty as one where the sun rays do a perfect star in calm shallow water? No.

Does it have an ugly sunball of death? No

Is it noisy grainy or lacks sharpness? Definitely not

Would you have taken this image if you believed the camera exposure settings? Probably not

How to take good high dynamic range images underwater with a mirrorless camera

There are a number of challenges to be overcome:

  1. On some cameras the EVF may get so dark that you can’t see any of the foreground
  2. The camera metering system reflects a jpeg not a raw image file
  3. The image review afterwards may also be incorrect
  4. You do not know how to edit such image to find out if it was clipped or not

Let’s take those challenges one by one.

Normally with a mirrorless camera if you try to expose so that the sunball is not clipped the display gets so dark that you can’t see the foreground unless you have a light.

Some cameras like mine have a metering mode called highlight weighted where the camera calculates exposure not on the middle grey but the highlights. This in turn allows us to calculate how much headroom is built in the exposure tool of the camera. I have calculated that for mine is 1 full stop. So the first step is to set your camera to the fastest shutter speed your flash can sync to (in my case 1/400) the lowest ISO (in my case 200) and the smallest aperture that does not go into diffraction (in my case f/10) and see if you can match that 1 stop overexposed and work from there with your aperture. Set the strobes to match your aperture in my case I set them to f/16 to start and then move to f/22 if needed if I am reasonably close otherwise I may go all the way to full power.

The second step is to switch back the camera to a normal multi metering mode and ignore entirely any warning of clipped highlights so you can compose the scene and shoot.

The jpeg review will show blinking highlights in abundance but you know that is not actually true.

Later in lightroom we apply the setting to remove the program bias and see if the scene was clipped

Lightroom develop mode

As you can see the scene is correctly exposed!

After some editing we are at what I consider a decent result

Adjusted Image

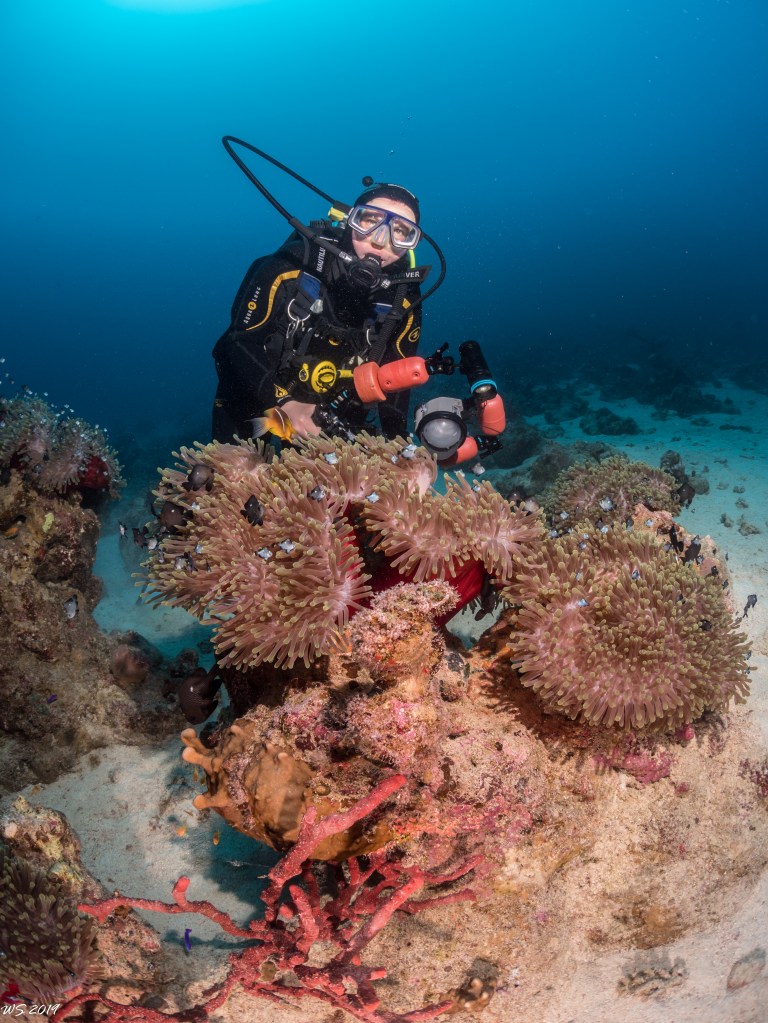
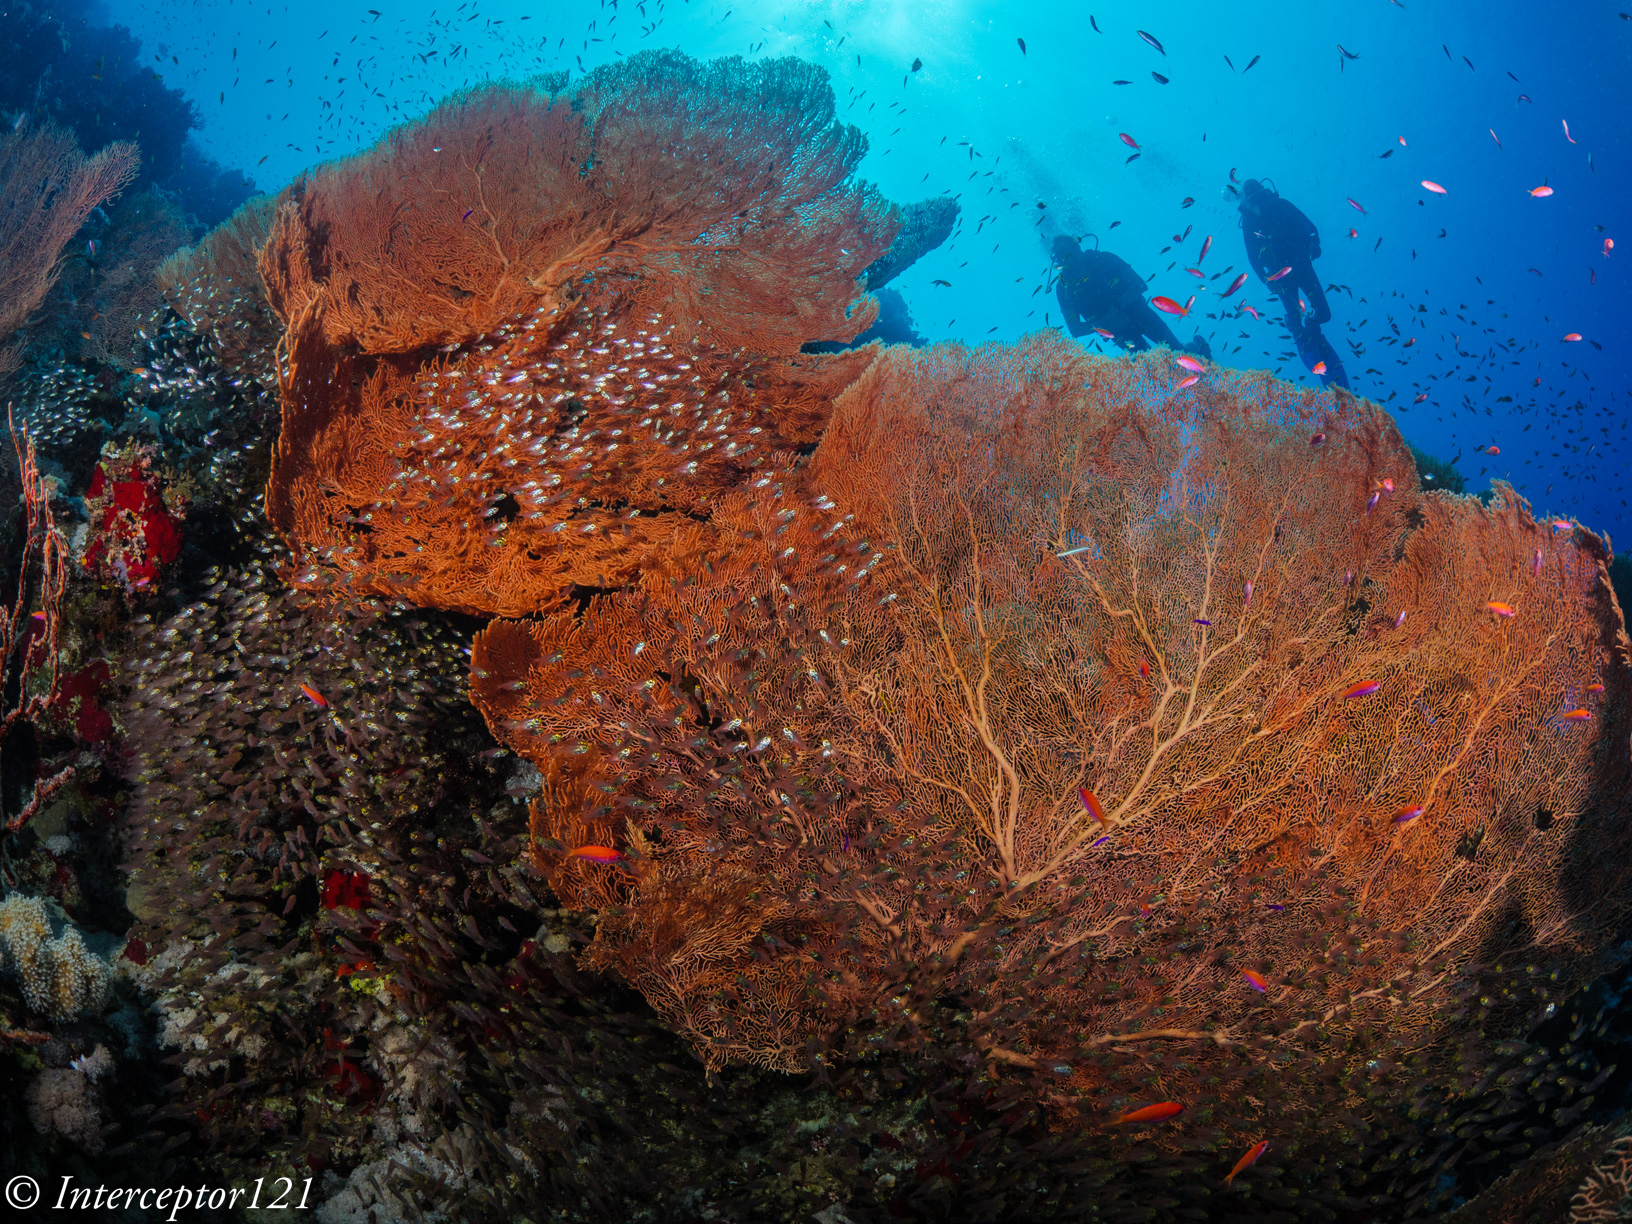
Here another example later in the day in another dive site an even more challenging backlit situation.

Buddy diving

Conclusion

There is no doubt that the eye and the brain can do an easier job in those challenging condition to frame the shot however any camera including a DSLR will lie to you when it comes to the image review so ultimately you can push your equipment much further than you think if you know how.

Fisheye Zoom for Micro Four Thirds

Looking at Nauticam port chart the only option for a fisheye zoom is to combine the Panasonic PZ 14-42 with a fisheye add on lens. This is a solution that is not that popular due to low optical quality.

So micro four thirds users have been left with a prime fisheye lens from Panasonic or Olympus…until now!

Looking at Nauticam port chart we can see that there is an option to use the Speedbooster Metabones adapter and with this you convert your MFT camera to a 1.42x crop allowing you to use Canon EF-M lenses for cropped sensor including the Tokina 10-17mm fisheye. This is certainly an option and can be combined with a Kenko 1.4x teleconverter giving you a range of 14.2 to 33.8 mm in full frame equivalent or 7.1 to 16.9 mm in MFT terms fisheye zoom of which the usable range is 8 -16.9 mm after removing vignetting.

A further issue is that the Speedbooster gives you another stop of light limiting the aperture to f/16 while this is generally a bonus for land shooting in low light underwater we want to use all apertures all the way to f/22 for sunbursts even if this means diffraction problems.

Wolfgang Shreibmayer started a trend time ago in WetPixel https://wetpixel.com/forums/index.php?/topic/61629-canon-ef-lenses-on-mft-cameras/ to use full frame lenses and in this post I want to do a deep dive on what is for me the most interesting lens option the Canon 8-15mm fisheye.

This lens on full frame can be used for a circular and diagonal fisheye but Wolfgang has devised a method to use it as an 8-15mm fisheye zoom on MFT.

Part list – missing the zoom gear

What you need are the following:

  • Canon EF 8-15mm f/4L fisheye USM
  • Metabones Smart Adapter MB_EF_m43_BT2 or Viltrox EF-M1 Adapter
  • A 3D printed gear extension ring
  • Nauticam C-815Z zoom gear
  • Nauticam 36064 N85 to N120 34.7mm port adapter with knob
  • Nauticam 21135 35mm extension ring with lock
  • Nauticam 18810 N120 140mm optical glass fisheye port

The assembly is quite complicated as the lens won’t fit through the N85 port. It starts with inserting the camera with no lens in the housing.

GH5 body only assembly
Camera in housing without port

The next step is to fit the port adapter

Attach N85 N120 Metabones adapter

Then we need to prepare the lens with the smart adapter once removed the tripod mount part.

Canon 8-15 on Metabones Smart Adapter IV

As the port is designed for the speed booster the lens will be few mm off therefore the gear will not grip. Wolfgang has devised a simple adapter to make it work.

gear extension ring
Zoom gear on lens

This shifts the gear backwards allowing to grip on the knob.

3D design is here

Lens inserted on housing

Looking at nauticam port chart an extension ring of 30mm is recommended for the speedbooster and now we have extra 5mm in length Wolfgang uses a 35mm extension. however looking at the lens entrance pupil I have concluded that 30mm will be actually better positioned. Nauticam have confirmed there won’t be performance differences. You need to secure the ring on the dome before final assembly.

Fisheye dome and extension
Full assembly top view
Side front view

The rig looks bigger than the 4.33 dome but the size of the GH5 housing is quite proportionate. It will look bigger on a traditional small size non clam style housing.

The disassembly will be made again in 3 steps.

Disassembly

I am not particularly interested in the 1.4x teleconverter version consider that once zoomed in to 15mm the lens is horizontally narrower than a 12mm native lens so there is no requirement for the teleconverter at all.

This table gives you an idea of the working range compared to a rectilinear lens along the horizontal axis as diagonal is not a fair comparison. The lens is very effective at 8-10mm where any rectilinear would do bad then overlaps with an 8-18mm lens. The choice of lens would be dictated by the need to have or not straight lines. The range from 13mm is particularly useful for sharks and fish that do not come that close.

Focal lengthHorizontalVerticalDiagonalHorizontal Linear EqWidthHeightDiagonal
8130.995.9170.217.31321.64
9114.984.7147.8
10102.575.9131.06.9
1192.668.7117.88.3
1284.562.9107.29.5
1377.757.998.410.8
1472.053.790.911.9
1567.050.184.613.0

Wolfgang has provided me with some shots that illustrate how versatile is this set up.

8mm end surface shot
Caves 8mm
15mm end close up
Dolphins at 15mm
Diver close up at 8mm
Snell windows 8mm
Robust ghost pipefish @15mm

As you can see you can even shoot a robust ghost pipefish!

The contrast of the glass dome is great and the optical quality is excellent. On my GH5 body there is uncorrected chromatic aberration that you can remove in one click. Furthermore lens profiles are available to de-fish images and make them rectilinear should you want to do so.

I would like to thank Wolfgang for being available for questions for providing the 3D print and the images that are featured here on this post.

If you can’t print 3D and need an adapter ring I can sell you one for £7 plus shipping contact me for arrangements.

Amazon links UK

Canon EF 8-15 mm f/4 fisheye USM lens

Viltrox EF-M1 Mount Adapter

Note: it is possible to use a Metabones Speed Booster Ultra in combination with a Tokina 10-17mm zoom fisheye and a smaller 4.33″ acrylic dome.

UK Cost of the canon option: £3,076

Uk Cost of the Tokina option: £2,111

However if you add the glass dome back

UK Cost of Tokina with glass dome: £2,615

The gap is £461 and if you go for a Vitrox adapter (would not recommend for the speedbooster) the difference on a comparable basis is £176 which for me does not make sense as the Canon optics are far superior.

So I would say either Tokina in acrylic for the cost conscious or Canon in glass for those looking for the ultimate optical quality.

Red Sea Workshop with Alex Mustard – Part V Tiran & Mermaids

As the currents were not playing ball we decided to head to Tiran to dive Jackson reef.

I love jackson as a dive and a video dive but I was a bit vary from a photography point of view as lighting can be a problem.

Anyway there was an option for a hammerhead dive in the early morning or a first dive on Jackson followed by a second before returning to Ras Katy for an afternoon and sunset dive.

Hammerhead are found on the back of Jackson reef when there are shallow thermoclines with the surface at 26C the chances were low however I had alternative ideas for that dive.

As foreseen there were no hammerheads so towards the end of the dive I tried a few shots of the Lara Wreck (that is on the surface) through the Snell window despite the strong surf.

The resulting shot is currently my desktop theme and is here.
Lara from the reef
I tried to get the wreck on the surface, the breaking surf, the sunball, some fish or at least silhouette of fish and the hard coral to give a dramatic moody look to the image.

On dive two was time to have a relaxing dive with not much effort on photos. I saw few tunas at around 28 meters that is unusual and a turtle and some other critters though the shots are not particularly exciting.

In one occasion a dive guide came to be all excited as he had seen a turtle so I went there and bumped into our own guides that were out for a fun dive.

Turtle and Dive Guide

They usually are asked to get out of the frame instead I took the shot for their facebook perusal.

When the turtle had enough she shot off to the surface and I tried a silhouette however I forgot the strobe on

Failed Silhouette
Failed Silhouette

Nothing that lighroom can’t fix and this is the resulting shot after adjustment

Silhouette after lightroom

Not bad huh?

Back at Ras Katy I tried few more portraits like this one

Fish Portrait
Fish Portrait

Though my favorite is another
Masked Butterflies

At sunset I was part of the mermaid group, we had a model Katrin Felton  suprising what a phenomena Mermaid tails have become.

We had a 2-3 shots in different poses however only the first was successful as the snell windows was ruined by one of the photographer that keept shooting with strobe…and getting in the way as she did not listen to the briefing properly well no big deal.

Anyway I gave it a shot afterwards Kat was not particularly happy about the barrel distortion that she said makes her look fat! Unfortunately I did not have a rectilinear lens anyway if you find yourself in this kind of set up make sure you have one.

Mermaid Kat I
All in all it was a bit of fun again I tried to include some fish, the reef, the mermaid, the sun rays. I looked at other pictures of the mermaid and I think she can’t appreciate how important is not to see the knees too much but I guess she likes to focus more on her figure on how slim she looks lol!

All in all another great day and a different perspective on shooting model underwater.


Red Sea Workshop with Alex Mustard – Part III Sunbursts and the Caves

On the early morning of Day 3 we left the Thistlegorm for Ras Mohammed.

Dive number one would have been on Ras Zahatar, this dive site has some great opportunities for sunburst shots in the early morning but generally not a lot of fish as the location is quite sheltered and there is never too much current that I recall.

There are also some very nice gorgonian fans around the 22 meters mark however as soon as we jumped in it was clear it was going to be a competition to have some of it. Besides not having made clear arrangements for modelling with anyone it was going to be a quite technical session.

Since the arrival of digital sunburst shots have proven to be problematic for DSLR and mirrorless users. The issue is with the sunball itself there is an issue of highlights when you try to shoot a coral reef with the sunball in the frame and you are using a shutter speed of 1/250th or 1/320th that are typical DSLR sync speed.

Mirrorless cameras do even worst as usually the base ISO starts at 200 that makes it really difficult to capture this shot.

So the key is to put the sun behind something or have the rays in the frame but not the sunball. Something like this to give an idea

Soft Coral
The sunball just behind the soft coral gives a nice glow so even with a 1/250th shutter and f/8 at ISO 100 is possible to capture a captivating scene.

Few meters away there is a gorgonian with a red soft coral on top that is really exciting to see at naked eye. To me this reminds of a frogfish head profile. It is impossible to capture this scene at 1/250th f/11 ISO 100 it is just too bright you need to reduce at least two stops to get the sun properly however if you did that on a DSLR you would be shooting at f/22 and it is near to impossible to properly illuminate the coral with your strobes at the distance required.

That is where our RX100 compact comes to help as you can sync your strobes at 1/2000th this should give a black background around the coral, the coral properly lit in the foreground as I had the strobes at full power and the sunball in the frame as well without too  many glowing highlights, this is the resulting shot
Sunburst
Note that a model would not be visible in this shot and fish would be colorful only in front of the coral or close by anyway as discussed there was not fish to model for me and this was just technical entertainment. The image is quite strong but the lack of fish makes it less interesting.

I found some cooperating clown fish on this dive however they are those with the dark eyes so despite the eye contact the shot is not as strong as it would be with a better subject
Look Right in
This is taken with a single Inon UCL-165 a luxury of having a compact and being able to wide and macro on the same dive.

Anyway I was happy with the sunburst in the frame so that dive was well worth it.

Dive two was at Jackfish Alley, and proved to be the most entertaining of the day. Who knows this dive sites knows that there are two caves, the first is wide but very dark and at certain times has turtles inside. The second is really narrow but has few cracks the provides a cathedral light effect best experienced in other site of the Southern Red Sea. Anyway we got the briefing and Dr Mustard was going to be marshaling the queue of photographer in cave number 2.

Being familiar with the dive site I knew that cave 2 is quite narrow even for normal diver let alone this big troupe of photographer so I mounted my tripod legs on the tray with a view of working in cave 1 and then move to cave 2 after the chaos was over.

Well it was real chaos as you can see from the feature image divers in the way, bubbles silt, in short it was a mess.

So I spent some time in cave number 1, this cave is really dark and you can’t really shoot handheld. In cave number 2 you can use speeds of 1/25 or 1/30 up your ISO  and put the camera on a rock whilst you take the shot, in cave 1 this results in darkness unless you go to 4 digits ISO.

So my shot on cave 1 is taken at 0.4″ f/4 ISO100.
1st Cave@Jackfish Alley
The shot is taken with the camera on the tripod using self shoot so that there is no shake from the hand pressing the shutter, this means the picture is sharp as it can be and due to low ISO also very noise free. Unfortunately fish did not feature in the shot so this is again a fairly technical shot that is not as strong as it could be.

There were other interesting opportunities in smaller cracks like this one that I like quite a lot though is not a sensational shot.
Window
I like the fact that the two snappers are one silhouette and the other full color.

After the shambles of dive 2 we moved to Shark Reef where the first dive was really more to acclimatise with the site so won’t bore you with the pictures for that dive.

In the evening the sunset dive was at Ras Katy that would have been our regular evening spot from there onwards.

On day one I was playing with dapple light and reflections

Dapple at Ras Katy
Dapple at Ras Katy


This is me taking the shot above

Interceptor Shooting Dapple

As you can see I am nearly at the surface thanks to Damo for this picture.

Near surface can also be interesting like in this case

Test Shots dapple Reflections

Here you can see part of the Snell windows together with the reef and the sunball. This shot can be made much more interesting if you focus on the reflections.

Anyway this was the end of day 3 of diving next post will be about Shark Reef and the schools of fish.