Nauticam entered the wet lenses market with their SMC close up wet lens that was optimized for DSLR.
Then it released the CMC compact macro converter for compact cameras and micro four thirds and finally the Wet Wide Angle Lens I that is compatible with compacts, micro four thirds and also full frame cameras with 28mm equivalent lens.
Up to now all lenses were using the traditional M67 mount as most of the lenses, even the close up ones, are pretty heavy this means going for the dive with the same lens. Nauticam has developed the flip diopter adapter for flat ports to overcome this issue.
Flip Diopter on Nauticam RX100 IV
The flip diopter is a good solution for micro four thirds and DSLR but looks rather cumbersome on compacts as the image shows.
I asked Nauticam for a bayonet adapter and specifically if they could develop something for the Inon LD bayonet system that so far has been the reference for wet lenses for compacts and micro four thirds cameras.
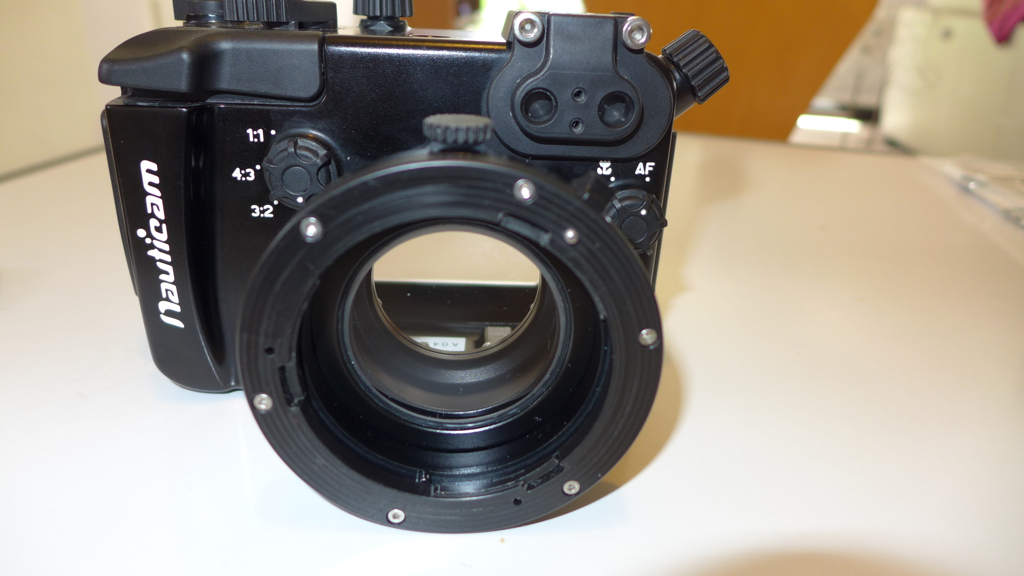
LD mount converter on RX100 IV
Edward told me that due to the fact that the WWL-1 lens rear element is so large the Inon LD system was not an option so they went off and developed their own system.
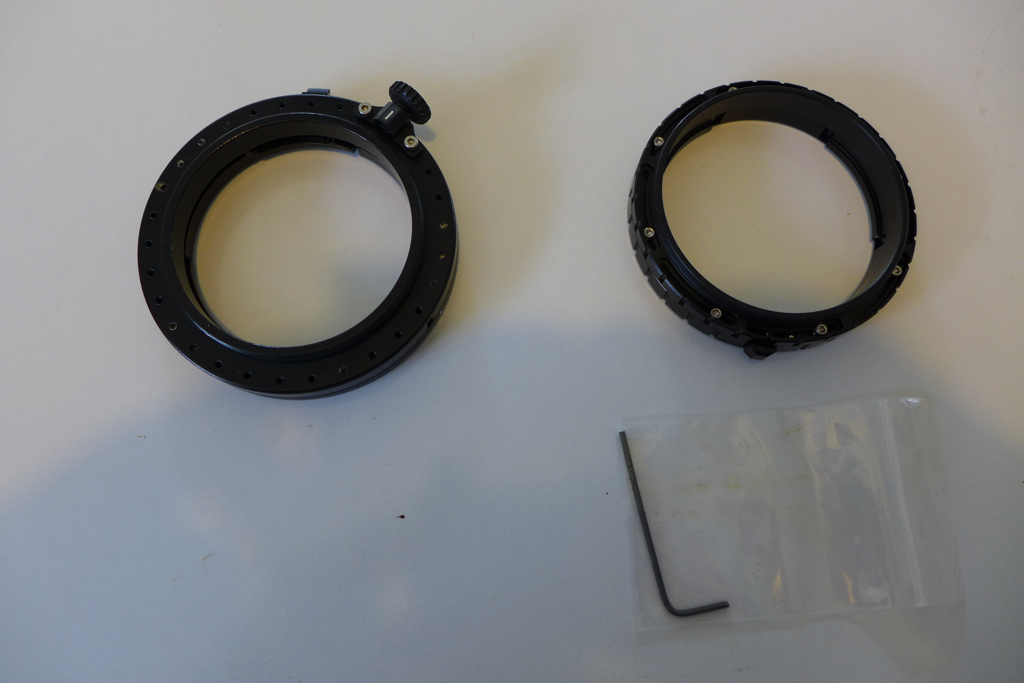
M67 bayonet mount converter
I would like to thank Nauticam again for making those parts available before general availability.
Looking a bit closer to it you can see that due to the specific construction with two concentric rings you need a special tool to apply the adapter on the port.
M67 bayonet mount converter The large item is to attache the mount to the port
Obviously as the Nauticam lenses use an M67 thread new adapter needed to be developed.
Mount converter for CMC/SMC
Nauticam does not use ABS plastic and uses aluminum for all their parts.
Now that the items have a bayonet adapter there is a need for a lens holder to put on the arms.
Lens holder looks too big for a 5″ arm segment
The lens holder is too big for a standard 5″ segment but looks in proportion with a longer segment.
Lens holder on 8″ arm segment
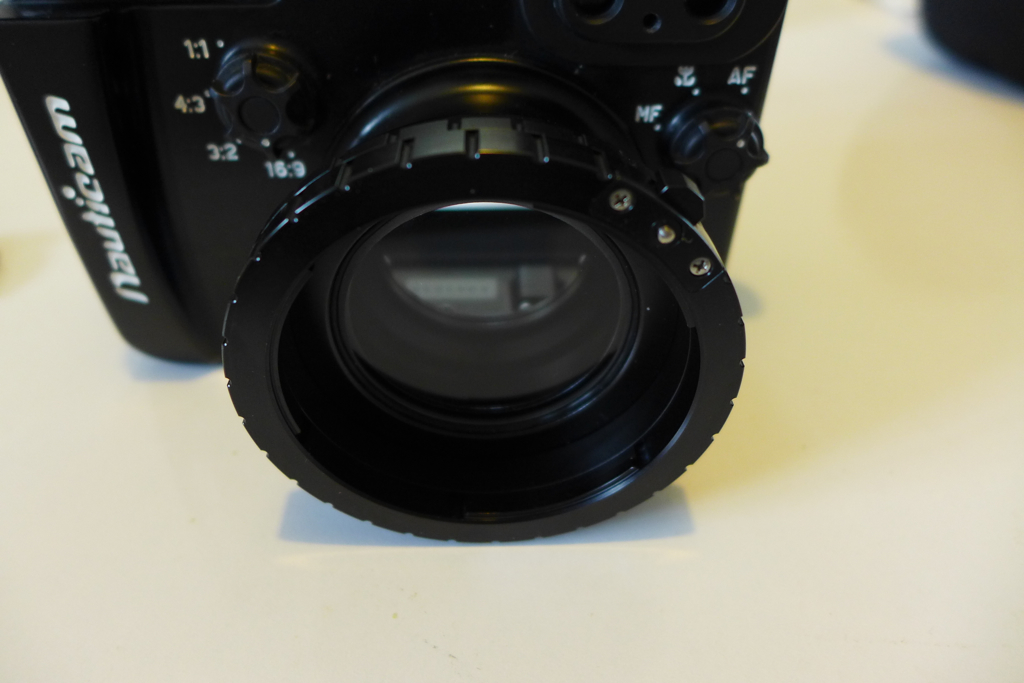
The adapter is larger than the LD mount and a bit big for compacts to the point that even with a tray the adapter tips the rig back.
Another challenge is that this system is designed for Nauticam lens that have protruding rear element so when used with standard lenses there is a gap between the port and the wet lens that can be counter productive, not the end of the world and frankly the Inon system has the same problem. This however means that if you wanted to use this system with a different wide angle wet lens this would be suboptimal.
I am waiting for Nauticam to ship me back the WWL-1 so I can show how that lens performs on this system.
Another observation of course is that if you use this system for wide angle the super heavy WWL-1 and the fact that the adapter only works on a normal segment means your rig will be very heavy in water. I am going to discuss with Nauticam the possibility to have the adapter on a float arm however their carbon arms do not have any mounting point to be used.
Stay tuned for a full review of this adapter with the new 29 macro port that looks very promising for video.
Youtube now supports double frame rate video 50p and 60p so what?
That is actually a legitimate question look at this example here which is a short clip from a trip to Barbados in 2013, this was originally shot on a Sony RX100 Mark II in AVCHD progressive 1080@50p 28 Mbps
If you don’t see the 50p option is because your browser operating system does not support it. You need the latest version of browser and operating system and a machine fast enough plus enough bandwidth. So for Mac this means OS X Yosemite and Safari and for Windows you need 8.1 and IE9.
I hope you enjoyed the clip now check this other one which is a instead shot at 25p with the same camera at 24 Mbps/
I think you can see by yourself which one looks better and it is the 25p clip despite an overall lower bitrate.
There are a number of reasons:
Underwater clips do not have a lot of action as you may think so extra frames go a bit to waste
The encoding which is how the clip is first recorded by the camera is not really that different.
The human eye does a great job at interpolating missing frames anyway
There is not really much more data in the 50p file compared to its 30p rendition
The image quality if you look at a still frame is better in the 25p clip.
There are of course benefits in shooting at double frame rate if you want to slow down the footage 50% speed but for what concerns your normal shooting you would say for that clip you could not tell.
Let’s think about it in simple terms if you have a clip shot at 25p with 24 Mbps you would expect something not quite double but a bit more for 50p instead you only have 28 Mbps. To be more precise you have 22 Mbps vs 26 Mbps video which is 18% more in Sony’s case. So that is not really much information more.
What is more interesting is the structure of the data what follows now is a bit technical but bear with me.
GOP Structure Row 1 and 3 Sony AVCHD 25p and AVDHD progressive 50p
The first and third rows are representation of Sony 25p and 50p clips. The green bar are I frames that you can think of like a JPEG image, the red bars are P frames or prediction the only contain a delta from the previous frame not a full image.
You can see that in the first row there are 12 P red bar between each green I bar. This means that the GOP or group of picture is composed of a sequence IPPPPPPPPPPPP that repeats indefinitely.
On the 3 row there is a representation of a Sony 50p clip you can see that now there are 23 P frames between two I frames.
So the increment in full frame is limited however if we look at the sizes we see that the I frames in the 25p clip are 12% bigger and also the P frames are smaller.
So in short if you look at the image quality the 25p clip has more information in the full frames as well as for the predicted frames whilst the 50p clips has more frames but overall with less quality.
Which means that unless you are shooting something that is really action packed or you want to do slow motion there is no actual benefit but instead a deterioration when you shoot AVCHD progressive underwater.
Note: if instead we were shooting at higher bitrates for the 50p the story would be different but at similar bitrate it goes as above.
You will also have noticed stream 2 and 4 in the image above I repeat them again here
GOP Structure Panasonic AVCHD 25p and AVCHD progressive 50p
The second and fourth stream are generated by a Panasonic camera and they look different. You will notice now the existence of frames with the tag B and also that some of the P frames have a green slice.
This means that Panasonic AVCHD implementation has two features that Sony does not have:
1. It has B frames which not only predict future frames from the past frames but can also reference future frames in the prediction (sounds crazy but it works basically the frames are stored in memory before past ones are saved)
2. It has slices for images so on one frame there can be an element of prediction from a previous frame and another element completely newly generated for example if the prediction was completely in a part of picture where there was a lot of movement.
H264 encoding has motion compensation so things that do not change are referenced and new parts are predicted or in this case partially created from scratch.
So the Panasonic encoding algorithm is much superior to the Sony one for AVCHD this explains why a small camera like the Panasonic LX7 could produce video to compete with a larger sensor RX100 with almost double number of megapixels.
What makes me laugh is when photography magazines jump to conclusion on the video quality of a camera shooting a static frame!
Of course if there is not movement the camera with the best IQ in still pictures will prevail however when you record motion all of that becomes somewhat less relevant as compression impacts the quality.
So the more effective compression algorithm of Panasonic beats Sony to the point that even a larger sensor size seems not to matter.
This explains why when you take a real life clip Panasonic cameras perform better in video despite a worst image quality in still images.
The difference between the 28 Mbps and 24 Mbps follows pretty much the same trend of the Sony clips there is not enough bitrate to justify the double frame rate unless there is a lot of action in your clip.
So to conclude if you are shooting AVCHD the normal 24/25p more will have better image quality and will be more suitable to scenes with a lot of dynamic range, will give more colour and contrast. If there is really a lot of action or you want to slow down the clip shoot in 50p bearing in mind that image quality will actually drop if you look at a still frame in isolation.
Underwater contrary to what you may expect things do not actually go that fast and most of the movement is in a specific part of the frame or in a limited part of it so AVCHD 24/25p gives better results.
Finally when looking at a camera for video check for real clips do not look at resolution charts designed for still images as they give very little indications on the quality of your videos. Also if there are any tests make sure those are on the JPEG images that share similar processing engine not on RAW files are you are not shooting RAW video. And finally consider that at similar bitrate some manufacturer have a clear edge on others when it comes to real time compression in our example Panasonic produces similar quality to a Sony camera with overall a better sensor but poorer compression.
After the various Backscatter, Bluewater photo, and other shops compact cameras reviews I thought of putting my 10 pence in as well.
Most of those reviews you find are written by people who shoot DSLR and then occasionally go and take a compact in water to see how it goes. For what concerns underwater use I only shoot compact and I believe I know how to navigate into features and limitations of compact camera quite well so here is my view on the subject.
The first hint when you look at a high-end compact camera is to check if Nauticam makes a housing for it. If not maybe your camera is not as good after all. There are some exceptions of course.
Categories
I have ranked compacts according to the following shooting categories:
Movie
Ambient Light
Macro
Portraits
Close Focus Wide Angle
All purpose cameras
When possible there will be a top 3 in each category.
The Compacts
I have considered only the following cameras
Canon G16
Canon S120
Olympus XZ-2
Panasonic LX7
Sony RX100II
The Fuji X20 is a potential addition but I have not found anyone that actually shoots it underwater so I abstain from judging here.
Best Cameras for Movie
In order to score in this category the cameras need to have full manual exposure control in movie mode and be able to shoot double frame rates for the system of choice PAL or NTSC.
This is my appraisal:
Sony RX100II
Panasonic LX7
N/A
Canon cameras do not offer exposure control in movie mode, Olympus video is pathetic. Not possible to even consider a number 3 here.
Best Cameras for Ambient Light
Here I consider shots without strobes with a view angle of 100º diagonal you need a wet wide-angle lens to take those shots.
Here are the rankings:
Sony RX100II
Panasonic LX7
Canon S120
Olympus lags behind in image quality and the Canon G16 does not have any wet lens that allows to take those shots without strobes.
Best Cameras for Macro
I am looking here at shots are real 1:1 reproduction ratio and how easy is to take those shots in terms of autofocus and depth of field. In order to achieve this level of magnification a close up wet lens is necessary for all cameras. No compact camera achieves real macro with the bare port underwater.
Here are the results:
Canon G16
Canon S120
Panasonic LX7
The Canon G16 in virtue of a 140mm focal length at telephoto end gives the highest magnification ratio, the Canon S120 follows closely same image quality less magnification. The Panasonic LX7 has only a 90mm equivalent lens however the autofocus is incredible so you can use +10 diopters very easily and it is the only camera to really offer Bokeh.
The Olympus XZ-2 lags in terms of image quality, the RX100II has great image quality but little magnification, you need a +10 diopter to give a 1:1 reproduction ratio and focus is difficult because of shallow depth of field due to the large sensor.
Best Cameras for Portraits
Here we are considering shots with the bare port at 35mm focal length using strobes. Here is the ranking:
Sony RX100II
Panasonic LX7
Canon S120 & Canon G16
Whilst the RX100II has the best image quality it comes a bit as a surprise why the LX7 gives better images than the Canon. The reason is that Canon tend to have a very unbalanced color range with over saturated red. This does not go away with RAW images as it affects the whole spectrum. It is possible to correct this using blue diffusers for strobe but this is just a patch, the LX7 tend to give much better balanced images.
Best Cameras for CFWA
Close focus wide-angle is shot with a fisheye like lens, using strobes typically at small apertures here are the rankings:
Sony RX100II
Canon G16
Canon S120
It is quite clear that the RX100II with the widest choice of fisheye lens and the highest dynamic range is the best camera for the job, but the addition of the Inon Zoom lens helps getting the G16 in this category, the S120 follows with similar results. The LX7 does not offer a fisheye options sadly and the XZ-2 lags behind in image quality compared to the two canons.
Best Versatile Still Cameras
Here I look at cameras that can shoot all type of shots from macro to ambient light.
Sony RX100II
Canon S120
Olympus XZ-2
The lack of fisheye options cuts out the LX7 and the poor performance of zoom wide-angle lens at wide end kicks the G16 out.
Best Overall Camera Still and Movie
Taking the previous list and eliminating the cameras that do not offer exposure control in movie mode this is the result
Sony RX100II
NA
NA
So the Sony RX100II is the only real all round camera and this explains why it beats the other in terms of sales.
I thought of doing a debrief of the settings I use as I see few people that have bought this camera and have few niggles to go through and the obvious learning curve of new equipment so here we go.
Which Video Setting
It is always possible to reduce detail if needed so always shoot in the highest mode AVCHD progressive that in the menu is called PSH this records at 28 Mbps.
Which Mode to Use for Video
The LX7 has a one touch video mode that is accessible in still mode. When you press this button, even if the camera is in Aperture or Shutter priority and even in Manual, the movie clip is recorded in Program mode.
It follows that the mode to use to have full control is the creative video mode accessible through the mode dial.
Standard Setting for Creative Video Mode
I use the Shutter priority setting submenu in this mode. This is because the LX7 does not follow the 180 degrees shutter rule in video program mode.
Set your shutter speed to 1/100 for PAL and 1/125 for NTSC so that your shutter speed is double of the frame rate (1/50 for PAL and 1/60 for NTSC).
Exposure Lock Button
I never use the manual or the aperture priority mode as I find the lens fairly sharp even in macro and very small subjects. When I have changing light I point the camera to the exposure I want and the click Exposure Lock. To disable focus lock you need to go into the menu and set the button to AE lock only.
Exposure Control
I personally find the standard exposure of the LX7 underwater far too bright. So using the exposure compensation dial found by pressing the shutter speed wheel I dial down to -2/3. This is personal sometimes I even go down to -1.
ISO and Max ISO
The LX7 has a very bright lens even at telephoto end and this lens produces also a very sharp image. In the worst case of deep water with low light I found that having an underexposed but cleaner picture at ISO400 is better than letting the camera go all the way to high ISO. So in the menu I set ISO MAX to 400 or in some cases I push this down to 800. I set the ISO to Auto as the camera generally keeps it very low anyway.
Autofocus
I leave autofocus for video mode to on and I ensure that the autofocus is set to single area. Be careful as the default setting is face detection and that does not work well underwater! Multi area and tracking are not available in video mode.
Zoom
In video you can extend the 90mm lens to 180 with the iZoom and to 360mm with digital zoom. I set iZoom to on and Digital zoom to off as I have seen that the iZoom is very useful in macro and the picture quality is not visibly affected.
Metering Mode
I use multi metering for landscapes and centred weighted for close ups and macro.
iDynamic
This is a tricky setting; generally I keep it off or on Low as the standard settings clip the highlights. In doubt turn it off.
Photo Style
This setting controls contrast, sharpness, saturation and noise reduction. I use the standard setting that is a little bit oversaturated. If you do a lot of colour corrections in post processing use the Natural setting. The footage will be less saturated and a bit less sharp with less noise reduction.
White Balance
I use two custom settings WB1 and WB2 one for shooting with ambient light and the other one with lights that I only use in special circumstances.
Stabiliser
I leave this on and it does not affect the field of view.
Zoom Resume
Zoom resume has to be left off as this delays the camera ready to shoot time and ends up with missed opportunities.
Menu Resume
It is useful to leave this on.
Custom Menus
I record all my settings for shooting in ambient light in the C1 mode this has all the settings are describes and recalls the Custom White Balance 1.
I then set another menu C2-1 with auto white balance for shooting with lights and menu C2-2 for shooting with lights and WB2.
This is an example video shot with those settings and no additional lenses this is with video lights and auto white balance little to no correction in post processing.
This other video is with some grading applied and ambient light for most
First of all I have to thank Mike on Scubaboard to get this in motion the original post is here
When you shoot macro and operate at high magnification even the smallest movement translates into shake, let’s think about it for one moment.
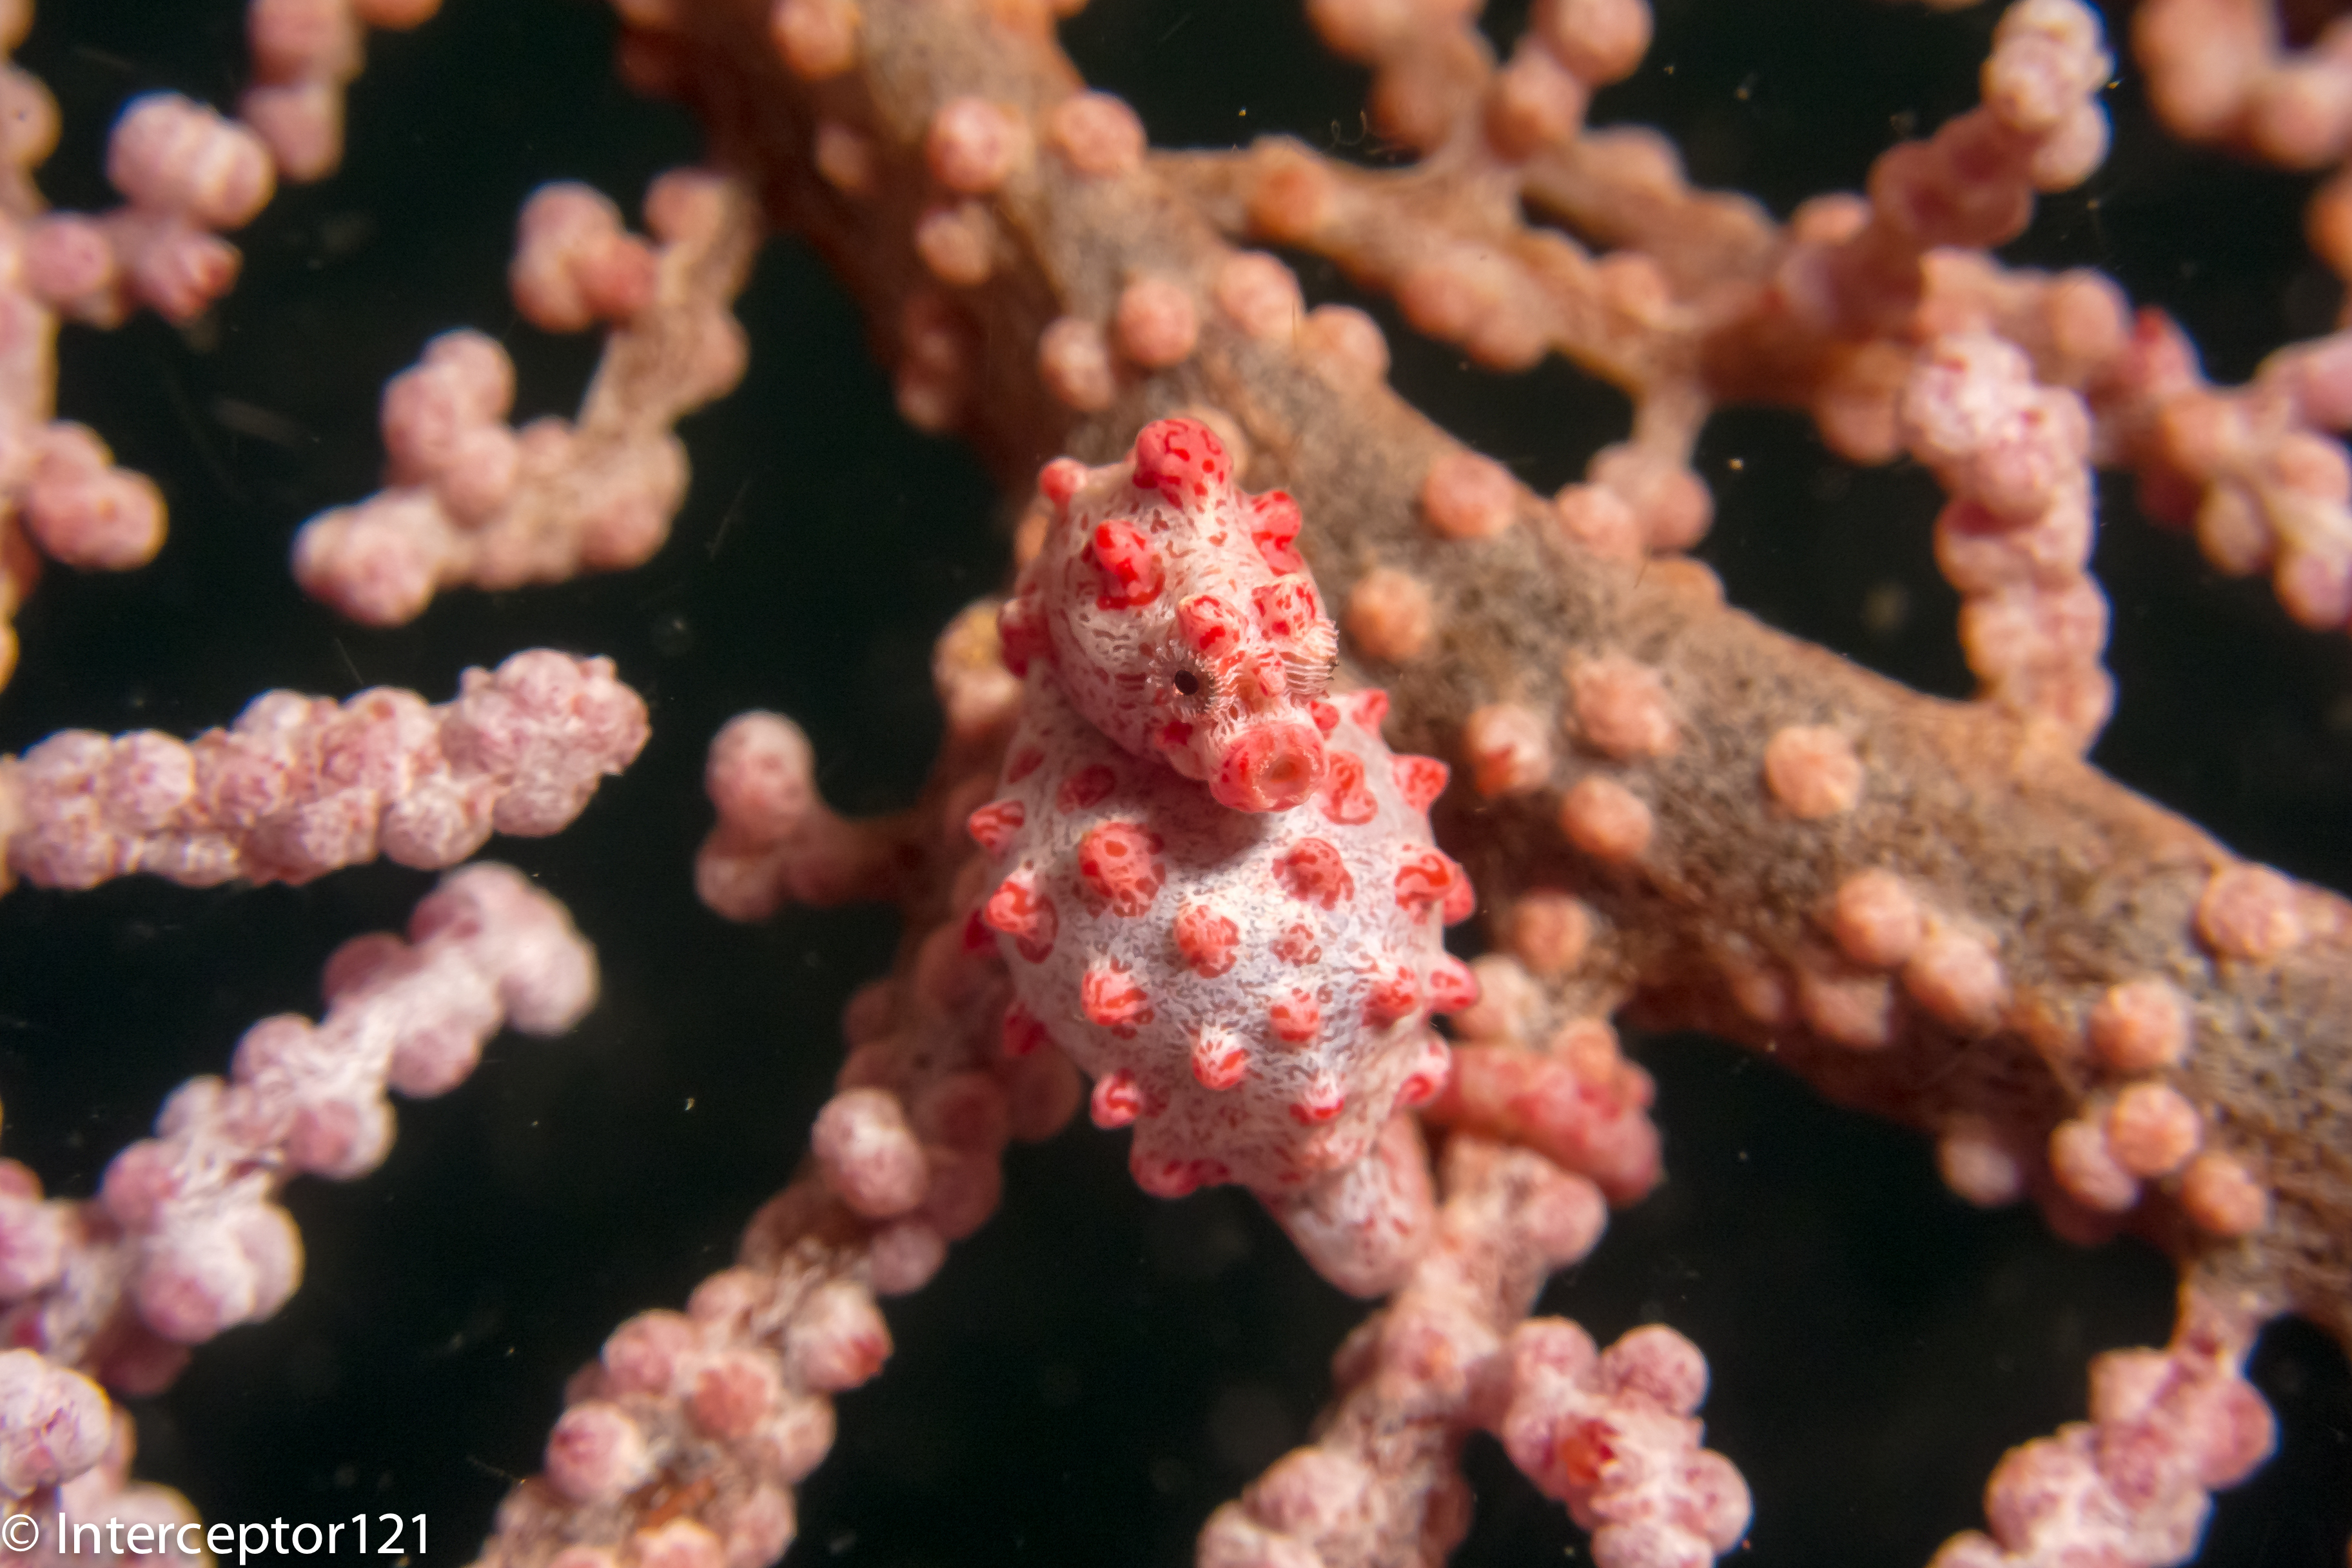
A macro image will have a frame size of 36×24 mm, this means that a move of half centimeter or 1/5 of an inch is equivalent to 20% vertical movement a considerable annoyance. When you shoot a picture this is not an issue because with a very high shutter speed you can freeze motion and there will be no blur like in this image.
Pygmy Seahorse 1.5 cm
Trying to take a video of a moving subject like this proves challenging, and you need to slow down the footage to avoid sea sickness like here
So how do we get outstanding macro footage? We need to be super stable and avoid any type of shake.
One possibility is a tripod. There are various examples of underwater tripods such those made by Ultralight example here
There are several inconveniences using a tripod first is that those are more suited to a camera than a tray that may have the tripod hole off centre, so if you use a tray for your set up and just want to occasionally put it on a tripod this gets complicated.
So that where Mike came into action and contacted ULCS to build a tripod out of a tray those are my results using the following parts:
Camera set up
TR-DM tray
TR-DUP Extention
2x TR-DH handles
2x 12 segments 12″ locline arms
2x Sola 1200
Panasonic LX7 in Nauticam housing
Tripod set up (approx $310)
3x 1420 ball base adapters
BA-FBd plate
3x clamps
3x 5″ arm segments
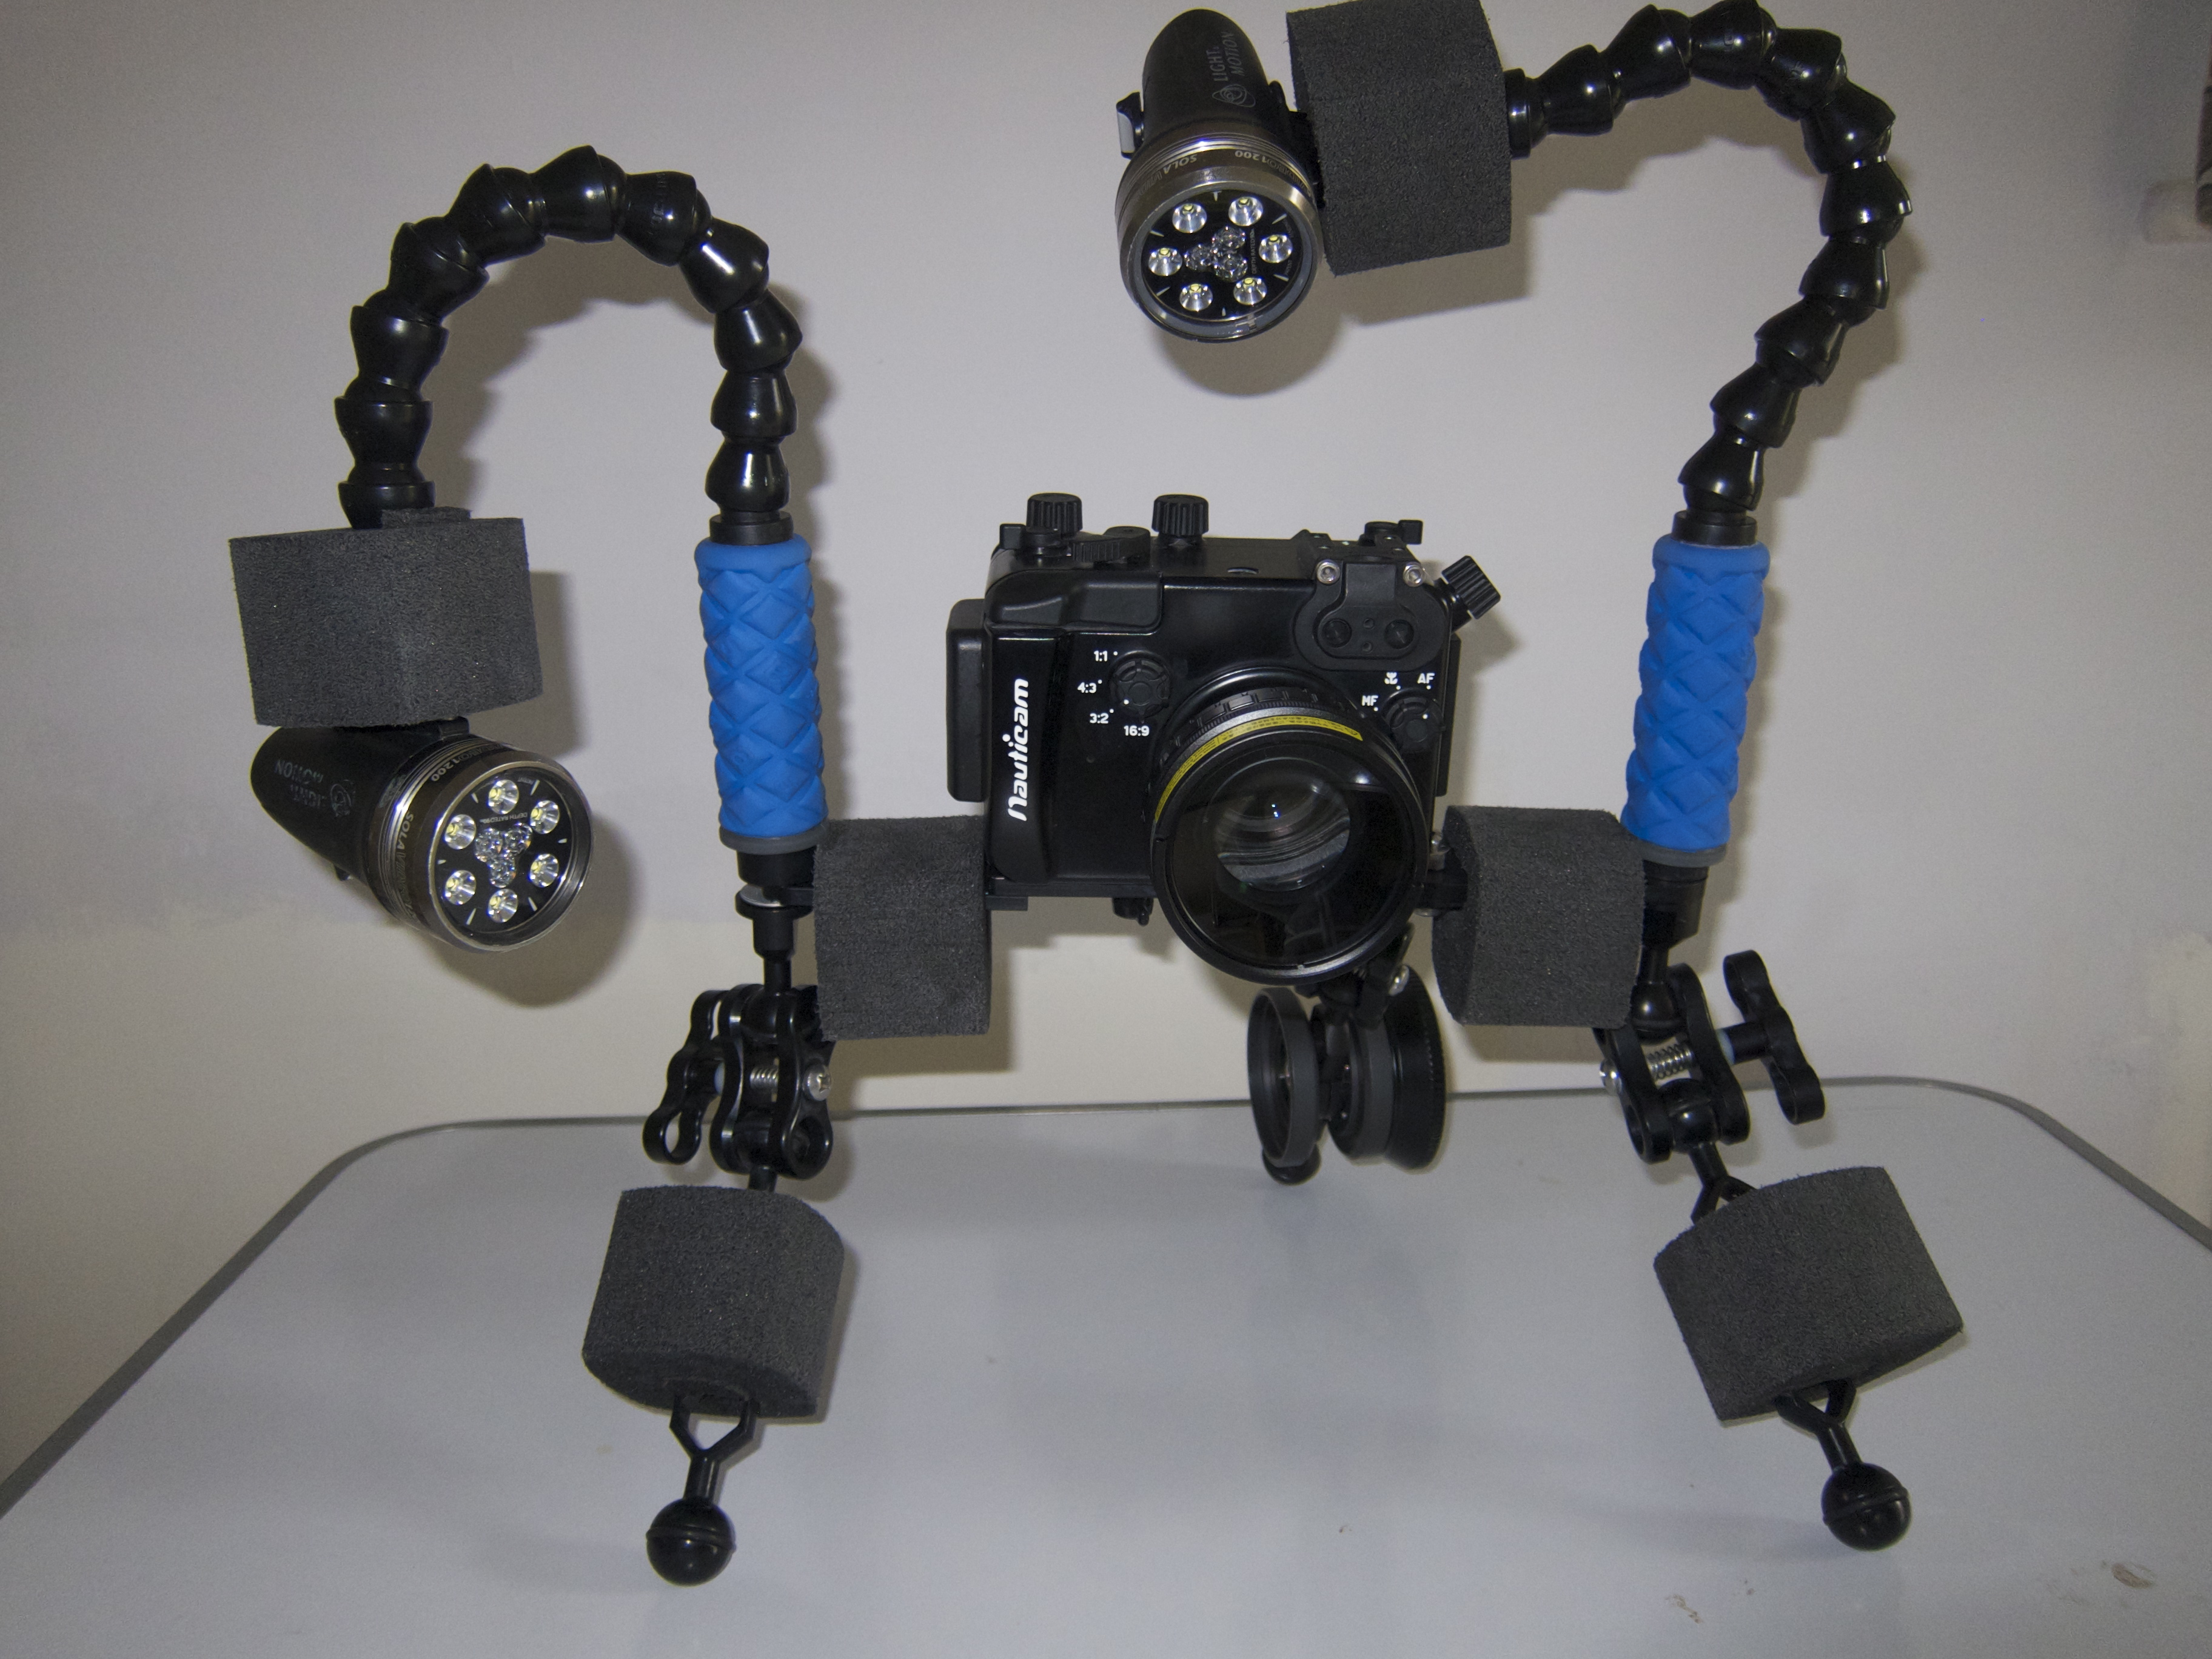
This gives something like this also called Ultimusmacro
UltimusMacro
I tried this set up and the key issue is that you are far away from the floor and end up with working distances of around 10-15 cm or 4-6″ those are suited to a +6 diopter but not more and best with camera with at least 105mm zoom.
This is a bit of an issue with my Panasonic LX7 as the max zoom is 90mm equivalent. So I came up with a mini-monopod that has several advantages:
Closer to sea floor
Less expensive
Lighter
More flexible
For the mini-monopod all you need is ($150)
3x 1420 ball adapters (two female and one with screw or bolt) – alternatively 3x 3816 2x female and 1x 1420 with bolt if you use AC-AH handles with 3/8 hole
BA-FBd plate
1 clamp
1 8″ arm segment
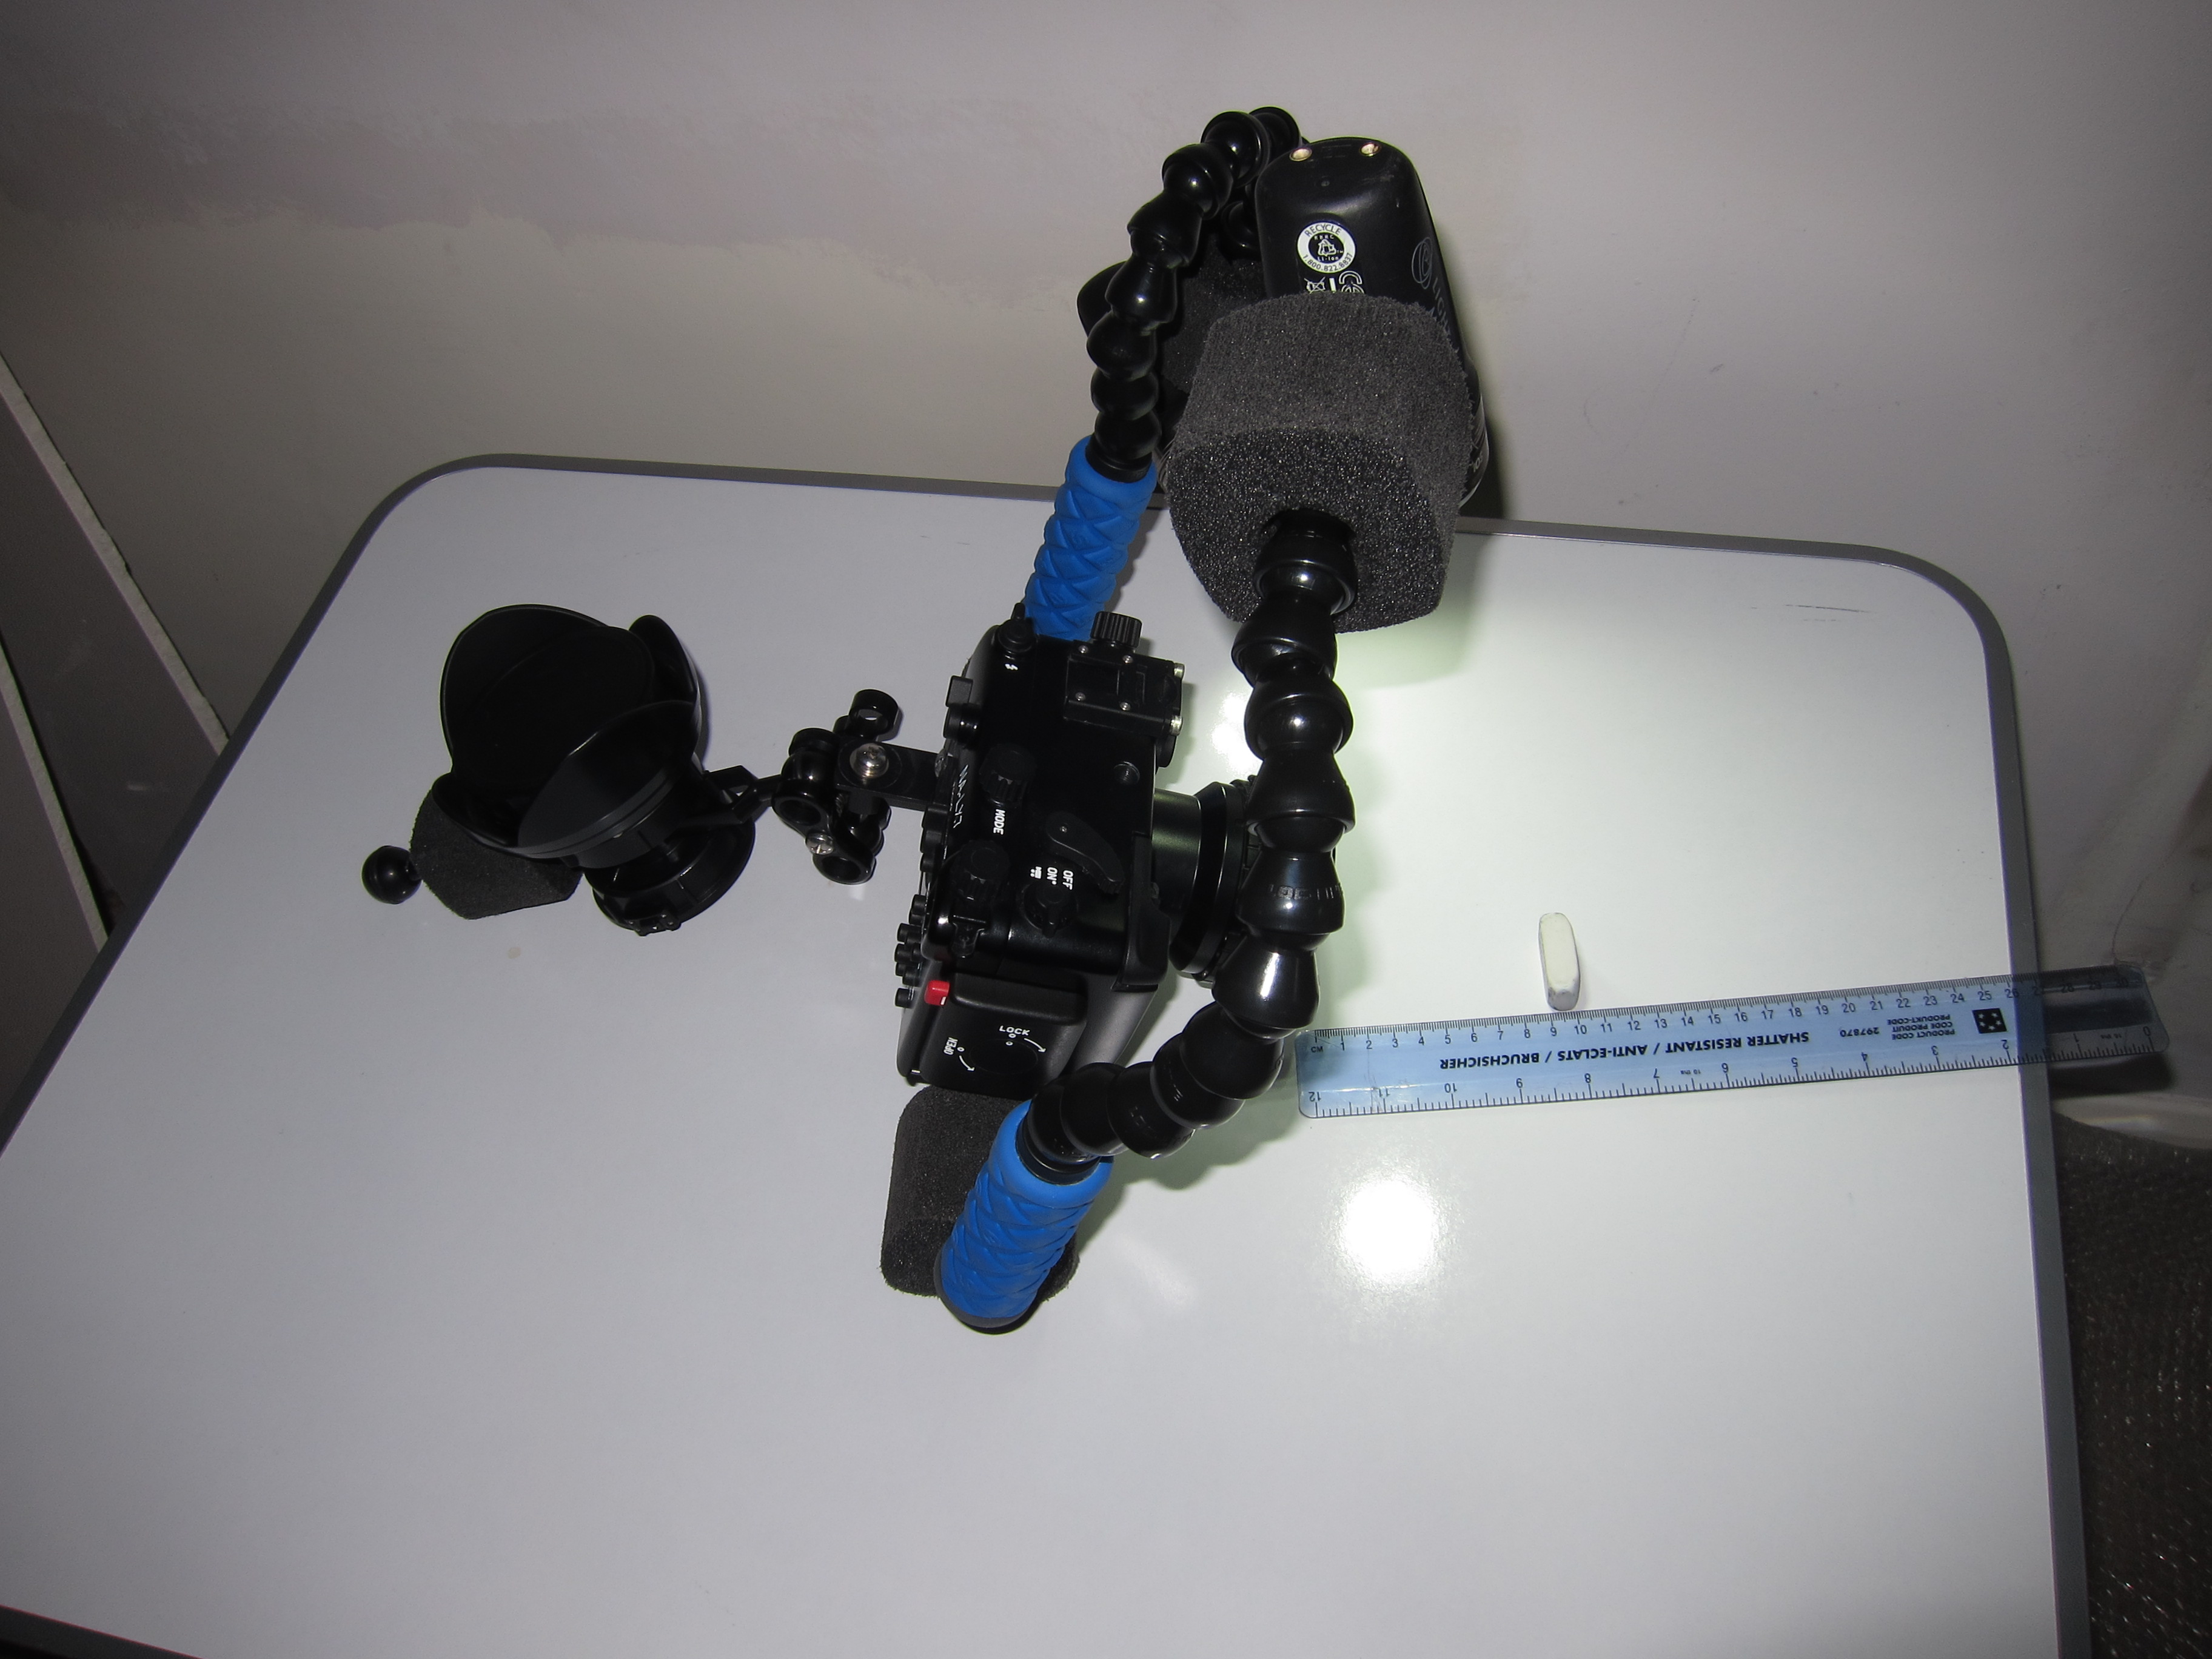
This is the mini in action also called cyclop
Monopod
In this configuration I also have a lens holder on the 8″ this gives even more stability
With a mini-monopod you can easily use +10 diopters as you are on the bottom. In my set up I have floats however the 3 1420 ball heads on the bottom are sufficient to have a stable platform that can be pointing down even more raising the arm segment.
In addition to this the monopod can be used to push the camera in remote places or approach critters in crevices or similar
I will be testing both in North Sulawesi starting next week I hope to come back with some great footage
For more pictures of the set up check the Panasonic LX7 link on the top of the page
Who has followed my initial LX7 tests is aware of the few issues I have had at wide angle with the LX7.
One was the reflections back on the lens that I have now hopefully resolved using a black marker and changing the camera from white (and silver lens ring) to black and the other was flare.
Flare is an issue at wide angle even on land. What causes flare? Stray light coming from the sides that washes out the picture and eliminates contrast in the process.
Wide angle lens tend to have an ability to catch stray light from the sides and top and this is the reason why wet wide angle lenses have to be really coated well so that this effect is diminished, however it still can happen.
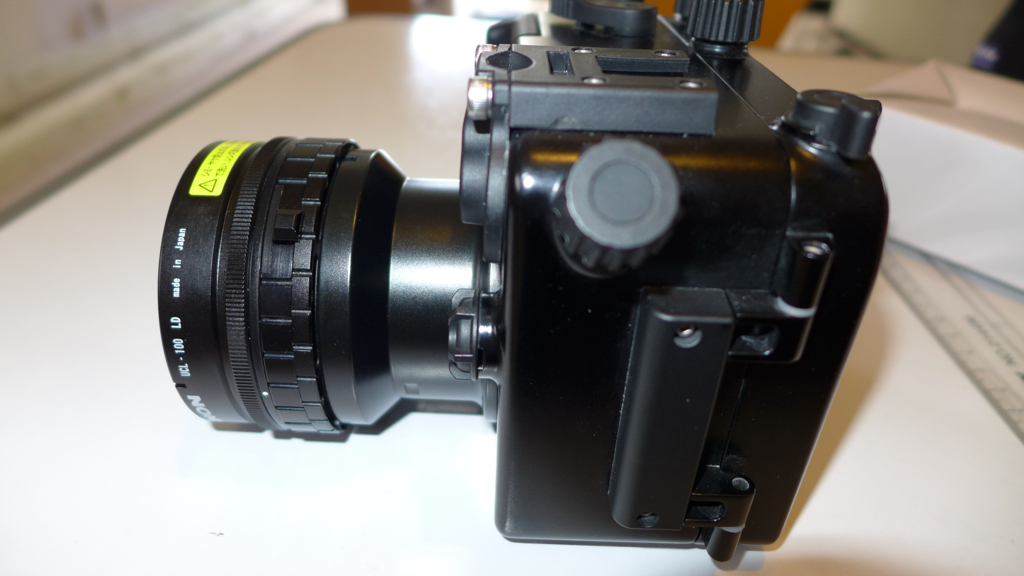
And it did happen to me with the Inon UWL-H100. The general advice to eliminate or reduce flare is to have a lens hood however lens hoods are generally not an option for wet lenses with an M67 thread mount. The only lens that I know that can position the hood on a screw mount is the fix UWL28M52 or UWL04 most of the other lens do not have a hood and have a circular lens unprotected from stray light. And this usually means at some point you will get flare.
So how do you get around it? In the case of the LX7 is pretty much a forced choice as the Inon UWL-H100 is the only lens that does not vignette at 28mm equivalent focal lenght so the possible solution is to put a hood on the lens.
Inon sells a hood for the UWL-H100 but the hood is attached through 6 allen bolts and its position can’t be fine tuned so to use the hood it is a requirement to change mount from M67 to the LD bayonet. You need also to convert the lens itself into an LD bayonet. If you go to your Inon dealer there is a relatively cheap service part that allows you to convert your M67 lens into a bayonet.
LD Bayonet lens holder
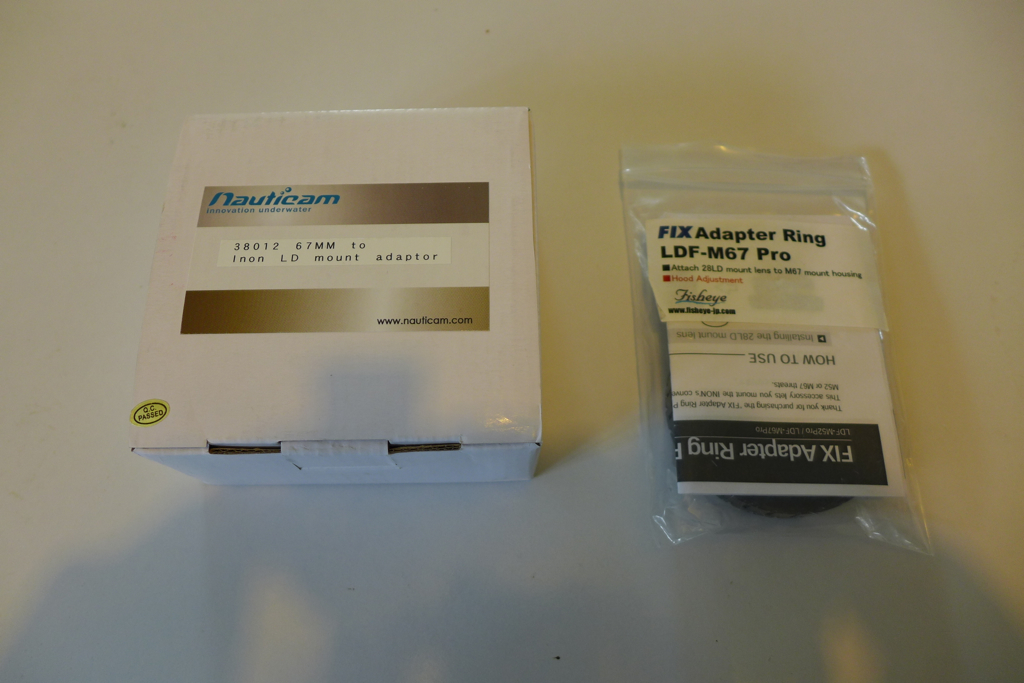
The LD bayonet is the latest incarnation of bayonet mount released by Inon. Whilst the old AD mount relied on a mechanical action to secure the lens, the new LD bayonet is much shallower and relies on a pin lock release to stay in place. There are two adapters on the market that are capable of attaching LD bayonet lenses to an M67 thread, one produced by Nauticam themselves and the other by the Japanese Fisheye Fix.
LD Adapters BoxedNauticam and Fix LD-M67 adapter
There is a price difference between the adapters with the Fix being 20% more expensive.
Nauticam LD Adapter
The Nauticam adapter is the largest of the two. It has 6 allen bolts on the front and a thumb screw lock on the back to fix it in position. With LD lenses there is only one position to put the lens hood in the correct place so if for some reason the thread ends in the wrong place with your housing you will need to unscrew the front of the adapter to ensure the release lock is on the upper left of the port this happens the same way on the fix adapter. Make sure the little spring does not jump off in the process…Once the release lock is in the right area the fine tuning of the hood position is done with the thumb screw. A possible weakness is that if your housing port has no room for the thumb screw then this adapter is not good for you.
Whilst the Nauticam is made of plastic and metal the Fix seems to be 100% aluminum, this adapter looks better but does not have a mechanism to fix in place it relies on the strength of the M67 thread, however this locking system is compatible with any 67mm threaded port.
FIX LD Adapter
The fix allows to perfectly fine tune the hood position and it shows.
Nauticam Hood Alignment
The alignment mechanism of the Nauticam adapter creates an alignment issue with the hood where the lens is few degrees turned clockwise.
With the fix this does not happen.
Fix Hood Position
The hood can be properly aligned. Note that in both cases this does not mean more vignetting as the corners are not covered by the hood.
The other check I do is the position of the back of the lens, if there is a gap between the thread and the back of the lens this can create vignetting so it has to be as close as possible or even protruding as the Inon UWL-H100 mount type 2 does.
Let’s have a look at the back of those two adapters with teh UWL-H100 28LD attached.
Nauticam Rear Lens
The Nauticam thread is somewhat too long so the lens sits slightly more inside the thread line.
With the fix the situation changes sightly.
Fix Rear Lens
There seems to be little difference we will now check if there is an impact on the possible vignette in water.
Nauticam 28mm
As we can see there is a little bit of residual vignette on the bottom right corner when the lens is at 28mm equivalent focal length,
This is the same situation with the Fix
Fix 28mm
There is still a dark bottom right corner but it is less.
Inserting a 1.25mm spacer between the inner housing and the left side of the camera improves matters, this is because the lens of the LX7 is somewhat misaligned in the Nauticam housing and this corrects it.
Nauticam 28mm Spacer
With the spacer in the housing and the Nauticam adapter there is a tiny little residue of vignette but overall this is ok.
With the fix adapter this is the result.
Fix 28mm Spacer
No dark corners left.
So this is the recap:
You can change the UWL-H100 28M67 into an LD version with a cheap service part
Once the lens has an LD mount it is possible to attach the hood this will reduce flare
Vignetting is slightly increased but can be eliminated with a spacer with the Fix adapter
There is an issue of hood alignment an increased vignetting with the Nauticam LD adapter
A final note: inserting a spacer in the housing is risky, you need to know what you are doing as in theory the chance of flooding could increase so this is not for everyone.
My recommendation to those who want to improve contrast with the UWL-H100 is to convert to LD mount, attach the hood and get a Fisheye Fix LDF-M67 Pro adapter. Changing to bayonet has other advantages making lens swaps in water much faster and easier compared to the thread version especially with a lens as heavy as the UWL-H100.
There are few design issues and manufacturing errors in the Nauticam LD adapter that create issues with the LX7, most likely other cameras that are not so fussy will have no problems but if you have an LX7 avoid the Nauticam adapter entirely until a new production version is defined. I have given Nauticam the feedback and they will probably react.
Inon introduced a new close up lens in February of this year the UCL100. So why did Inon come up with this after the very successful UCL165 series? Probably some pressure from products like Subsee that produce better quality images than the Inon lenses and more and more lenses with similar performance to the existing Inon lenses. So what is different about the UCL100? First of all this lens is heavy 243/269 grams in the LD/M67 version in air that become 130/151 grams in water double than the UCL165. The lens is made of 3 elements instead of two and is very similar to a Subsee this is more evident taking a look at the lens on land.
This shot is taken with the bare port at 50mm.
LX7 50mm
This is the same shot at the same working distance using the UCL100 note the magnification.
LX7 UCL100 50mm
The lens behaves like a magnifying glass exactly as the Subsee, Inon has made some effort to try to reduce vignetting, this picture is taken on land at 28mm.
UCL100 Fix Land 28mm
Note a little dark bottom right corner, the lens in fact vignettes at 24mm this is due to the huge size of the LX7 lens and may not happen with other cameras.
Here we can see the rear of the lens from the Fix adapter side. The lens sits very close to the glass port.
UCL100 rear lens attached to Fix LD adapter
I have opted for a bayonet version of this lens as I will use the fix as m67 adapter if I had to dive with the wet mate.
If you are a photographer I would definitely recommend the LD bayonet version over the M67 as it is easier to remove and attach in water.
There are some other very interesting characteristics of this lens. Usually a diopter works only around a certain working distance for a given zoom so the issue with such a powerful close up lens is that if we are far away from the working distance the lens is not usable.
The UCL100 instead is quite flexible and has a huge swing of working distances for a given focal length as in the table below.
Zoom Position
Min
Max
90
60
100
70
45
115
50
20
130
35
10
200
28
0
300
All values are in mm.
So the lens keeps working well far away the nominal 100mm and due to the construction also gives a magnifying effect this means that it is possible to take this lens in water as the only close up lens and there will not be too much of a limitation if for some reason we can’t get that close to the subject. A swing of 40mm at telephoto end is excellent and this becomes 70mm at 70mm zoom and 110 at 50mm.
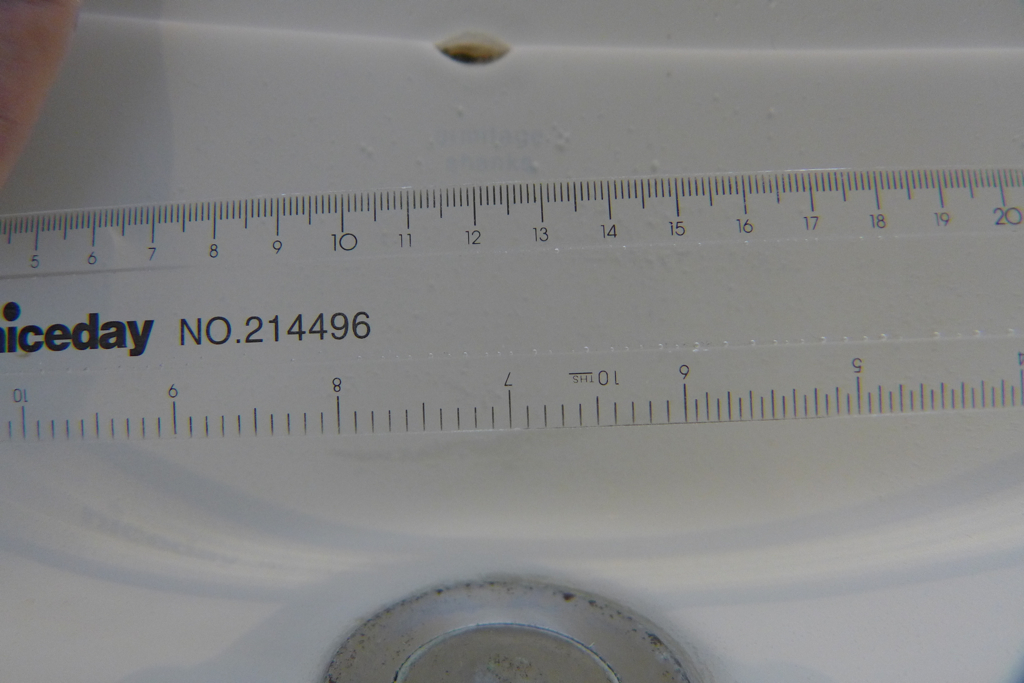
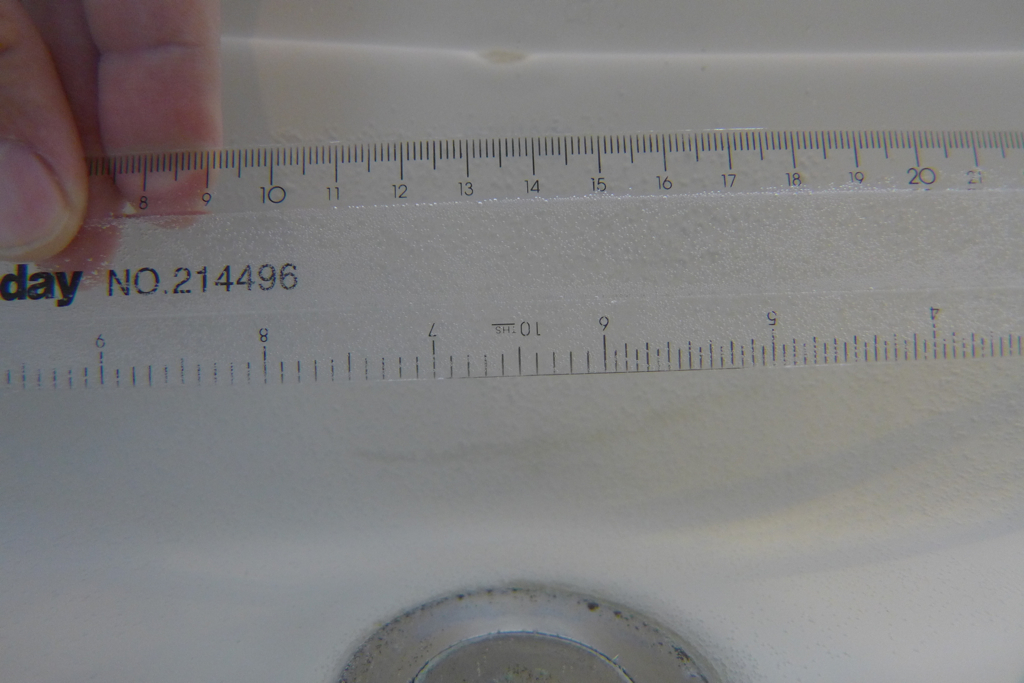
What about image quality most of you will know by now how specific I am when it comes to aberrations, this is a crop of an image taken with the UCL165
Inon UCL165 Fringing
You can see the yellow and purple halo around the zero.
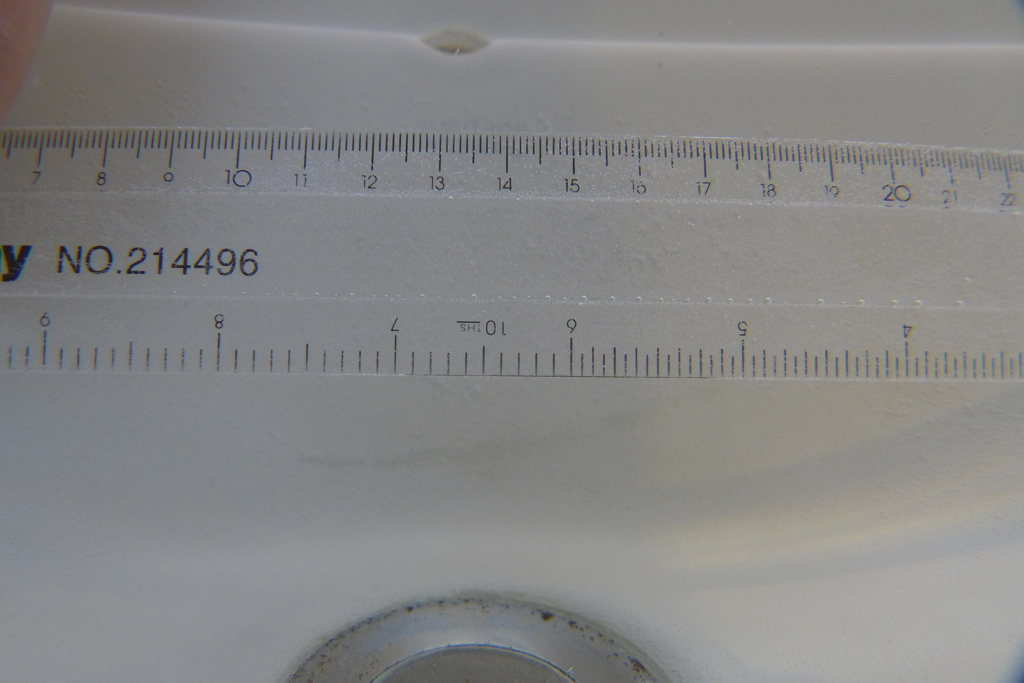
This is a detail of the same ruler in water with the UCL100
Inon UCL100 Detail
The image is a bit soft because of the aperture used but absolutely free of any fringing that is astounding for this level of magnification, the quality of the image is same as Subsee.
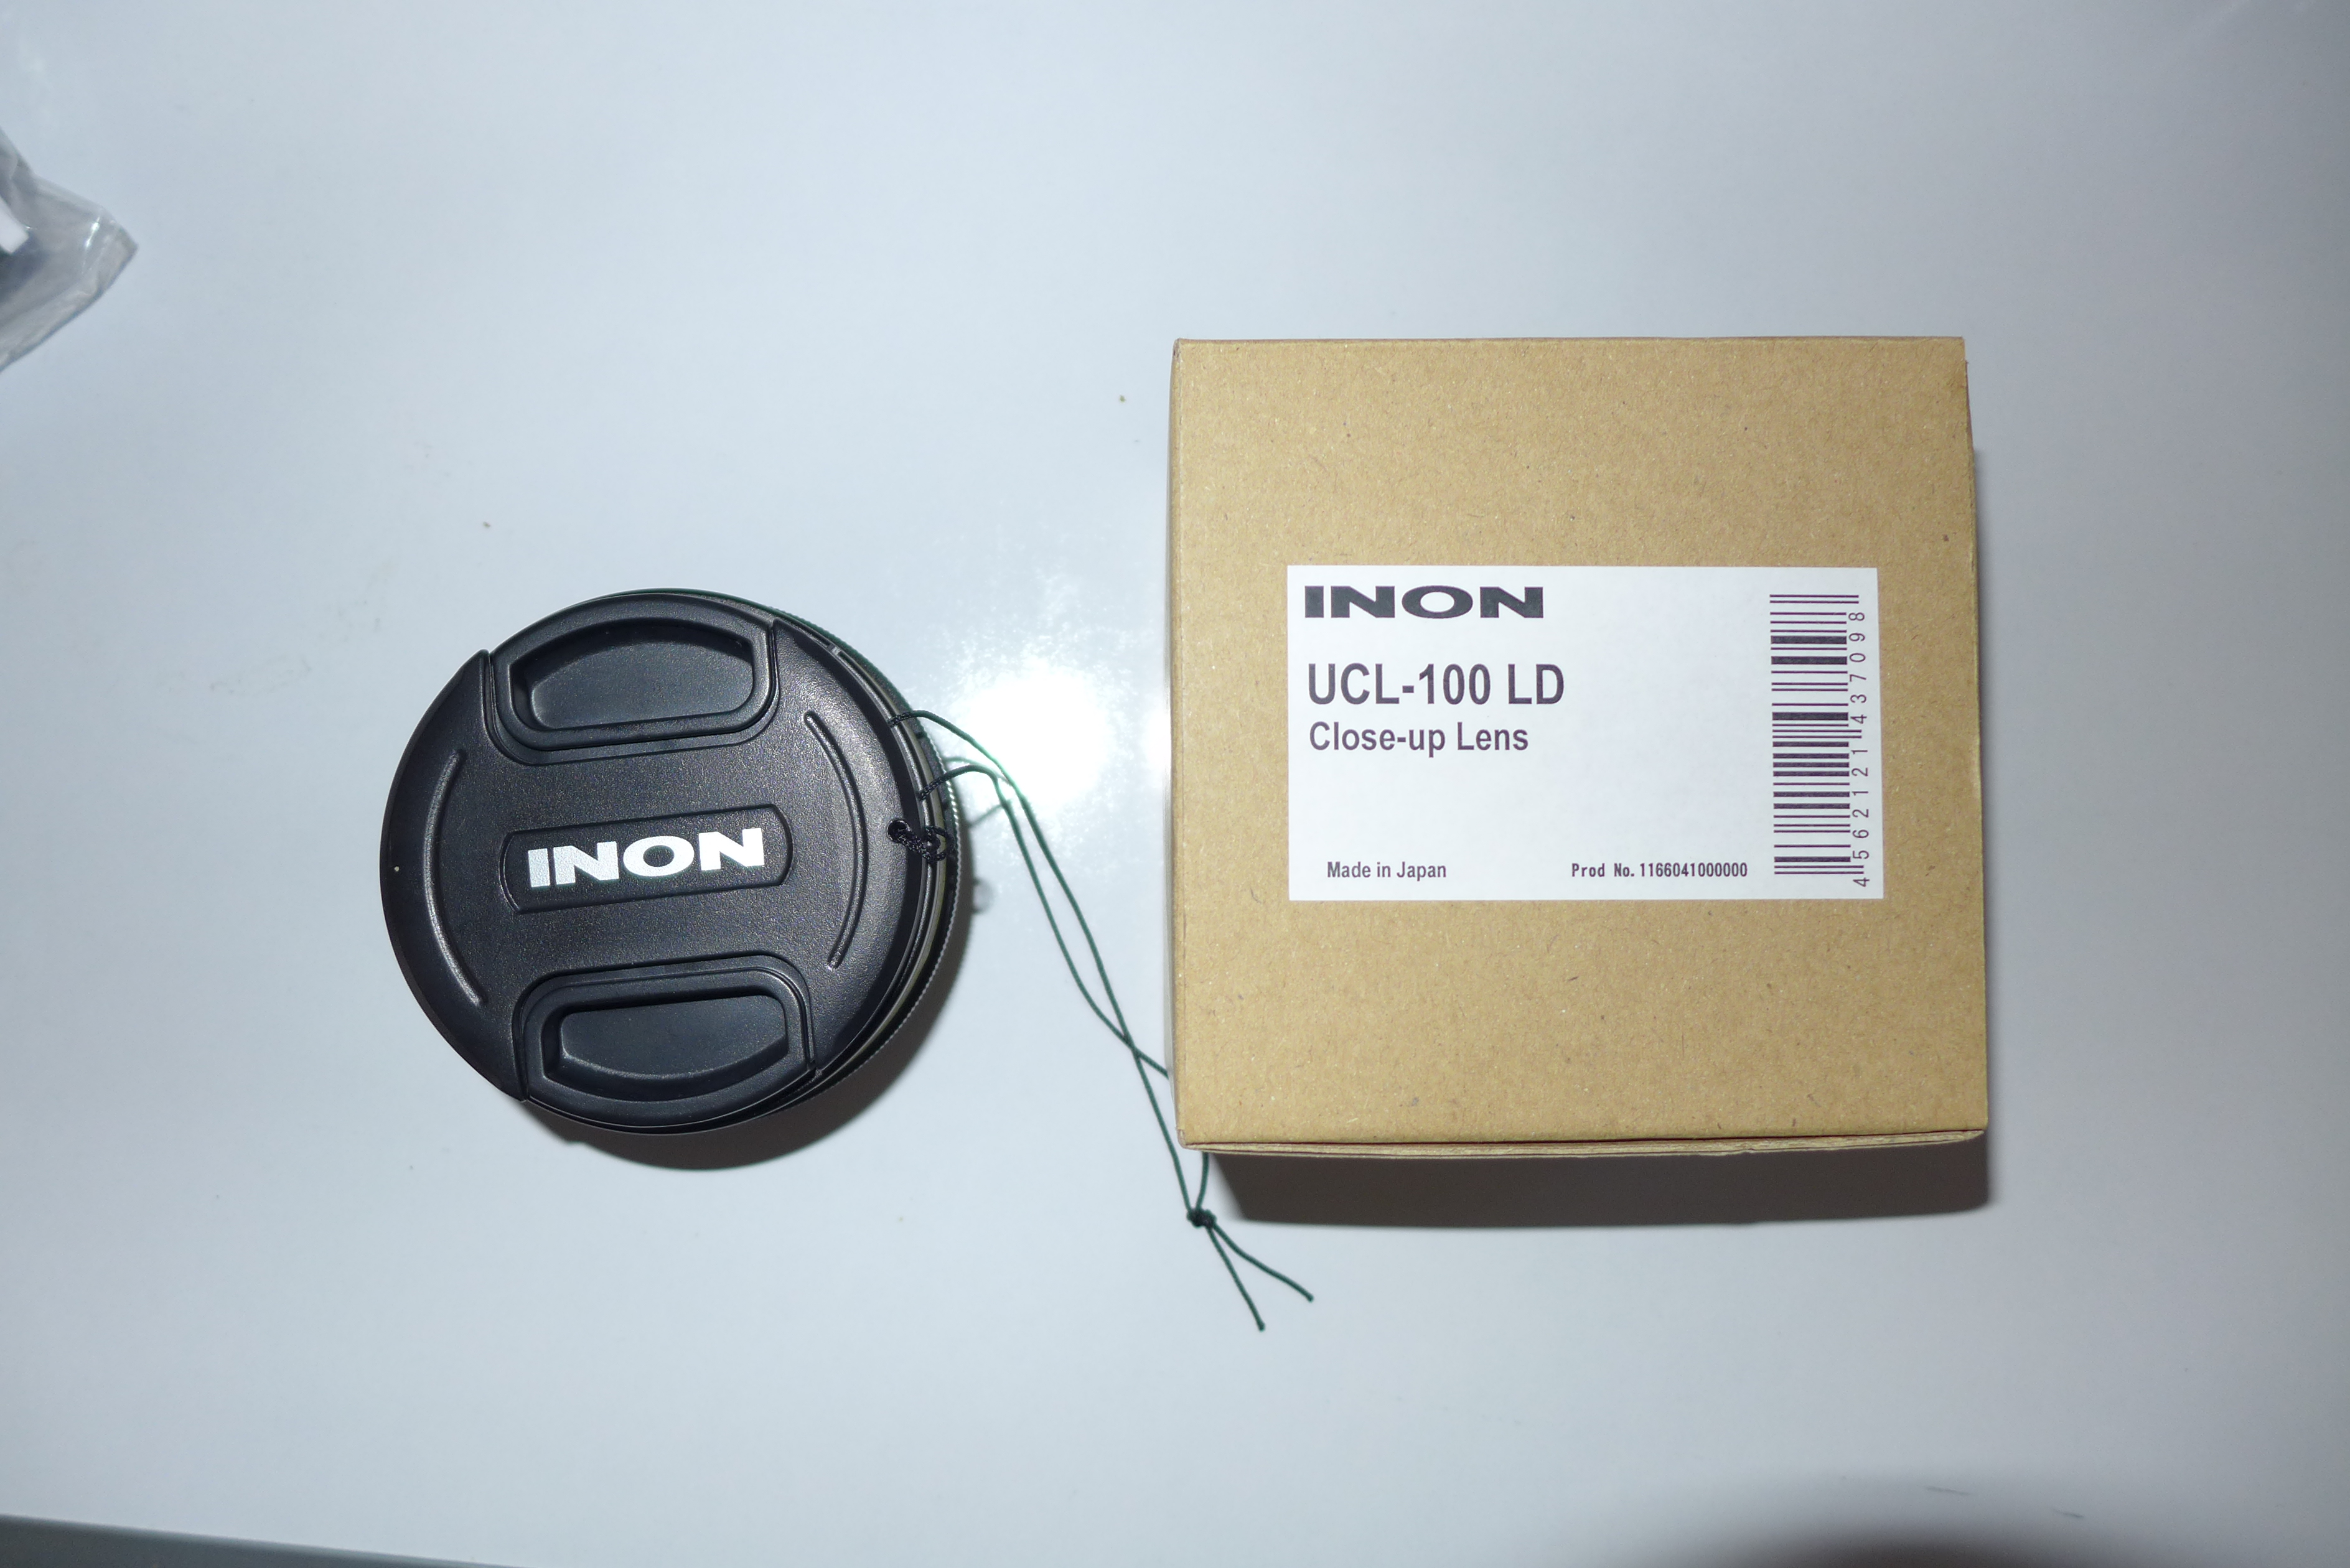
This lens comes with a lens front and back cover, the front lens is a clip with lanyard. The UCL100 can also be stacked with other M67 lenses if you need more!!!
Inon UCL100
With the LX7 the UCL100 achieves a reproduction ratio of 1.1:1 compared to the 1.4:1 of an Inon UCL165. The limitation of the zoom of the LX7 shows a bit here as even the Sony RX100 gets nearly a 1:1 with this lens but the strength of the focus of the LX7 are second to no other camera in this segment so I look forward to using this lens on some really small stuff.
The UCL100 is priced at $282 in US and £275 in UK versus $225/£210 of Subsee so why would you bother getting this lens from Inon instead? I think the main selling point of this lens in addition to the image quality and magnification power is the fact that the lens operates until wide end and has a very wide range of working distances so you are not stuck just around the 100mm nominal focal lenght. This allows use of the full zoom from wide to tele that in video is especially important. For pictures I am not so sure the additional cost is justified as stills are usually at full telephoto end.
You can see in the section of the Veronica L that missing those extra degrees field of view did not allow me to take the full wreck by side even if it was not that big. On couple of reef dives I already had the Inon on the previous wreck dive so I left it you can compare performance of the two lenses in terms of sharpness and flare. Generally I feel the wet mate has less flare and is sharper however it does have an issue of reflections as covered in the previous post.
As always I have used iMovie to edit the AVCHD progressive files that I converted to normal mp4 using the workflow in a previous post. There are no dramatic alterations of colour or exposure and no stabilization has been run in any part of the video (in some parts like the snake eel moving it shows) all was done with custom white balance using the camera functionality, considering how deep were some of the wrecks this is very good I believe.
I would love your comments this was mostly an exploration trip so it is interesting to compare to the RX100 Raja Ampat videos
So I finally had the opportunity to take the LX7 on a trip after some pool tests.
After my attempts last year with the Sony RX100 I was a bit skeptical that I could actually find something better for video but I think the LX7 beats it.
I put together a sample just to give an idea of equipment used and how it works, please note this is not altered in any way http://vimeo.com/62838598
There is a picture of the rig in this blog on a specific page but let me confirm once again in detail
Panasonic LX7
Nauticam LX7 housing
Ultralight TR-DM tray with extension TR-DUP and two TR-DH handles without ball.
12 segments locline arms on 3/4″ mount base and reducer on the handles
Two sola 1200
Nauticam wet mate
Inon UCL165AD on bespoke M67 adapter
Inon UWL-H100 28M67
Inon M67 double lens holder on custom mount
In a previous post I highlighted that for most the wet mate will be the only lens needed however I had some wreck dives and the 18mm of the Inon wide angle are more appropriate.
I also gave a try to the panasonic intelligent zoom that allows for 2x digital magnification and sharpening that for me works very well and you can see it in the footage. This allows a user with just the wet mate to further zoom without need of a close up lens or a use with a single +6 diopter to achieve super macro.
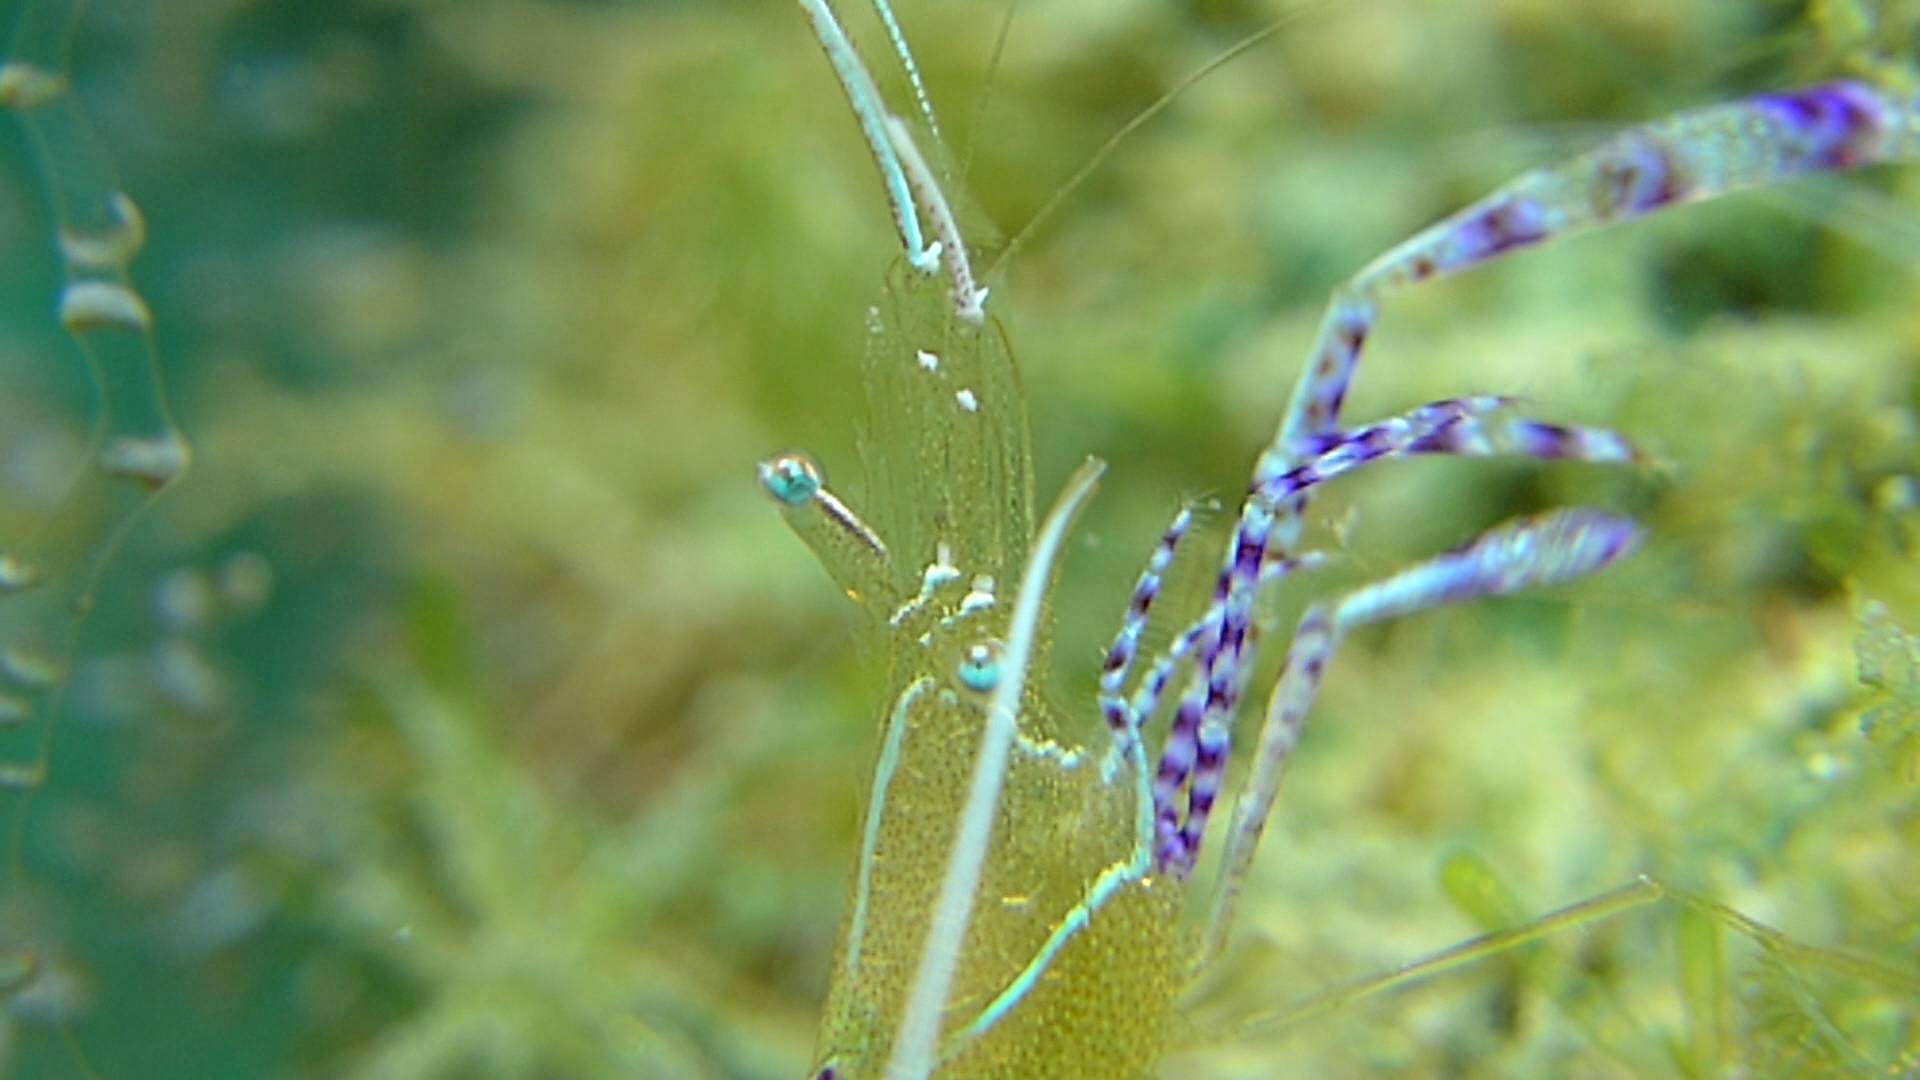
Pedersen Shrimp with two stacked UCL165AD and intelligent zoom 7.5x The frame height is less than 1cm
I found the white balance of the camera excellent on both my hand or sand. I had issues with my padi slate that many times returned a ‘scene too bright’ error. Maybe this is the reason why backscatter failed this camera for video?? Who knows.
You can see that even at 36 meters the colour are as good as they can be.
White Balance on Bianca C 36 meters depth
For macro shots I used the temperature setting at 6500K, I found the white balance tint fine tuning to be excellent to further enhance it.
I shot in shutter priority the whole time with shutter speed of 1/100 or 1/50 depending on conditions and type of shot. The camera autoISO and choice of aperture privilege noise reduction however as the lens of the LX7 is really sharp the relatively wide aperture did not mean soft corners.
I tried the various photo styles and at the end settled for the standard one, I found the natural really to have too little contrast.
I thought of shooting in mp4 for wide and AVCHD progressive for close up but this would have meant two different frame rates to edit, at the end I shot at the highest available setting to avoid confusion.
I had received a new port from nauticam so I had no vignette at 28mm and the full 100 degrees the inon lens can offer.
The ergonomics of the camera that have fixed commands for aperture and shutter proved to be convenient and the built in neutral density filter was very effective at shallow depth or on the surface.
In essence I think that the issues backscatter mention are non existent.
I did have a few problems with the wet lenses though.
Lens Marking reflection on Wet mate dome
The wet mate proved to be a great little tool very sharp and light however none of the sides of the glass have anti reflective coating. In bright scenes or backlit scenes I did not have many issues with flare however I could see the marking on the lens reflected back on the wet mate and in the picture. I suggest putting an inon anti ghost sticker or gaffer tape to hide those shining markers or to colour them with permanent black ink.
Other than this the wet mate performs very well in all reef scenes and close up of critter a few inches big.
The inon diopter did not cause any trouble other than the obvious vignetting until 70mm. One pleasant surprise is the LX7 autofocus. Having struggled with the poor focus of the RX100 at high magnification I was astonished that the LX7 finds focus even with two stacked diopters and keeps it!!! I never had to use manual focus that with the RX100 was the norm at macro range.
I had bought the UCL165 and UCL330 in m67 format but decided to sell them as I will actually switch to bayonet very soon for the wide angle.
The Inon UWL-H100 was probably the most disappointing find of the trip. Image was sharp in normal condition however this lens tends to flare quite a bit and this creates block noise in the water column in video, when I used my hand to shade the lens the flare went away. Inon sells a lens hood for the 28LD version of this lens but not for the M67 as there would be issues to align the hood petals to the frame.
Inon UWL-H100 Flare on top of the frame
Considering that the lens is very heavy in water at 350 grams and that screwing and unscrewing was a concern mid water I have decided to convert the lens into an LD bayonet. Inon sells a replacement service part for the 28LD that can be used to replace the M67 thread of the lens. Other than this part the two lenses M67 and 28LD are identical. I will use a nauticam m67 LD adapter I hope this will not increase the vignette. I will connect my AD mount close up with a AD->LD converter when using the wide angle and then use an AD->M67 converter when I use the wetmate. This saves me buying two different diopters and I can stack the two UCL165AD I already have. They do vignette a lot at medium but who cares when you shoot at full zoom.
I look forward to testing the UWL-H100 with the lens hood I am sure results will be better. On the other hand when the sunlight is behind the shots have incredible sharpness with this lens.
So the LX7 gets 5 stars from my side and I leave you with two recommendations:
1. Apply a form of anti ghost sticker to the LX7 lens
2. If you want to get the Inon UWL-H100 go for the LD mount so that you can put the lens hood on