Category Archives: Strobe

Underwater Strobe Triggers for Sony cameras

When I got my A1 I looked at strobe triggering together with lenses housing and ports as for photography you will be mostly shooting with underwater strobes.

I got in contact with Shane Smith and Cindy Shaw and I asked them what they used and what their experiences were.

Shame has recently been highly commended for UPY and provided me a detailed breakdown of the Turtle TTL trigger. I recommend having a look at his website for great shots with Sony A1 here.

Cindy instead had a Nauticam manual trigger and we exchanged some messages on the burst functionality and the rear curtain sync.

Shane also owns a Nauticam trigger and both confirmed that this trigger only works with mechanical shutter and front curtain.

I use rear curtain on certain shots so I went on the lookout for a trigger that would support it that was not TTL.

I do not want to open a discussion on manual vs TTL however I shoot flash top side and even there I never use TTL unless I have to do a documentary/product shot and I have no time to prepare.

Strobe Trigger Options for Sony

I went on the lookout for options and my research included the following manufacturers:

  • Nauticam
  • UWTechnics
  • TRT Electronics

The following table is a summary of the various units I have directly or inderectly assessed.

BrandModelPrice (€)TTLRear CurtainHSSBurstMultishotPowerProgramming required
NauticamMini Flash Trigger294NoNoNoYesNoBatteryNo
UWTechnics11075- HSS/TTL Converter485YesYesYesYesNoBatteryNo
Turtle ManualTurtle Manual299NoYesYesYesNoRechargeableNo
Turtle Smart TTLTurtle Smart387YesYesYesYesYesRechargeableYes
Strobe Triggers for Sony

Only Turtle triggers seemed to offer all the features I was looking for so I contacted Pietro Cremone at fotosub shop after a long discussion with Turtle electronics technical team who did some remote tests for me on an A1. The A1 can trigger flash with electronic shutter and this is something I was looking for.

Turtle Manual vs TTL

The turtle TTL trigger has all the feature of the manual in addition it offers TTL of course and a cool feature called multishot.

I personally do not have any interest in TTL but my main issue with this product is that in order to change for example from front to rear curtain you need to reprogram it.

I wanted a solution with no computer where I could control all settings from the camera and is not TTL. This is achieved only by the Manual Turtle Trigger.

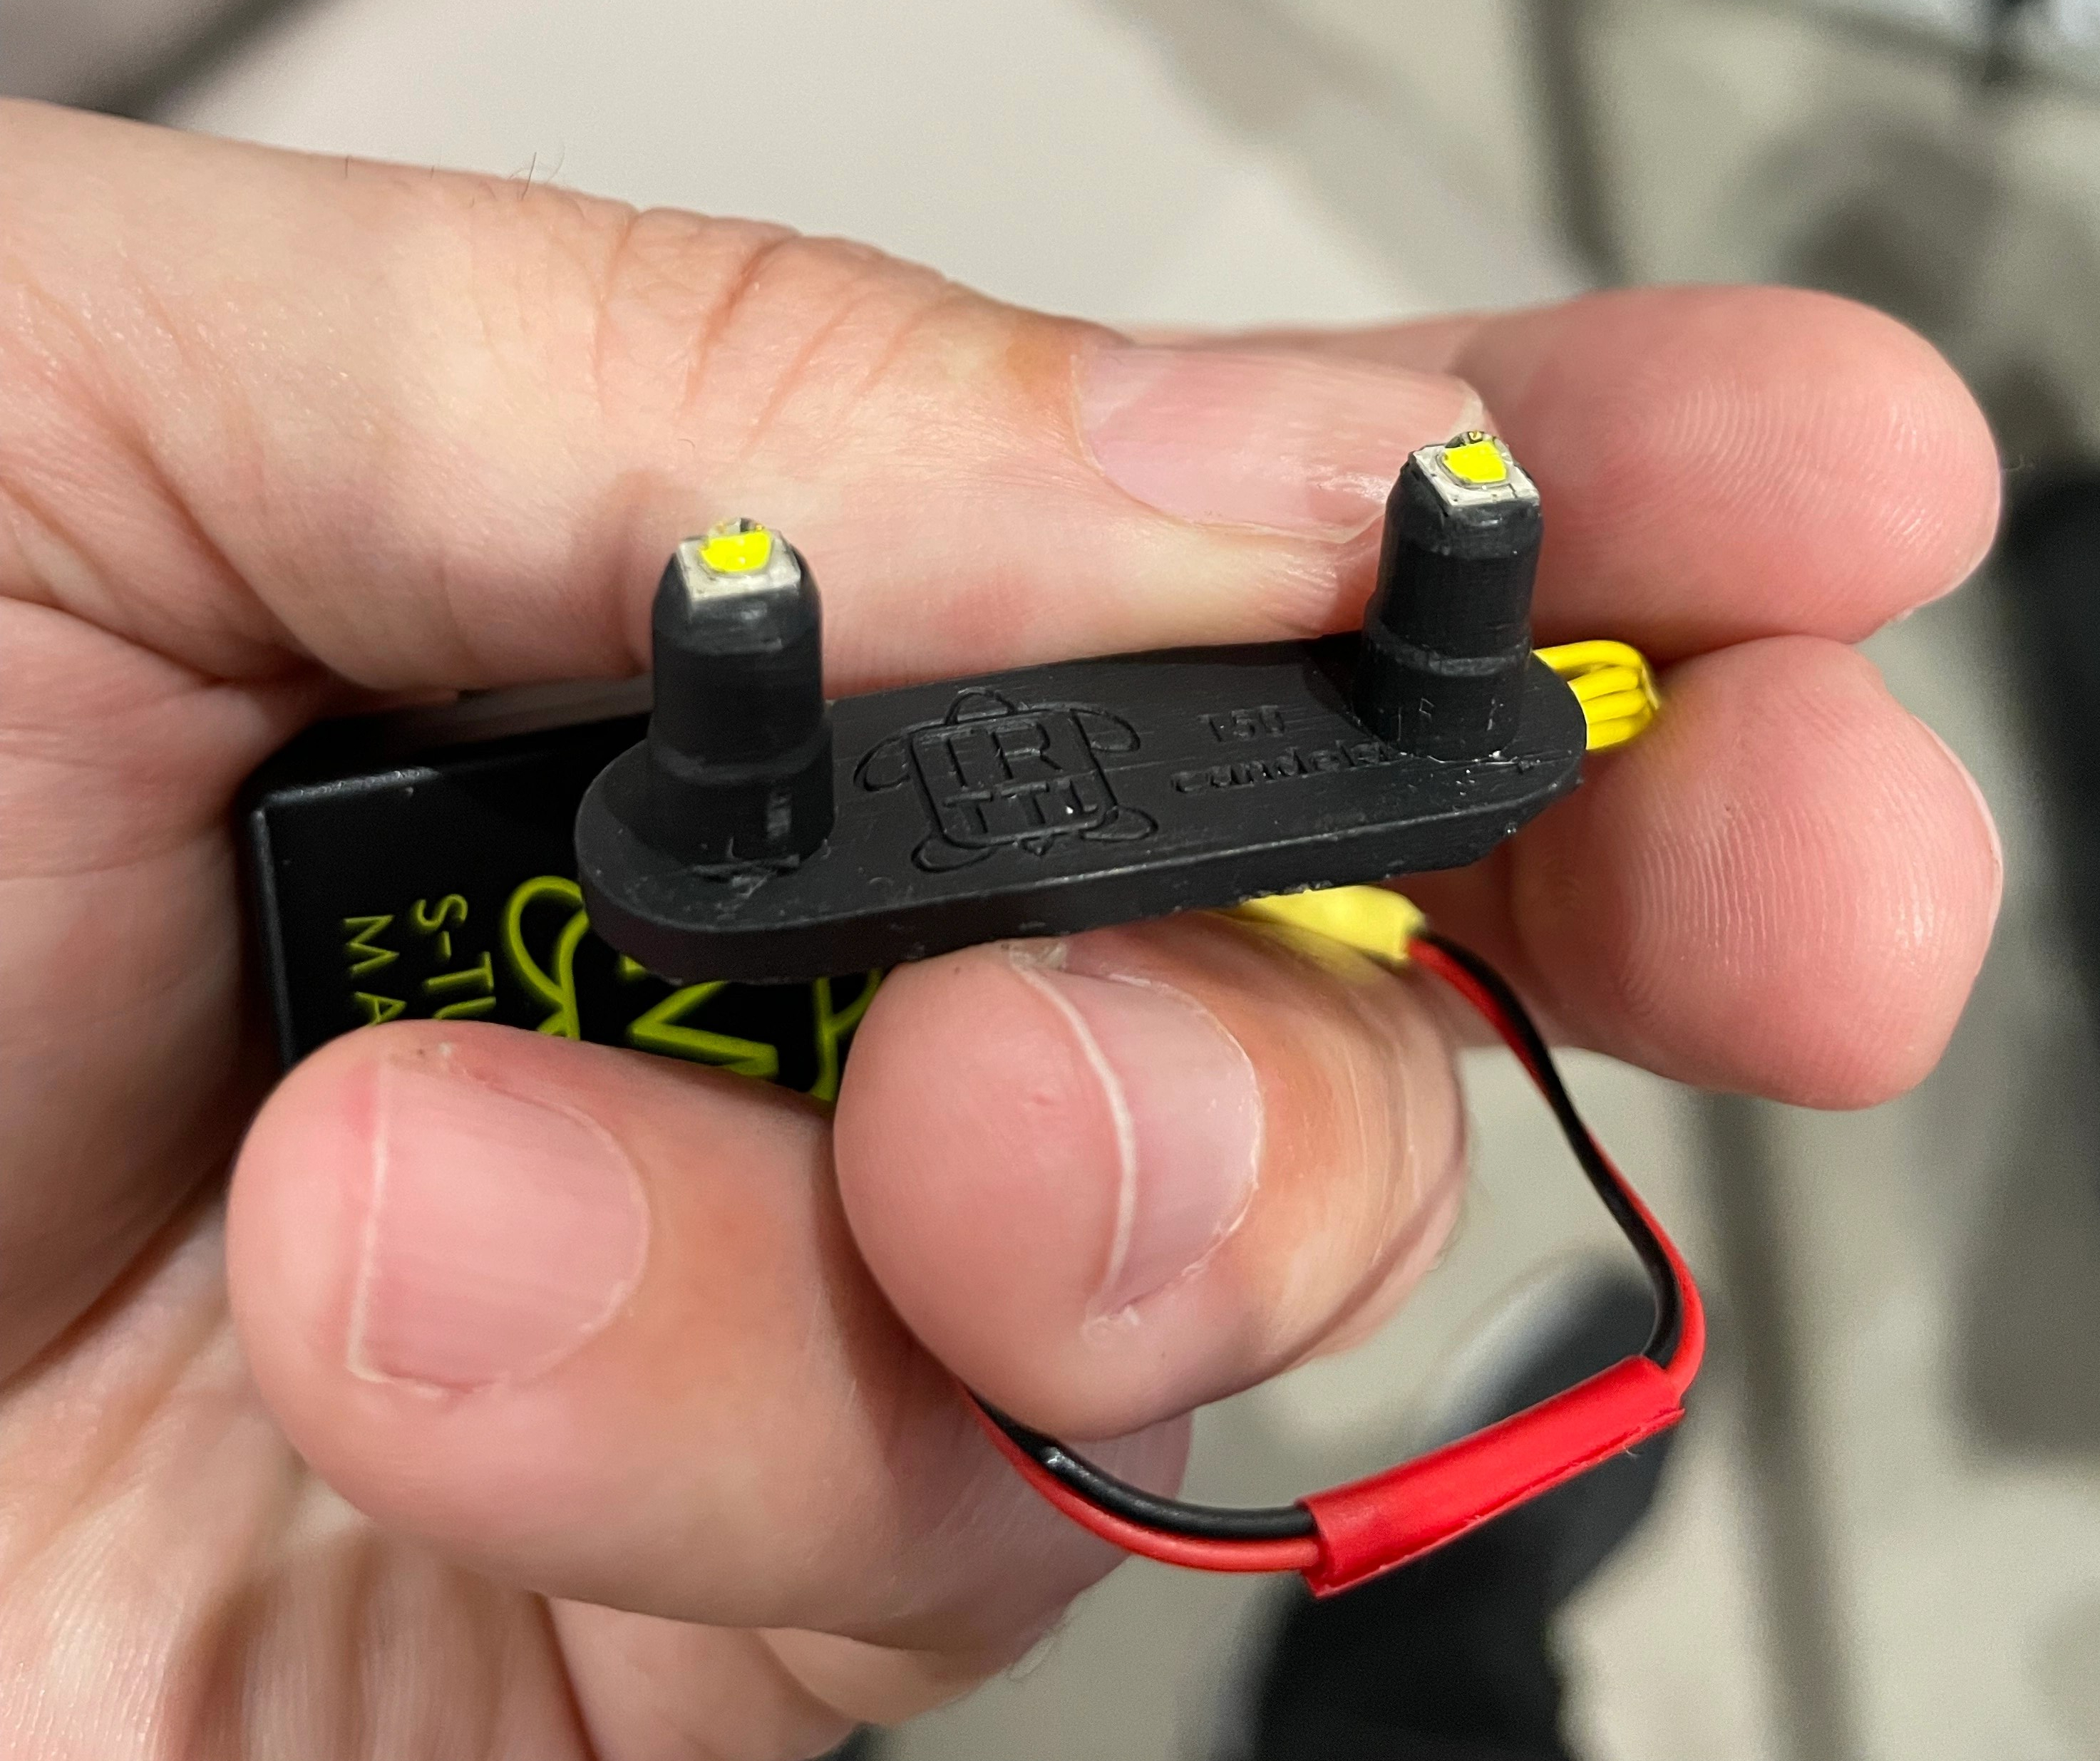
Turtle Manual Trigger In detail

The turtle manual trigger is really a joy to use and is extremely well built.

The first consideration is that it is housed with no electronics showing so an occational drop of water is not going to fry it. The second is that the battery is rechargeable. I have experience with Nauticam trigger that suddenly my strobes would stop firing consistently as the battery was low without warning. The fact that you can recharge the trigger each day or whenever you like is a great feature.

USB charging with standard micro USB

The second consideration is that the unit is really small and light.

In a hand

Finally the version I got had a convenient rubber part to inser in the housing strobe trigger sockets. This is a part from the TTL trigger that will allow to fire with cheaper cables and does not come as standard on the manual trigger, you need to request an upgrade which I warmly recommend.

So I set the trigger in my A1 housing and so far after around 1000 shots it has not failed once.

Installed

Turtle Manual controls

The good news is that well there are no controls everything is set in the camera menu. Here are the steps for my A1 but all Sony cameras are pretty much the same.

  1. MENU →  (Exposure/Color) → [Flash] → [Flash Mode] → desired setting.

Menu item details

 Flash Off:The flash does not operate.

 Fill-flash:The flash works every time you trigger the shutter. (Front Curtain)

 Slow Sync.:The flash works every time you trigger the shutter. Slow sync shooting allows you to shoot a clear image of both the subject and the background by slowing the shutter speed.

 Rear Sync.:The flash works right before the exposure is completed every time you trigger the shutter. Rear sync shooting allows you to shoot a natural image of the trail of a moving subject such as a moving car or a walking person.

This means I can set the flash mode each shot if I want to without changing any settings on the strobe or elsewhere.

In order to access the HSS mode you need to turn wireless mode on

  1. MENU →  (Exposure/Color) → [Flash] → [Wireless Flash] → [On].

This is not wireless mode but the trigger tells the camera HSS is supported and you get a indicator WL HSS. Your shutter speed is not capped anymore.

Unless you have an HSS capable strobe this setting should be left Off otherwise your photos will have the shutter in the image. I do not have HSS strobes but if you own Retra this is very useful.

Other positive points of the Turtle trigger:

  • Supports electronic shutter (only applicable to A9/A1 series)
  • Supports Speed priority with A1 (1/400 on mechanical shutter)
  • It works with SINGLE core and cheap cables when used with the upgraded LED unit

I had sourced two expensive multicore Nauticam fiber cables after my Nauticam trigger refused to shoot consistently and now with the turtle am back at shooting my 15 years old Sea and Sea cables.

Well seasoned Sea and Sea Fiber cables

It also works with ebay single core fiber home made cables.

Probably the only limitation for me is the burst speed. With electronic shutter the A1 goes at 6 fps the trigger would only fire once probably a limitation of the internal LED recharging circuit.

However in mechanical shutter it would work with the Low speed setting of 3 fps.

Take into account that the strobe will deplete its charge when you shoot continuously and the recharge time that are typical mean that when the capacitor holding the charge is empty the strobe will stop firing or fire at much lower power.

Consider the following Log2(burst speed)->minimal output power reduction required in stops for practical use.

In my case log2(3)=1.58 round up to 2 stops reduction of strobe power.

With Sea and Sea YS-D2 maximum power 32 maximum sustained burst rate 32 – 2 stops = 16 this is the maximum you can fire your strobes at.

Realistically you are not going to be able to shoot smaller aperture than f/11 with a diffuser before the strobe starts loosing power in the following shots unless you increase your ISO. This however is plenty for me and frankly it was more academic.

I want one how do I get it?

If you are UK based please send £285 using this link and one will be shipped to you within two weeks. This will ensure you have two years warranty and no paperwork import duties etc to deal with due to Brexit. The trigger will have the higher power LED as in this article.

If you are in Europe I recommend fotosub shop of the friend Pietro Cremone he deals in larger quantities and can offer great prices.

CREATIVE strobe filters for wide angle

When people think about creating lighting technique for underwater photography a few things come to mind and usually it is about tools. Snoots for example have become very popular and help the underwater photographer to increase separation of the subject from the background. I have seen some people jumping in the water with a black slate to create an artificial black background, clearly is much easier to do that for macro as everything is at end and typically the subjects are not fast moving or the diver is not fast moving.

Then of course there is strobe positioning, classic, inward, crossed, rabbit ears, backlighting etcetera here goes a long list of options.

At the end however some pictures just seem to “pop” more than others, and this usually has to do with the colours and the contrast and with the blue.

It is not a coincidence that the term Mustard Blue is what has made some shots from Alex Mustard re-known and if you read his underwater photography masterclass there is a whole section ‘The sea is blue’ where Dr. Mustard goes on about the importance of exposure and background blue.

His suggestions are to:

  1. Dial in an underexposure (for the water) around -2/3 to -1 1/3 Ev
  2. Using warm strobes

It is worth stressing out that the primary reason why the camera gets fooled by the conditions underwater is because colours gets absorbed and blue lights gets scattered instead creating that milky glare at times when the water has lots of suspended particles.

If shoot an auto mode with exposure compensation at zero your pictures will for most part come out washed out and lacking contrast underwater and this is one the primary reasons photographer like Dr Mustard do not follow the expose to the right rules.

Underexposure for the water is obtained by keeping the aperture and ISO constant as they are aligned to the strobes and changing the shutter speed accordingly. Obviously if you are shooting video your shutter speed is most likely fixed so you need to find alternative ways to get your blue as you want it but generally you would still underexpose probably not as much.

With regards to warm strobes this is a fairly subtle point linked to the camera auto white balance mechanism.

Most flash strobes have colour temperatures between 5500 and 6500 K and therefore are not at all particularly warm.

Inon Z240 Standard and Warm diffuser

Inon has developed warming diffusers for their Z240 range and I believe also for the most recent Z330 range. They are available in 4600K and 4900K temperature. I definitely recommend the 4600K version over the 4900K as it has a stronger effect.

So how does a warm strobe work in order to get a richer blue?

Table of light sources – Olympus education

When we shoot with strobes the camera is set to auto white balance, and will average for most the subject we hit with our strobes to calculate the average colour temperature and tint.

The camera auto white balance operates between 2500K and 7500K typically so a warm strobe is likely to set the colour to 4600K instead of the typical 5500K the ‘extra’ 900K do not really do anything to the subject that will anyway we white balance but give an extra kick to the blue background. Underwater colour temperature is usually higher than 9000K and easily reaches 14000K (purple tone in the water) at depth. So the warm strobes are particularly effective in shallower and clearer water as they push the blue to a darker tint like in this example taken around 12 meters.

f/8 1/125 ISO 125

You can see how deep is the blue other example taken on the Barge at less than 10 meters.

Portrait in deep blue…

So what happens if you don’t have a warm strobe or if there aren’t warm diffusers for the strobe you have, or maybe you don’t want to spend the money for them?

Amazon comes to the rescue

If your strobe is around 5250 with diffusers (like Sea and Sea YS-D2 or Inon S2000/Z240/D200) get a 1/8 CTO

Rosco Cinegel sun 1/8 CTO, 20×24″ Color Correction Lighting Filter

You can find this filter also under Lee on colour 231, with a little amount you can get a half sheet that is enough for a few strobes.

This filter has a negligible -0.3 Ev light loss and will bring your strobe down to around 4600K .

If you have a fairly cool strobe you need a 1/4 CTO

Rosco un 1/4 CTO 20X24 Amber – Rosco RS340911

If you have something different you can try a mired shift calculator here

http://www.leefilters.com/lighting/mired-shift-calculator.html

Be careful not to exceed with this technique or subject will turn too warm.

An alternative and perhaps counterintuitive approach is to use cooling filters.

In this case the strobe light will become colder to emulate the water colour and the camera will need to be set to custom white balance.

In almost all cameras except Olympus that reach 14000K colour temperatures are limited to 10000K however they can be further enhanced to reach 11000K if you have an adjustment panel like the Panasonic or Sony cameras. Pushing the adjustment to the A gives extra 1K. This technique with a bare lens has however a limitation as when the custom white balance caps the colours go completely off.

In order to see what can the colour temperature setting do we can compare a normal grey card shot with one where the colour temp is 11000K and magenta is pushed to the max.

Grey card bare lens
Maxed out Custom White balance on Panasonic GH5

In order to cool down the strobes you need a cyan filter, the custom white balance can correct up to 2 stops Cyan but no more. You can trim a sheet of Rosco 4360 to fit into your diffuser as below. This takes around 1 stop Ev off the strobe.

Sea and Sea diffuser with a Cyan 60 gel

It important to stress that the predominant colour in blue and blue water is cyan not blue and this is what gives the washed out scattering. We want to keep the deep blues and get rid of light blue and green which ultimately is cyan the colour of water.

So the strobe will emulate the water and the camera custom white balance will set the colour restoring what was lost and giving us a full correct spectrum. This however only works until the water colour temperature gets to 11000K and this is not as deep as you may think it could be a low as 9-10 meters. A cyan 60 filter is approximately 9500K. You can see the colour in the image below.

Cyan 2 Stop results in Colour Temperature around 9500K

In this technique the strobe is not used to give colour but to eliminate shadows the custom white balance is going to give a deep colour that penetrates the whole frame so any subject in the distance will be colourful as well.

The benefit of this technique is that you may use wider apertures and even slower shutter speeds like in this 1/60 example here.

batfish formation 1/60 f/5.6 ISO 200

You can clearly see the orange colours of the anthias far behind in the frame.

The ultimate stretch of this technique is to combine a filter like the magic filter this can be used with both a Cyan 2 stops and also a Cyan 3 stops in deeper water. This technique is taxing on exposure as your strobes are half power and your exposure has 1 2/3 stops less however this is easily recovered as you tend to shoot at slower shutter speeds of 1/30 to 1/60 instead of 1/125 to 1/200 because the filter will give you the deeper blues.

Magic filters on WB slate

The magic filter adds around 3000K to you camera custom white balance ability reaching the 14000K where the water starts turning purple blue. To that regards due to the amount of red I do not recommend going to deep with the magic and keep it to a max of 13 meters as recommended on their website.

The magic filter is almost a perfect match for the Cyan 60 filter if you overlap them over the lens you get almost a neutral grey card the temperature is only 150K off while the tint is around 5 notches toward green in Lightroom.

Magic Filter + Cyan 60 results in almost neutral grey card

This cave shot I believe gives an idea and is taken with filter on lens and strobes.

Magic filter plus Cyan 60

I have also tried the magic filter with Cyan 90 however there are some side effect to consider. Firstly you get Cyan cast on the image at shallower depths. Second the magic filter has a tendency to turn purple below a certain depth so I recommend to use the magic with the Cyan 60 as you are certain that the foreground subject and the strobe filter will give you a neutral colour. If you are in deeper water and the temperature is above 10000K this will only result in a deeper blue and a warmer light on the subject that once RAW corrected will look just fine.

Conclusion

In this post I have tried to give you some tips on how to use gels to give deeper blue or richer colours to your wide angle. I would recommend to start with warming diffusers and then move to cyan filters and finally to magic filter and cyan filter in combination.

I will be demonstrating extensively this techniques during my 2020 Red Sea Liveaboard

A final word for video shooters. I am not aware of any add on warming diffusers for video lights and generally I have not seen LED warmer than 5000K therefore unless you shoot at 60p 1/125 it will be very hard to get deep blue at shallow depths without a lens filter.

See my other post for video specific tips.

Full size images are available on my flickr pages all images here are reduced to 1600 pixels for storage purposes.

Red Sea Workshop with Alex Mustard – Part III Sunbursts and the Caves

On the early morning of Day 3 we left the Thistlegorm for Ras Mohammed.

Dive number one would have been on Ras Zahatar, this dive site has some great opportunities for sunburst shots in the early morning but generally not a lot of fish as the location is quite sheltered and there is never too much current that I recall.

There are also some very nice gorgonian fans around the 22 meters mark however as soon as we jumped in it was clear it was going to be a competition to have some of it. Besides not having made clear arrangements for modelling with anyone it was going to be a quite technical session.

Since the arrival of digital sunburst shots have proven to be problematic for DSLR and mirrorless users. The issue is with the sunball itself there is an issue of highlights when you try to shoot a coral reef with the sunball in the frame and you are using a shutter speed of 1/250th or 1/320th that are typical DSLR sync speed.

Mirrorless cameras do even worst as usually the base ISO starts at 200 that makes it really difficult to capture this shot.

So the key is to put the sun behind something or have the rays in the frame but not the sunball. Something like this to give an idea

Soft Coral
The sunball just behind the soft coral gives a nice glow so even with a 1/250th shutter and f/8 at ISO 100 is possible to capture a captivating scene.

Few meters away there is a gorgonian with a red soft coral on top that is really exciting to see at naked eye. To me this reminds of a frogfish head profile. It is impossible to capture this scene at 1/250th f/11 ISO 100 it is just too bright you need to reduce at least two stops to get the sun properly however if you did that on a DSLR you would be shooting at f/22 and it is near to impossible to properly illuminate the coral with your strobes at the distance required.

That is where our RX100 compact comes to help as you can sync your strobes at 1/2000th this should give a black background around the coral, the coral properly lit in the foreground as I had the strobes at full power and the sunball in the frame as well without too  many glowing highlights, this is the resulting shot
Sunburst
Note that a model would not be visible in this shot and fish would be colorful only in front of the coral or close by anyway as discussed there was not fish to model for me and this was just technical entertainment. The image is quite strong but the lack of fish makes it less interesting.

I found some cooperating clown fish on this dive however they are those with the dark eyes so despite the eye contact the shot is not as strong as it would be with a better subject
Look Right in
This is taken with a single Inon UCL-165 a luxury of having a compact and being able to wide and macro on the same dive.

Anyway I was happy with the sunburst in the frame so that dive was well worth it.

Dive two was at Jackfish Alley, and proved to be the most entertaining of the day. Who knows this dive sites knows that there are two caves, the first is wide but very dark and at certain times has turtles inside. The second is really narrow but has few cracks the provides a cathedral light effect best experienced in other site of the Southern Red Sea. Anyway we got the briefing and Dr Mustard was going to be marshaling the queue of photographer in cave number 2.

Being familiar with the dive site I knew that cave 2 is quite narrow even for normal diver let alone this big troupe of photographer so I mounted my tripod legs on the tray with a view of working in cave 1 and then move to cave 2 after the chaos was over.

Well it was real chaos as you can see from the feature image divers in the way, bubbles silt, in short it was a mess.

So I spent some time in cave number 1, this cave is really dark and you can’t really shoot handheld. In cave number 2 you can use speeds of 1/25 or 1/30 up your ISO  and put the camera on a rock whilst you take the shot, in cave 1 this results in darkness unless you go to 4 digits ISO.

So my shot on cave 1 is taken at 0.4″ f/4 ISO100.
1st Cave@Jackfish Alley
The shot is taken with the camera on the tripod using self shoot so that there is no shake from the hand pressing the shutter, this means the picture is sharp as it can be and due to low ISO also very noise free. Unfortunately fish did not feature in the shot so this is again a fairly technical shot that is not as strong as it could be.

There were other interesting opportunities in smaller cracks like this one that I like quite a lot though is not a sensational shot.
Window
I like the fact that the two snappers are one silhouette and the other full color.

After the shambles of dive 2 we moved to Shark Reef where the first dive was really more to acclimatise with the site so won’t bore you with the pictures for that dive.

In the evening the sunset dive was at Ras Katy that would have been our regular evening spot from there onwards.

On day one I was playing with dapple light and reflections

Dapple at Ras Katy
Dapple at Ras Katy


This is me taking the shot above

Interceptor Shooting Dapple

As you can see I am nearly at the surface thanks to Damo for this picture.

Near surface can also be interesting like in this case

Test Shots dapple Reflections

Here you can see part of the Snell windows together with the reef and the sunball. This shot can be made much more interesting if you focus on the reflections.

Anyway this was the end of day 3 of diving next post will be about Shark Reef and the schools of fish.

Red Sea Workshop with Alex Mustard – Part II Thistlegorm and Co

After the first day of fish portraits it was time to go and dive the Thistlegorm, this can be an amazing dive site but also very challenging as the wreck is not sheltered by any reef formation.

We got there early in the morning and attached to the wreck using the classic 3 point method: anchor, line on the bow and line on the stern we were all ready to go.

I have to say Dr Mustard prepared this very well and had a wealth of information on the wreck and the specific features.

The first dive was suggested to be a guide tour of the wreck from the outside with a limited penetration, the second would have been a penetration and the third dive a play with remote strobes (that I did not have).

As I had dived the wreck a number of times I decided to change the order so on dive number one went for a penetration of hold 2 and played a bit with the motorbikes.

There were already some others surrounding the bike as I went down so I played a bit with the divers themselves before being able to get in position.

Wreck Diving
It is amazing how much more interesting is a picture once you have a person in it. Eventually I got hold of the Bike in hold 2 also known as Elle’s bike. I looked around and there were some hatchet fish that I thought would have made the picture more interesting compared to the usual single fish in front of the bike.

Motorbike in Hold 2
I love the reflection on the fish that the strobe produced.

On dive 2 it was time to take some ambient light shots and I was expecting some divers to be around the stern that I could capture. Unfortunately the day boats had gone and the Thistlegorm was pretty empty so dive 2 was a bit of a waste as the boat itself says very little without a diver or a school of fish.

Thistlegorm Stern
Thistlegorm Stern

It could be the size of a RIB but you could not tell from here the massive size of the boat. It is quite dark at the 28 meters I took the picture so there is not a lot of color.

On dive 3 people that had them were playing with remote strobe. I fired a few shots when my cabin mate was placing his strobe, funny enough his remote strobe fired and I blackened him in lightroom so he is actually still there!
Trucks

The remote strobe creates the blue in the truck glass that would not be there otherwise.

Next trip I will take my third Z240 and the gorillapod, I have to get a remote trigger but I think this is relatively straightforward.

The briefing from Dr Mustard included map of all the bikes and trucks and suggestion for shots and strobe positioning really impressive detail there.

After 3 dives on the wreck we moved to Beacon Rock where the Dunraven rests not to dive the wreck but to experiment with dapple light.

This was a very productive dive for me I had some of the best shots in relatively poor conditions.
Dapple

The surface was not flat but this made it even more dramatic as the waves were breaking through.

There were also barracuda and goat fish shoals. The barracuda were not really cooperating so I focused on the goat fish

Special Guest

Goats

Meteor

I also had a 26º snoot this time so I played a bit with an octopus
Waiting in the dark

The good thing about the Inon snoot is that you can remove it and take normal shots with two strobes
This is the same octopus as before just to give you an idea

Side Shot

I was very happy with the performance of my RX100 Mark II one of the only two compact on the trip especially comparing to micro 4:3 that did not really look that much better.

Part 3 will be out soon with the first shots from Ras Mohammed


Red Sea Workshop with Alex Mustard – Part I

So finally the time had come to attend the Nauticam Try out with Alex Mustard.

If you have never done any of those workshops I would definitely recommend you one. It is not just the outstanding tuition but the fact that the boat will go to specific dive sites at specific times to take advantage of conditions and light for photography.

If you are keen to see the pictures this is the link to the set with the 30 images I like the most

Giant Moray

I used the RX100 for stills for the whole trip but then on the last dive I shot this short clip just to give an idea of what it was like. Note that I used the auto magic filter on the lens and by then I had ruined it a bit so the image is softer than it should be and not up to my usual standards, the purpose is to illustrate the diving style not the quality of my set up for video.

The trip started with a preliminary explanation on how things were going to work and after a static first evening on the boat we departed for Abu Nuhas the early morning after. Unfortunately the conditions were really rough so we ended up aborting and after a check dive at alternatives we went to the barge.

The objective was to shoot fish portraits, cardinal fish had eggs in their mouth, at least some of them were carrying them, so you could find yourself your fish and try to take some shots. It was apparent that due to the level of comfort of the fish I could not get close enough with my diopters to take a shot to fill the frame so I needed to crop quite a bit as in this shot.
Eggs

Hopefully the eggs are still visible. Anyway the rest of the gang had for 90% DSLR and were happily shooting portraits with their 100mm macro lens I was struggling getting anything decent so I decided to try something alternative as it was clear that if I was shooting fish mid water I would have been too far away to fill the frame.

This shot from Alex Tattersall gives you an idea of what should have come out with the right level of magnification that I could not achieve.

cardinalwitheggs

In some cases I did find more cooperative fish like those two.
BigEyes

So I put on the snoot and started looking for different things like in this shot taken with the Inon at 20º.
Grey Moray
Those little gray moray are endemic of the red sea and look quite cute. I then found a giant moray and took a series of shots this one being my favorite.
Giant Moray

The Inon snoot is a great piece of kit especially because you can go from 20º to 100º depending on the parts you combine. There are fiber optics snoot on the market that are sensational for macro but do no wide angle, the Inon snoot can do wide angle with 86º 53º 46º coverage and narrower beams of 26º and 20º for smaller things or special effects.

This is a picture of the snoot set that I would recommend to all Inon strobe users.

Wide angle Snoot
Wide angle Snoot

20 degree snoot
20 degree snoot

Inon snoot kit
Inon snoot kit

Obviously I could only capture semi static subjects with the snoot and the issue of fish portraits remains. The RX100 at 100mm equivalent requires 50cm focus distance that becomes 66cm in water. At this distance the capture area is rather large and unsuitable for smaller fish like the cardinals in the example so a solution would be to use an Inon UCL330 diopter to reduce distance to around 25-30 cm and therefore have a 2x magnification but I don’t have this lens anymore so can’t confirm. I will buy it again and do some more tests in a future trip.

I will post part II in the next days with some shots from the Thistlegorm so stay tuned

Galapagos: Sony RX100 Mark II Photos

I have mentioned the conditions we found in Galapagos in the previous post so no need to repeat myself.

One of the things I was told before going is that the last dive of the day tends to be pretty dark so not good for video, therefore I used this for photos were I was expecting to use strobes at all times.

I made a mistake as I should have taken the still rig also on the second cousins rock dive anyway I am quite happy on how things turned out considering I did only 4 dives and took 117 photos I am pretty happy I could pick 20 that I consider decent.

The whole set is here

Watching you

The rig I decided to pack at the end had 6+8 inches segment so it looked pretty cumbersome on land.

Photo RIg on Land
Photo RIg on Land

In water the setup looked like a glider with a significant wing span

Photo Rig Underwater

The reason why I took arms so long is that I was expecting sharks to be 4-6 feet away and quite a bit of particles in the water.

I was right. Just have a look at the following two shots, the first taken with a Canon S95 and a single 8″ arm.

Turtle with single strobe 8" arm
Turtle with single strobe 8″ arm

You can see the considerable amount of backscatter despite the 1/1600 shutter speed.

This is another turtle on the same dive

Turtle with twin strobes

This time two strobes on the longer arms are used, even at 1/320 this looks neat. The turtle looks bigger as the lens is not as wide as the previous, shooting distance is the same.

The arms proved to be good for the sharks as expected, I used aperture of f/4 for most shots, ISO 100/200 and shutter 1/60 to 1/125

This is emotionally the best shot

Galapagos Shark Watching me

Later on in the snorkeling trips I took couple of split shots.

Unfortunately the weather was not good and the sky cloudy so I had to play with the graduated filter.

Galapagos Penguin Split Shot

The purist will notice that the water line is not neat, as I am shooting with a wet lens the back of the lens has water as well so to avoid to see that I shoot portrait with the back of the lens in the water, which is a limitation but on a good day will produce interesting shots regardless, also the lens is only 9cm diameter and is flat (Inon UWL-H100)

I took some close ups but even the sea horses were huge so no need for close up lenses.

Giant Pacific Seahorse

Funny enough I took this at f/5.6 1/60 after reading on DXOMark that the RX100 resolution is actually better at f/5.6 than it is at f/11.

The lens is at 35mm equivalent at the shooting distance I used the depth of field is only a couple of cm and as the background is quite plain I did not bother trying a black background that I could possibly not even achieve. This was a TTL shot whilst all the sharks and wide angle were taken with the strobes in manual.

Another great feature on land of the RX100 is the panorama, which I used in Bartolome and other places

Bartolome Panorama
Bartolome Panorama

In general the conditions were very difficult and I am happy with what I could achieve in just 4 dives.

I will be taking the same arms and strobes configuration to the Red Sea in a few weeks but with the Inon UWL-100 with dome. I expect better results as the conditions are usually fabulous in comparison, probably I could do with shorter arms but once in water the set up is not heavy so I will keep it like that


Tuition Day with Martin Edge

During the London Dive Show I attended a talk from Martin where he covered a number of shooting situations and how to deal with them in terms of composition and settings.

There was a promotion for a two for one tuition day with him that my buddy was keen to take so few months later we made our way to Dorset for a day of underwater photography with Martin.

This will be my first day of shooting with the RX100 Mark II albeit in a pool with my new arms and lenses so I was looking forward to it.

We arrived in Poole the night before and got ready for an 8.30 start with Martin.

We started off with a review of some basic exposure concepts and then looked at competition winning pictures and trying to identify what makes a wow picture. It was extremely useful!

Afterwards we went through our trips pictures so he could see what needed improving. Then look at what was needed for the next trip.

With that in mind we set up to jump in the pool to take some pictures the objective was to improve my buddy close ups and portraits as apparently her wide angle is as good as it gets with the Canon S95 used see featured image on this post.

Pool conditions were low visibility and plenty of suspended particles as the pool is used for kids swimming lessons let me give you an idea!

Pool Conditions
Pool Conditions

The first task was to shoot a frog with a view of eliminating shadows in its mouth. Start with one strobe and finish off with two.

Frog at 28mm
Frog at 28mm

The frog with the bare port gives you an idea of the size and the complexity of the task with one strobe. There are shadows in his mouth.

Frog at 50mm
Frog at 50mm

I then shot a portrait at 50mm, the reason why you see shadows more on the left is because I set the strobe at different powers.

Frog single diopter
Frog single diopter

The magnification of the RX100 is little so I went on with a first Inon UCL-165 and full zoom at 100mm equivalent. Note that everything is pretty much sharp at f/11.

Frog Double Diopter
Frog Double Diopter

With two Inon UCL-165 focusing on the mouth will result in this and the eyes being in focus and the rest blurred because of lack of depth of field.

Octopus fisheye
Octopus fisheye

I then moved to an Octopus rich of textures. I took the first shot with my Inon UWL-100 28AD with dome.

Octopus at 28mm
Octopus at 28mm

The same octo at 28mm fills the frame much more of course.

Octopus at 50mm
Octopus at 50mm

The Octopus at 50mm looks even better. I have topped up the lighting on this one.

Octopus single diopter

I then took this guy with a single UCL-165 note the depth of field insufficient to keep the back of the head in focus, results though are exceptional.

Octopus double diopter

With two close up lenses we go back to the depth of field problem even at f/11.

I thought I had at that point nailed all focus and strobe issues, especially considering I shot with single auto focus, I did not bother using manual focus at all with exception of some double diopter shots.

I then tried a few surface reflections with the fisheye this being the best.

Falcon Fisheye
Falcon Fisheye

You can see the outside of the pool and the windows on the top.

Family Fisheye
Family Fisheye

Afterwards made my own composition of statues for a fisheye shot that I think came out very well. The Z240 performed extremely well in both TTL and external auto as well as manual.

Child with dog
Child with dog

Martin asked me to have a go at the child with the dog as it is extremely difficult to lit up properly.

I went for an alternative strobe placement with light from the bottom as if it was in a gallery. He was impressed with the results.

Lion Mouth Single Diopter

To finish off my last task was the tongue and eyes of a lion that I shot with a single UCL-165.

Overall a great day and I definitely recommend you the tuition day with Martin. He is a great person and extremely good at teaching I can see the benefits my buddy had right away.

Lessons learned on the RX100

There were a few things that I learned about my RX100 still rig mode that I want to share with you.

  • The autofocus is incredible. I even used this for macro. If the camera does not focus is because you don’t have enough depth of field and that is it.
  • Best macro performance is with a single diopter and also had a benefit of an increased working distance, this means the shots will need cropping for extremely small critters
  • Two diopters resulted in near bokeh with less than 1mm in focus and difficult to autofocus (though the LCD is great and I could see if things were in focus or not I think this is personal and I would recommend DMF to others)
  • Performance at wide angle with the UWL-100 28AD with dome is stellar
  • Inon float arms (I used two 6″ segments) were perfect with lens holders on it.
  • Inon Z240 twin set with one in TTL and the second in external auto delivered creative lighting without headaches, remember to buy the AUTO diffuser that does not come with the strobe
  • Strobes in manual allowed for even more creativity and the level of precision compared to sea and sea was staggering
  • Despite pool conditions the RX100 focused well in low light and much better than the Canon S95 that was returning focus error on the same exposures. I will not bother having a focus light with this camera and only have a single sola on night dives

That’s all for now any question just drop a comment


Sony RX100 Mark II Bulkhead Connection Flop

In this post I will investigate for your enjoyment the bulkhead connector available for the Sony RX100 Mark II and will see why this is unfortunately an accessory that is not worth buying. There are other ways to put the M16 port to use for example with a leak detection system but if were thinking of firing strobes using electrical sync cords then think again.

I was today at the London International Dive Show where I met Dr Alex Tattersall of Nauticam UK that also introduced me to Catherine Lai, daughter of Edward CEO and founder of Nauticam and herself operations director.

I felt a bit sorry when I had to explain why the bulkhead was not a workable solution and if you have a look at the youtube video you will understand why, this has been shot by my fiance’ on an iPhone so apologies for the portrait format and occasional shake.

Right so if you didn’t manage to hear the audio or understand the subtitles here is the plain text explanation.

The bulkhead has a single X pin that connects to the center of the RX100 multi-shoe, now this is the same interface that is on the newer Nex and on the A7. The Sony multi-shoe has a complex 21 pin interface that used with compatible accessories can trigger an external TTL flash.

In order for an external device to be recognized the interface of the connector need to connect to the 21 pin slot not just to the center. Nauticam bulkhead adapter is not so complex and only connect only on the center pin.

So the result is that the external connection is not recognized and if you leave the flash set to fill flash, as you would do with an optical connection, the internal RX100 flash pops out and fires away negating the benefit of the electrical connection.

So in order to make it work you need to set the internal flash to OFF. As the pin on the multi-shoe is always live this works perfectly so when you press the shutter the nikonos interface triggers the external strobe which is what should happen.

The little but significant inconvenient is that if you set the flash to off the LCD goes pretty much black as the RX100 has live view on the LCD and only lights up when you half press the shutter. This means is practically impossible to compose any shot unless you have a really bright focus light or there is sufficient ambient light. In any case for a close focus wide angle shot that you will take with this camera with apertures between f/8 and f/11 the screen will look pitch black as in the video even if you set the LCD to sunny weather.

Whilst the A7 and Nex have an option to disable live view in the LCD, the RX100 does not have such option so you are pretty much done and this accessory is not worth buying as it also introduces an additional point of failure for the housing and one for each strobe.

So the supposed big advantage of the Mark II goes out of the window, time to despair? Not at all!!!

As previously anticipated in my first impression post https://interceptor121.wordpress.com/2013/07/27/sony-rx100m2-first-impressions/

I had the impression that the internal flash was recycling much faster than the original RX100, well I have done some tests and I can confirm what imaging-resource has measured: the flash recycling time at full power goes from 7.2 sec of the RX100 down to 4.4 seconds of the Mark II.

Now this is significant because after your shot you need anyway 2 seconds to recharge the strobes and look at the image preview after the shot and probably another 2 seconds to recompose the shot, at that time the RX100 Mark II will be ready to shoot again at full power.

The improved CIPA rating of the Mark II also means well in excess of 200 shots at full flash before having to change the battery so there is no big deal that the electrical option is not workable, get yourself a twin set of Inon Z240 (my current favourite) or Sea and Sea YS-D1 and you will have no issues compared to any other compact as the RX100 Mark II has the highest CIPA rating of all compacts on the market that are good underwater.

In fact the most significant improvement of the RX100 Mark II in addition to the better performance in low light is certainly the strobe recycle time, from 7.2 to 4.4 is nearly a 40% improvement and the Mark II is faster to recycle than a Canon S120 although not as fast as the G15 or as fast as the Panasonic LX7 or Olympus XZ2. However we are talking about 1.2 seconds difference I doubt that is such a big deal

Clearly the RX100 Mark II is the best compact camera for both still and videos and I look forward to shooting more stills with it.