I only did 4 video dives during the trip and one of them was not really good. This is a short video of the other 3 plus the dolphin experience
Valeri did a much better job with his Sony camcorder in Gates housing and produced this outstanding HDR video
I think it was beneficial for him to be on the boat together as I saw his craft getting better and better during the trip.
The inside of the Thistlegorm are one of the highest quality video examples I have ever seen so well done Val!
I have been thinking if I should do this trip again in the future or switch to something different for example macro in the Philippine I am interested in hearing your views!
In 2018 I wrote the original article as I had acquired the GH5 and I was faced with a ton of non-sense on which format to use when I was shooting video. With the S series software stack Panasonic has made some changes to the options available and I thought it was about time to refresh the original article. As Before I will focus my analysis on 4K video and ignore other formats. This time I will be looking at the NTSC standard of 29.97 and 59.94 frames per second. This is simply because today majority of content produced by Panasonic consumer digital cameras is consumed online and all computer screen work at 60 Hz refresh rate so shooting anything different than 30 or 60 will result in choppy video. This presents some challenges if you are in a PAL zone and are shooting under artificial lights however for the purpose of this article I want to just ignore this issue, obviously you could shoot 24 fps and hope in a 24 – 30 conversion which is scatty of course. For simplicity I will refer to 30 and 60 fps and not exact values.
Today we have 5 settings for UHD
200 Mbps 420 10 Bits Long GOP 60 fps
150 Mbps 420 8 Bits Long GOP 60 fps
100 Mbps 420 8 Bits Long GOP 30 fps
150 Mbps 422 10 Bits Long GOP 30 fps
400 Mbps 422 10 Bits All-Intra 30 fps.
The last option is only available on the GH5 series and on the S1H. The first option is only available on the S series and the GH5M2.
Long GOP vs All Intra
The difference between Long GOP and All Intra is that in the Long GOP what is encoded is a group of pictures (GOP) and not separate individual pictures.
Within a Group of Pictures there are different type of frames:
I (Intra coded) frames containing a full picture
P (Predictive coded) frames containing motion interpolated picture based on a prediction from previous frames
B (bi-predictive coded) frames containing a prediction from previous or future frames
It is important to note that frames are not stored sequentially in a GOP and therefore the GOP needs to be decoded and the frames reordered to be played, this requires processing power.
The reason why H264/HEVC is very efficient is that within a group of picture there is only one full frame and the rest are predictions clearly if the prediction algorithm is accurate the level of perceived quality of long GOP is very high and similar to All-Intra clips.
This is the reason why comparing All Intra and Long Gop using static scenes or scenes with repetitive movement that can be predicted very accurately by the codec is a fundamental error.
So which format should you choose?
In order to understand the workings we need to dig deeper into the structure of the GOP but before doing so let’s evaluate the All-Intra codec.
AVC All-Intra explanation
This codec records at 400 Mbps so with 30 fps this means circa 13.4 Mbits per frame or 1.67 MB per frame and there is no motion interpolation so each frame is independent from the others. The implementation of All-Intra of the GH5 does not make use of CABAC entropy but only CAVLC coding is used, this makes the resulting files easier to read and to edit. The idea of All intra is that you don’t require powerful hardware to edit without conversion in an intermediate codec. However based on my experience this is not entirely through and you need a decent GPU to play it back and edit real time without issues.
If you consider a Jpeg image of your 3840×2160 frame on the GH5 you see that it stores around 4.8 MB per image because there is no chroma sub-sampling so if you wanted to have exactly the same result you would need to use ProRes 4444 to get a comparable quality (this not even taking into account that Jpeg are 8 bits images).
Video uses chroma sub-sampling so only part of the frame contain colours at a given time. Apple in their ProRes white paper declare that both ProRes 422 and 422 HQ are adequate to process 10 bit colour depth and 422 sub-sampling however they show some quality differences and different headroom for editing. If you count 50% for 4.2:0 sub-sampling and 67% for 422 you get around 2.34 MB and 3.5 MB frame sizes that correspond to ProRes 422 and ProRes 422 HQ individual frame sizes.
it would appear that All Intra 400 Mbps would fall short of Apple recommended bit-rate for 422 10 bit colour however practical tests show that AVC All intra at 400 Mbps is perceptually identical to ProRes 422 HQ and uses much less space. We also did some SNR measures time ago with the friend Paal Rasmussen and we did not find significant improvements shooting ProRes 422 HQ vs All-I on card.
Long GOP Codecs
Coming back to the other recording quality option we still need to evaluate how the various long GOP codecs compare relative to each other.
In order to fully understand a codec we need to decompose the GOP into the individual frames and evaluate the information recorded. If you look on Wikipedia it will tell you that P frames are approximately half the size of an I frame and B frame are 25%. I have analysed the Panasonic GH5M2 clips using ffprobe a component of ffmpeg that tells you what is exactly in each frame to see if this explains some of the people claims that there is no difference between the settings.
Link to Panasonic on the H264 implementation is here: documentation
There is unfortunately no documentation of the HEVC implementation that I have found to date.
200 Mbps 420 10 Bits Long GOP 60 fps Analysis
An analysis with ffprobe shows a GOP structure with N=30 and M=1 where N is the length in frames of the group of pictures and M is the distance between I or P frames.
This codec does not have B frames but only P frames.
Analysing a set of I frames of a fixed subject at 60 fps resulted in a frame size of 1.16MB for the I frames. This value is quite low however we need to understand that HEVC is much more efficient than H264.
I shot this test video time ago comparing the recording of this codec with a Ninja V in ProRes 422 HQ. As you can see no major differences however I have not pushed the grading in the clip.
The speed ramps in this video use this codec
150 Mbps 420 8 Bits Long GOP 60p Analysis
An analysis with ffprobe shows a GOP structure with N=30 and M=3 where N is the length in frames of the group of pictures and M is the distance between I or P frames.
So each Group of Pictures is made like this
IBBPBBPBBPBBPBBPBBPBBPBBPBBPBB before it repeats again.
Analysing a set of I frames of a fixed subject at 30 fps resulted in a frame size of 1.26MB for the I frames.
One very important aspect of the 150 Mbps codec is that as the GOP is double the length of the single frame rate 100 Mbps codec there are the same number of key frames per second and therefore it is NOT true that this codec is better at predicting motion however the additional frames result in better slow motion performance than what is done in software in majority of cases.
100 Mbps 420 8 Bits Long Gop 30 fps Analysis
An analysis with ffprobe shows a GOP structure with N=15 and M=3 where N is the length in frames of the group of pictures and M is the distance between I or P frames.
So each Group of Picture is made like this
IBBPBBPBBPBBPBBP before it repeats again.
Analysing a set of I frames of a fixed subject at 30 fps resulted in a frame size of 1.49MB for the I frames which is the highest if we exclude All I.
150Mbps 422 10 Bits Long Gop 30 fps
An analysis with ffprobe shows a GOP structure with N=15 and M=1 which means this codec does not use B frames but just I and P frames so the GOP structure is as follows:
IPPPPPPPPPPPPPP before it repeats again.
Analysing a set of I frames of a fixed subject at 30 fps resulted in a frame size of 1.25MB for the I frames.
H264 Codec Ranking for Static Image Quality UHD
So in terms of absolute image quality and not taking into account other factors the Panasonic GH5M2 and S series Movie recording settings ranked by codec quality are as follows:
400 Mbps 422 10 Bit All intra 30 fps (1.67 MB per frame)
100 Mbps 420 8 Bit Long Gop 30 fps (1.49 MB per frame)
150 Mbps 420 8 Bit Long Gop 60 fps (1.26 MB per frame)
150 Mbps 422 10 Bit Long Gop 30 fps (1.25 MB per frame)
The 100 Mbps and 400 Mbps codec are marginally different with the 150 Mbps long GOP really far away.
Note that as the technology is different I cannot directly compare the new 200 Mbps codec however based on visual impression and ability to grade I would recommend this over the 150 Mbps 420 8 bits
Conclusion
If you have a camera that has the 400 Mbps All Intra this remains the best format to use. V90 cards have dropped in price and are now available up to 256 GB. Unfortunately this option is only available on the GH5 series and on the S1H.
If you have a camera that does not have the All-I you can of course purchase an external recorder that in some cases will allow you to shoot RAW however this is not necessarily going to give better image quality and will definitely extend your processing time.
My revised advice, if your camera does not have the ALL I and you don’t have an external recorded, is as follows:
Use the 100 Mbps Long Gop codec it is very efficient in the compression and the perceived quality is very good. You need to get the exposure and white balance right in camera as the clips may not withstand extensive corrections. There is a risk with footage with a lot of motion of some errors in motion interpolation that can generate artefacts but this based on experience is not very high.
Use the new 200 Mbps HEVC for double frame rate it is not hard to process as HEVC 10 bits has hardware acceleration on all platforms.
Generally there appears to be no benefit using the internal 422 10 Bit codec nor the 420 8 bit double frame rate due to the limitations of the GOP structure, in addition the lack of hardware acceleration for H264 10 bits means you will need to convert the files for editing and they do not open with standard programs or load on phones or tablets. The same is true for All Intra but at least you can edit it ok.
To conclude this is a summary table with all key information
Additional Considerations
A certain number of GH5 users have upgraded to the S5, I was one of them until I sold the camera after 1 month of using and after buying a Ninja V. If you are a Panasonic S1/S5 user you need not only to contend with recording time limits but also with lack of codecs on the camera to fully use the potential that it has. You need to add an external recorder to really see the benefits because in real life situations you are not shooting a step chart so the dynamic range is destroyed by compression quality and errors and SNR drops. It would be interesting to test how does the GH5M2 400 Mbps compare with one of the S cameras using the 150 Mbps 10 bit codec but this is not something I did. I would only warn everyone going down that path that you may get less than what you think and you may require additional hardware to get there. Take also into account that S series only shoot 50/60 fps in APSC/Super35 mode and that in full frame mode there is a substantial amount of rolling shutter that makes pans and tilt practically not possible.
The previous post on the technical nature of V-LOG has stirred up quite a bit of unset among those people that advocate the use of it as a preferred gamma for video capture. In this post I will show some data point to help you make an informed decision based on what you are planning to shoot in your video project.
Basics of Display Gamma and Dynamic Range
First of all a bit of background on gamma curves. The standard video gamma is based on a correction factor of 0.45 as screen decode it with the reciprocal value 2.22.
Cinema gamma is historically based on a value of 1/2.6 as projectors decode with a gamma of 2.6.
Today most of our content is consumed on phones, monitors or Tv screens as well as of course cinemas but for the purpose of this post I will assume we do not have a real ambition to project in cinemas.
To give some ideas of the dynamic range of the display consider those values
Phone (HDR)
9+
Computer Monitor
10
Tv (1886 HDTV)
11
HDR Tv
13+
Projector
16+
Typical Display Dynamic Range
It is important to understand how the content we produce will be consumed when we capture our source material as otherwise our video pipeline may be suboptimal.
Mobile phones and tablets are now the predominant platform to consume content and looking at the table above this means that in terms of dynamic range there is not a high requirement. In addition phones and computer monitors may also not be particularly accurate in terms of colour rendition.
HDR content, due to lack of widespread compatibility, is growing on mobile phones but remains a product for high end platforms such as HDR TVs and Projectors.
It follows that content that will be displayed at the best quality on the most common platforms has pretty limited requirements in terms of dynamic range and other qualities are perhaps more important such as sharpness, low amount of noise, colour rendition and delivery of what looks high contrast on a limited contrast medium.
A further obvious consideration is that standard rec709/sRGB video is limited to 10 stops of dynamic range in the display (contrast ratio 1000:1) while new TV sets aligned to BT.1886 can display 11 stops )(Contrast ratio 2000:1). So no matter how you acquire if you end up in rec709 the dynamic range is limited and it becomes more important to accurately capture tones and colors.
Gamma Curves for Capture
As explained capture gamma is the reciprocal of display gamma and therefore majority of cameras capture a standard video gamma (0.45) or in some cases an HDR gamma (logarithmic). I do not want this post to become a deep dive on HDR video of which I have written enough however to stay on course I want to compare traditional gamma (non linear) and log gamma.
In the following graph you see the bit codes output vs input of a standard video gamma (1/2.2) a cine gamma (1/2.6) and a log gamma (v-log).
Bit code mapping for 14 bits linear sensor data
In broad terms you can see that a video gamma produces an output of 3865 vs 16383 bits, a cinema gamma sets at 3166, while a Log gamma can take all 14 bits of data and still be within bit value 960.
It follows that to store the whole set of values read at 14 bits into a 10 bits container a standard gamma needs to do some scaling while a log gamma does not need scaling to fit into a 10 bits container. This also explains why exposure values in log are 2 stops higher than standard video for a 14 bit range, while for a 12 bit range the offset is one stop. As the meter is using a standard RGB gamma all values are rescaled back.
You notice that at no point here I have made references to dynamic range. The camera dynamic range is solely related to the maximum well capacity vs the read noise and it does not relate to the gamma curve being used, however the different compression of the gamma curve have an effect on how tones are mapped and on the perceived dynamic range.
Camera Dynamic Range vs Display Dynamic Range
The overall camera dynamic range influences what you can do with your content and if it is worthwhile to produce an HDR version or not.
If we compare the previous table of display dynamic range vs camera dynamic range and we focus on nominal values (SNR=1) and photographic (SNR=20) we can see what device we need for our purpose.
Camera Type
DR
PDR (SNR=20)
Compact
12.9
9.8
MFT
12.3
10.3
APSC
14
11.1
Full Frame
14
12.2
Dynamic Range by Sensor Type
We can see that if all we need to do is to output on a mobile device or a computer monitor smaller sensor are adequate, however for HDR production larger format are preferred. Obviously we can stretch SNR to lower values and this will upgrade the above table of 1 stops or so but not change our reasoning substantially.
Gamma curves vs Bit codes mapping
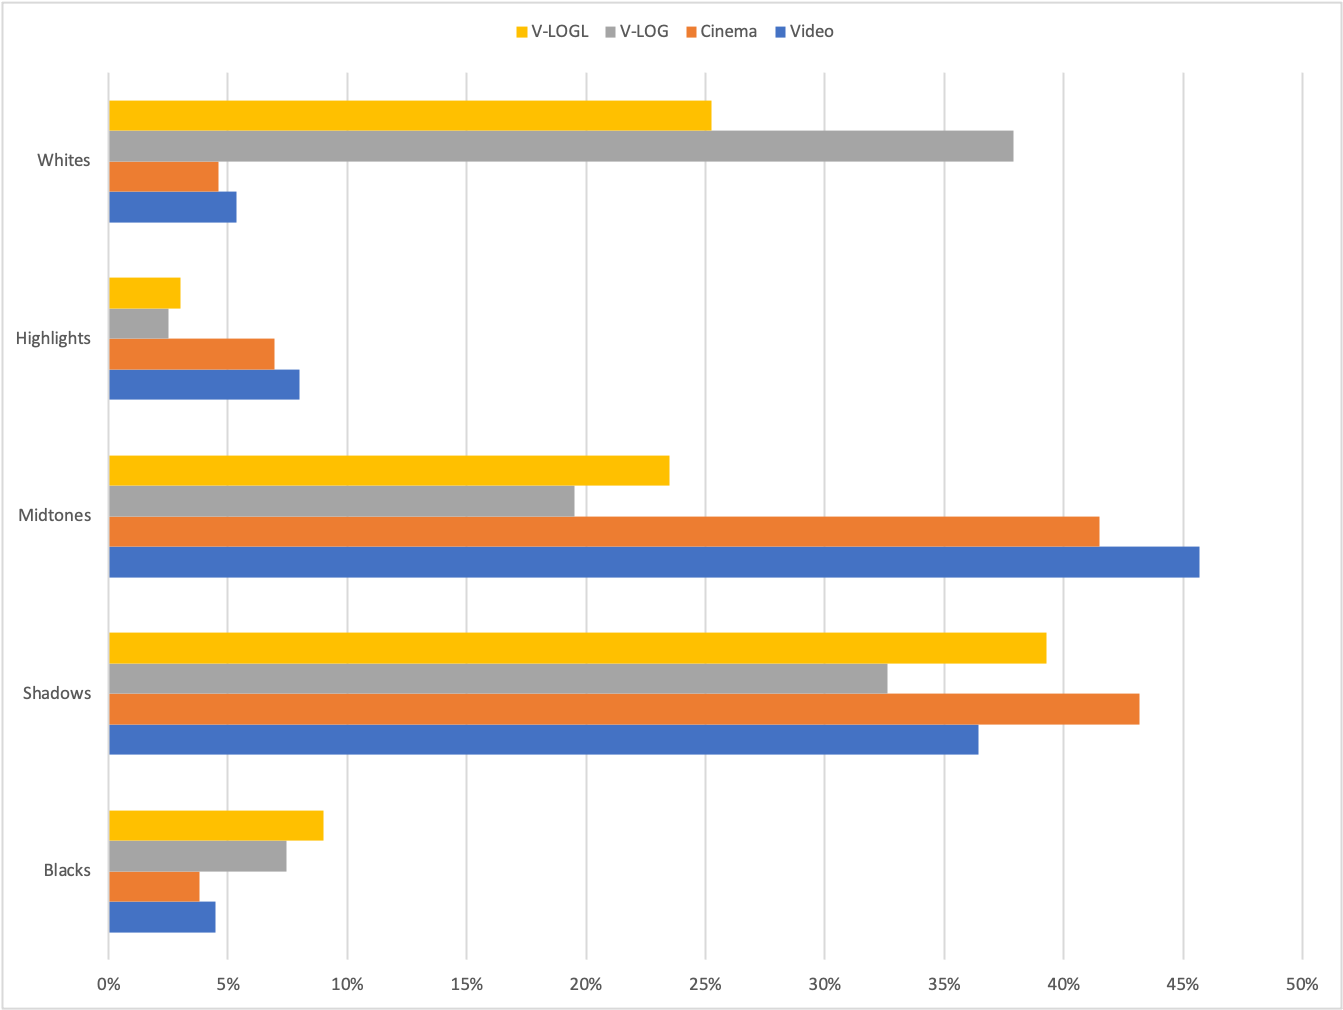
The various gamma curves have a different distribution of tones (bit values), in this table I compare a video gamma vs cinema a reduced 12 stops log and a full Vlog for a full frame sensor camera.
For the purpose of this comparison blacks are bit codes in the lowest 10%, Shadows are up to 18%, midtones up to 75%, highlights up to 90% and whites above. Blacks and whites do not have color information but just brightness while shadows, midtones and highlights contain respectively dark, medium and light hues.
Distribution of tones vs Gamma
A standard video gamma has over 45% of midtones, those are the colors and tones with intermediate values so produce softer tones. Shadows are just above 35% with highlights under 10% and blacks and whites around 5%.
If we look at a cinema gamma we can see that shadows are now predominant and very close to the midtones, highlights, whites and blacks are compressed.
V-LogL (12 stops DR 12 bit implementation) has the largest range in shadows, midtones are compressed around 50% compared to a video gamma, blacks are subtantially more than a video gamma, and while highlights are compressed, whites are super whites are greatly expanded.
Full VLog is dominated by whites that make 38% of the bit values, Shadows are at 32% with midtones now under 20% and highlights compressed. Blacks remain expanded.
Choosing a Gamma Curve for your Video Project
Our decision tree starts from the content which determines the device we need. Once we have a device capable of a given dynamic range we can make appropriate choices in terms of gamma curve.
Broadly speaking compact cameras and micro four thirds do not have enough device dynamic range at sufficient level of SNR to justify a high dynamic range gamma. There are some very specific exception where this may be worth it (Panasonic GH5s) but in general terms a standard MFT camera for photography should be limited to video or cinema gamma for optimal results as the dynamic range is limited and compression is not required.
If you own an MFT camera your choice is between a video gamma and a cinema gamma. Depending on the look you want to achieve you may choose one or the other. Video gamma has generally more contrast (more blacks and highlights and whites) while Cine gamma has a balance between midtones and shadows but not strong blacks and whites giving overall a softer look.
If you own a full frame or apsc camera you have more options which means you need to think more about the gamma curve to be used. HDR content requires a log curve you can then decide to use a cinema or video gamma if you do not want to output HDR or want to achieve a different look. It is important to note that log gamma have lots of bit values in whites and super whites and those do not exist in many typical scenes.
Scene vs Dynamic Range
While the current effort of camera manufacturers is to promote high dynamic range the reality is that in most cinematography situation you use devices that reduce contrast and therefore dynamic range (think about pro mist filters).
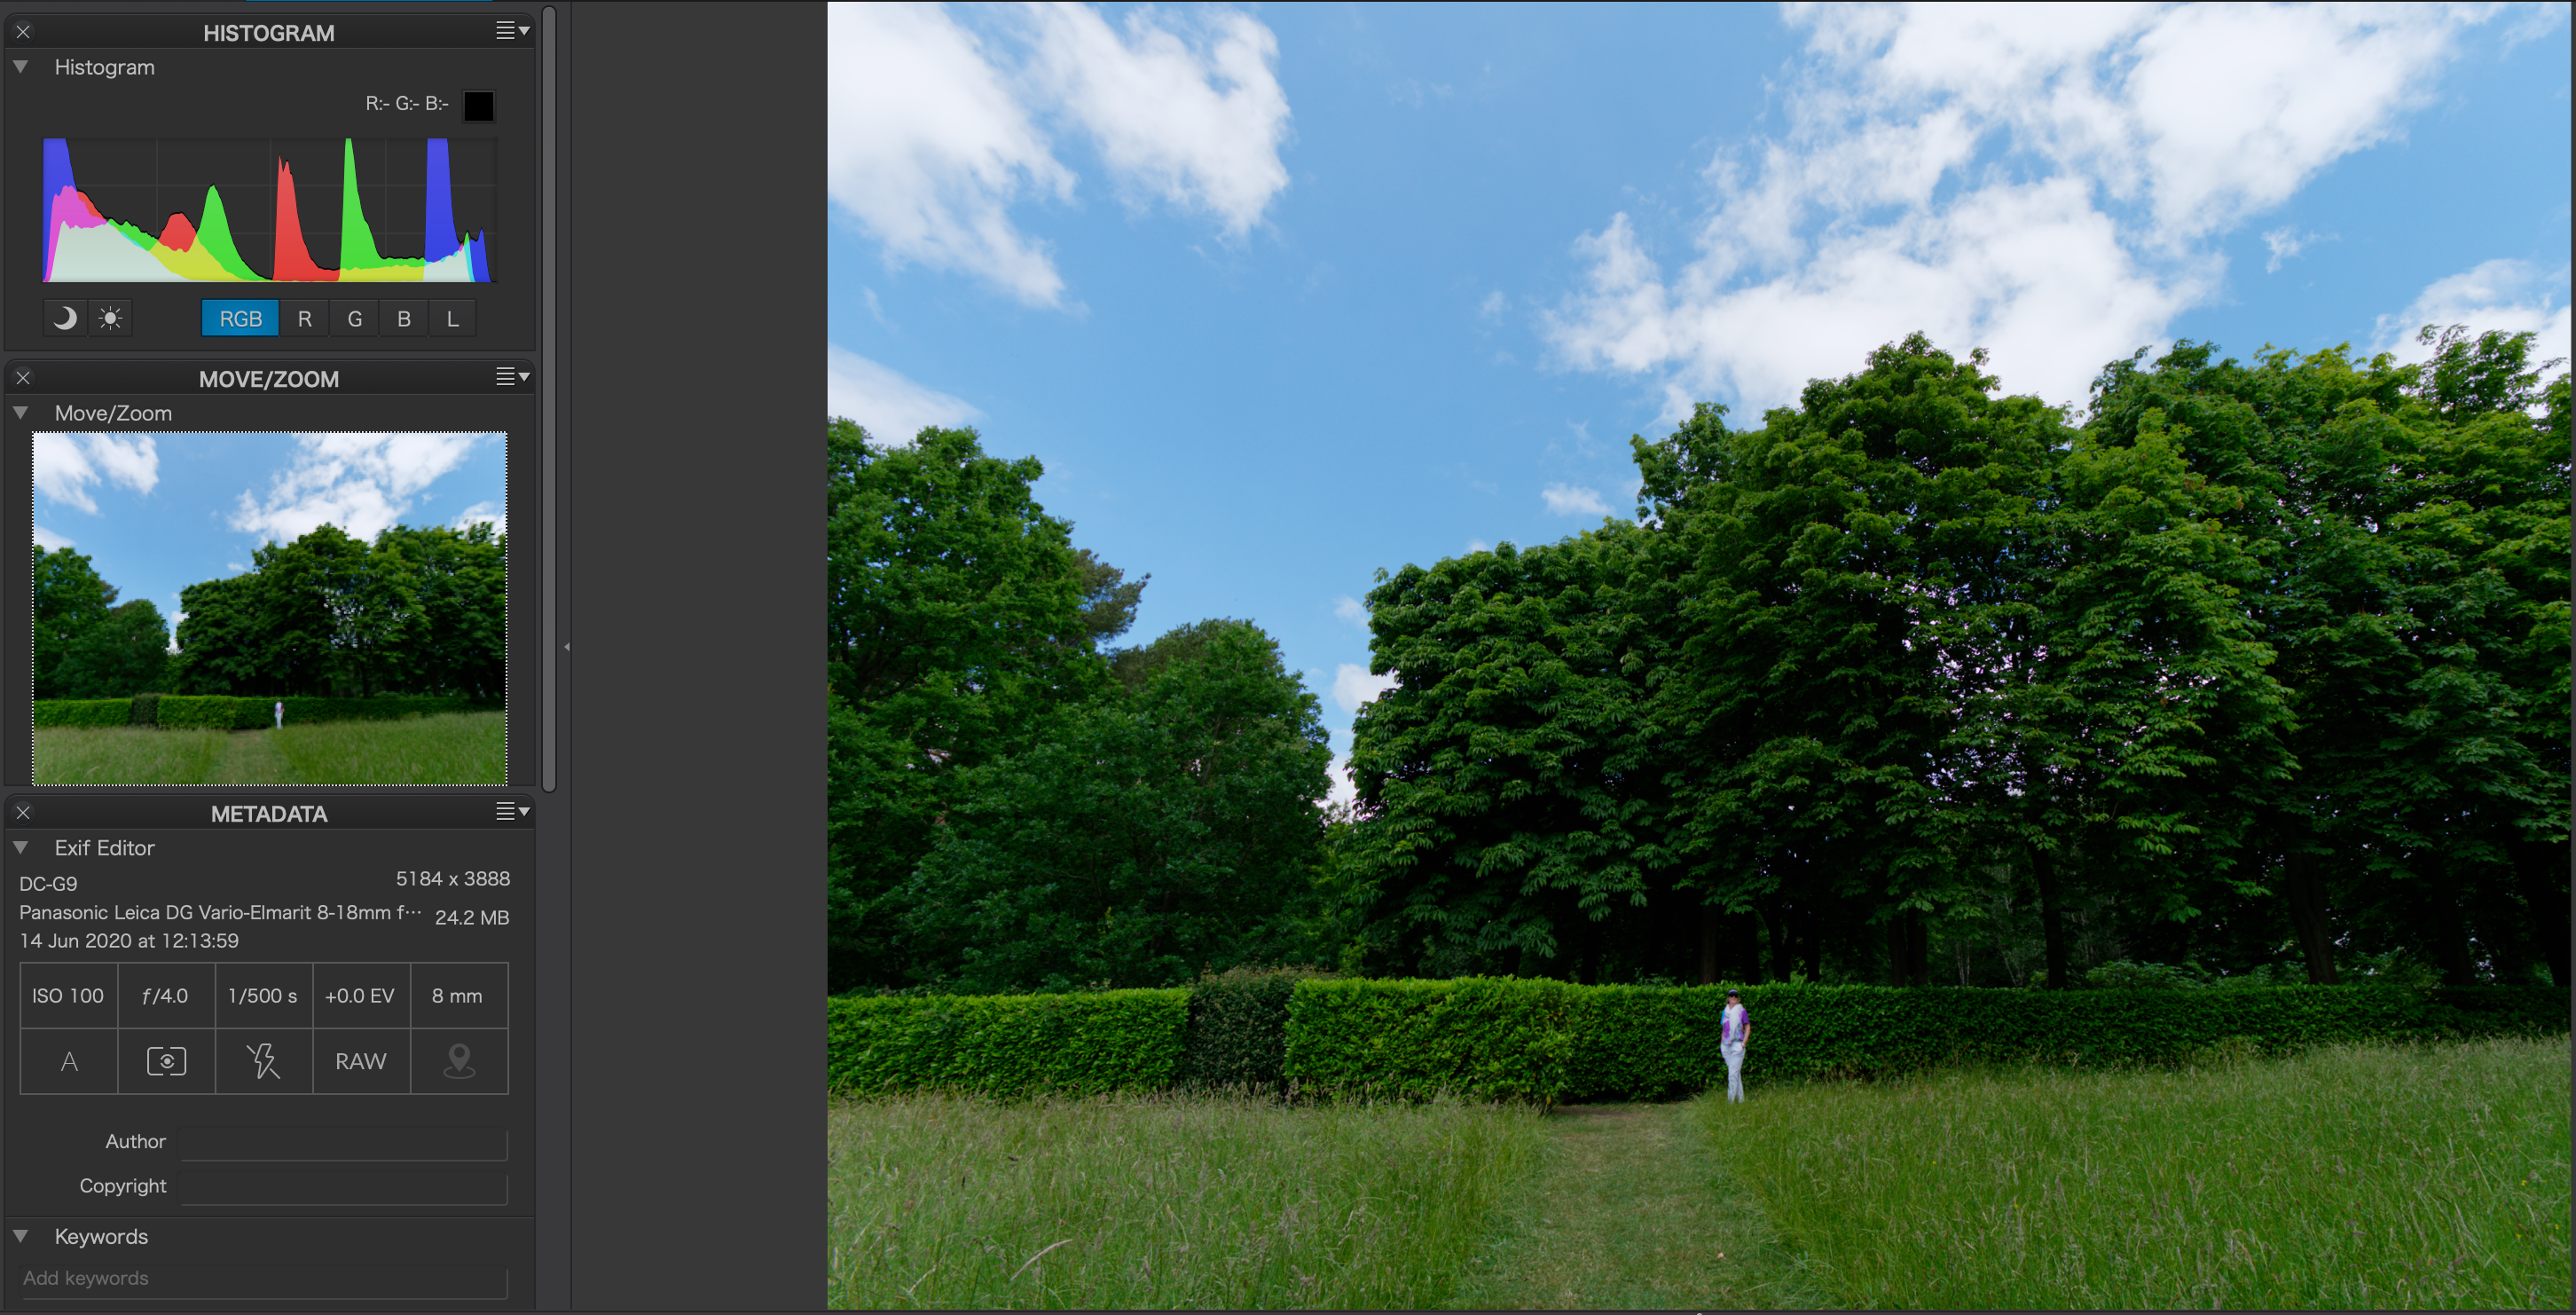
The DR of a scene can be evaluated looking at the histogram. This is of course influenced by the gamma curve so it is important to do this evaluation taking a photograph not video.
The following are example of scenes with the underlying histogram.
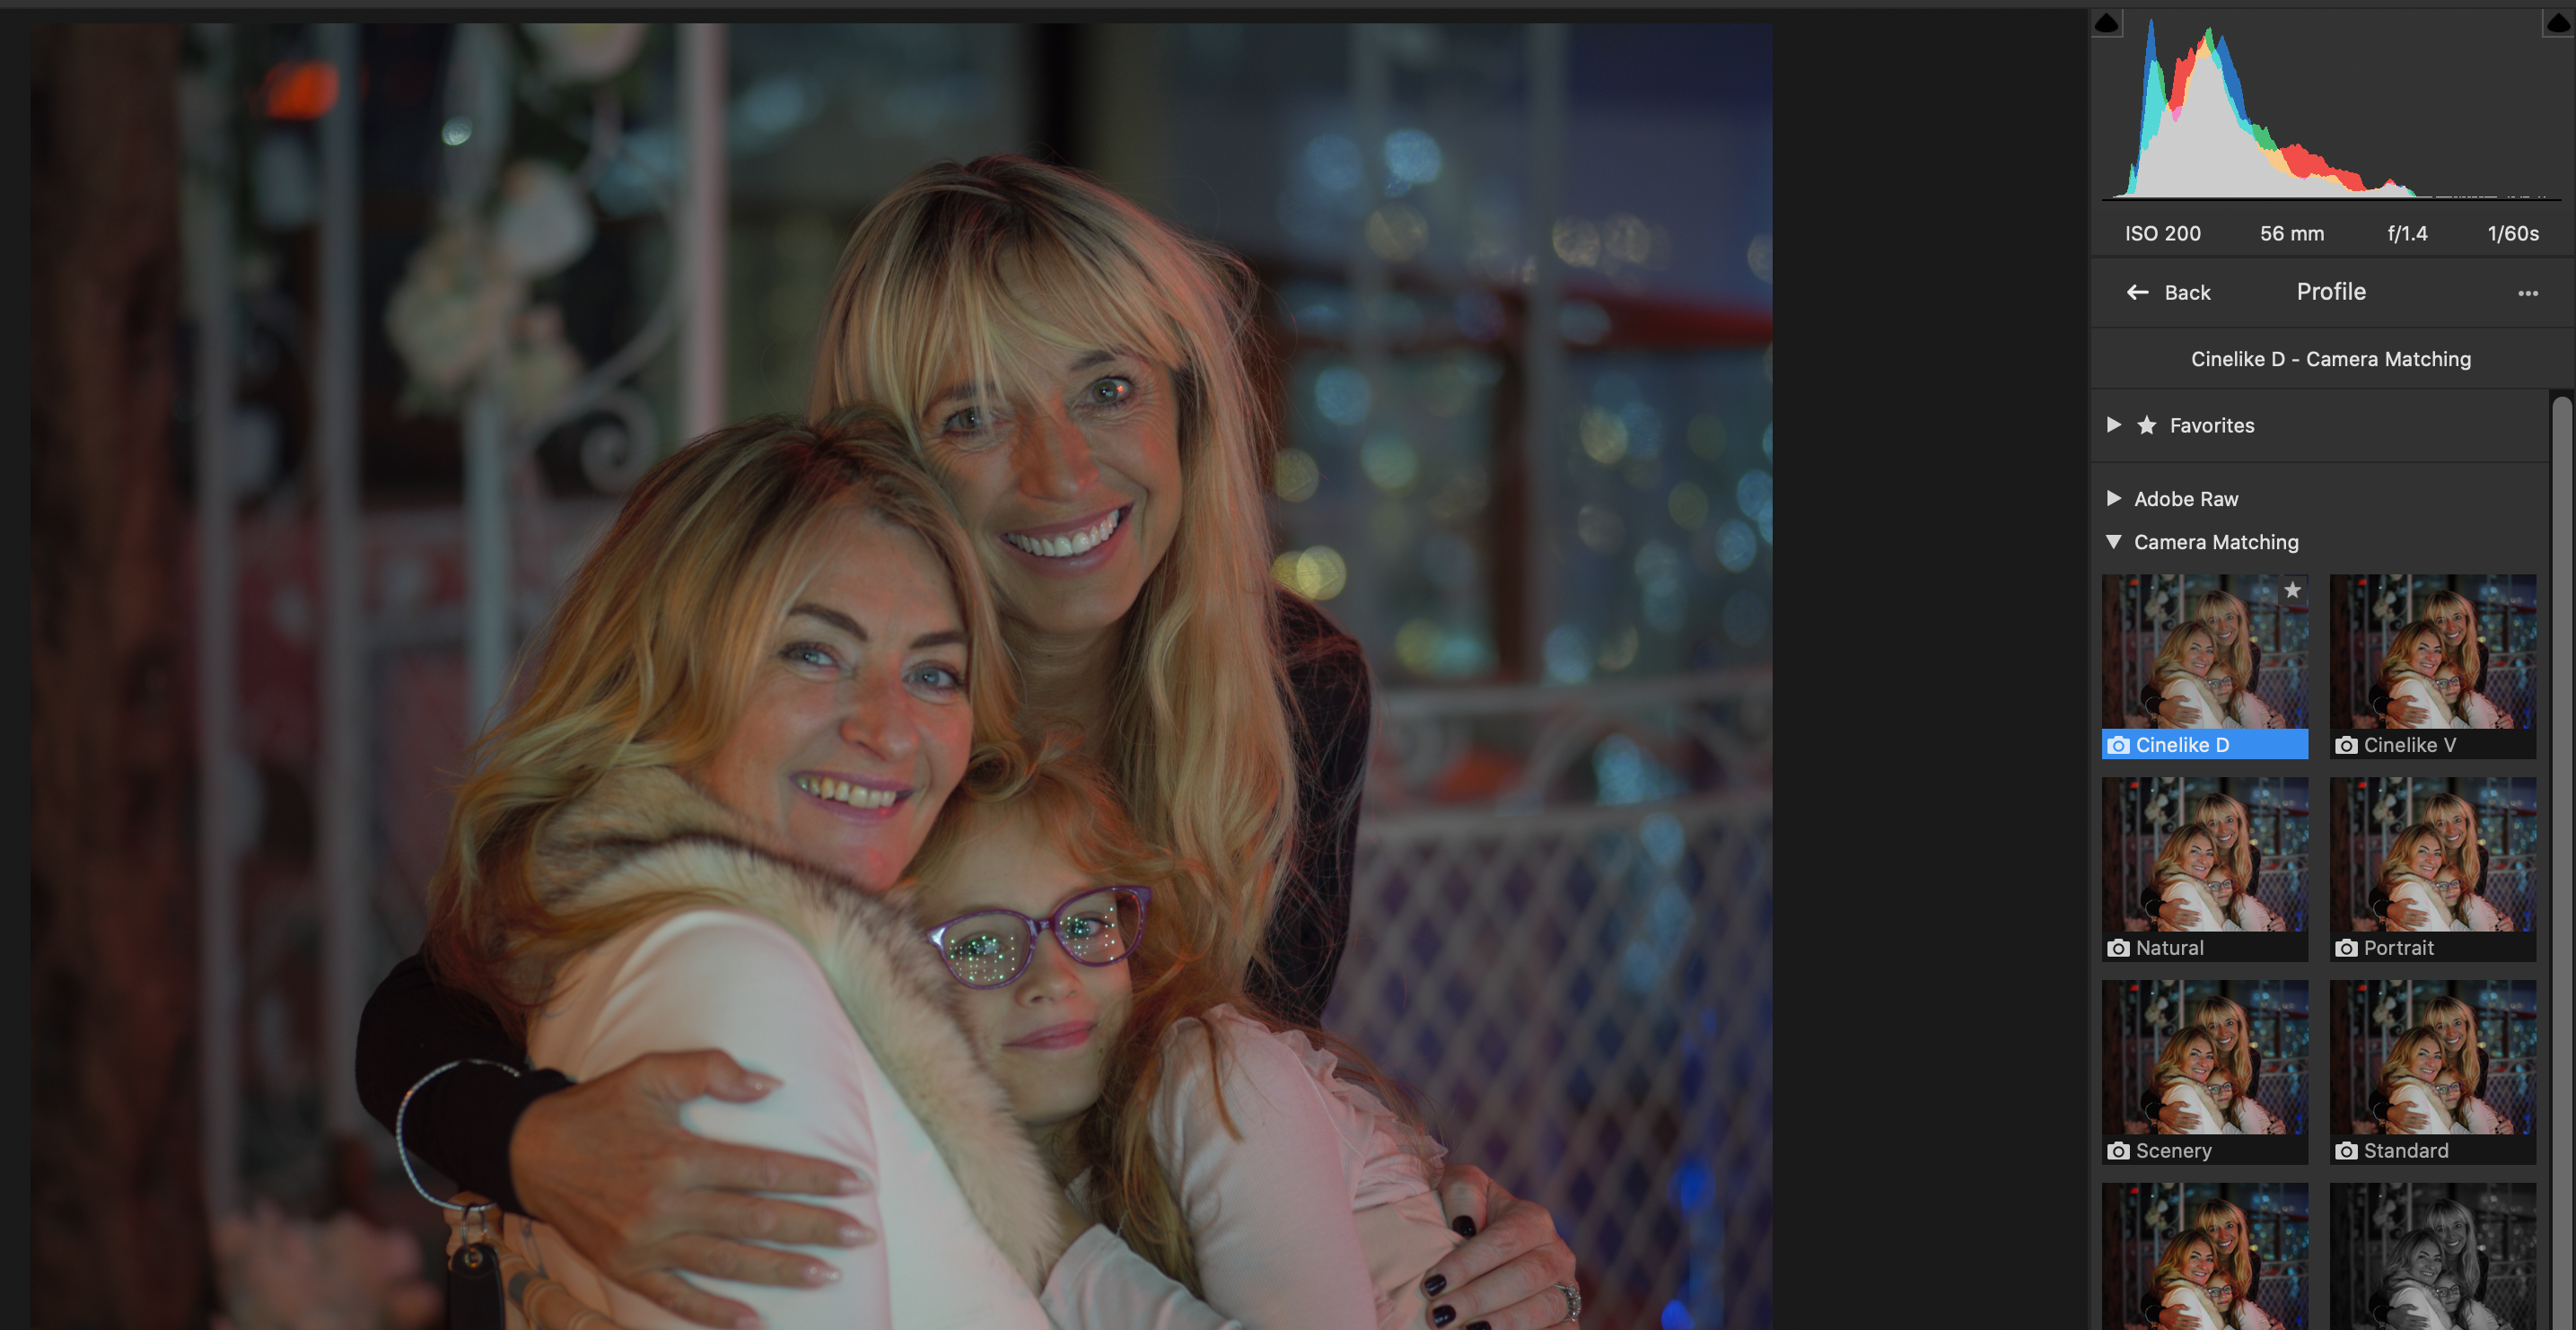
High Dynamic Range scene note the shape of the histogram with peaks on darks and lightsindoor scene with mostly midtonesLow contrast portrait despite the light backgroundUnderwater landscape that does not have as much DR as you would thinkMoth image predominant in midtonesOutdoor image with low dynamic rangeTypical indoor party scene with flash does not have significant dynamic rangeThe same portrait with a cine gamma sees enhanced shadows and lighter overall image but with bright tones subdued
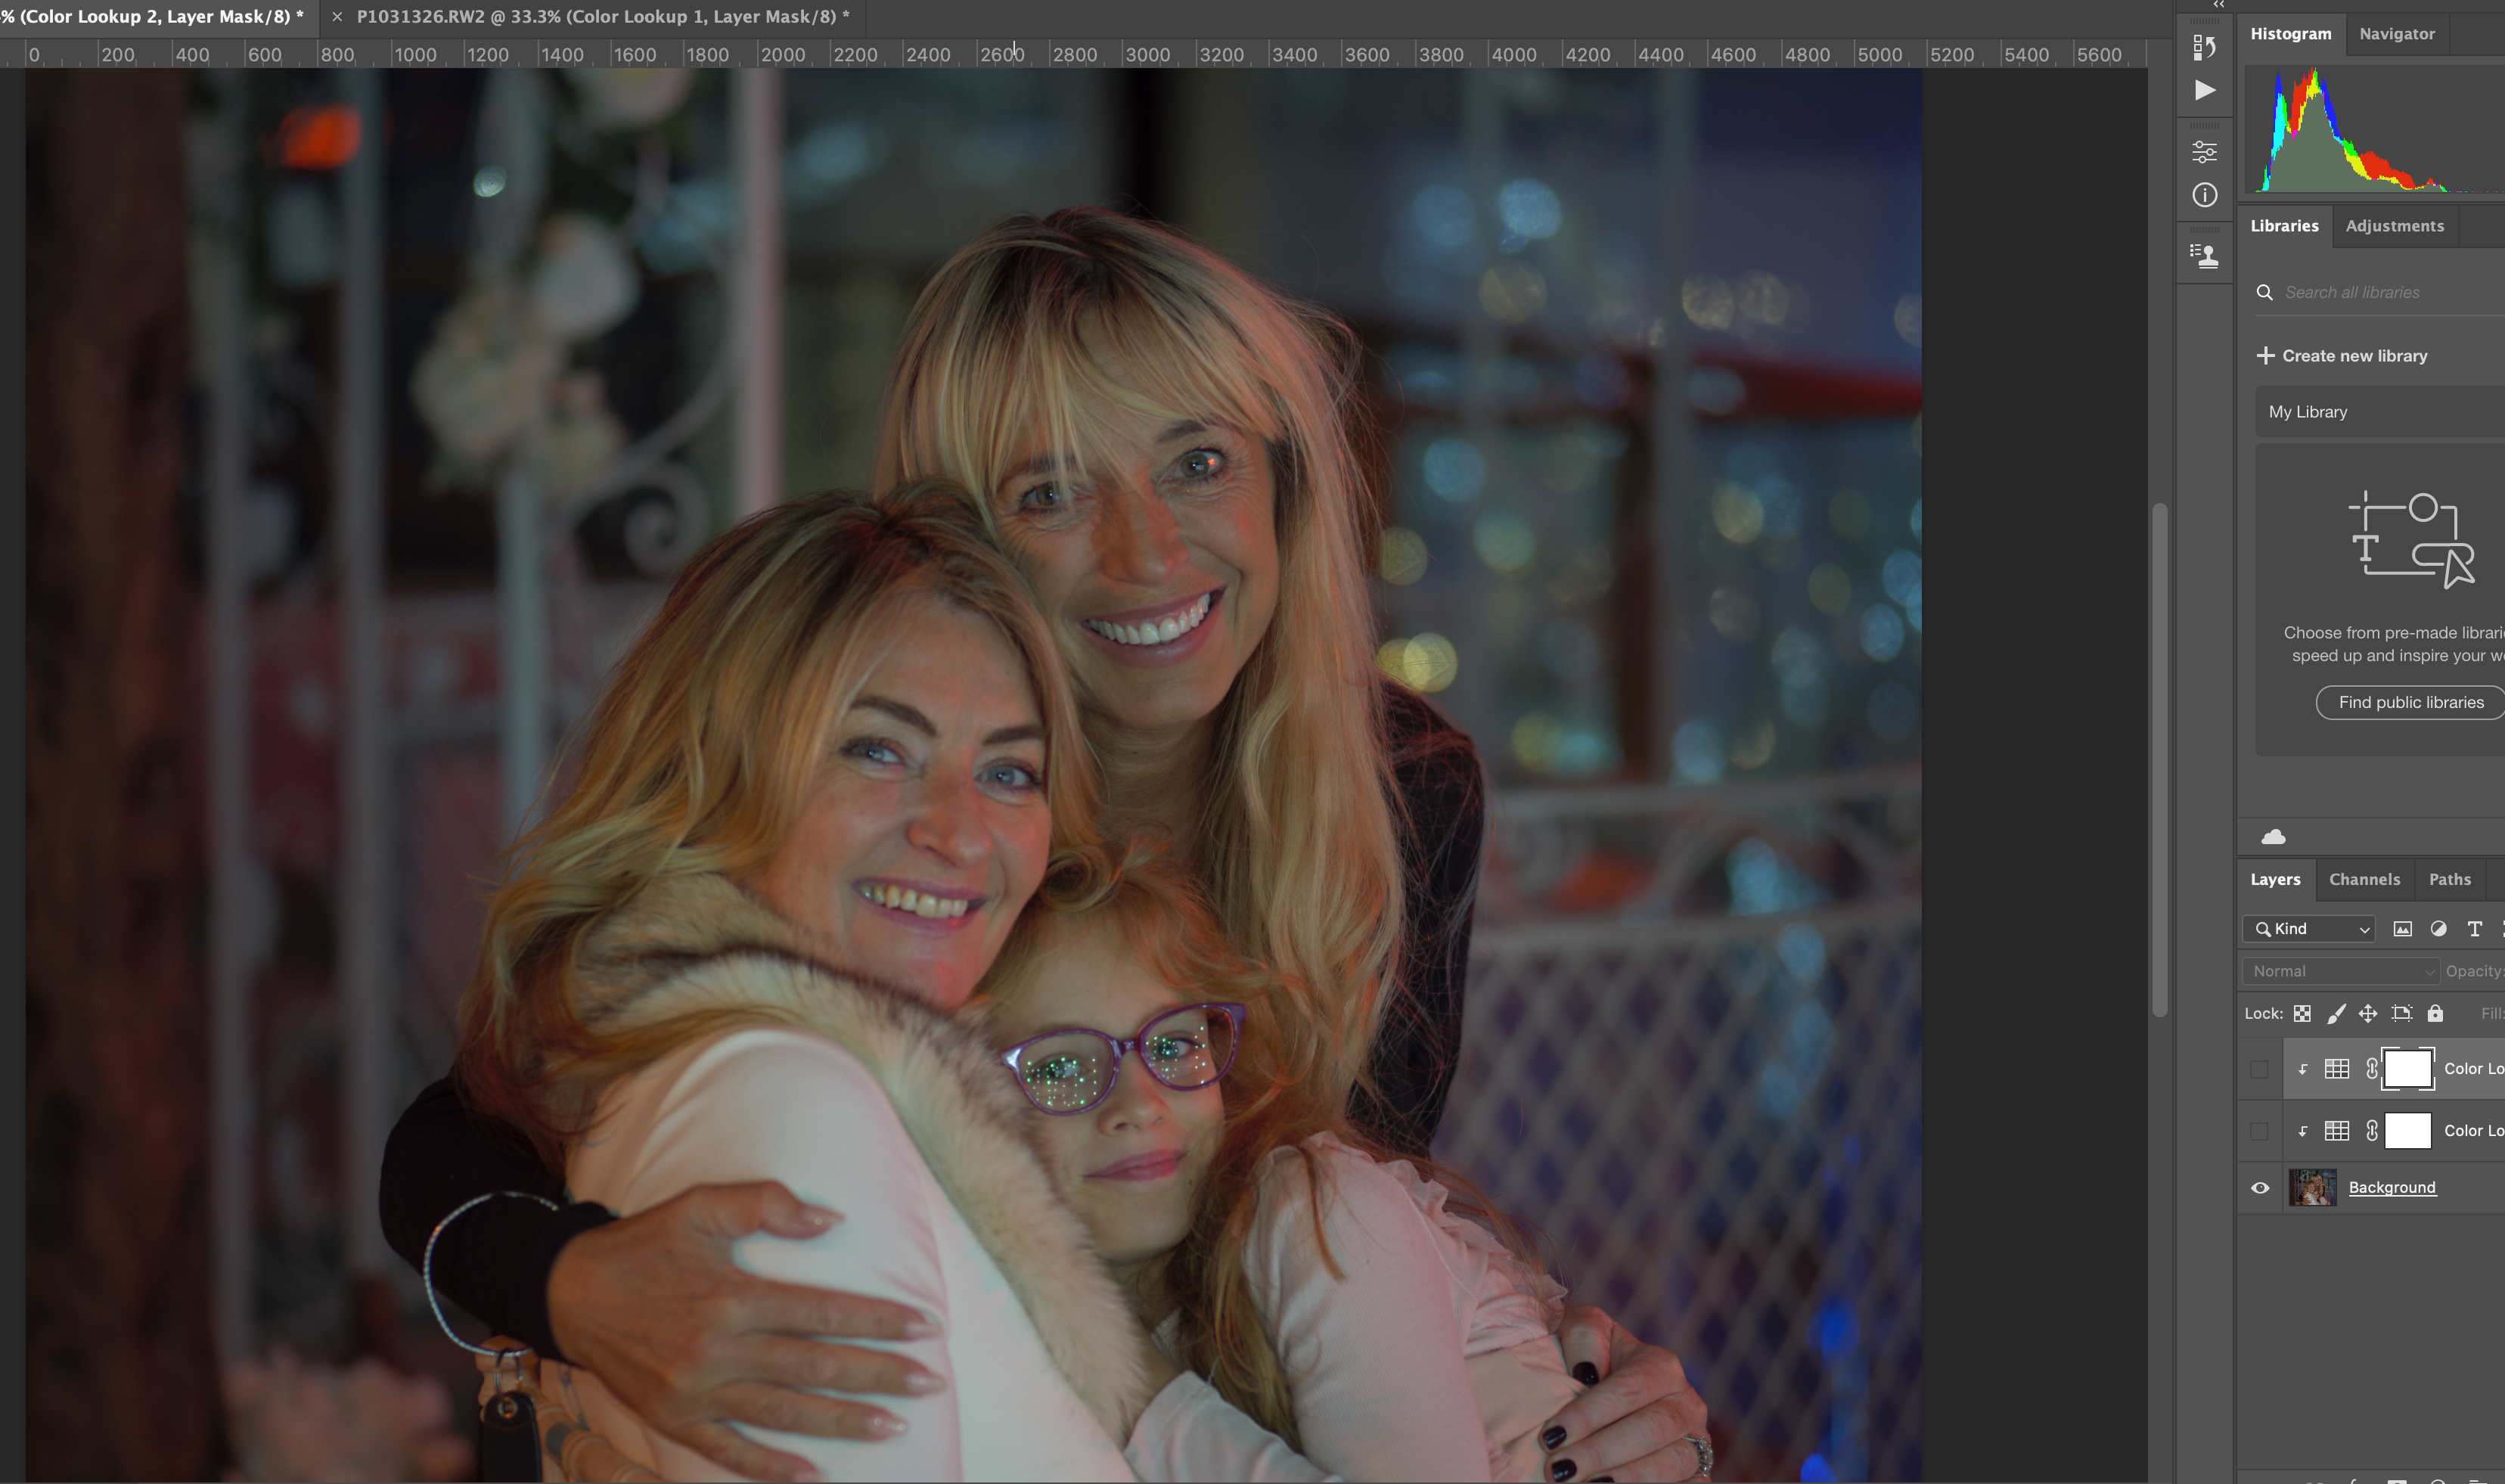
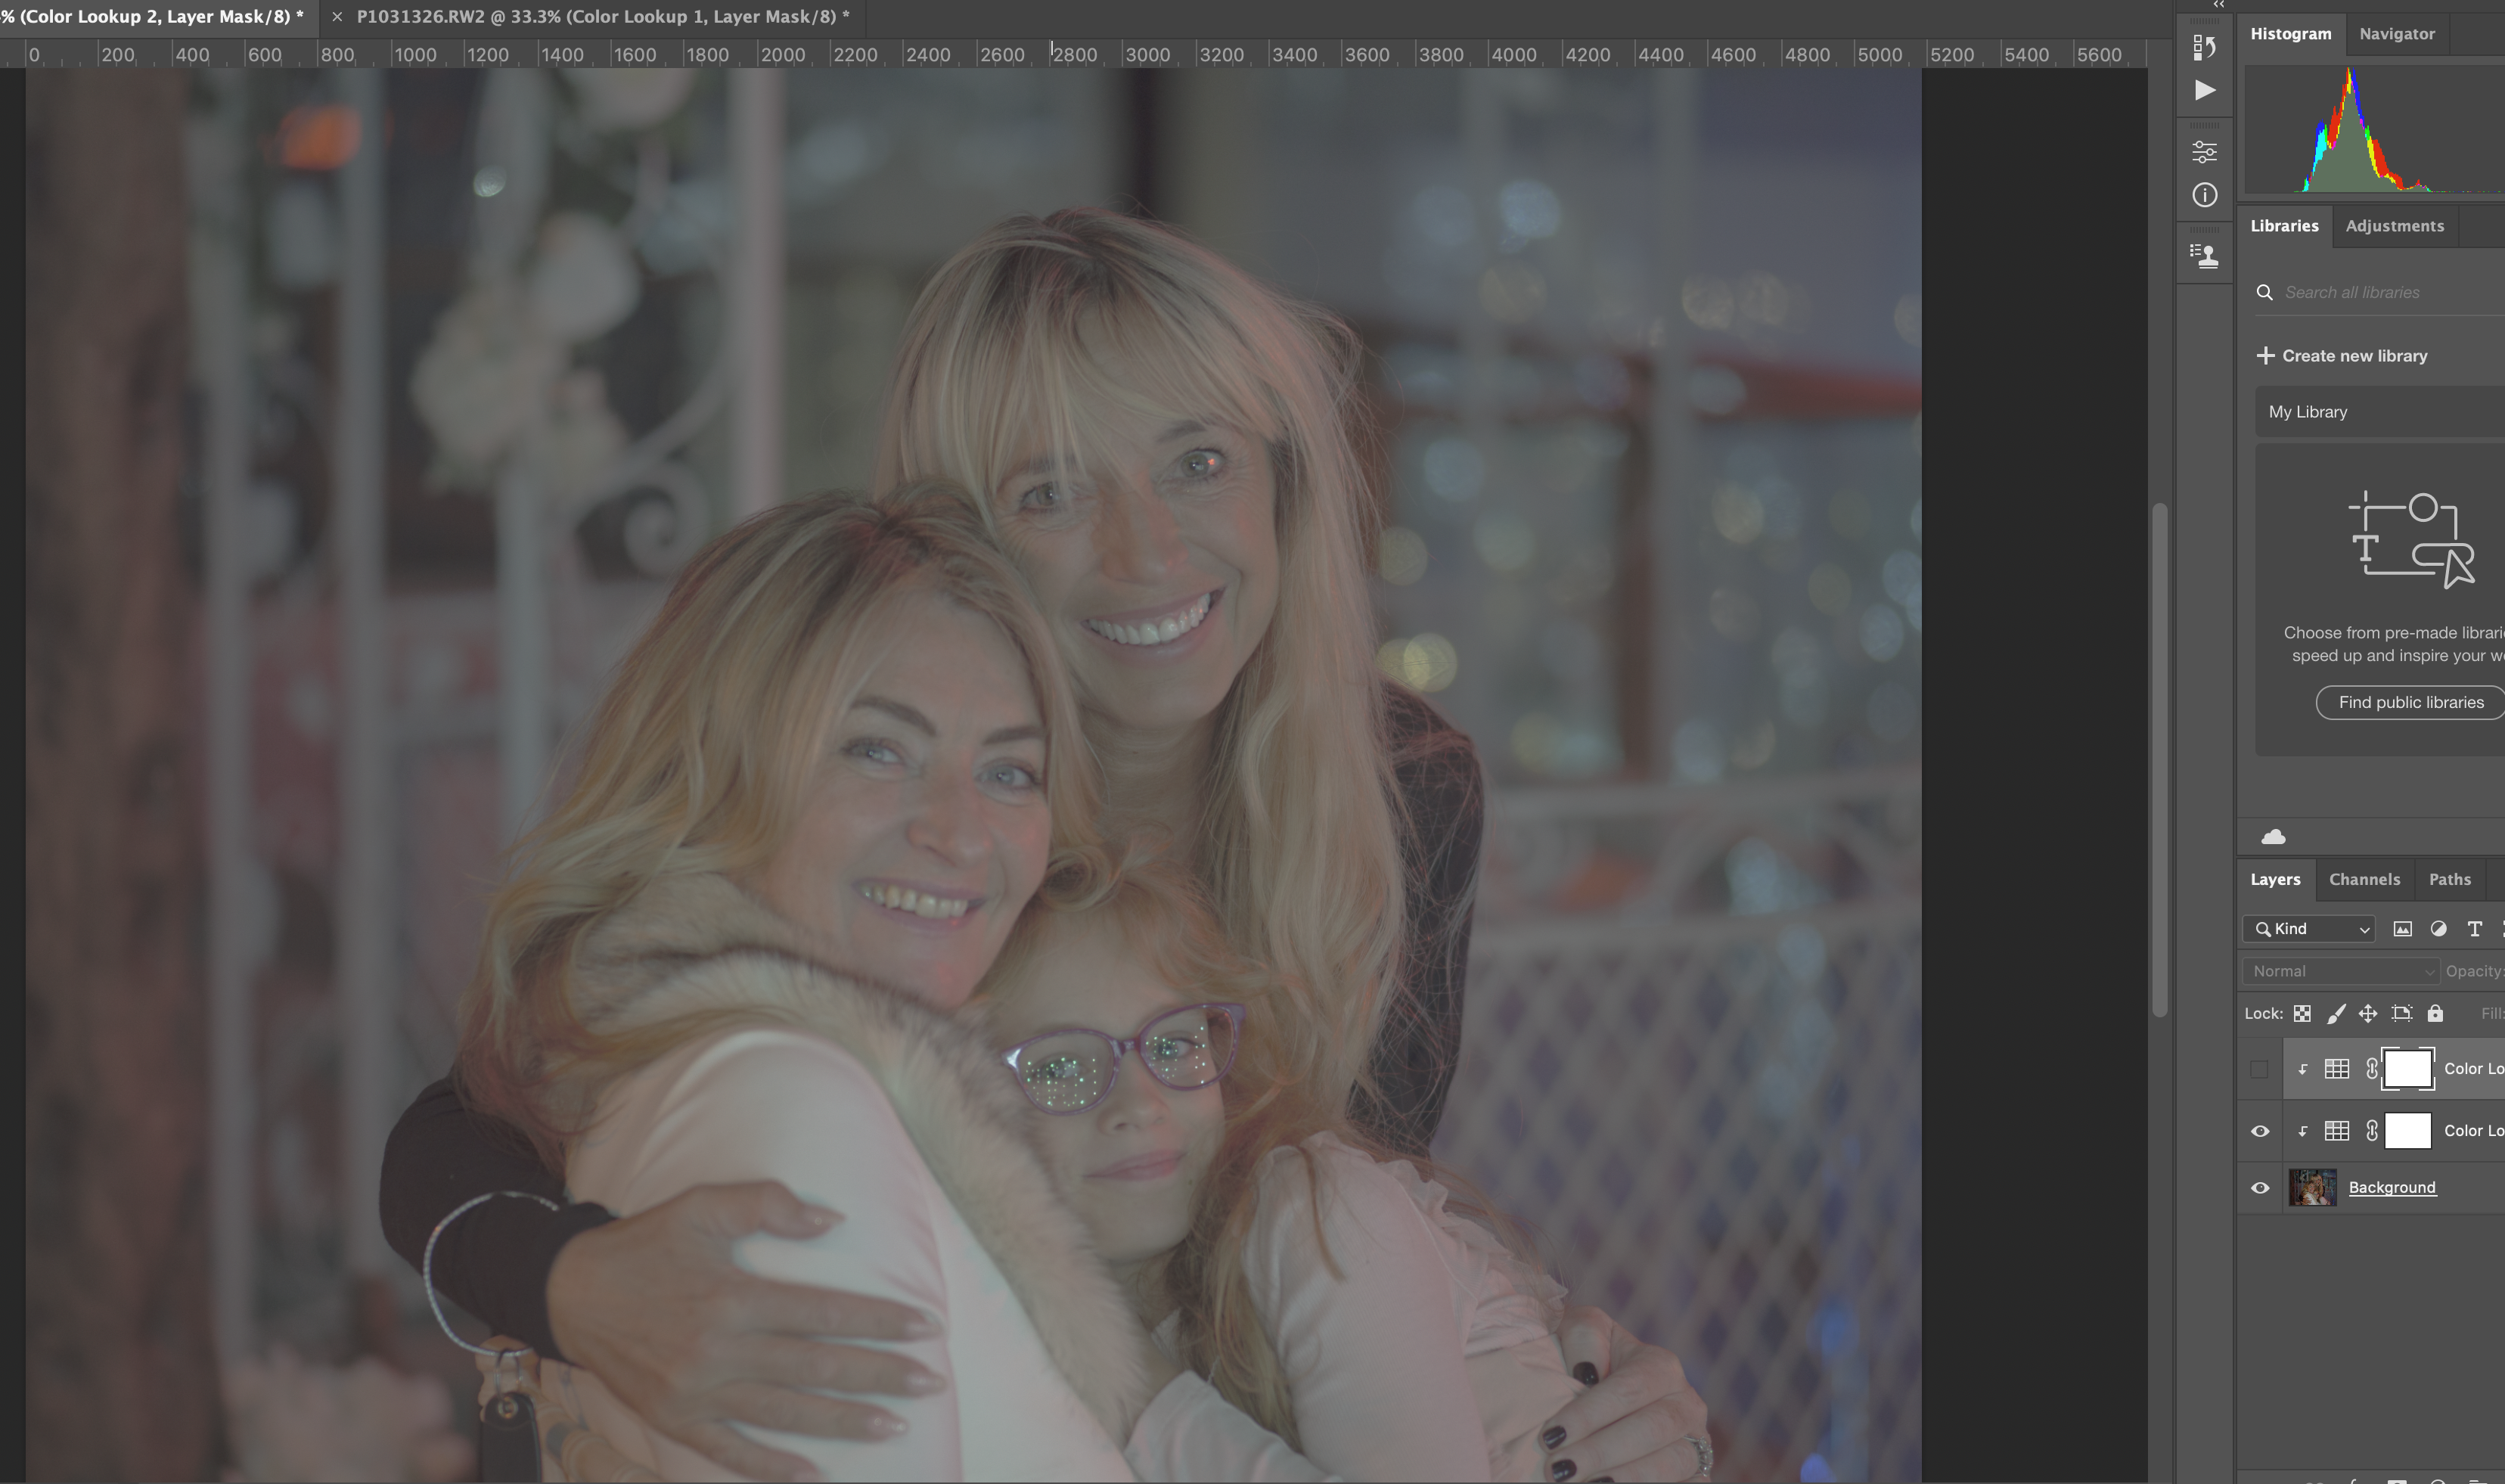
It may be useful to see the effect of LOG using the LUTs in photoshop on the raw data
Original imageVlog image Vlog + LUT back to Rec709
The example above shows that a significant number of midtones have been lost in the conversion with no DR benefit as the scene essentially lacked it.
Conclusion
For underwater video purposes as the water reduces contrast and smooths highlights I would not recommend shooting log or HDR with the exception of very specific scenarios. Likewise if I am shooting a v(ideo)log or an interview there is no requirement for extra dynamic range and log compression is not required.
Outdoor scenes especially in bright conditions, snow, are appropriate for HDR and should be shot with a log format assuming of course the luminance of the scene is not being reduced with ND filters or similar.
Events like weddings can have challenging conditions with a mix of low contrast indoor and bright outdoors with the bride typically dressed in white so in effect those can be very demanding on the equipment but you need to bear in mind that if your delivery format is just HD video the benefit of log gamma are greatly reduced and extensive work may be required to bring colours back in check, always account for the limitations of your equipment as well.
We are finally there. Thanks to smaller companies that are keen to get a share of the market we now have at least two cameras with MFT sensor that are able to produce RAW video.
RAW Video and RED
It has been RED to patent the original algorithm to compress raw video data straight out of the sensor before the demosaicing process. Apple tried to circumvent the patent with their ProRes RAW but lost in court the legal battle and now has to pay licenses to Red. Coverage is here.
So RED is the only company that has this science, to avoid paying royalties Blackmagic Design developed an algorithm that uses data taken from a step of the video pipeline after demosaic for their BRAW.
I do not want to discuss if BRAW is better than RedCode or ProRes RAW however with a background in photography I only consider RAW what is straight out of the sensor Analag Digital Converter so for me RAW is RedCode or ProRes RAW and not BMRAW.
How big is RAW Video
If you are a photographer you know that a RAW image data file is roughly the same size in megabytes than the megapixels of your camera.
How is that possible I have a 20 Megapixel camera and the RAW file is only a bit more than 20 megabytes? My Panasonic RW2 files are 24.2 MB without fail out of 20.89 Megapixels so on average 9.26 bits per pixel. Why don’t we have the full 12 bits per pixel and therefore a 31 MB file? Well cameras are made of a grid of pixels that are monochromatic so each pixel is either red, green or blue. In each 2×2 matrix there are 2 green pixels, 1 red and 1 blue pixel. Through a series of steps of which on is to decode this mosaic into an image (demosaic) we rebuild an RGB image for display.
Each one of our camera pixels will not have the full 4096 possible tones, measures from DxoMark suggest that the Sony IMX272AQK only resolves 24 bits colours in total and 9 bits of grey tones. So this is why a lossless raw files is only 24.2 MB. This means that an 8K frame video in RAW would be 9.25 MB and therefore a 24 fps RAW video stream would be 222 MB/s or 1,776 Mb/s if we had equivalent compression efficiency. After chroma subsampling to 422 this would become 1184 Mb/s.
Cameras like the ZCam E2 or the BMPCC4K that can record ProRes 422 HQ approach those bitrates and can be considered virtually lossless.
But now we have ProRes RAW so what changes? The CEO of ZCAM has posted an example of a 50 fps ProRes RAW HQ files and this has a bitrate of 2255 Mb/s if this was 24 fps it would be 1082 Mb/s so we can see how my maths are actually stacking up nicely.
Those bit rates are out of reach of almost all memory card so an SSD drive support is required and this is where Atomos comes into the picture.
Atomos have decided to adopt ProRes RAW and currently offer support for Nikon, Panasonic and Zcam selected model.
ProRes RAW workflow
So with the ProRes RAW file at hand I wanted to test the workflow in Final Cut Pro X. Being an Apple codec all works very well however we encounter a number of issues that photographers have resolved a long time ago.
The first one is that RAW has more dynamic range than your SDR delivery space, this also happens with photos however programs work in larger RGB spaces like ProPhotoRGB at 16 bits and using tone mapping you can edit your images and then bring them back to an 8 bit jpeg that is not as good as the RAW file but is in most cases fine for everyone.
Video NLE are not in the same league of photo raw editors and usually deal with a signal that is already video is not raw data. So the moment you drop your ProRes RAW clip on a SDR timeline it clips as you would expect. A lot of work is required to bring back clips into an SDR space and this is not the purpose of this post.
To avoid big issues I decided to work on an HDR timeline in PQ so that with a super wide gamut and gamma there were no clipping issues. The footage drops perfectly into the timeline without any work required to confirm which is brilliant. So RAW for HDR is definitely the way forward.
ProRes RAW vs LOG
My camera does not have ProRes RAW so I wanted to understand what is lost going through LOG compression? For cameras that have an analog gain on sensor there is no concept of base ISO fixed like it happens on Red or ARRI cameras. Our little cameras have a programmable gain amplifier and as gain goes up DR drops. So the first bad news is that by using LOG you will lose DR from RAW sensors.
This graph shows that on the Panasonic GH5 there is a loss of 1 Ev from ISO 100 to 400 but still we have our 11.3 Ev minimum to play with. I am not interested in the whole DR but I just want to confirm that for those cameras that have more DR than their ADC allows you will have a loss with LOG as this needs gain and gain means clipping sooner.
Panasonic GH5 full resolution 20.9 MPixels DR
What is very interesting is that net of this the ProRes RAW file allowed me to test how good is LOG compression. So in this clip I have :
RAW video unprocessed
RAW video processed using Panasonic LOG
RAW video processed using Canon LOG
RAW video processed using Sony LOG
In this example the ZCAM E2 has a maximum dynamic range of 11.9 Ev (log2(3895)) from Sony IMX299CJK datasheet. As the camera has less DR than the maximum limit of the ADC there is likely to be no loss.
We can see that there are no visible differences between the various log processing options. This confirms that log footage is an effective way to compress dynamic range in a smaller bit depth space (12->10 bits) for MFT sensors.
The same ProRes RAW files processed using log from Panasonic, Canon and Sony shows no visual difference
Final Cut Pro gives you the option to go directly to RAW or go through LOG, this is because all your log based workflow and LUT would continue to work. I can confirm this approach is sound as there is no deterioration that I can see.
Is ProRes RAW worth it?
Now that we know that log compression is effective the question is do I need it? And the answer is it depends…
Going back to our ProRes RAW 1082 Mb/s once 422 subsampling is applied this drops to 721 Mb/s this is pretty much identical to ProRes 422 HQ nominal bit rate of 707 Mb/s. So if you have a Zcam and record ProRes RAW or ProRes 422 HQ you should not be able to see any difference. I can confirm that I have compressed such footage in ProRes 422 HQ and I could not see any difference at all.
However typically with photos a RAW files can hold heavy modifications while a JPEG cannot. We are used processing ProRes and there is no doubt that ProRes 422 HQ can take a lot of beating. In my empirical tests I can see that Final Cut Pro X is very efficient manipulating ProRes RAW files and in terms of holding modifications I cannot see that this codec provides a benefit but this may be due to the lack of capability of FCPX.
For reference Panasonic AVC Intra 422 is identical in terms of quality to ProRes 422 HQ though harder to process, and much harder to process than ProRes RAW.
Conclusion
If you have already a high quality output from your camera such as ProRes 422 HQ or Panasonic AVCI 400 Mbps with the tools at our disposal there is not a lot of difference at least for an MFT sensor. This may have to do with the fact that the sensor DR and colour depth is anyway limited and therefore log compression is effective to the point that ProRes RAW does not appear to make a difference, however there is no doubt that if you have a more capable camera, there is more valuable data there and this may be well worth it.
I am currently looking for Panasonic S1H ProRes RAW files. Atomos only supports 12 bits so the DR of the camera will be capped as RAW is linearly encoded. However SNR will he higher and the camera will have more tones and colors resulting in superior overall image quality, someone calls this incorrectly usable DR but is just image quality. it will be interesting to see if AVCI 10 bits and log is more effective than ProRes RAW 12 bits.
In order to product HDR clips you need HDR footage. This comes in two forms:
Log footage
HLG
Cameras have been shooting HDR since years the issue has been that no consumer operating system or display were capable of displaying it. The situation has changed as Windows 10 and Mac Os now have HDR-10 support. This is limited for example on Mac Os there is no browser support but the Tv app is supported, while on windows you can watch HDR-10 videos on YouTube.
You need to have in mind your target format because Log and HLG are not actually interchangeable. HLG today is really only Tv sets and some smartphones, HDR-10 instead is growing in computer support and is more widely supported. Both are royalty free. This post is not about what is the best standard is just about producing some HDR content.
The process is almost identical but there are some significant differences downstream.
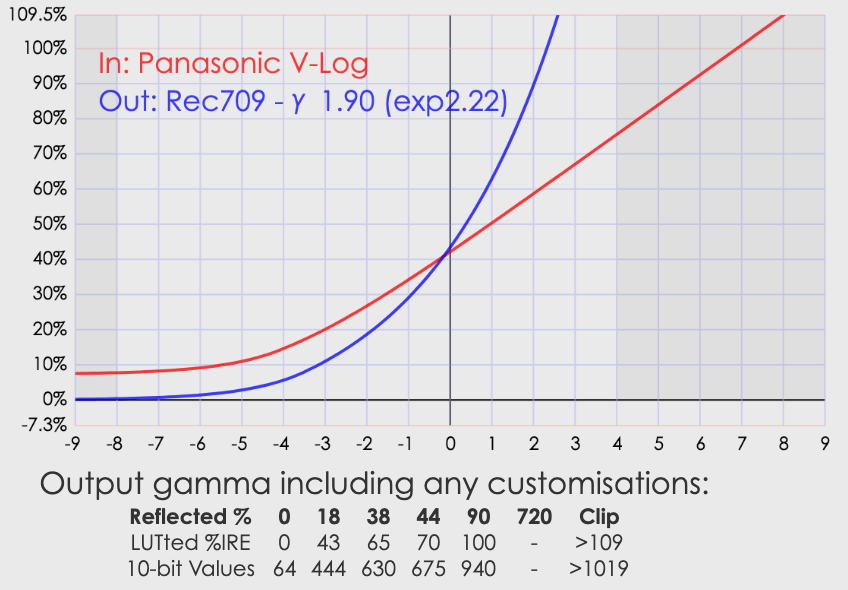
Let me explain why this graph produced using the outstanding online application LutCalc show the output input relationship of V-LOG against a standard display gamma for rec709.
V-LOG -> PQ
Stop diagram V-LOG vs Rec709
Looking at the stop diagram we can appreciate that the curves are not only different but a lot of values differ substantially and this is why we need to use a LUT.
Once we apply a LUT the relationship between V-LOG and Rec709 is clearly not linear and only a small parts of bits fit into the target space.
Output vs Input diagram for V-LOG and Rec709
We can see that V-Log fills Rec709 with just a bit more than 60% IRE so there will need to be a lot of squeezing to be done to fit it back in and this is the reason why many people struggle with V-Log and the reason why I do not use V-Log for SDR content.
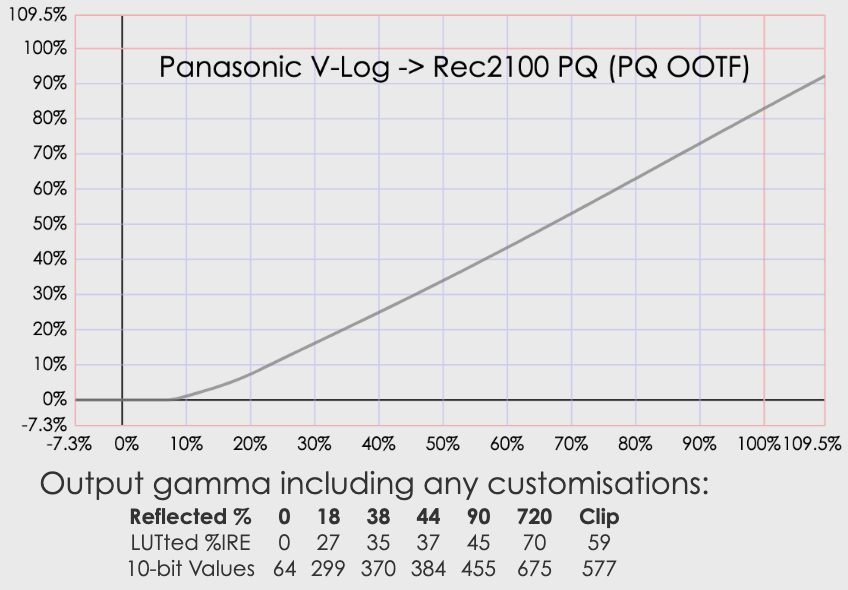
However the situation changes if we use V-Log for HDR specifically PQ.
Stop Table V-Log to PQ
You can see that net of an offset the curves are almost identical in shape.
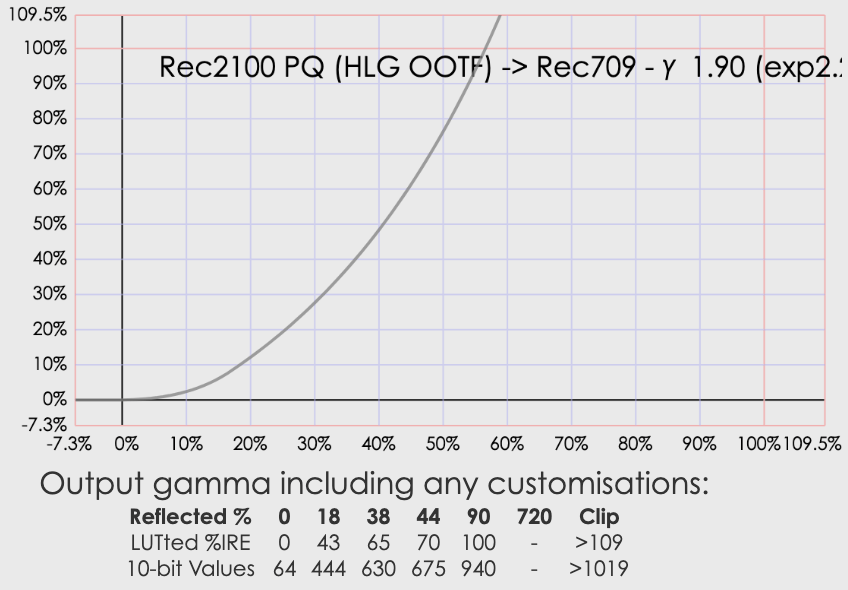
This is more apparent looking at the LUT in / out.
LUT in/Out V-Log to Rec2100 PQ
With the exception of the initial part that for V-Log is linear while PQ is fully logarithmic the curve is almost a straight line. As PQ is a larger space than that V-Log can produce on a consumer camera we do not have issues of squeezing bits in as PQ accommodates all bits just fine.
HLG
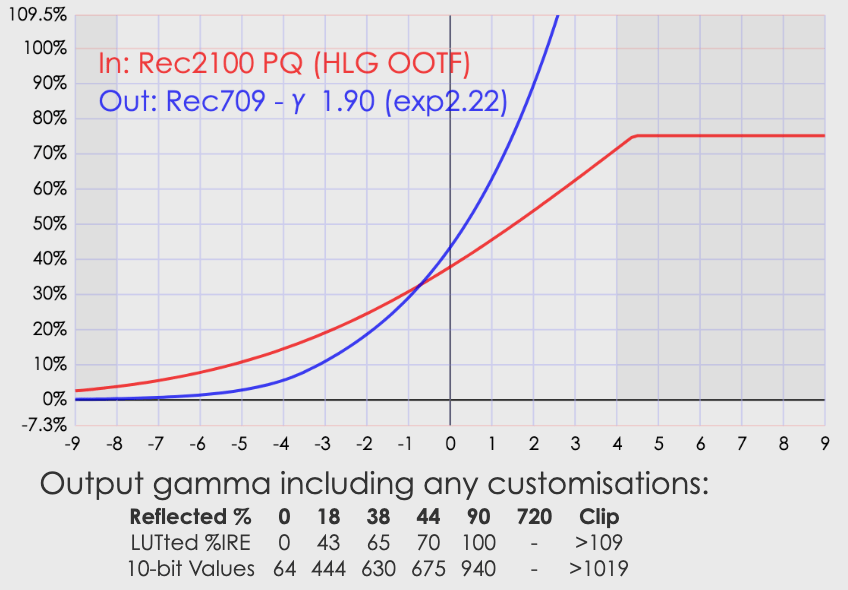
Similar to V-LOG HLG does not have a great fit into an SDR space.
Stop Table HLG to Rec709
The situation becomes apparent looking at the In/Out Lutted values.
HLG to Rec709
We can see that as HLG is also a log gamma with a different ramp up 100% is achieved with even less bits that V-Log.
So really in pure mathematical terms the fit of log spaces into Rec709 is not a great idea and should be avoided. Note with the arrival of RAW video we still lack editors capable to work in 16 bit depth space like photo editors do and currently all processes go through LOG because they need to fit into a 10/12 bits working space.
It is also a bad idea to use V-Log for HLG due to the difference of the log curves.
V-Log vs HLG
And the graph demonstrates what I said at the beginning. You need to decide at the outset your output and stick to a compatible format.
Importing Footage in Final Cut Pro X 10.4.8
Once we have HLG or LOG footage we need to import it into a Wide Gamut Library, make sure you check this because SDR is default in FCPX.
Library Settings
HLG footage will not require any processing, but LUTs have to be applied to V-LOG as this is different from any Rec2100 target spaces.
The most convenient way is to go into Organise workspace select all clips than press the i button and select General. Apply the Panasonic V-Log LUT to all clips.
Organise View the LUT option is not available in the Basic view so make sure you select General
Creating a Project
Once all files have been handled as required we create our HDR-10 project which in final cut means Rec2020 PQ.
For HLG project change colour space to HLG
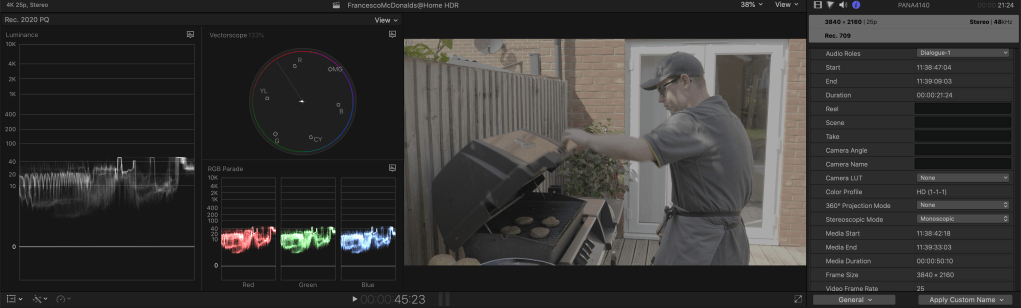
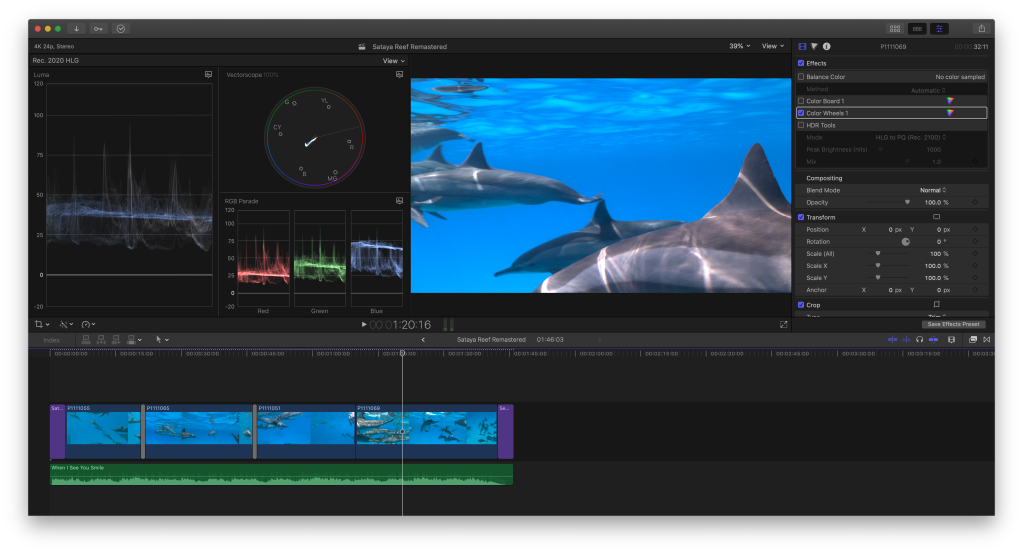
The following screenshots demonstrate the effect of the LUT on footage on a PQ timeline.
LUT not applied footage looks dim as values are limited to 80%
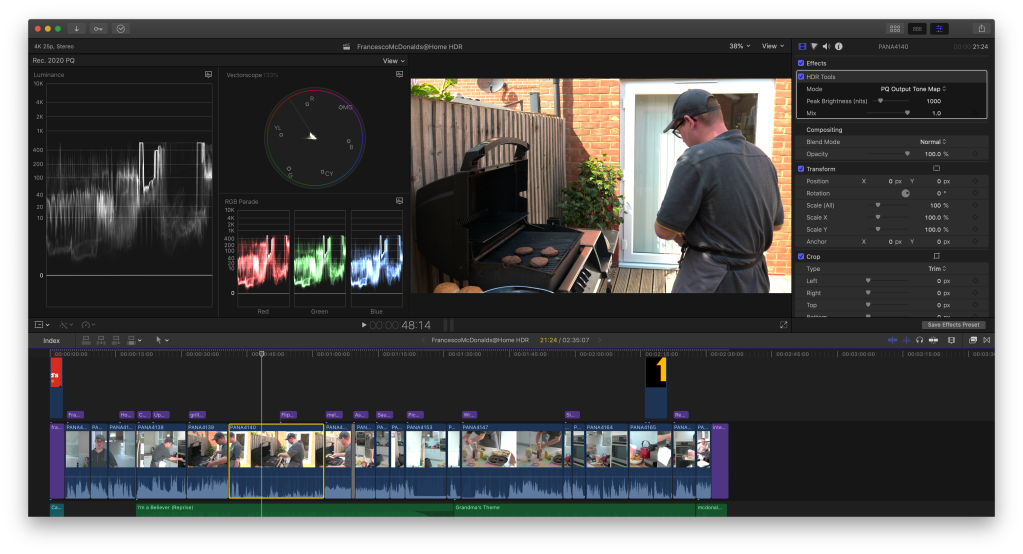
With the LUT applied the V-LOG is expanded in the PQ space and the colours and tones come back.
LUTed clip on PQ timeline
We can see the brightness of the scene is approaching 1000 nits and looks exactly we we experienced it.
Once all edits are finished and just as last step we add the HDR Tools to limit peak brightness to 1000 Nits which is a requirement of YouTube and most consumer displays. The Scope flex slightly with an automatic highlight roll-off.
Exporting the Project
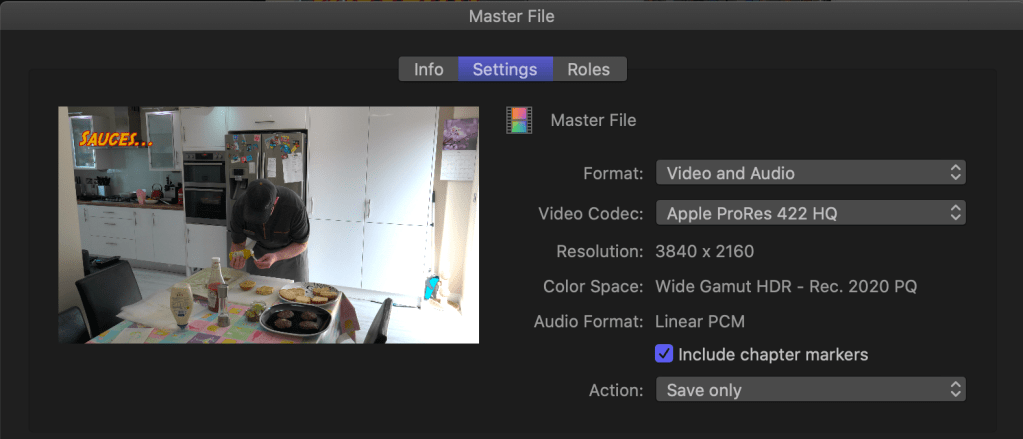
I have been using Panasonic AVCI 400 mbps so I will export a master file using ProRes422 HQ if you use a lower bitrate ProRes 422 may be sufficient but don’t go lower as it won’t be HDR anymore.
Export in ProRes 422 HQ
YouTube and other devices use default settings for HDR-10 metadata so do not fill the mastering display nor content information it is not required and you would not know how to fill it correctly with exception of peak brightness.
Converting for YouTube
I use the free program handbrake and YouTube guidelines for upload to produce a compatible files. It is ESSENTIAL to produce an mp4 file otherwise your TV and YouTube may not be able to display HDR correctly avoid any other format at all costs.
The finished product can be seen here
Home HDR Video HDR-10
HLG Documentary style footage
SDR version from HDR master
There are residual issues with this process one is the production of an SDR version. This currently works much better for HLG than HDR-10 which is interesting because HLG is unsupported on any computer so if you produce HDR HLG you are effectively giving something decent to both audiences.
For HDR-10 YouTube applies their own one fits all LUT and the results can be really bad. You may experience oversaturated colours in some cases, dark footage in others, and some clips may look totally fine.
At professional level you would produce a separate SDR grade however it is possible to improve the quality of YouTube conversion using specific techniques I will cover in a separate post.
Final Remarks
Grading in HDR is not widely supported the only tools available are scopes and Tone Mapping of your display. There is no concept of correct exposure for skin tones, in one scene those have a certain brightness and in another this changes again because this is not a 0-100% relative scale but goes with absolute values.
If you invested in a series of cinema LUT you will find none of them work and compresses the signal to under 100 nits. So there is less headroom for looks. There are other things you can do to give some vintage look like adding grain but you need to be careful as the incredible brightness of the footage and the details of 10 bits means if you push it up too much it looks a mess. Currently I am avoiding adding film grain and if I add it I blend it to 10%-20%.
One thing that is interesting is that Log footage in PQ does have a nice feel to it despite the incredible contrast. After all Log is a way to emulate film specifically Cineon, this is true for almost all log formats. Then you would have the different characteristics of each film stock, this is now our camera sensor and because most of them are made by Sony or Canon the clips tend to look very similar to each other nowadays. So if you want to have something different you need to step in the world of Red or ARRI but this is not in the scope of what I am writing here and what you my readers are interested in.
Am keeping a playlist with all my HDR experiments here and I will keep adding to it.
YouTube HDR Playlist
If you find this useful please donate using the button on the side and I will have a drink on you…Cheers!
As you have read, I have been at the forefront of HDR use at home. I have a total of 5 devices with HDR certification of which 2 supporting all standards all the way to Dolby Vision and 3 supporting at least HLG and HDR-10. The consumption of content is composed for most of Netflix or Amazon originals and occasional BBC HLG broadcasts that are streamed concurrently to live programs. So, it is fair to say I have some practical experience on the subject and two years ago I started writing about shooting HLG with the GH5. This was mostly limited by lack of editing capabilities on the display side, but recently Mac OS 10.15.4 has brought HDR-10 support that means you can see HDR signal on a compatible HDMI or DisplayPort device. This is not HLG but there are ways around it as I wrote in a recent post. This post makes some considerations on the issues of shooting HDR and why as of 2020 shooting SDR Rec709 with your Panasonic GH5 is still my preferred option for underwater video and not.
Real vs Theoretical Dynamic Range
You will recall the schematic of a digital camera from a previous post.
This was presented to discuss dual gain circuits but if you ignore the two gain circuits it remains valid. In this post we will focus on the ADC which stands for Analog to Digital Converter. Contemporary cameras have 12- and 14-bits ADC, typically 14 bits ADC are a prerogative of DSLR cameras or high-end cameras. If we want to simplify to the extremes the signal arriving to the ADC will be digitalised on a 12- or 14-bits scale. In the case of the GH5 we have a 12-bits ADC, it is unclear if the GH5s has a 14-bits ADC despite producing 14-bits RAW, for the purpose of this post I will ignore this possibility and focus on 12-bits ADC.
12-bits means you have 4096 levels of signal for each RGB channel this effectively means the dynamic range limit of the camera is 12 Ev as this is defined as Log10(4096)/Log10(2)=12. Stop wait a minute how is that possible? I have references that the Panasonic GH5 dynamic range is 13 Ev how did this become 12?
Firstly, we need to ignore the effect of oversampling and focus on 1:1 pixel ratio and therefore look at the Screen diagram that shows just a bit more than 12 Ev. We then have to look at how DxOMark measures dynamic range this is explained here. In real life we will not be shooting a grey scale but a coloured scene, so unless you are taking pictures of the moon you will not get much more than 12 stops in any scenarios as the colours will eat the data.
This was for what concerns RAW sensor data before de-mosaicing and digital signal processing that will further deteriorate DR when the signal is converted down to 10-bits even if a nonlinear gamma curve is put in place. We do not know what is really the useable DR of the GH5 but Panasonic statement when V-LOG was announced referenced 12 stops dynamic range using a logarithmic curve so we can safely conclude that the best case is 12 stops when a log curve is used and 10 for a gamma curve with a constant correction factor. Again, it is worth stressing that the 12 stops DR is the absolute maximum at the camera setting with 0 gain applied aka base or native ISO which for the GH5 is 200 corresponding to 400 in log modes.
Shooting HLG vs SDR
Shooting HLG with the GH5 or any other prosumer device is not easy.
The first key issue in shooting HLG is the lack of monitoring capabilities on the internal LCD and on external monitors. Let’s start with the internal monitor that is not capable to display HLG signals and relies on two modes:
Mode 1 : priorities the highlights wherever they are
Mode 2 prioritise the subject i.e. center of the frame
In essence you are not able to see what you get during the shot. Furthermore, when you set zebra to 90% the camera will be rarely reaching this value. You need to rely on the waveform, that is not user friendly in an underwater scene, or on the exposure meter. If you have a monitor you will find if you are carefully in the spec that the screens are rec709 so will not display the HLG gamma while they will correctly record the colour gamut. https://www.atomos.com/ninjav : if you read under HDR monitoring gamma you see BT.2020 that is not HDR is SDR. So you encounter the same issues albeit on a much brighter 1000 nits display that you have on the LCD and you need to either adapt to the different values of the waveform or trust the exposure meter and zebra that as we have said are not very useful as it take a lot to clip. On the other hand if you shoot an SDR format the LCD and external monitor will show exactly what you are going to get except you shoot in V-LOG, in this case the waveform and the zebra will need to be adjusted to consider that VLOG absolute max is 80% and 90% white is 60%. Once you apply a monitor LUT however, you will see exactly what you are going to get on the internal or external display.
Editing HLG vs SDR
In the editing phase you will be faced with similar challenges although as we have seen there are workarounds to edit HLG if you wish so. A practical consideration is around contrast ratio. Despite all claims that SDR is just 6 stops I have actually dug out the BT.709, BT.1886, BT.2100 recommendations and I this is what I have found.
Contrast Ratio
Max Brightness
Min Brightness
Analog DR
BT.709
1000
100
0.1
9.97
BT.1886
2000
100
0.05
10.97
BT.2100
200000
1000
0.005
17.61
Specifications of ITU display standards
In essence Rec709 has a contrast ratio of 1000 which means 9.97 Stops of DR and already allows for 8- and 10-bits colour. BT.1886 was issued to consider CRT screens no longer exist and this means that the DR goes to 10.97 stops. BT.2100 has a contrast ratio of 200000:1 or 17.61 stops of DR.
Standard
Contrast Ratio
Max Brightness
Min Brightness
Analog DR
HDR400
1000
400
0.4
9.97
HDR500
5000
500
0.1
12.29
HDR600
6000
600
0.1
12.55
HDR1000
20000
1000
0.05
14.29
HDR1400
70000
1400
0.02
16.10
400 TB
800000
400
0.0005
19.61
500 TB
1000000
500
0.0005
19.93
DisplayHDR Performance Standards
Looking at HDR monitors you see that, with the exception of OLED screens, no consumer devices can meet BT.2100 standards; so even if you have an HDR monitor in most cases is falling short of BT.2100 recommendation.
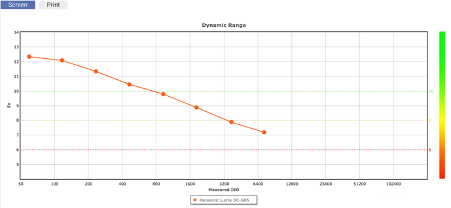
Our GH5 is capable of a maximum 12 stops DR in V-Log and maybe a bit more in HLG however those values are far below BT.2100 recommendations and more in line with BT.1886 recommendation. If we look at DxOMark DR charts we see that at ISO 1600 nominal that is in effect just above 800 the DR has fallen below 10 Ev. Consider that this is engineering DR practically speaking you are getting your 12 stops just at ISO 200 and your real HDR range is limited to 200-400 ISO range this makes sense as those are the bright scenes. Consider that log photo styles start at ISO 400 but this really translates to ISO 200 on this chart as well as exposure values. Unless you are shooting at low ISO you will get limited DR improvement. Underwater is quite easy to be at higher ISO than 200 and even when you are at 200 unless you are shooting the surface the scene has limited DR anyway. Generally, 10 stops are more than adequate as this is what we get when we produce a Jpeg from a RAW file.
Viewing HDR
I think the final nail in the coffin arrives when we look where the content will be consumed.
Standard
Contrast Ratio
Max Brightness
Min Brightness
Analog DR
IPS/Phones
1000
350
0.35
9.97
LED Tv
4000
400
0.1
11.97
OLED
6000000
600
0.0001
22.52
Typical Devices Performance
Phones have IPS screen with some exceptions and contrast ratio below 1000:1 and so do computer screens. If you share on YouTube you will know phones and computer constitute around 85% of playback devices. Tv are around 10% and a small part of those will be HDR. So other than your own home you will not find many HDR devices out there to give justice to your content.
10-bits vs 8 bits
It is best practice to shoot 10 bits and both SDR and HDR support 10 bits colour depth. For compatibility purposes SDR is delivered with 8 bits colour and HDR on 10 bits colour.
Looking at tonal range for RAW files on 8 Megapixels we see that the camera has 24 bits depth over RGB this means 8 bits per channel and 9 bits tonal range. Tonal range are grey levels so in short, the camera will not produce 10 bits colour bit will have more than 8 bits of grey tones which are helpful to counter banding but only at low ISO, so more useful for blue skies than for blue water. Considering that image for photo competitions are JPEGs and that nobody has felt the need for something more we can conclude that as long as we shot at high bitrate something as close to a raw format 8 bit for delivery are adequate.
Cases for HDR and Decision Tree
There are cases where shooting HLG can be meaningful those include snorkelling at the surface on bright days. You will not be going at depth so the footage will look good straight off the camera, likewise, for bright shots in the sun on the surface. But generally, the benefit will drop when the scene has limited DR or at higher ISO values where DR drops anyway.
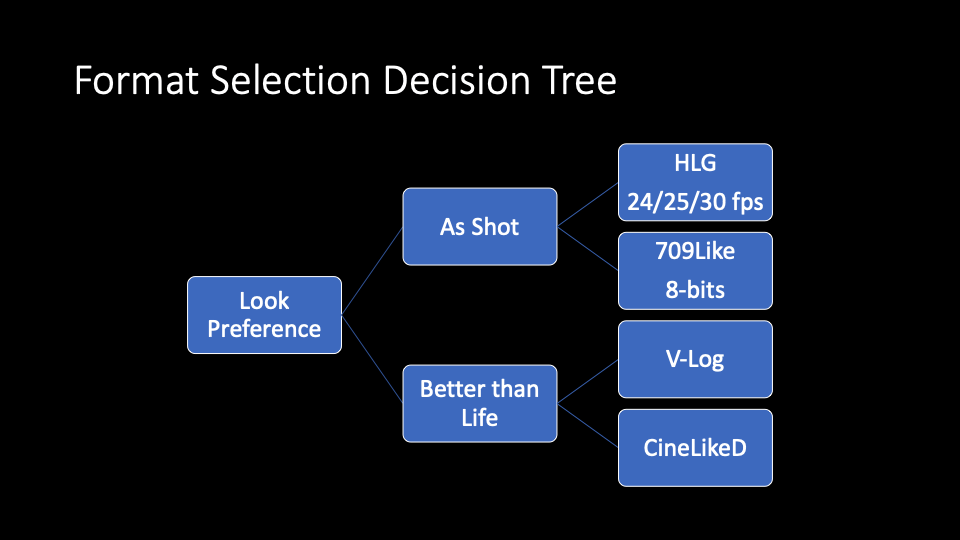
What follows is my decision tree to choose between SDR and HDR and 10 bits vs 8 bits formats. I like my pictures and my videos to look better than life and I think editing adds value to the imaging although this is not an excuse for poor capture. There are circumstances where editing is less important, namely when the scene is amazing by itself and requires no extra help, or when I am looking at fast paced, documentary style scenes that do not benefit from editing. For the rest my preference remains for editing friendly formats and high bit rate 10 bits codec all intra. Recently I have purchased the V-Log upgrade and I have not found difficult to use or expose so I have included this here as possible option.
The future of HDR
Except a cinema like setting with dark surrounding and low ambient light HDR mass consumption remains challenging. Yes, you can have high peak brightness but not high contrast ratio and this can be obtained with SDR for most already. There is a lot of noise in the cinema community at present because the PQ curve is hard to manage and the work in post processing is multiplied, clearly PQ is not a way forward for broadcasting and HLG will prevail thanks to the pioneering efforts of the BBC but the lack of monitoring and editing devices means HLG is not going to fit cine like scenarios and little productions. It could be a good fit for a zero-edit shooter someone that like to see the scene as it was.
Conclusion
When marketing myths and incorrect information is netted out we realise that our prosumer devices are very far away from what would be required to shoot, edit and consume HDR. Like many other things in digital imaging is much more important to focus on shooting techniques and how to make the most of what we have, instead of engaging on a quest for theoretical benefits that may not exist.
It has been almost two years from my first posts on HLG capture with the GH5 https://interceptor121.com/2018/06/15/setting-up-your-gh5-for-hlg-hdr-capture/ and last week Apple released Catalina 10.15.4 that now supports HDR-10 with compatible devices. Apple and in general computer are still not supporting HLG and it is unlikely this is ever going to happen as the gaming industry is following VESA DisplayHDR standard that is aligned to HDR-10.
After some initial experiments with GH5 and HLG HDR things have gone quiet and this is for two reasons:
There are no affordable monitors that support HLG
There has been lack of software support
While on the surface it looks like there is still no solution to those issues, in this post I will explain how to grade HLG footage in Final Cut Pro should you wish to do so. The situation is not that different on Windows and DaVinci Resolve that also only support HDR-10 monitors but I leave it to Resolve users to figure out. This tutorial is about final cut pro.
A word about Vlog
It is possible to use Vlog to create HDR content however VLOG is recorded as rec709 10 bits. Panasonic LUT and any other LUT are only mapping the VLOG gamma curve to Rec709 so your luminance and colours will be off. It would be appropriate to have a VLOG to PQ LUT however I am not aware this exists. Surely Panasonic can create that but the VLOG LUT that comes with the camera is only for processing in Rec709. So, from our perspective we will ignore VLOG for HDR until such time we have a fully working LUT and clarity about the process.
Why is a bad idea to grade directly in HLG
There is a belief that HLG is a delivery format and it is not edit ready. While that may be true, the primary issue with HLG is that no consumer screens support BT.2020 colour space and the HLG gamma curve. Most display are plain sRGB and others support partially or fully DCI-P3 or the computer version Display P3. Although the white point is the same for all those colour spaces there is a different definition of what red, green and blue and therefore without taking into this into account, if you change a hue, the results will not be as expected. You may still white balance or match colours in HLG but you should not attempt anything more.
What do you need for grading HDR?
In order to successfully and correctly grade HDR footage on your computer you need the following:
HDR HLG footage
Editing software compatible with HDR-10 (Final Cut or DaVinci)
An HDR-10 10 bits monitor
If you want to produce and edit HDR content you must have compatible monitor let’s see how we identify one.
Finding an HDR-10 Monitor
HDR is highly unregulated when it comes to monitors, TVs have Ultra HD Premium Alliance and recently Vesa has introduced DisplayHDR standards https://displayhdr.org/ that are dedicated to display devices. So far, the Display HDR certification has been a prerogative of gaming monitors that have quick response time, high contrast but not necessarily high colour accuracy. We can use the certified list of monitors to find a consumer grade device that may be fit for our purpose: https://displayhdr.org/certified-products/
A DisplayHDR 1000 certified is equivalent to a PQ grading device as it has peak brightness of 1000 nits and minimum of 0.005 this is ideally what you want, but you can get by with an HDR-400 certified display as long as it supports wide colour gamut. In HDR terms wide gamut means covering the DCI-P3 colour space at least for 90% so we can use Vesa list to find a monitor that is HDR-10 compatible and has a decent colour accuracy. Even inside the HDR-400 category there are displays that are fit for purpose and reasonably priced. If you prefer a brand more orientated to professional design or imaging look for the usual suspects Eizo, Benq, and others but here it will be harder to find HDR support as usually those manufacturers are focussed on colour accuracy, so you may find a display covering 95% DCI-P3 but not necessarily producing a high brightness. As long as the device supports HDR-10 you are good to go.
I have a Benq PD2720U that is HDR-10 certified, has a maximum brightness of 350 nits and a minimum of 0.35, it covers 100% sRGB and REC709 and 95% DCI-P3, so is adequate for the task. It is worth nothing that a typical monitor with 350-400 nits brightness offers 10 stops of dynamic range.
In summary any of this will work if you do not have a professional grade monitor:
Search professional display specifications for HDR-10 compatibility and 10 bits wide gamut > 90% DCI-P3
Final Cut Pro Steps
The easy way to have HDR ready content with the GH5 is to shoot with the HLG Photo Style. This produces clips that when analysed have the following characteristics with AVCI coded.
MediaInfo Details HLG 400 Mbps clip
Limited means that it is not using the full 10 bits range for brightness you do not need to worry about that.
With your material ready create a new library in Final Cut Pro that has a Wide Gamut and import your footage.
As we know Apple does not support HLG so when you look at the Luma scope you will see a traditional Rec709 IRE diagram. In addition, the ‘Tone Mapping Functionality’ will not work so you do not have a real idea of colour and brightness accuracy.
At this stage you have two options:
Proceed in HLG and avoid grading
Convert your material in PQ so that you can edit it
We will go on option 2 as we want to grade our footage.
Create a project with PQ gamut and enter your display information in the project properties. In my case the display has a minimum brightness of 0.35 nits and max of 350 and it has P3 primaries with a standard D65 white point. It is important to know those parameters to have a good editing experience otherwise the colours will be off. If you do not know your display parameters do some research. I have a Benq monitor that comes with a calibration certificate the information is right there. Apple screens are typically also P3 with D65 white point and you can find the maximum brightness in the specs. Usually around 500 nits for apple with minimum of 0.5 nits. Do not enter Rec2020 in the monitor information unless your monitor has native primaries in that space (there are almost none). Apple documentation tells you that if you do not know those values you can leave them blank, final cut pro will use the display information from colour sync and try a best match but this is far from ideal.
Monitor Metadata in the Project Properties
For the purpose of grading we will convert HLG to PQ using the HDR tools. The two variants of HDR have a different way to manage brightness so a conversion is required however the colour information is consistent between the two.
Please note that the maximum brightness value is typically 1000 Nits however there are not many displays out there that support this level of brightness, for the purpose of what we are going to do this is irrelevant so DO NOT change this value. Activate tone mapping accessible under the view pull down in the playback window this will adapt the footage to your display according to the parameters of the project without capping the scopes in the project.
Use HDR Tools to convert HLG to PQ
Finalising your project
When you have finished with your editing you have two options:
Stay in PQ and produce an HDR-10 master
Delete all HDR tools HLG to PQ conversions and change back the project to HLG
If you produce an HDR-10 master you will need to edit twice for SDR: duplicate the project and apply the HDR tool from HLG to SDR or other LUT of your choice.
If you stay in HLG you will produce a single file but is likely that HDR will only be displayed on a narrower range of devices due to the lack of support of HLG in computers. The HLG clip will have correct grading as the corrections performed when the project was in PQ with tone mapping will survive the editing as HLG and PQ share the same colour mapping. The important thing is that you were able to see the effects of your grade.
Project back in HLG you can see how the RGB parade and the scope are back to IRE but all is exactly the same as with PQ
In my case I have an HLG TV so I produce only one file as I can’t be bothered doing the exercise two times.
The steps to produce your master file are identical to any other projects, I recommend creating a ProRes 422 HQ master and from there other formats using handbrake. If you change your project back to HLG you will get a warning about the master display you can ignore it.
This is post is going to focus on exporting our videos for consumption on a web platform like YouTube or Vimeo.
This is a typical workflow for video production
We want to focus in the export to publish steps for this post as things are not as straighforward as it may seem.
In general each platform has specific requirements for the uploads and has predefined encoding settings to create their version of the upload this means that is advised to feed those platforms with files that match their expectations.
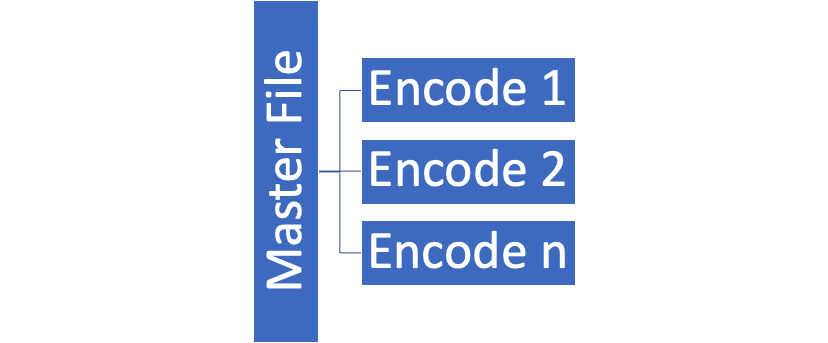
The easiest way to do this is to separate the production of the master from the encodes that are needed for the various platforms.
For example in Final cut this means exporting a master file in ProRes 422 HQ in my case with GH5 10 bit material. Each camera differs and if your source material is higher or lower quality you need to adjust however the master file will be a significantly large file with mild compression and based on intermediate codecs.
So how do we produce the various encodes?
Some programs like Final Cut Pro have specific add ons in this case Compressor to tune the export however I have had poor experience with compressor and underwater video to the point I do not use it and do not recommend it. Furthermore we can separate the task of encoding from production if we insert a platform independent software in the workflow.
Today encoding happens primarily by H264 and H265 formats through a number of encoders the most popular being x264 and x265 that are free. There is a commercial right issue to use HEVC (x265 output) for streaming so a platform like YouTube uses the free VP9 codec while Vimeo uses HEVC. This does not matter to us.
So to uploade to YouTube for example we have several options:
Upload the ProRes file
Upload a compressed file that we optimised based on our requirements
Upload a compressed file optimised for YouTube requirements
While Option 1 is technically possible we are talking about 200+ GB/hour which means endless upload time.
Option 2 may lead to unexpected results as you are not sure of the quality of YouTube output and how it matches your file so my recommendation is to follow option 3 and give the platform what they want.
YouTube recommends H264 settings as follow for SDR (standard dynamic range) Uploads
Progressive scan (no interlacing)
High Profile
2 consecutive B frames
Closed GOP. GOP of half the frame rate.
CABAC
Variable bitrate. No bitrate limit required, although we offer recommended bitrates below for reference
Chroma subsampling: 4:2:0
There is no upper bitrate limit so of course you can make significantly large files however for H264 there is a point in which the quality reaches a point that you can’t see any visible differences.
Recommended video bitrates for SDR uploads
To view new 4K uploads in 4K, use a browser or device that supports VP9.
Type
Video Bitrate, Standard Frame Rate (24, 25, 30)
Video Bitrate, High Frame Rate (48, 50, 60)
2160p (4k)
35–45 Mbps
53–68 Mbps
1440p (2k)
16 Mbps
24 Mbps
1080p
8 Mbps
12 Mbps
720p
5 Mbps
7.5 Mbps
480p
2.5 Mbps
4 Mbps
360p
1 Mbps
1.5 Mbps
YouTube Bitrate table
YouTube recommended settings are actually quite generous and if we perform a high quality encode we may easily be able to create smaller file however we are unsure of the logic that YouTube applies to their compression if we deviate so to be sure we will follow the recommendations.
It is very important to understand that bitrate controls the compression together with other factors however in order to get a good file we need to make sure we put some good logic in the analysis of the file itself this will greatly influence the quality of the compression process.
There is a whole book on x264 settings if you fancy a read here.
For my purposes I use handbrake and to make YouTube happy I use Variable Bit Rate with two pass and target bitrate of 45 Mbps. Together with that I have a preset that takes into account what YouTube does not like and then does a pretty solid analysis of motion as H264 is motion interpolated. This is required to avoid artefacts.
Note the long string of x264 coding commands
I have tested this extensively against the built in Final Cut Pro X YouTube Export.
Starting from the timeline and going directly into YouTube resulted in files of 88 Mb starting from a 7.06 GB ProRes 422 HQ comparable for the project. Following the guidelines and the handbrake process I ended up with 110.1 MB which is a 24% increase.
I have also exported to H264 in FCPX this gave me a 45.8 Mbps file however when I checked on YouTube their file it was still smaller than my manually generated file of 12%. I have used 4K video downloader to retrieve file sizes.
Same source file different encodes different results in YouTube
For HDR files there are higher allowed bitrates and considerations on colour space and color depth but is essentially the same story and I have developed HandBrake presets for that too.
When I have to produce an export for my own use I choose H265 and usually a 16 Mbps bitrate which is what Netflix maxes at. Using Quality at RF=22 produces around 20 Mbps files which is amazing considering the starting point of 400 Mbps for GH5 AVCI files. YouTube own files range between 10 and 20 Mbps to give you an idea once compressed in VP9. I cannot see any difference between my 16 Mbps and 20 Mbps files so I have decided to stay with the same settings of Netflix if it works for them will work for me.
There is also a YouTube video to explain in detail what I just said and some comparative videos here
For all my YouTube and Blog subscribers (need to be both) please fill the form and I will send you my 3 handbrake presets.
Edit following some facebook discussions: if you want to upload HD you have better results if you make the file 4K. According to my tests this is not true. Using x264 and uploading an HD file produces same or better results than the HD clip YouTube created out of the same source using a 4K upload. I would be vary about what you read on the internet unless you know exactly how clips are produced. 90% of the issue is poor quality encoding before it even gets to YouTube!
There are a lot of videos on YouTube that suggest that there is not much difference among the various recording settings of the GH5 for UHD.
To recap we have 4 settings for UHD (I will refer to PAL system because it is easier but all applies equally to 24p, the 30p/60p format will be the same with worse results)
100 Mbps 420 8 Bits Long GOP 25p
150 Mbps 420 8 Bits Long GOP 50p
150 Mbps 422 10 Bits Long GOP 25p
400 Mbps 422 10 Bits All-Intra 25p
The difference between Long GOP and All Intra is that in the Long GOP what is encoded is a group of pictures (GOP) and not separate individual pictures.
Within a Group of Pictures there are different type of frames:
I (Intra coded) frames containing a full picture
P (Predictive coded) frames containing motion interpolated picture based on a prediction from previous frames
B (bi-predictive coded) frames containing a prediction from previous or future frames
It is important to note that frames are not stored sequentially in a GOP and therefore the GOP needs to be decoded and the frames reordered to be played, this requires processing power.
The reason why H264 is very efficient is that within a group of picture there is only one full frame and the rest are predictions clearly if the prediction algorithm is accurate the level of perceived quality of long GOP is very high and similar to All-Intra clips.
This is the reason why comparing All Intra and Long Gop using static scenes or scenes with repetitive movement that can be predicted very accurately by the codec is a fundamental error.
Incorrect example here:
The scene is composed of static predictable objects with no motion and after YouTube compression the (wrong) conclusion is that there is no absolute difference between the codecs. Instead what this shows is the effectiveness of Long GOP when the prediction is accurate which is exactly the point of the codec plus the fact that YouTube flattens differences due to heavy compression and use of Long GOP.
Another example is a bit better as it uses a fountain which is a good representation of unpredictable motion
In the 300% crop you can see how All_Intra performs better than Long GOP in terms of prediction despite the YouTube compression, but generally those tests are unreliable if you see the last section of the video where there is a semi-static scene you cannot really take the three examples apart.
So why is that and is there any point selecting different settings on your Panasonic GH5?
In order to understand the workings we need to dig deeper into the structure of the GOP but before doing so let’s evaluate the All-Intra codec.
AVC All-Intra explanation
This codec records at 400 Mbps so with 25 fps this means circa 16 Mbits per frame or 1.9 MB per frame and there is no motion interpolation so each frame is independent from the others. The implementation of All-Intra of the GH5 does not make use of CABAC entropy encoding as Panasonic does not believe this is beneficial at higher bit-rates making this AVC-Intra implementation very close to ProRes as both are based on Discrete Cosine Transform.
If you consider a Jpeg image of your 3840×2160 frame on the GH5 you see that it stores around 4.8 MB per image because there is no chroma sub-sampling so if you wanted to have exactly the same result you would need to use ProRes 4444 to get a comparable quality (this not even taking into account that Jpeg are 8 bits images).
Video uses chroma sub-sampling so only part of the frame contain colours at a given time. Apple in their ProRes white paper declare that both ProRes 422 and 422 HQ are adequate to process 10 bit colour depth and 422 sub-sampling however they show some quality differences and different headroom for editing. If you count 50% for 4.2:0 sub-sampling and 67% for 422 you get around 2.34 MB and 3.5 MB frame sizes that correspond to ProRes 422 and ProRes 422 HQ individual frame sizes.
In simple terms All Intra 400 Mbps would fall short of Apple recommended bit-rate for 422 10 bit colour for circa 92 Mbps is like saying you are missing 0.44 MB from your ProRes 422 frame and 1.6 MB from ProRes 422 HQ and you have 0.3 MB more than ProRes LT however I do not have the full technical details of ProRes to evaluate directly.
The real benefit of such codec is that it can be processed with modest hardware without conversion as the AVC Intra codec is edit ready and each frame is captured individually without any motion artefacts and therefore the computer does not have to do a great deal of work to decode and render the clips.
In order to record All-Intra in your memory card you need a V60 or higher specs card which in terms of $ per GB costs you more than an SSD drive however you no longer need a recorder.
Coming back to the other recording quality option we still need to evaluate how the various long GOP codecs compare relative to each other.
In order to fully understand a codec we need to decompose the GOP into the individual frames and evaluate the information recorded. If you look on Wikipedia it will tell you that P frames are approximately half the size of an I frame and B frame are 25%. I have analysed the Panasonic GH5 clips using ffprobe a component of ffmpeg that tells you what is exactly in each frame to see if this explains some of the people claims that there is no difference between the settings.
An analysis with ffprobe shows a GOP structure with N=12 and M=3 where N is the length in frames of the group of pictures and M is the distance between I or P frames.
So each Group of Picture is made like this
IBBPBBPBBPBBP before it repeats again.
A size analysis shows that B frames are in average 14% of the I frame and P frames are around 44% of the I frame.
I
B
B
P
B
B
P
B
B
P
B
B
Size
1648326
247334
237891
728777
231947
228048
721242
228347
227544
713771
236866
232148
Ratio to I frame
100%
15.01%
14.43%
44.21%
14.07%
13.84%
43.76%
13.85%
13.80%
43.30%
14.37%
14.08%
With an average video bit-rate of 94 Mbps each GOP has 45.3 Mbps which means an I Frame has around 13.1 Mbits or 1.57 MB per frame and an equivalent All-Intra bit-rate of approximately 328 Mbps however this codec is using CABAC entropy encoding that Panasonic states is 20-30% more efficient than CAVLC used in All-Intra so net of motion artefacts this codec is pretty strong.
150 Mbps 420 8 Bits Long GOP 50p Deep Dive
An analysis with ffprobe shows a GOP structure with N=24 and M=3 where N is the length in frames of the group of pictures and M is the distance between I or P frames.
So each Group of Pictures is made like this
IBBPBBPBBPBBPBBPBBPBBPBB before it repeats again.
A size analysis shows that B frames are in average 13.4% of the I frame and P frames are around 41% of the I frame. With an average bit-rate of 142.7 Mbps each GOP has 68.5 Mbits which means an I Frame has around 11.3 Mbits or 1.35 MB per frame and an equivalent all Intra bit-rate of approximately 566 Mbps. Again this uses CABAC entropy encoding so the equivalent All-Intra is higher.
One very important aspect of the 150 Mbps codec is that as the GOP is double the length of the single frame rate 100 Mbps codec there are the same number of key frames per second and therefore it is NOT true that this codec is better at predicting motion. In fact it is exactly the same so if you had acquired a 100 Mbps codec at 25 fps and then slowed down the footage to half speed asking your editor to interpolate intermediate frames it would come to the same result although with some more processing required.
150Mbps 422 10 Bits Long Gop 25 fps
An analysis with ffprobe shows a GOP structure with N=12 and M=1 which means this codec does not use B frames but just I and P frames so the GOP structure is as follows:
IPPPPPPPPPPP before it repeats again.
A size analysis shows that P frames are on average 53% of I frames so this codec is in fact less compressed however this has also some consequences.
With an average bitrate of 150 Mbps each GOP has 72 Mbits which means an I Frame has around 10.5 Mbits or 1.25 MB per frame and an equivalent all Intra bitrate of approximately 262 Mbps. So this codec in terms of compression efficiency this is actually the worst and this is due to the lack of B frames.
We can only think that the Panasonic GH5 processing is not strong enough to capture 10 bit and then write 422 Long GOP with IPB structure.
Codec Ranking for Static Image Quality UHD
So in terms of absolute image quality and not taking into account other factors the Panasonic GH5 Movie recording settings ranked by codec quality are as follows:
400 Mbps 422 10 Bit All intra 25 fps (1.9 MB per frame)
100 Mbps 420 8 Bit Long Gop 25 fps (1.57 MB per frame)
150 Mbps 420 8 Bit Long Gop 50 fps (1.35 MB per frame)
150 Mbps 422 10 Bit Long Gop 25 fps (1.25 MB per frame)
The 100 Mbps and 400 Mbps codec are marginally different (21% larger frame size) with the 422 10 Bits long GOP really far away.
Conclusion
If you want to record your footage to the internal memory card you are really left with two choices:
Use the 100 Mbps Long Gop codec it is very efficient in the compression and the perceived quality is very good. It does however require you to convert to ProRes or similar during editing if you don’t want to overload your computer as the codec is really heavy on H264 features. You need to get the exposure and white balance right in camera as the clips may not withstand extensive corrections. There is a risk with footage with a lot of motion of some errors in motion interpolation that can generate artefacts.
Buy a V60 or V90 memory card and use 400 All intra at single frame rate. This will give you edit ready footage of higher quality without motion artefacts, You still need to get exposure and white balance right in camera as the headroom is not so large to allow extensive corrections. The bit-rate and frame size is not sufficient to really give you all the benefits of 422 sampling and 10 bit colour but it will be a good stepping stone to produce good quality rec709 420 8 bit footage.
Generally there appears to be no benefit using the internal 422 10 Bit codec nor the 420 8 bit double frame rate due to the limitations of the GOP structure, here Panasonic has created a few options that to be honest appear more a marketing effort than anything else.
There may be some use to the 150 Mbps double frame rate if you intend to slow down the footage after the conversion to ProRes or similar but the extremely long GOP does not make this codec particularly robust to scenes with a lot of motion and in any case not more robust than the 100 Mbps codec.
A final thought if you are interested in 10 bit colour is that the FHD All Intra 200 Mbps codec has enough quality and headroom to allow manipulation. This is in fact the only codec that has bit-rate higher than ProRes HQ at least at 24 and 25 fps so if you want to check the real range of colours and dynamic range the camera is capable of you should try this codec.
In the previous post I described the HDR settings especially relevant if you have an external recorder. However there is quite a lot of discussion if it is worth shooting HDR underwater video with the Panasonic GH5 at all. This follows the discussions about using VLOG L underwater versus studio production: many people that start using VLOG L revert to a more normal setting something using standard profiles and not even Cine profiles because the workflow is just too much work.
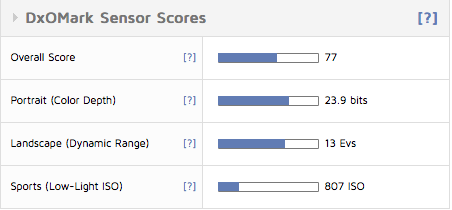
In general there are 3 characteristics that are important to underwater footage but more in general to any footage: colour , contrast and noise. This is the reason why when you look at DXOMark you have some measures of those 3 characteristics.
What DxOMark is telling us is that looking at a RAW image produced from the GH5 the colour depth is at best 23.9 bits, the dynamic range is at best 13 Evs and the Low-light ISO that still gives some decent colour depth and dynamic range is 807 ISO.
Let’s have some interpretation of those measures colour depth of 23.9 bits means 15.6 millions colours, this is actually less than true colour of an sRGB display. Considering the RGB scale the 23.9 bits per colour really mean 8 bit colour. OK so why does the camera have a 10 bit colour (equivalent to 30 bits per pixel no camera reaches that even full frame) option at all? We will talk about it in a minute…
Dynamic range for a RAW image is 13 Evs however Panasonic says VLOG L offers 12 stops compared to 10 stops of professional SDR footage. Now 12 stops require a display with a contrast ratio of 4000:1 which is beyond all commercial computer monitor and in the range of HDR devices. The new VESA DisplayHDR standard HDR600 is a minimum requirement to display this level of contrast ratio.
Finally the Low-light ISO of 807 (corresponding to 1600 on your GH5 as ISO values are always incorrect and geared towards higher values for marketing reasons) means that unless you are at the surface pretty soon there won’t be any colour or dynamic range to show (low-light ISO requires 18 bit colour depth 9 Ev Dynamic range and 30 dB SNR).
WHAT ABOUT THE GH5S?
The GH5s will give you 1.5 stops more of low-light performance and therefore your footage will look good until ISO 2400 or ISO 4800 looking at the camera settings which is quite a bump.
OK now coming to the main point of the post having seen those limitations why would I bother shooting in VLOG or HLOG?
First consideration: Noise
As we have seen both dynamic range and colour depth drop considerably when ISO goes up. In short unless you have abundance of natural light or you are shooting macro with a lot of artificial light is unlikely you will see any benefit shooting VLOG or HLG.
Considering that compression brings additional noise here we see why shooting with an external recorder at higher bitrate really helps fighting noise even if you don’t shoot log because you reduce the compression artifacts. If you don’t have a recorder consider setting a max ISO limit quite low around 1600 on your GH5 or you will see a lot of grain.
Second consideration: color depth
If the camera cannot even resolve 10 bits per pixel RGB why would you shoot 10 bits? When you shoot VLOG or HLG you are not operating in the REC709 colour space which is limited to 8 bits so it is possible that the colour that the sensor is capturing are not all the 16.7 millions of the RGB palette but some of them are outside in the Dci-P3 or even REC.2020 colour space. Clearly if you do not have a 10 bit screen (and almost all computer screens are 8 bits) or 8 bits with FRC to simulate 10 bits, this is a total waste of time and you won’t see those colours and nobody on a computer working in sRGB will see them either. So unless you have a proper screen to watch your clips there is no point working in 10 bits. When it comes to grading again if you can’t display those colours it won’t be possible to do your work properly so don’t waste your time and shoot in 8 bits.
You now understand why you can’t see any difference in all those youtube comparison that by the way have been encoded 8 bits!
A lot of people records in VLOG 10 bit to then produce in REC709 that has 8 bit colour and the reason is that they have proper grading monitors to see what they are doing.
Just to give you an example laptops with exception of some recent MacBook Pro and others like the Dell XPS can’t display 10 bit colour. An iMac displays 10 bit colour and some screens that support DCI-P3 also are capable any other RGB screen won’t work.
Conclusion don’t waste your time with 10 bit if you don’t have a decent screen and if you only produce for youtube.
Third consideration: Dynamic range
VLOG and HLG start at base ISO 400 (that really is 200) and this is where you have your 12 stops. Once you get to ISO 1600 (nominal 3200 on your GH5) you still have 9.5 stops but the colours are gone. Generally it does make sense to shoot LOG however the issue may well be that your editing display is not HDR600 and therefore you can’t really see what you are shooting accurately. Having a screen that can correctly display HDR is even harder than finding one that can display 10 bit colours. What you need to consider though that unless you are capturing a sunburst or a backlit scene or you are shooting the surface you will not have more than 10 stops in your scene anyway.
Conclusion
The settings you can shoot really depend on your editing and display devices.
If you have a laptop or just an 8 bit computer screen and no external recorder you can shoot at 100 mbps 8 bit colour with the picture profile of your choice, standard, natural, cine like whatever you like as you won’t be able to tell the difference at any point in the process from any other formats 10 bits logs etc.
If you have a DCI-P3 display or better for editing shoot 10 bit colour. Examples are iMac and MacBook Pro or some Philips or Acer screens on the market.
If you have an HDR display for editing and an HDR Tv set shoot HLG.
If you have an external recorder shoot in PRORES HQ (as the GH5 does not support camera RAW). Some of those recorders like the Atomos Shogun Inferno support HDR and can also be used for editing with some adapters so shoot in HLG to get the best results.
Generally VLOG L requires a lot of work and is best suited to studio production so if you don’t have a good grading set up don’t waste your time with it.
If you are one of those shooters that after a lot of trial and error ended up shooting 8 bits colour because you don’t have a recorder or shooting natural or cine-like because you don’t have a proper grading HDR monitor now you know why you are doing what you are doing….