I have been watching and reading lots of content about the new Sony A1 II.
I own two A1 and I have been evaluating if an upgrade was worth it. My interest as an hybrid shooter taking photos and video is to have the most versatile camera on the market however I have so far decided not to move forward.
There is a very interesting video from Marc Galer
Look at timestamp 11:17 or for your convenience this the table of the features that according to Marc are worth the upgrade. I have then analysed if they are relevant to underwater shooters.
Feature
Underwater Relevant
Comment
Improved Subject Recognition
No
Insect can see a nudibranch but it is not better than just tracking
Precapture, Speedboost
No
Burst rate required are low
Improved steadyshot
No
No long exposures, flash freezes motion
Multi angle monitor
No
housing does not allow movement
Still movie dial
No
Irrelevant
Ability to change drive mode from dial or menu
No
Improved AWB and High ISO noise reduction
No
Dynamic active steady shot for movies
Yes
Video only
As you can see there is really no benefit in the upgrade from this point of view.
Additional considerations
the A1 II has the same identical sensor of the original A1 there is no image quality improvement
Sony has a tendency to boast on their stabilisation rating a test of the A9III conducted by optyczne reveals an improvement of 1 stop over the A1.
The body shape is the same of the A9III and you need a new housing.
Let’s talk about money I will refer to USD prices differences in other countries will be higher due to sales tax.
Sony A1 Camera
5498
Sony A1 II Camera
6498
Difference
1000
The arrival of the new mkII has meant a price drop for the A1 and there are also some trade in bonus options making it more attractive.
Housing A1
4657
Housing A1 II
4920
Delta
263
The new housing is more expensive than the previous unclear for which motivation but here we are.
In summary to get a new A1 II you need $1,263 more compared to an A1.
Here are some ideas of what to do with that money
Total Difference
1263
Sony 90mm Macro
1098
Sony 28-60mm
498
Sony 16-25
1198
Canon 8-15
1249
I suppose there are many other ways to spend the difference,
If I was a sport photographer I would definitely be tempted by precapture however I am not. I do have two bodies that I bought for resilience and backup so perhaps I would swap one for the mark II but I need some proper review to see if the steadyshot has already improved as that is the reason why I kept a Panasonic GH7. Telelens video without a tripod is not a possibility with the original A1.
Hope you found this useful if you decided to save $1,263 and want to buy me a drink click the donate button.
This is my second post on the Lumix GH7. After discussing in detail autofocus which was for me top priority I want to cover more in detail image quality and ergonomics.
Image Quality
The GH6 was not a step forward in terms of image quality from the GH5M2. I have owned all the models GH5, GH5M2, GH6, GH7 and from a photography point of view the pinnacle has been the GH5M2 which was a more significant step forward from the original model most people think. I have provided test data to photonstophotos for all the follow up models and this graph summarises the situation when it comes to RAW PDR.
What this tells you is that both the GH5M2 and GH7 are a step forward from the original GH5 while the GH6 was an improvement only from ISO 800. Considering that underwater on micro four thirds you will always be shooting ISO 100-200 the GH6 was not really adequate for photo performance. It is true that the GH5 has been really the target of video shooters however GH stands for Hybrid cameras and the series has been made of models that could do very good video and photos. The GH6 was really a video beast the GH7 that has the same body is back on the GH5 tradition of top performing hybrid camera.
A few key improvement over the GH5 include:
Increased resolution 25 Megapixels vs 20.2
New RAW files with 16 bits depth
Dual Gain Output Circuit
Back illuminated sensor
The GH7 does have some interesting topside features like the ability to record pre-burst images and reach 60 fps with continuous autofocus but those are more for the bird shooter and not applicable to underwater use. Panasonic declares that image quality may drop for shutter speed slower than 1/15 at ISO 100 and therefore this should be your slowest setting also underwater. I do not see this as a limitation even for panning shots.
Many users confuse resolution and megapixels. Spatial resolution is computed on a single dimension in line per millimetre. Therefore the increase in resolution compared to the GH5 and GH5M2 is only 11.4% (5776/5184) this is not exactly life changing but more pixels are always better than less pixels bearing in mind that pixel size and image overall noise are NOT related.
With regards to the dual gain output circuit the increase in peak dynamic range compared to the GH5M2 is only 0.3 Ev (10.17 vs 9.87) and is entirely due to the fact that base sensitivity is now ISO 100 instead of 200.
In the ISO range between 200 and 2500 the GH7 is not better than the GH5M2 and from ISO 3200 it gets better in virtue of noise reduction. Again we are never going to shoot ISO 3200 underwater so this is for us of limited interest.
Perhaps the most interesting feature of the GH7 are the new 16 bits RAW files.
A typical wide angle image has a size of 38 MB which is rather large considering the 25 Megapixels, for reference Sony A7 IV files are around 42 MB. There are several discussion about the efficiency of Panasonic compression but we are not going to go and deep dive on this. What matters to use is how much beating the raw files can take.
Modern cameras exhibit peak dynamic range when underexposed 3 stops from a grey card (I know this sounds strange but is a fact). The way to assess how much beating a file can take is to select one image where your strobe did not fire or was too weak for the situation and increase exposure three stops and see the resulting image.
This is an underexposed image as an example where I had forgotten to turn up the strobes.
This is the image applying +3 exposure and other corrections.
The camera can easily take +3 adjustment as well as shadows up to 100% which is an excellent result.
The other aspect of image quality is of course the lens and we can here use the excellent canon 8-15mm in the entire zoom range.
Compared with my A1 in a similar shot I can say that at the edges the GH7 is superior and in the centre the difference in actual resolution is small to non-existent despite half the pixels.
Full resolution shot GH7 Full resolution shot A1
This is because the lens shot at f/16 drops considerably in resolution compared to f/8 which are the equivalent apertures in full frame to micro four thirds. The files are full resolution I let you do the pixel peeping.
This resolution chart shows the underlying reason when the lens goes from f/8 to f/16 looses 30% of the resolution. Taking into account the smaller pixels of the GH7 this could mean an additional drop to the point the images are indeed very similar.
All in all the RAW files of the GH7 can take a lot of beating without issues as long as you do not clip the highlights like any other camera.
In general terms I feel the RAW files of the GH7 are similar in handling to my A1 and A7C II.
Dive Guide
Housing Ergonomics
Lets’ first cover the drawbacks of the Nauticam housing.
As mentioned in the autofocus post the housing does not give you access to the joystick which is a drawback. There are other two issues with the housing, the handles are angled forward, something typical of the Nauticam GH series that I continue not to understand. Why would the GH5 be any different from other cameras?
Not all function buttons are accessible in particular the two on the left side of the camera are not. Those are to be fair not the most important buttons and there is already a variety of buttons and controls available so except the joystick there will not be an issue underwater.
The lever under the front ring controls the function buttons 2 and 3 that correspond to the front two buttons of the camera.
FN2 FN3
I recommend using one for constant preview, hitting will circle through aperture simulation, shutter simulation or nothing and the other can be used to recall the focus limiter which is very important for macro shooting as explained in the previous post. The function button on the back can be your fn 9 to recall the focus area movement useful if you want to move it.
In total you have access to 3 function buttons as well as white balance, ISO, exposure compensation, focus mode, operation lock, EVF/LCD, quick button, menu and the four arrows, delete, mode, shutter mode, playback, movie, af on so there is nothing really missing.
FN button instead of joystick control can be used to move the focus area
One very important feature is that the handles position can be adjusted, I move out the left handle so that the lens is central to the handles, on my A1 I needed to buy an extension as the port is closer to the left handle.
The housing also has an M10 accessory port as well as the ability to host M5 like the A1, and two ports for monitor and vacuum valve in addition to a cold show
While nauticam recommends the M5 accessory personally I find the cold shoe and especially the M10 port more suitable for focus light and external monitors.
One awkward thing is the N120 to N85 adapter port has the release on the bottom of the camera but that is not a housing issue yet something to bear in mind. The housing is not small at 331x176x136 with a weight of 2.8 kg is indeed similar or equal to a full frame camera.
The final consideration is that the price of the GH6 housing that is compatible with the GH7 is very high, more than a Sony A7 IV, less than Sony A1 and way more than other smaller micro four thirds body as well as other full frame (the S5II housing costs less).
Who is the GH7 for?
The Panasonic GH7 is without a doubt one of the most capable hybrid mirrorless cameras on the market however due to the housing price is unlikely to be attractive to the masses. If you are cost conscious you can get the OM-1 for less due to the smaller housing, if you want performance several full frame cameras will incur similar cost. The real strength of the micro four thirds is the lens choice. You can cover everything with the Canon 8-15 or if you prefer with the Tokina 10-17 there are many wide and macro lenses and the huge depth of field means everything will be consistently sharp across the frame. The real strength of the GH7 though is hybrid use, if you want a camera equally capable of top range photos and videos you are looking at Sony A1 or Nikon Z8 or similar or the GH7 and here it becomes interesting for the latest Panasonic. In the near future I will provide some details of how the GH7 performs as a video capture device.
The GH7 is the first model of the GH line to feature Phase Detection Autofocus. This is probably the single most important feature for the underwater shooter and therefore I have thought of putting together this post to give my impression from shooting the camera both at wide angle and macro.
There will be a separate post on image quality to see how the camera performs and how far the files can be strecthed.
Please note that the camera focuses differently in video than it does for photos and therefore you should not draw any conclusion for video autofocus from this post except that due to phase detection the infamous DFD pulsing no longer occurs.
The GH7 is physically identical to its now phased out predecessor GH6 therefore the housing fits both the GH6 and GH7. I sourced a second hand Nauticam GH6 housing from my friend Pietro Cremone of Fotosub Italia. The GH7 uses the same Nauticam trigger as the GH5/6 series.
General Autofocus Settings for the GH7
If you look in the menu nothing has changed from the previous Panasonic cameras.
Single Area + (includes anything touching the focus area)
Single Area (limited to subjects fully inside the focus area)
Pinpoint
Pinpoint is only available for single autofocus and subject detection can be enabled for any zone. The camera can recognise humans, animals, motorcycles, cars, trains and aeroplanes. The Animal setting has a body only mode in which case it will detect multiple animals and eye and body in which case it will detect one animal. This detection method works with fish and if you want to use it I recommend animal body only for wide angle and eye body for fish portraits. What has changed inside is that now for continuous autofocus the camera uses phase detection while single autofocus still relies on Panasonic DFD which is a sophisticated contrast detection method. The camera defaults to single autofocus in low light and clearly indicates this in the display so that if you need continuous you know it is time to turn on your focus light. I did not get this indicator in open water once.
One issue I have is that the joystick is not available through the housing so I needed to set a button to highlight the focus area and press the arrows to move it when I needed it. This is a considerable handicap compared to the A1 which topside does not exist as the camera has a joystick that unfortunately the Nauticam housing cannot control.Not many Nauicam housing have a joystick but Sony full size bodies, Canon and Nikon top of the range do.
To resolve this and make operations quicker you need to customise your camera for underwater use. Change the joystick to Fn and assign focus area to the joystick. This will allow you to skip one step compared to focus area select where you need to navigate to access focus area.
Sets the joystick movement on the recording screen. [D.FOCUS Movement]: Moves the AF area and MF Assist. (AF Area Operations, Record Using MF) [Fn]: Operates as Fn buttons. [MENU]: Operates as . Operations that can be performed by moving the joystick are disabled. [OFF]: Disables the joystick.
You then go to the Function Button set up and set Fn9 to Focus Area Set.
Macro lenses tend to focus hunt and take a long time to move from infinity to your focus point, this is a problem in any format unless you use a focus limiter. The challenge when using a limiter on the lens is that in most cases once the camera is inside the housing and you have made a choice you cannot change it during the dive and therefore miss photo opportunities when the subject is outside your range.
The GH7 however has a software focus limiter feature that is extremely useful. You can set the focus between a near and far point and the camera will increase the focus speed significantly afterwards. This is also very useful to make sure that you do get close to fish.
You can assign this feature to a function button to quickly turn it on and off.
For the purpose of my tests I did not use this feature as I wanted to stress the setup and thought of using it only if I had problems but I did not. I find this feature invaluable to ensure you get really close. I have discovered when using wet diopters that all the wet lens was doing was forcing me to get closer but indeed I could have used the naked lens to get the same shot. In consideration of the limited depth of field I rarely use wet diopters with dedicated macro lenses on micro four thirds as the imaging frame is as small at 17.3×13 mm in size.
One thing that may be worth for close up is to customise the AF settings, there are 4 different sets of parameters you can use and you can also customise the AF to be near or far in addition to recalling the focus limiter with a button.
In the future I will need to check more the tracking without subject detection that can be useful in some cases where the camera does not find a subject, however using a large single area and the cursor I could cover all shooting situations with no issues.
Wide Angle with the Canon fisheye 8-15mm
Let me start by saying that I am not a fan of shooting fisheye lenses with Continuous Autofocus as the depth of field is high and the focus range is so limited that rarely it matters.
With the GH7 I use the Canon fisheye 8-15mm using a metabones adapter and this in the past only supported single autofocus. I noticed some vignetting on the bottom side of the frame that I did not experience with the GH5 series and I need to double check but otherwise the setup is identical to what you see here on this website.
Metabones released firmware V4.10 on 12 July 2024 declaring continuous autofocus compatibility with the Panasonic G9M2 which has indeed the same AF system of the GH7.
The update also improves general performance. The link in case you do not have it is here.
I updated my adapter and I can confirm continuous autofocus works correctly with the Canon 8-15mm. Like it does with the Sony camera the focus is a bit wobbly however it works fine. Yet my preference unless you shoot a fish portrait with the fisheye is to use single AF.
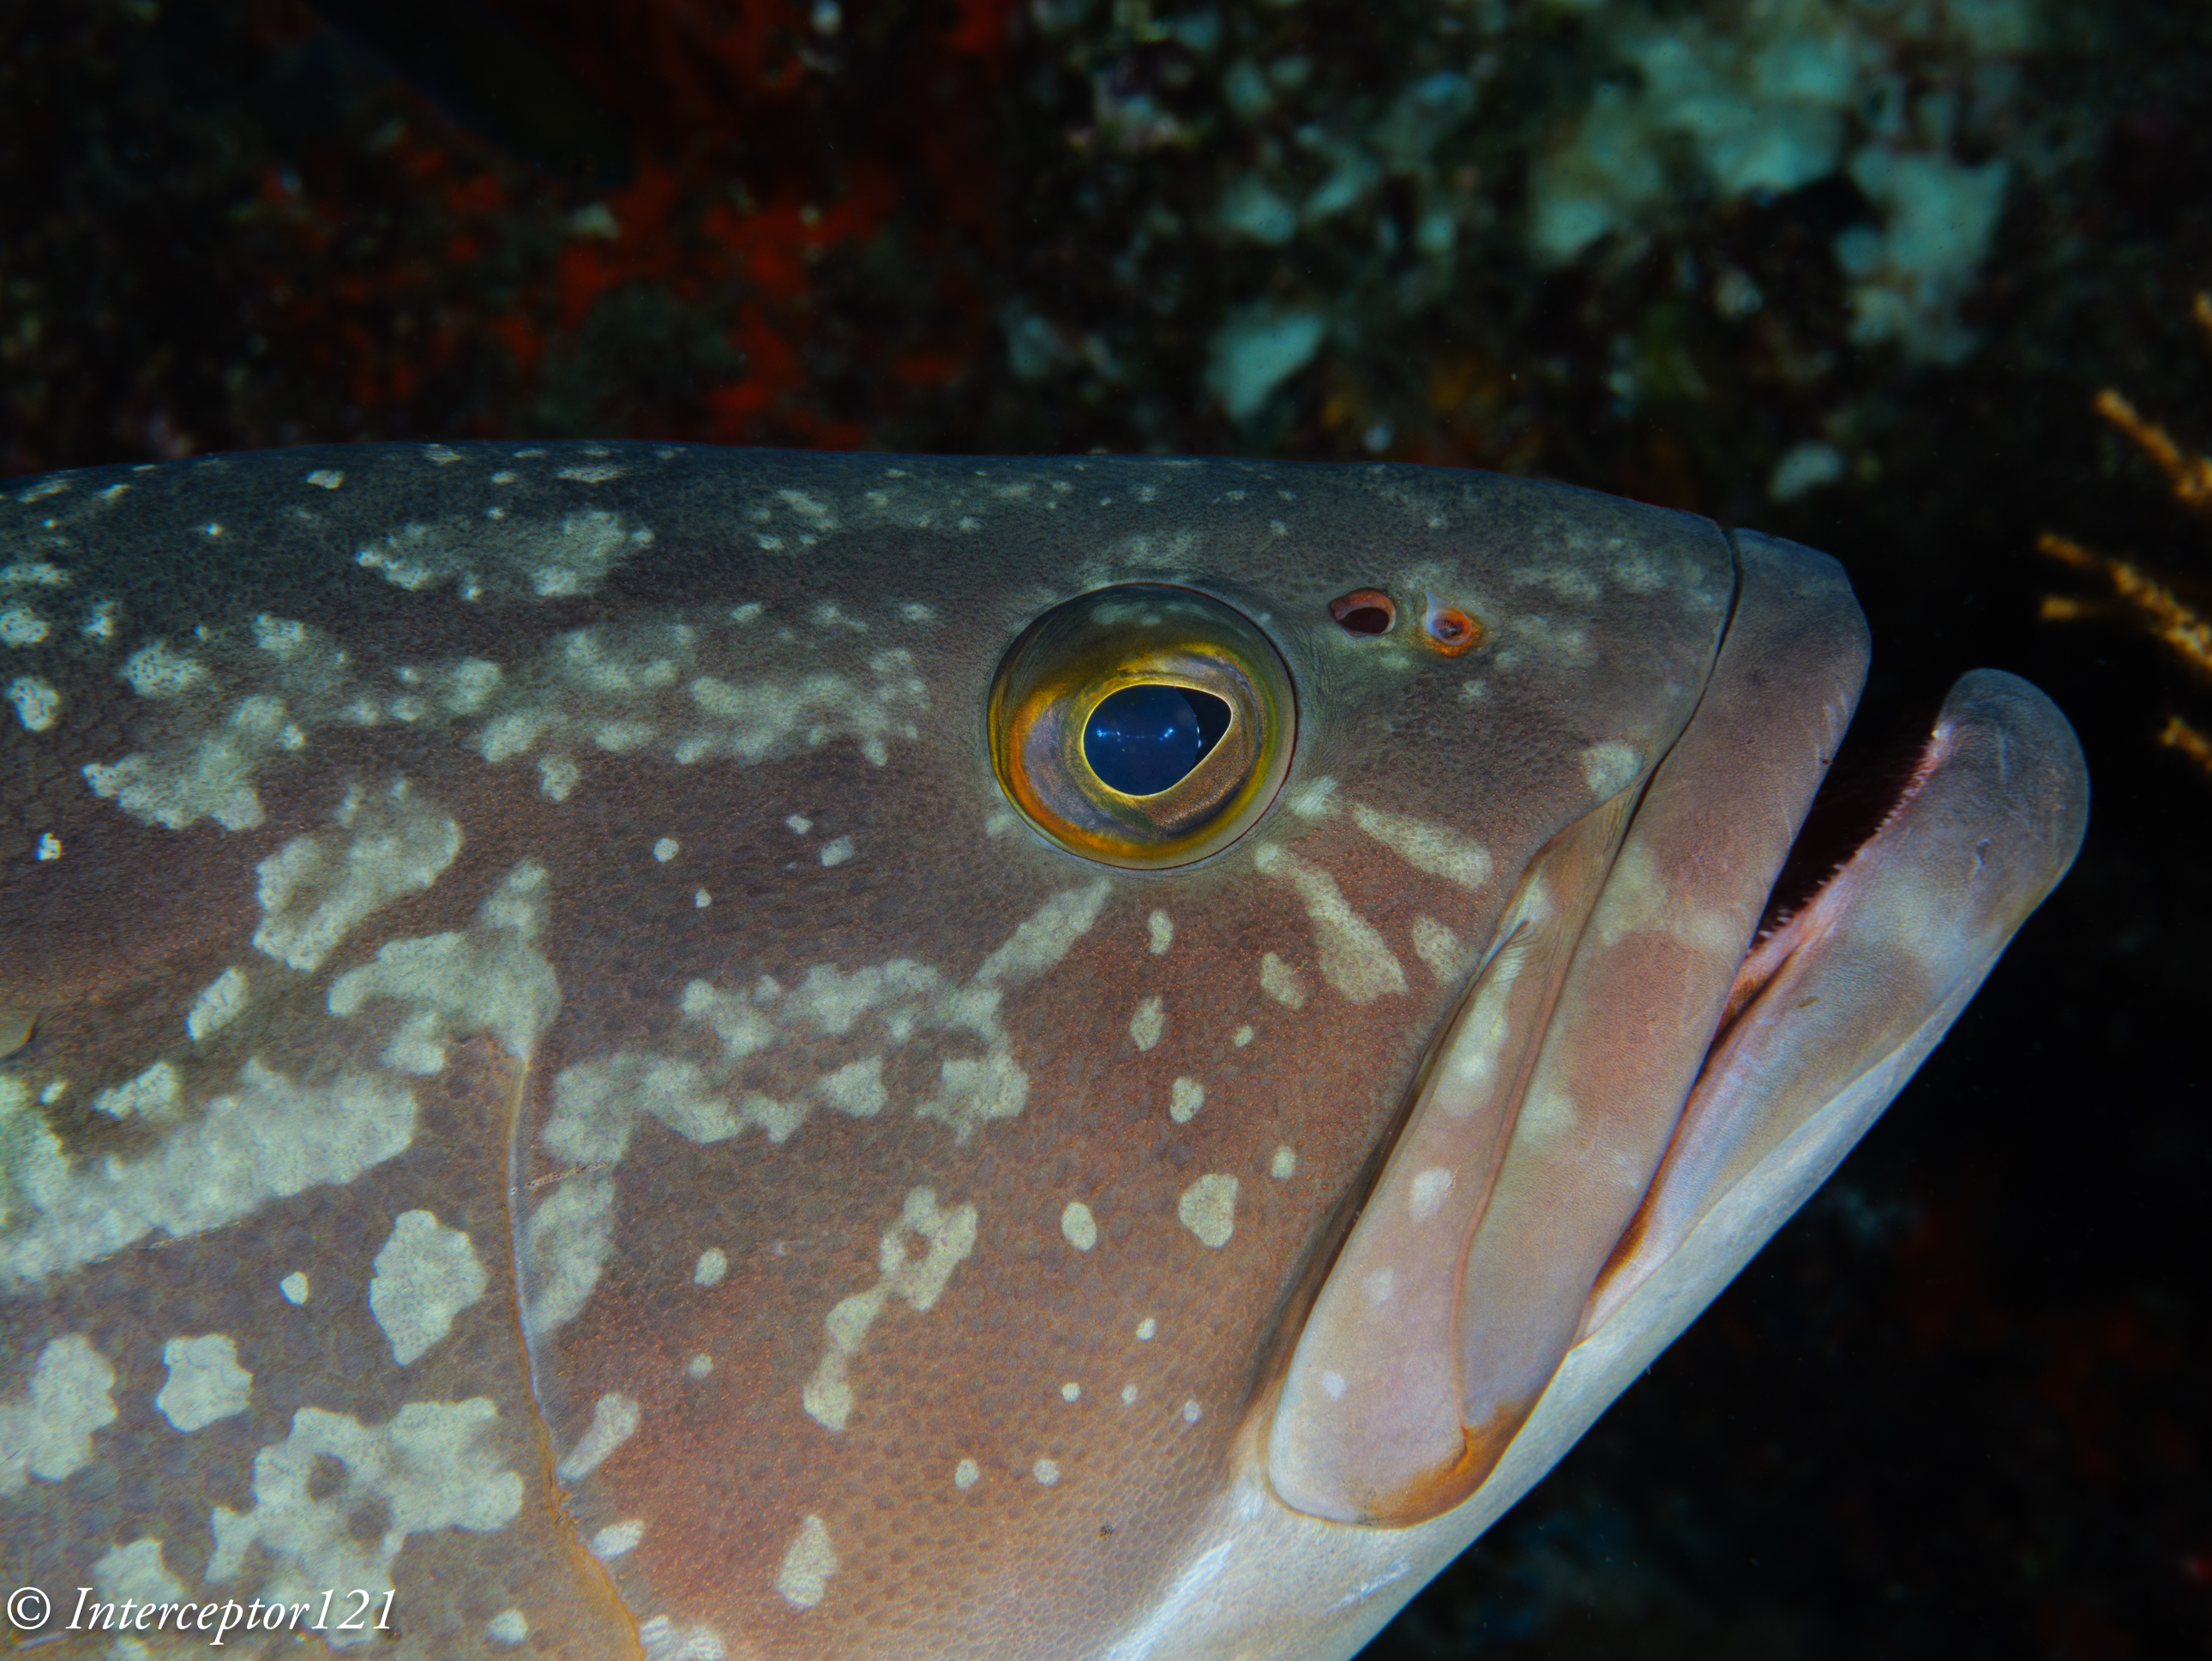
I used zone focus with subject detection, the GH7 does recognise fish and fish eyes so it did not have problem locking onto this grouper.
Fish was not always recognised, especially in those cases where only one eye was visible and the fish was on busy background, however the MFT camera combined with the 8-15 means there is always depth of field to fix any issues of focus at wide angle. A better option is to use animal detection without eye focus especially for schooling fish.
As I said before this was more academic so in the following dives I switched to single autofocus for wide angle because it is faster on the metabones, I do the same on the A1. The GH7 focussed very well. Few shots for illustration of the already known superb image quality of the Canon 8-15mm combined with the GH7.
Diver with GrouperSea StarsTubeGiant Clam
Close up work with the Panasonic 45mm Macro
For close up work I use the PL 45mm because it has the best rendering on the MFT landscape. Here I used continuous autofocus by norm using a single area or zone.
I have been advised by Panasonic not to use tracking functionality however topside tests indicate it may work ok underwater. Many people get confused between tracking and subject detection so it may be worth some explanation. Tracking works with or without subject detection and allows you to choose an area on the frame that may or not correspond to a detected subject and then the focus points follow this area. It is especially useful when the camera does NOT detect a subject. Subject detection works differently: it uses the camera live feed to scan for shapes using a deep learning algorithm when a shape is identified the location of the focus points is passed to the autofocus engine to take the shot. Strictly speaking the camera is not tracking an area of choice but detecting one or multiple targets across the frame. This has a risk when there are multiple targets as the camera may jump from one to another however in close up work this is not generally an issue. If the camera detection works there is no need to use tracking as the subject detection mechanism is quicker and more effective.
I activated subject detection with Single Area + and the camera identified all fish with eyes, in my case groupers, gobies and blennies. For nudibranchs I got a shape around the body most times. The subject detection for fish is way more successful than my A1 but I do not know how it compares with the latest implementation of the A7R V that has more detection modes like insect that may be relevant.
I took 255 shots in a dive with the 45mm of which 5 did not have a subject in focus and of those 2 had no subject as the fish had run off the frame.
For Macro you may want to activate auto review for 0.5 seconds, now this allows you to see where exactly the camera focused.
The Panasonic PDAF system focuses like a DSLR with the lens wide open. This is different from other mirrorless systems like Sony or Nikon and it means that when you stop down the lens the camera takes longer to take the shot and can potentially have focus shift, this is mitigated by the significant depth of field of the cropped format.
The GH7 focus right on the eye of this large grouper
I had a very high success rate as mentioned and only in a few circumstances the focus was off the eye but more because the fish had moved too quickly and I was at close range.
This focus system is excellent for shots wide open and you can easily obtain nice bokeh with eyes in sharp focus.
Subjects like nudibranchs can move fast or be on little algae that is swaying in the current, the MFT system with the huge depth of field available means you can achieve the effect you want easily. Different shots at various f stop
F4F5.6F8
The GH7 like the GH5 and GH6 can sync with the strobes at 1/400 using the Nauticam trigger which also supports rear sync. This is a value only the A1 can match and is very useful for close up work as it easily gives you dark backgrounds in the right conditions.
Take into account that the depth of field even at f/11 on MFT equivalent to f/22 on full frame is 1 cm at close range therefore some really small critters may even need f/16 or more.
I did not have a single shot with focus on the background which for me is quite impressive.
The 45mm maintains good sharpness even at f/10 and further but I did not stress the set up in my tests.
I had a focus light but I never had to turn it on because the GH7 focuses wide open, my strobes have a pilot light but this is only useful if you aim at the subject which in most cases I actually do, again there was no need to use it.
Conclusion
The Panasonic GH7 performs very well both at wide angle with a dome port and at close range with a macro lens. Continuous autofocus is reliable and appears to work fine without a focus light even when the shooting conditions are not easy. Subject detection recognises fish and fish eyes and makes shooting easy. The only remark is the lack of joystick control on the Nauticam housing that would make it even easier to work with single area focus, the operation is still possible but requires two button presses. I would trust the GH7 as much as I trust my A1 with the reservation of very dark environments that I did not have time to test.
The debate between resolution and depth of field is even more relevant today with the discontinuation of DSLR and the rapid growth of Mirrorless cameras.
I have been a mirrorless user since 10 years now and I am pretty familiar with the benefits and disbenefits of the system.
One of the main disbenefits I have found especially when moving up to the Sony E-Mount full frame system has been lack of depth of field in close up shots.
While the Canon RF and Nikon Z mount still allow apertures of f/32 on their macro lenses, the Sony 90mm Macro only goes up to f/22. This is indeed a serious limitation for macro shooting. The reason is unknown but all Sony E-mount lenses stop at f/22.
It may be that this is related to the loss of resolution due to diffraction.
On full frame sensor the diffraction limit is reached around f/20 however resolution starts to drop much sooner. Also consider that effective aperture of macro lenses is much smaller due to changes of the effective focal lenght, angle of view but this applies across the board and I do not want to make this post more complicated.
This is a resolution chart produced by lenstip for the Sigma FE 105 Macro. You can see that the resolution drops from a stellar value of 80 lp/mm at around 28 lp/mm at f/22, the lens has lost 65% of the peak resolution that was reached at f/4.
Depth of field however does matter in close up photography and has been one of the reason why I have recently invested in a Panasonic Lumix GH7.
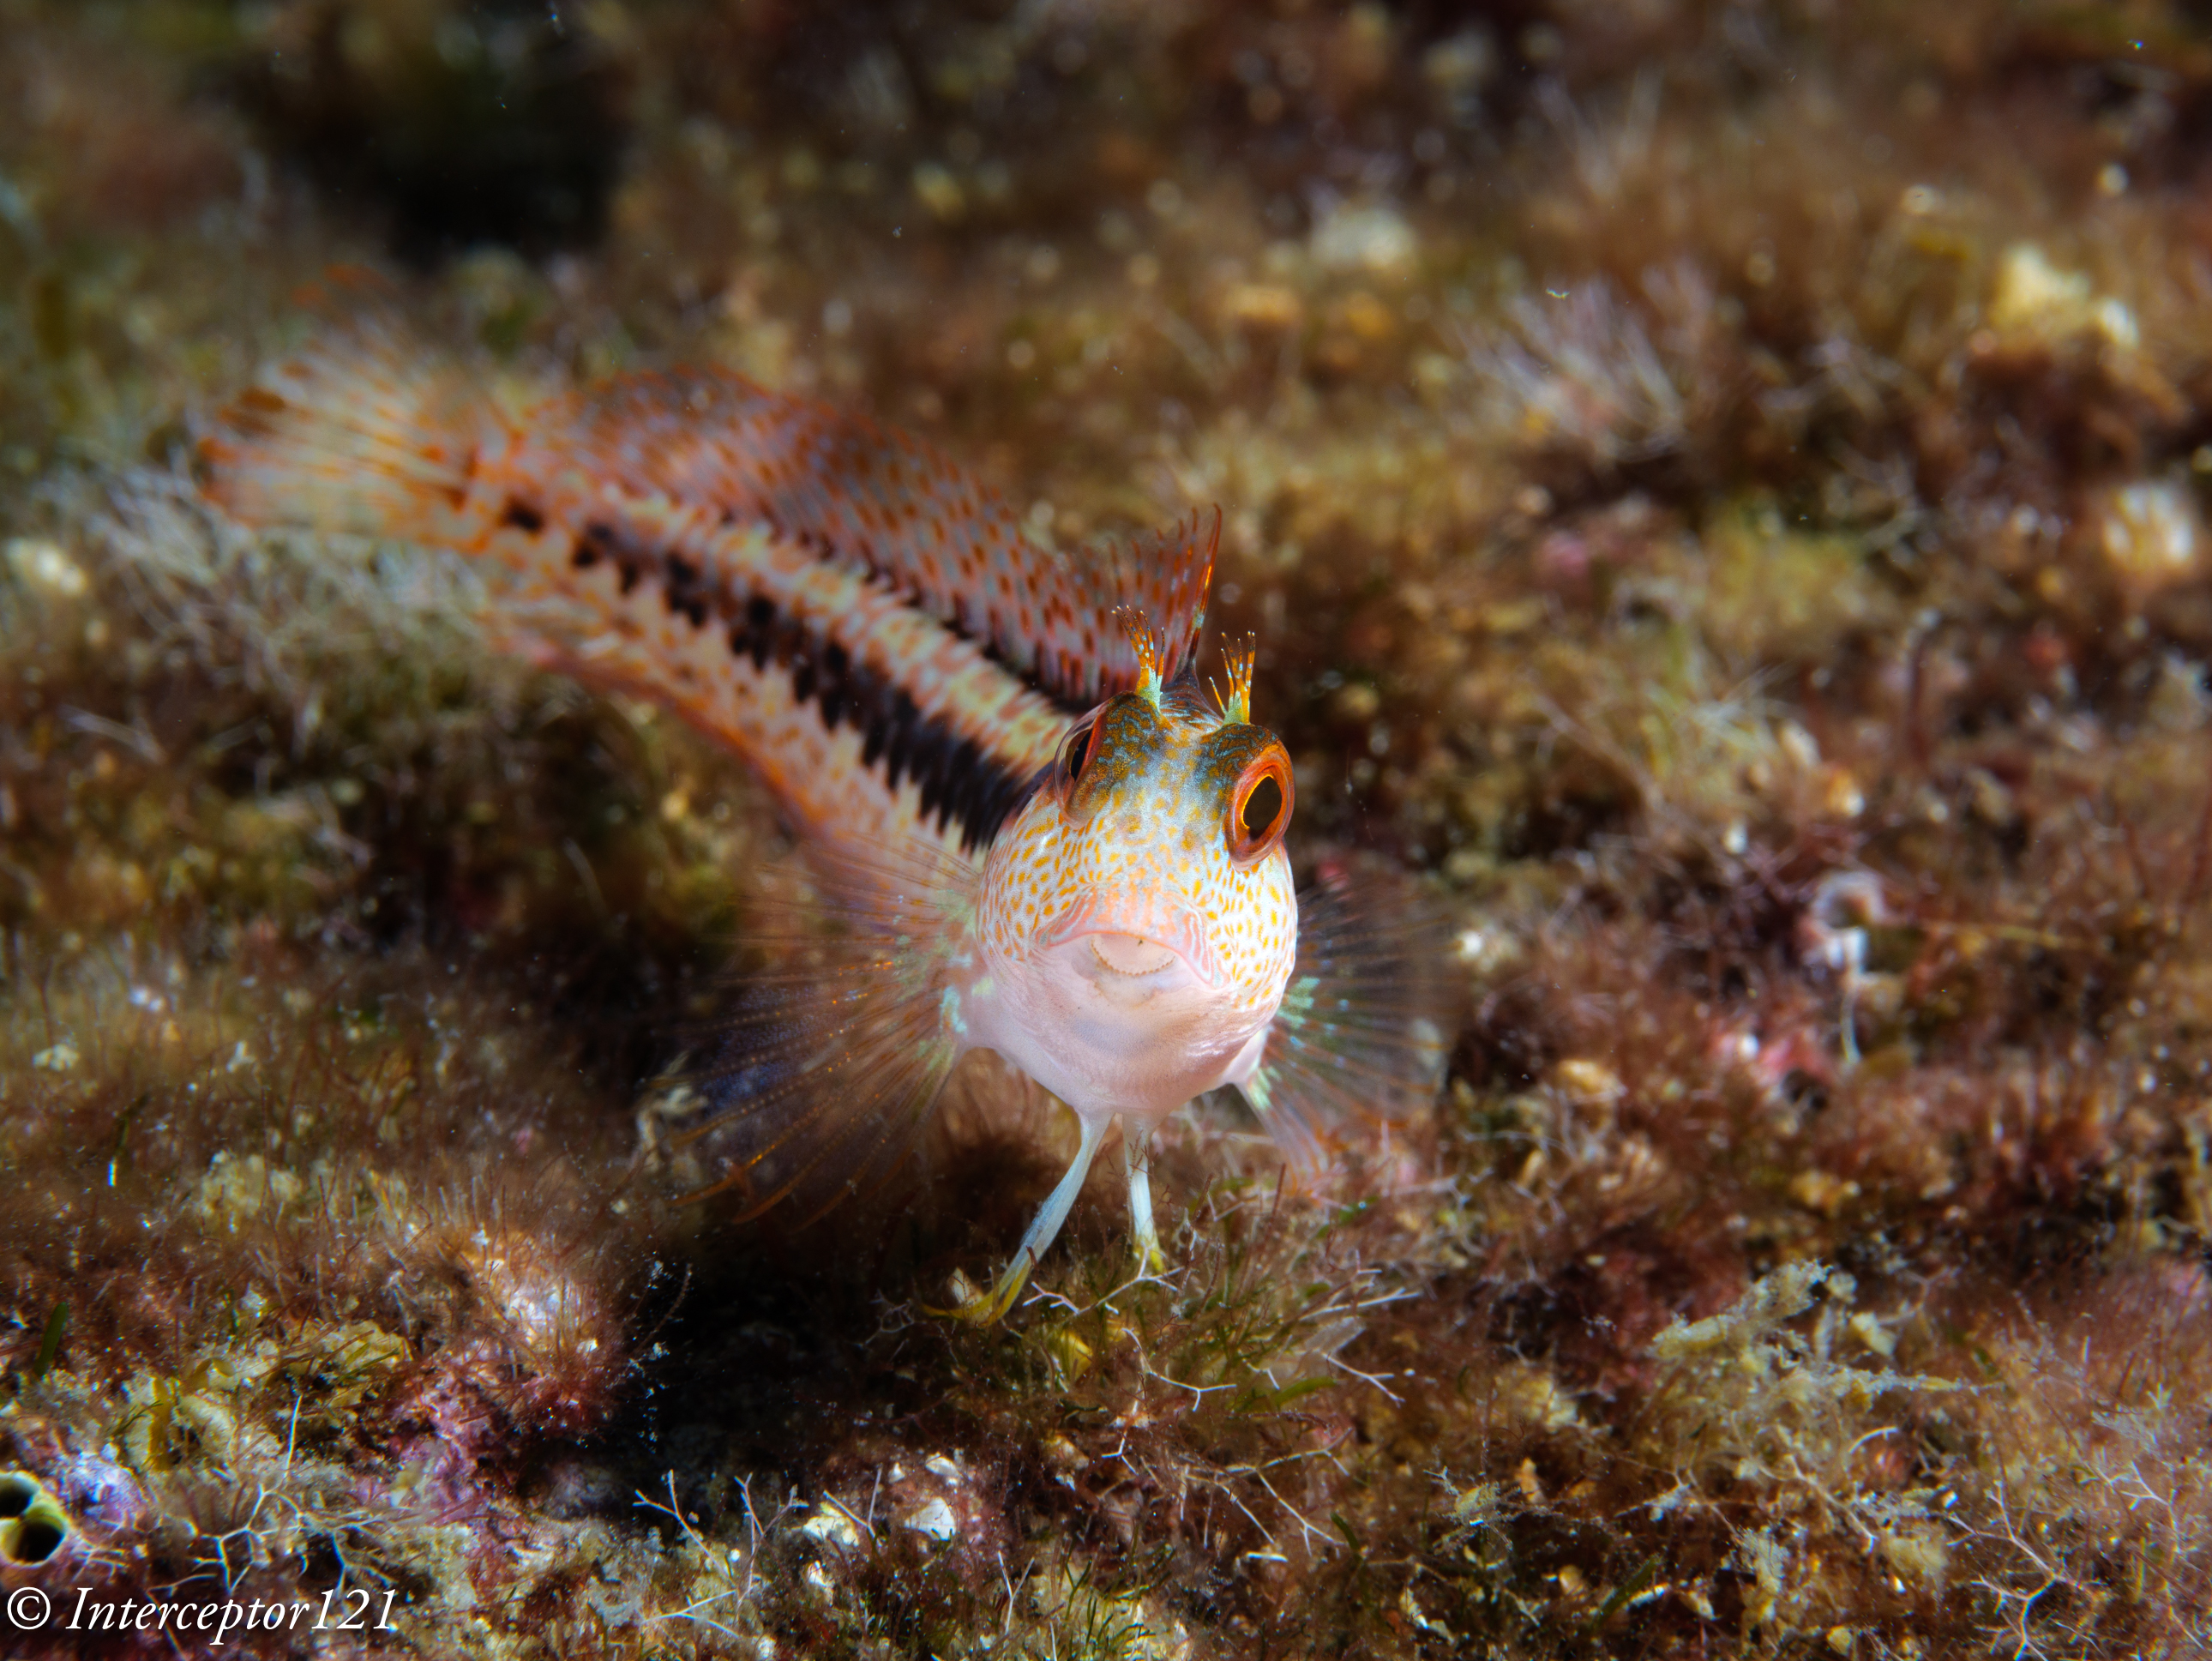
Panasonic GH7 with 45mm macro in Nauticam NA GH6 housing
In the title image you see an example of shallow depth of field on a blenny. That image is shot at f/2.8 on the GH7 which is f/5.6 on the sony FE system and the depth of field is extremely thin.
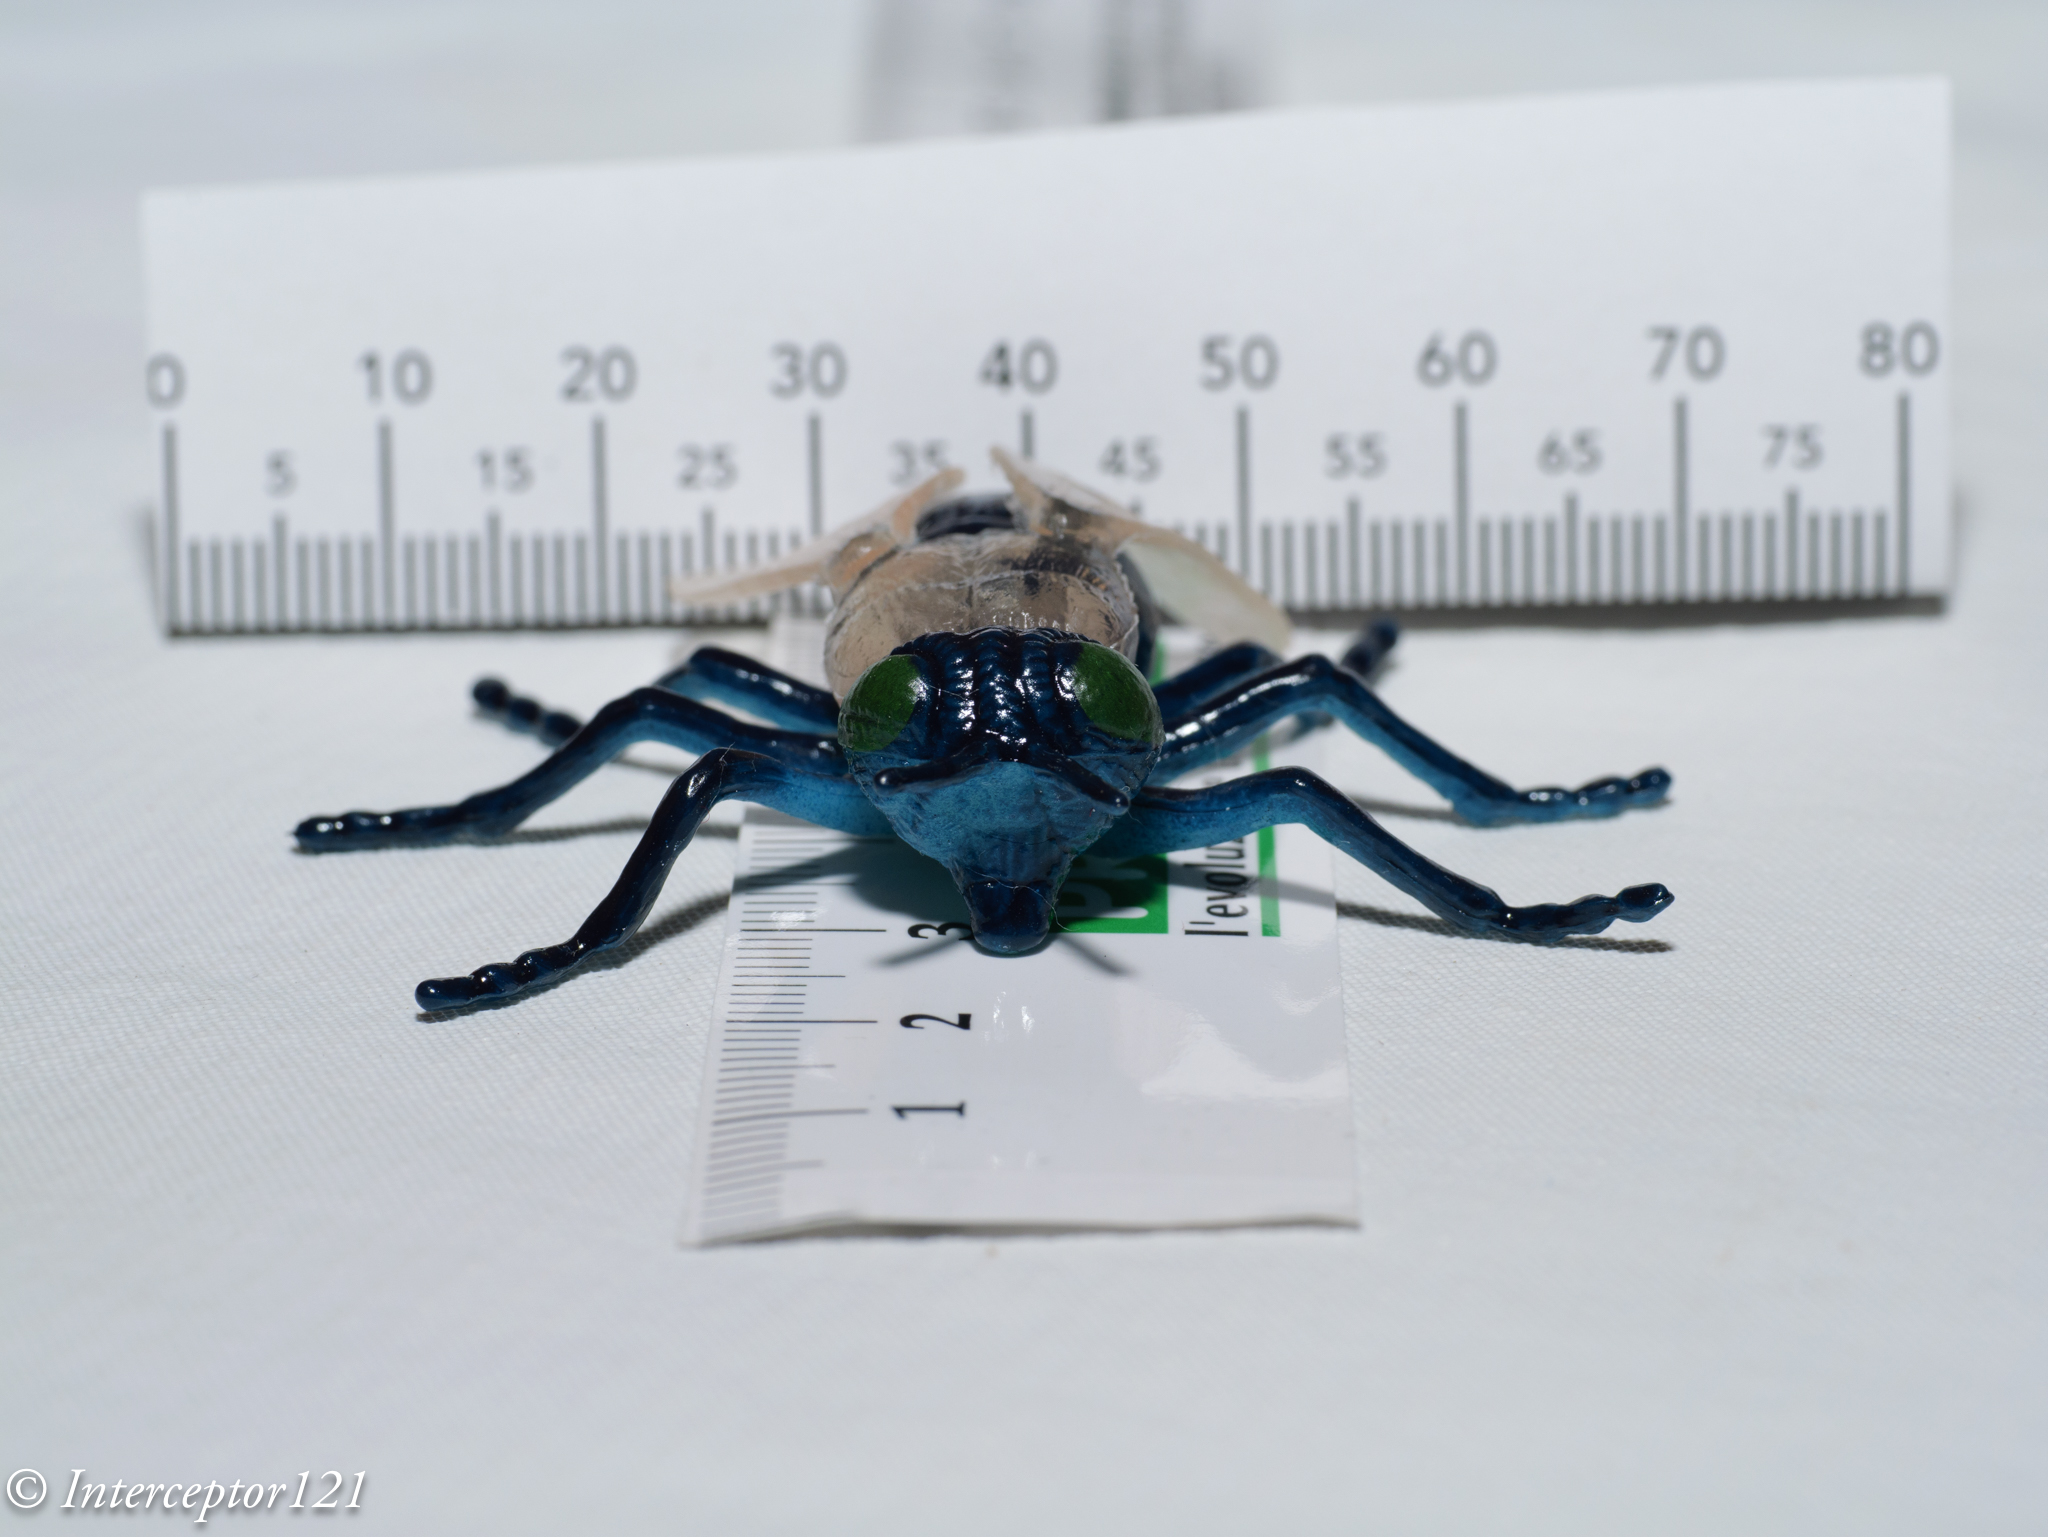
I have taken some test shots using a ruler here the entire series on the GH7 from f/2.8 to f/22.
The fly is 4 cm long starting from f/2.8 and focusing between the eye you can see looking at the ruler that only few mm are in focus despite the frame is around 9cm so no even macro.
Fly 2.8
At f/4 the lens reaches peak resolution however the depth of field is still very small we can barely read the numbers on the ruler behind the fly.
Fly 4.0
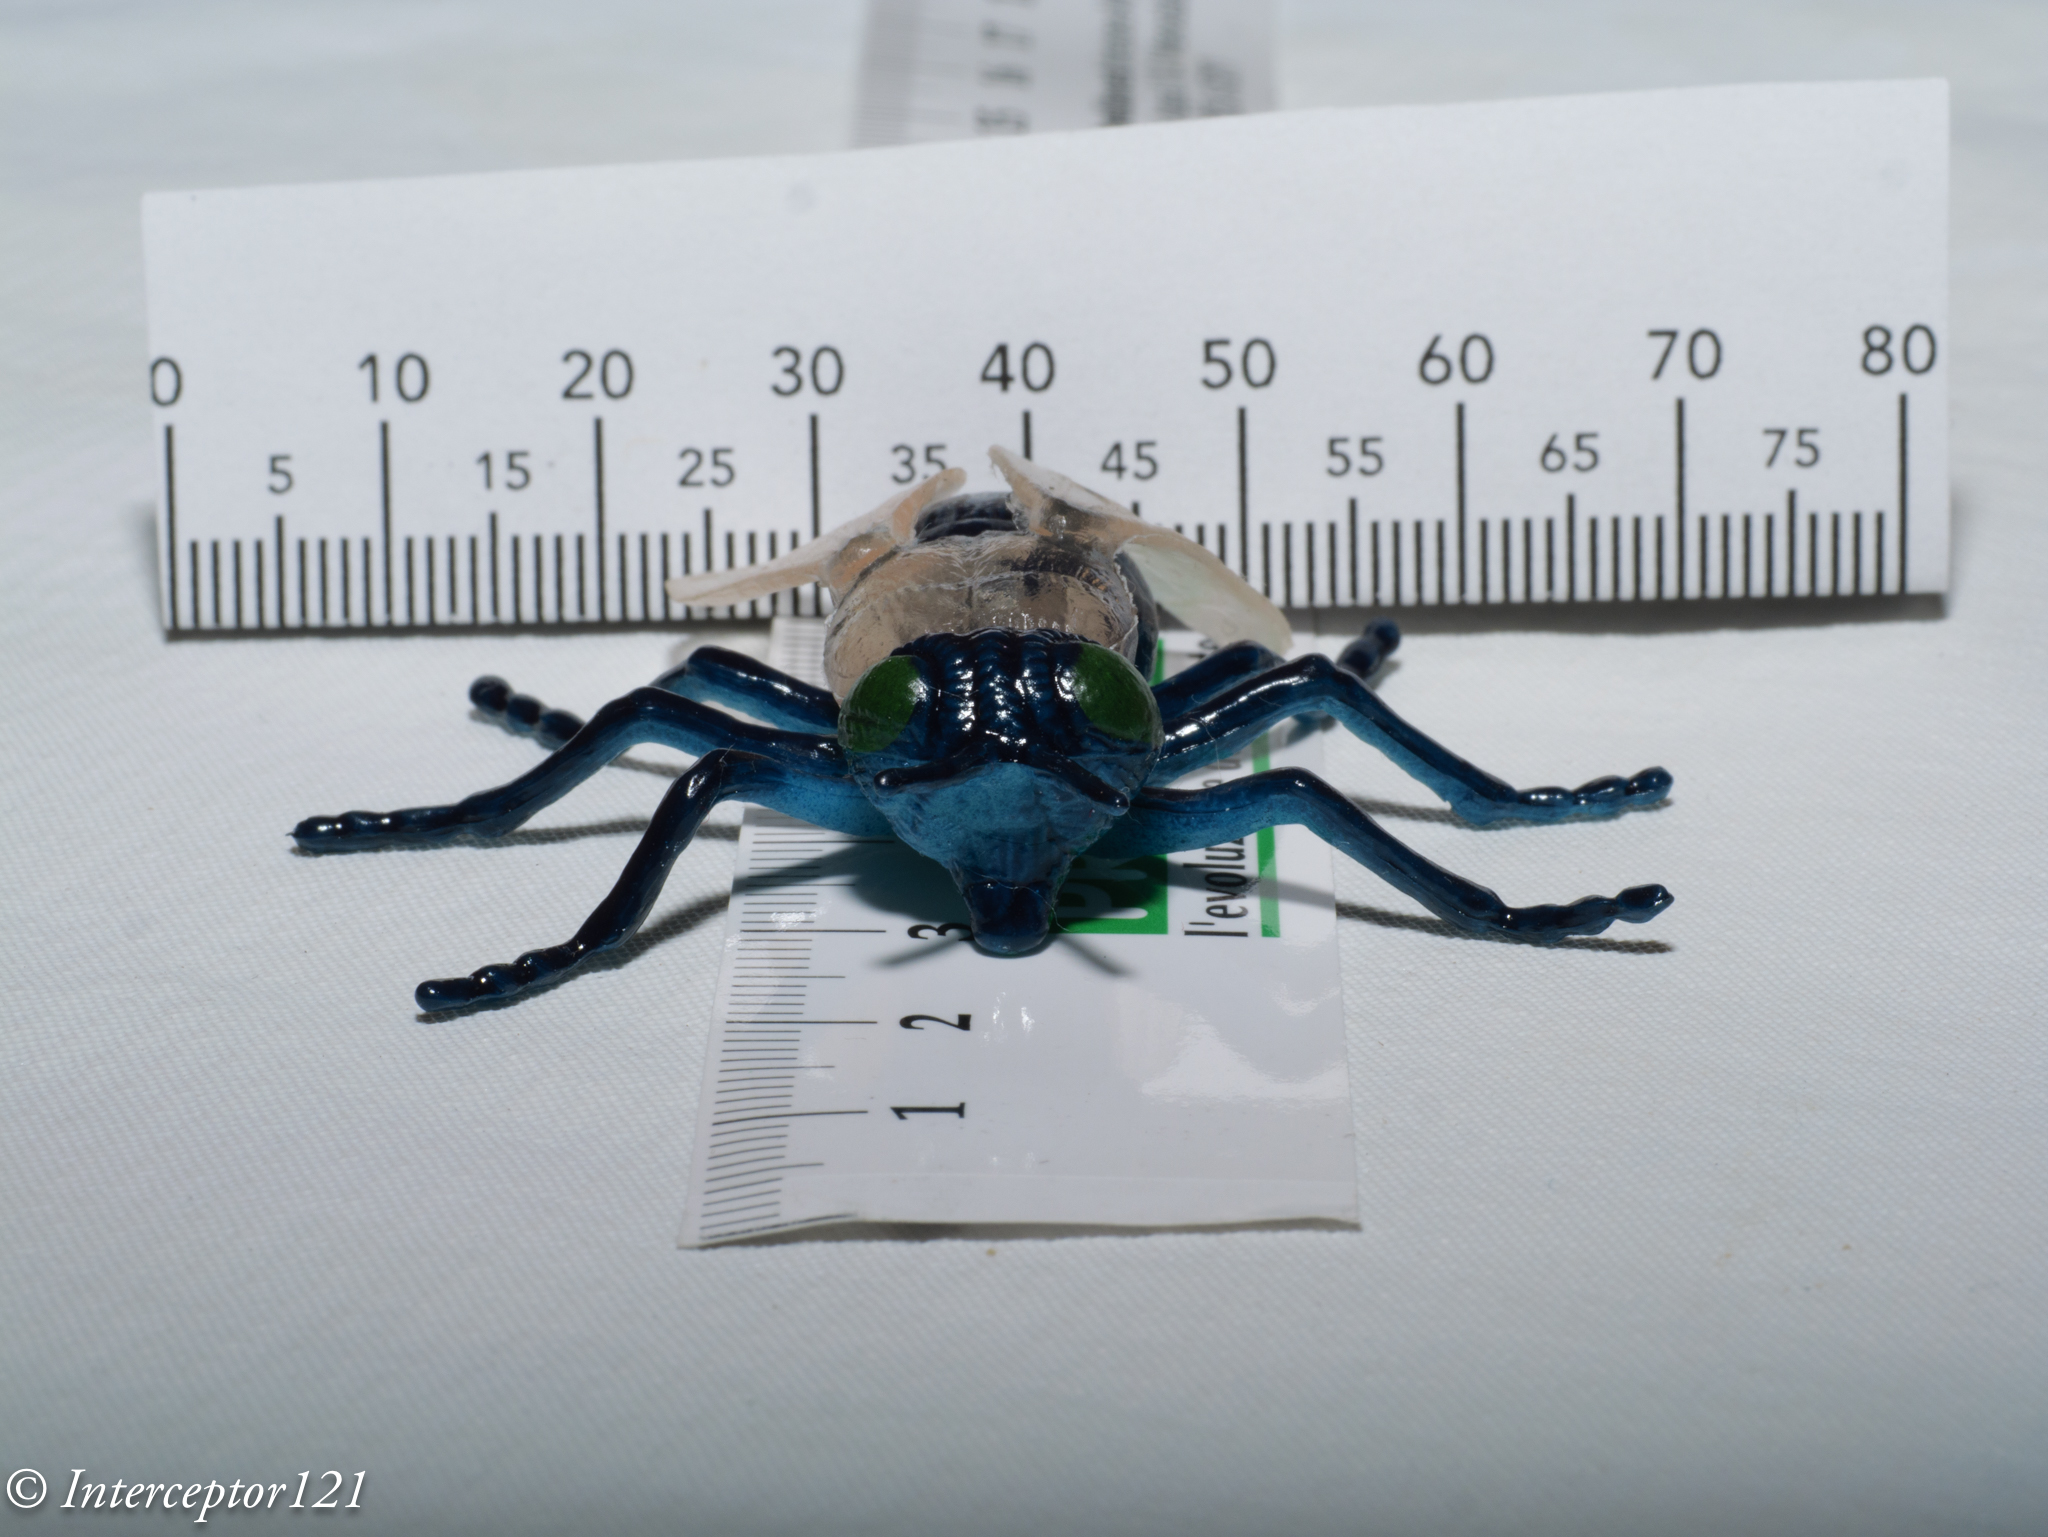
By f/5.6 we have more depth of field but not enough to focus on the front antennas.
Fly 5.6
At f/8 we start seeing the back of the fly but it is not all in focus.
Fly 8.0
By f/11 the whole head antenna included is in focus but not the whole bug. And here if we were on the Emount full frame the story stops.
Fly 11
We continue to f/16 which sees the focus arriving to the wings. This is as far as you could get with the Nikon and Canon mirrorless.
Fly 16
Finally we hit f/22 equivalent to f/44 on full frame and not available on mirrorless the fly is in focus front to back.
Fly 22
What is not apparent in this set of images is how much resolution has been lost stopping down the lens.
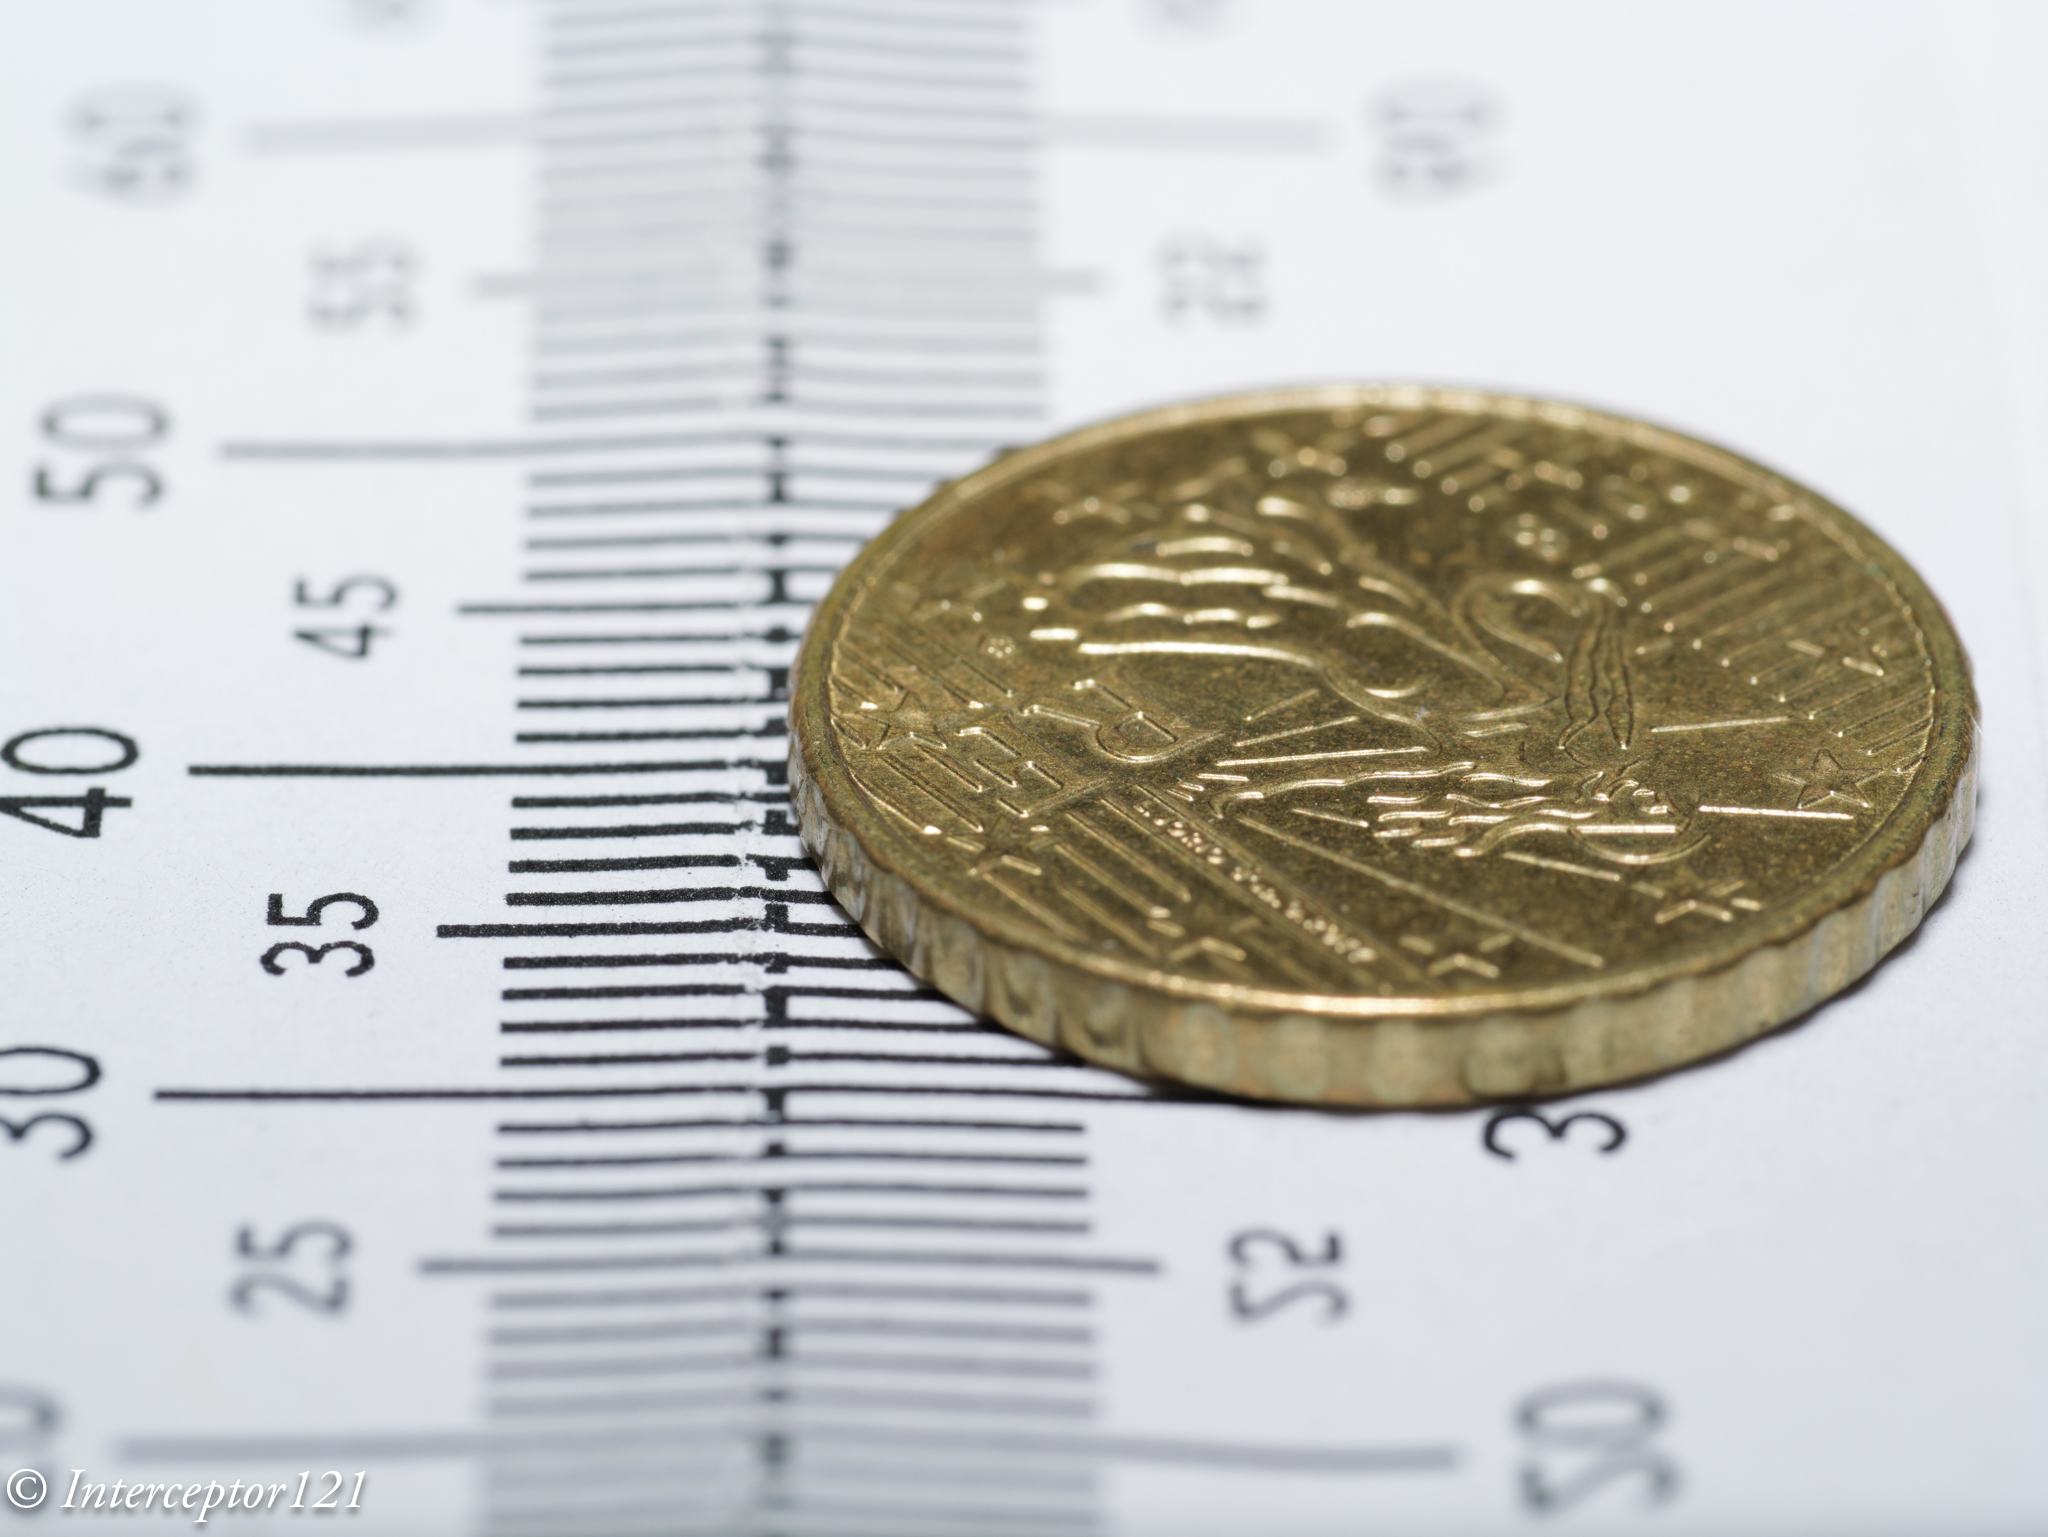
To give more precise indication I shot a 10 cents euro coin of the diameter of 1cm.
This image has got more magnification and is almost 1:1 on micro four thirds. At f/2.8 we have practically a bit more than 1mm depth of field.
Coin 2.8
At f/4 peak sharpness of the lens the detail is great but the depth of field is still very limited perhaps 2.5 mm.
Coin 4.0
We keep going until we hit f/8 and later f/11
Coin 8.0Coin 11
Not even at f/11 we have the whole coin in focus and we start loosing xy resolution due to diffraction.
f/16 is probably the best compromise for such high magnification image.
Coin 16
f/22 has the whole coin in focus however the resolution has dropped.
Coin 22
Yet if we need it we have our high depth of field scenario.
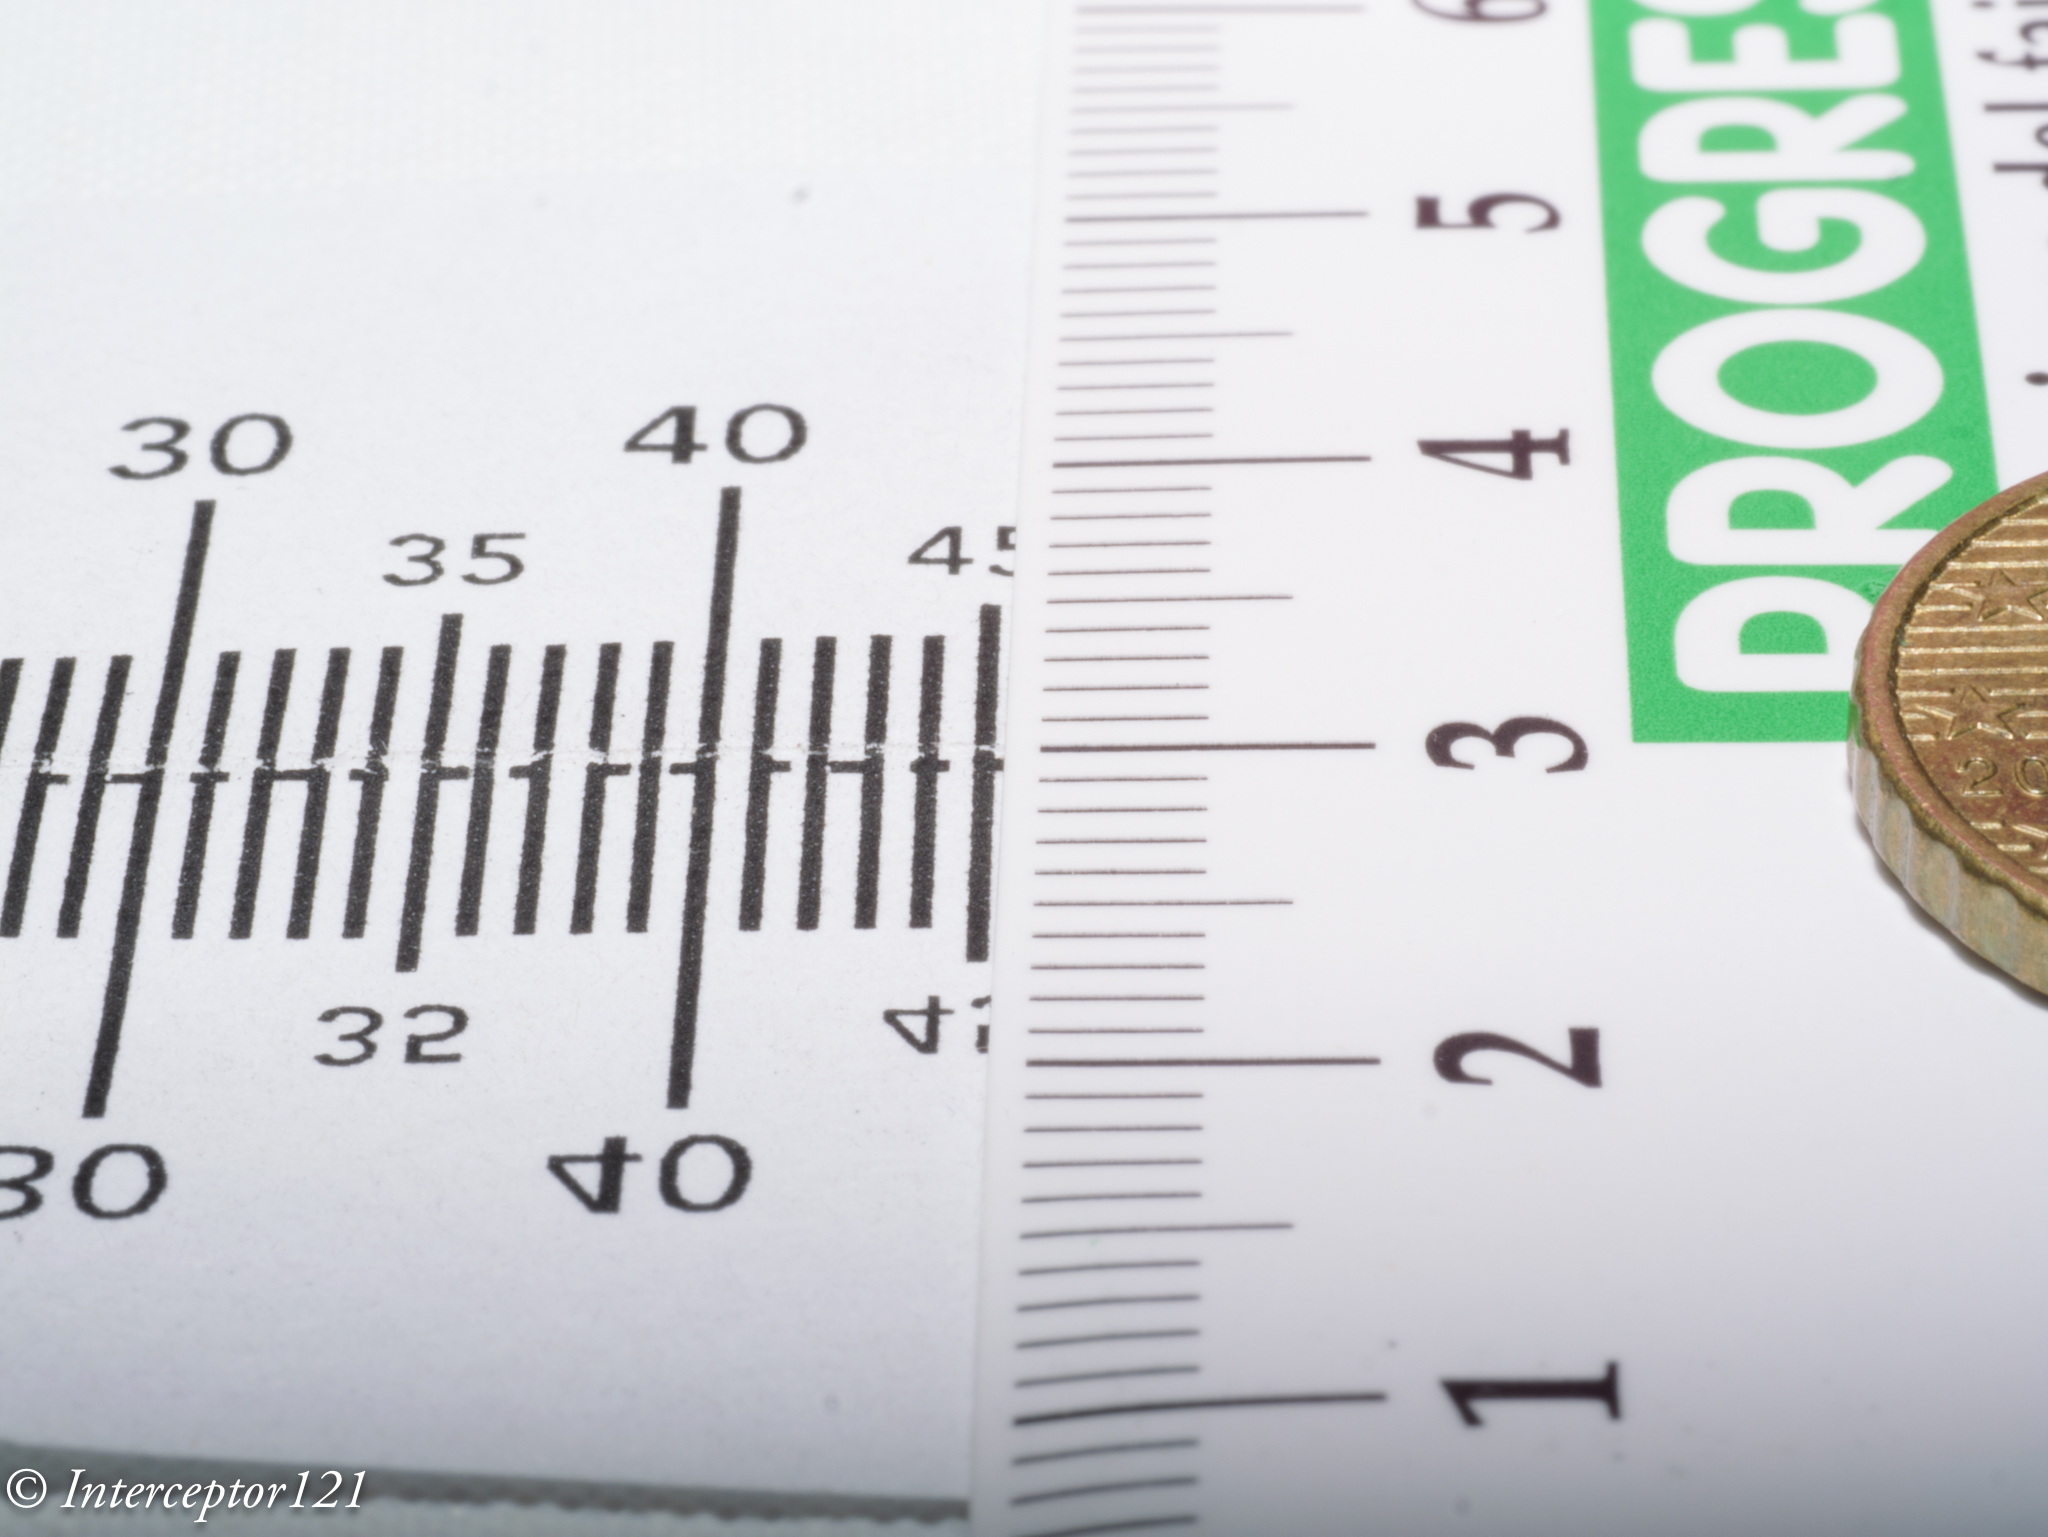
A few other examples at full frame 1:1 with frame width around 36mm.
The f/11 scenario equivalent to Sony 90mm f/22 has depth of field of around 1cm or less
Rulers 11
By f/16 we are hitting around 2 cm.
Rulers 16
Finally at f/22 we have 3cm depth of field more or less.
Rulers 22
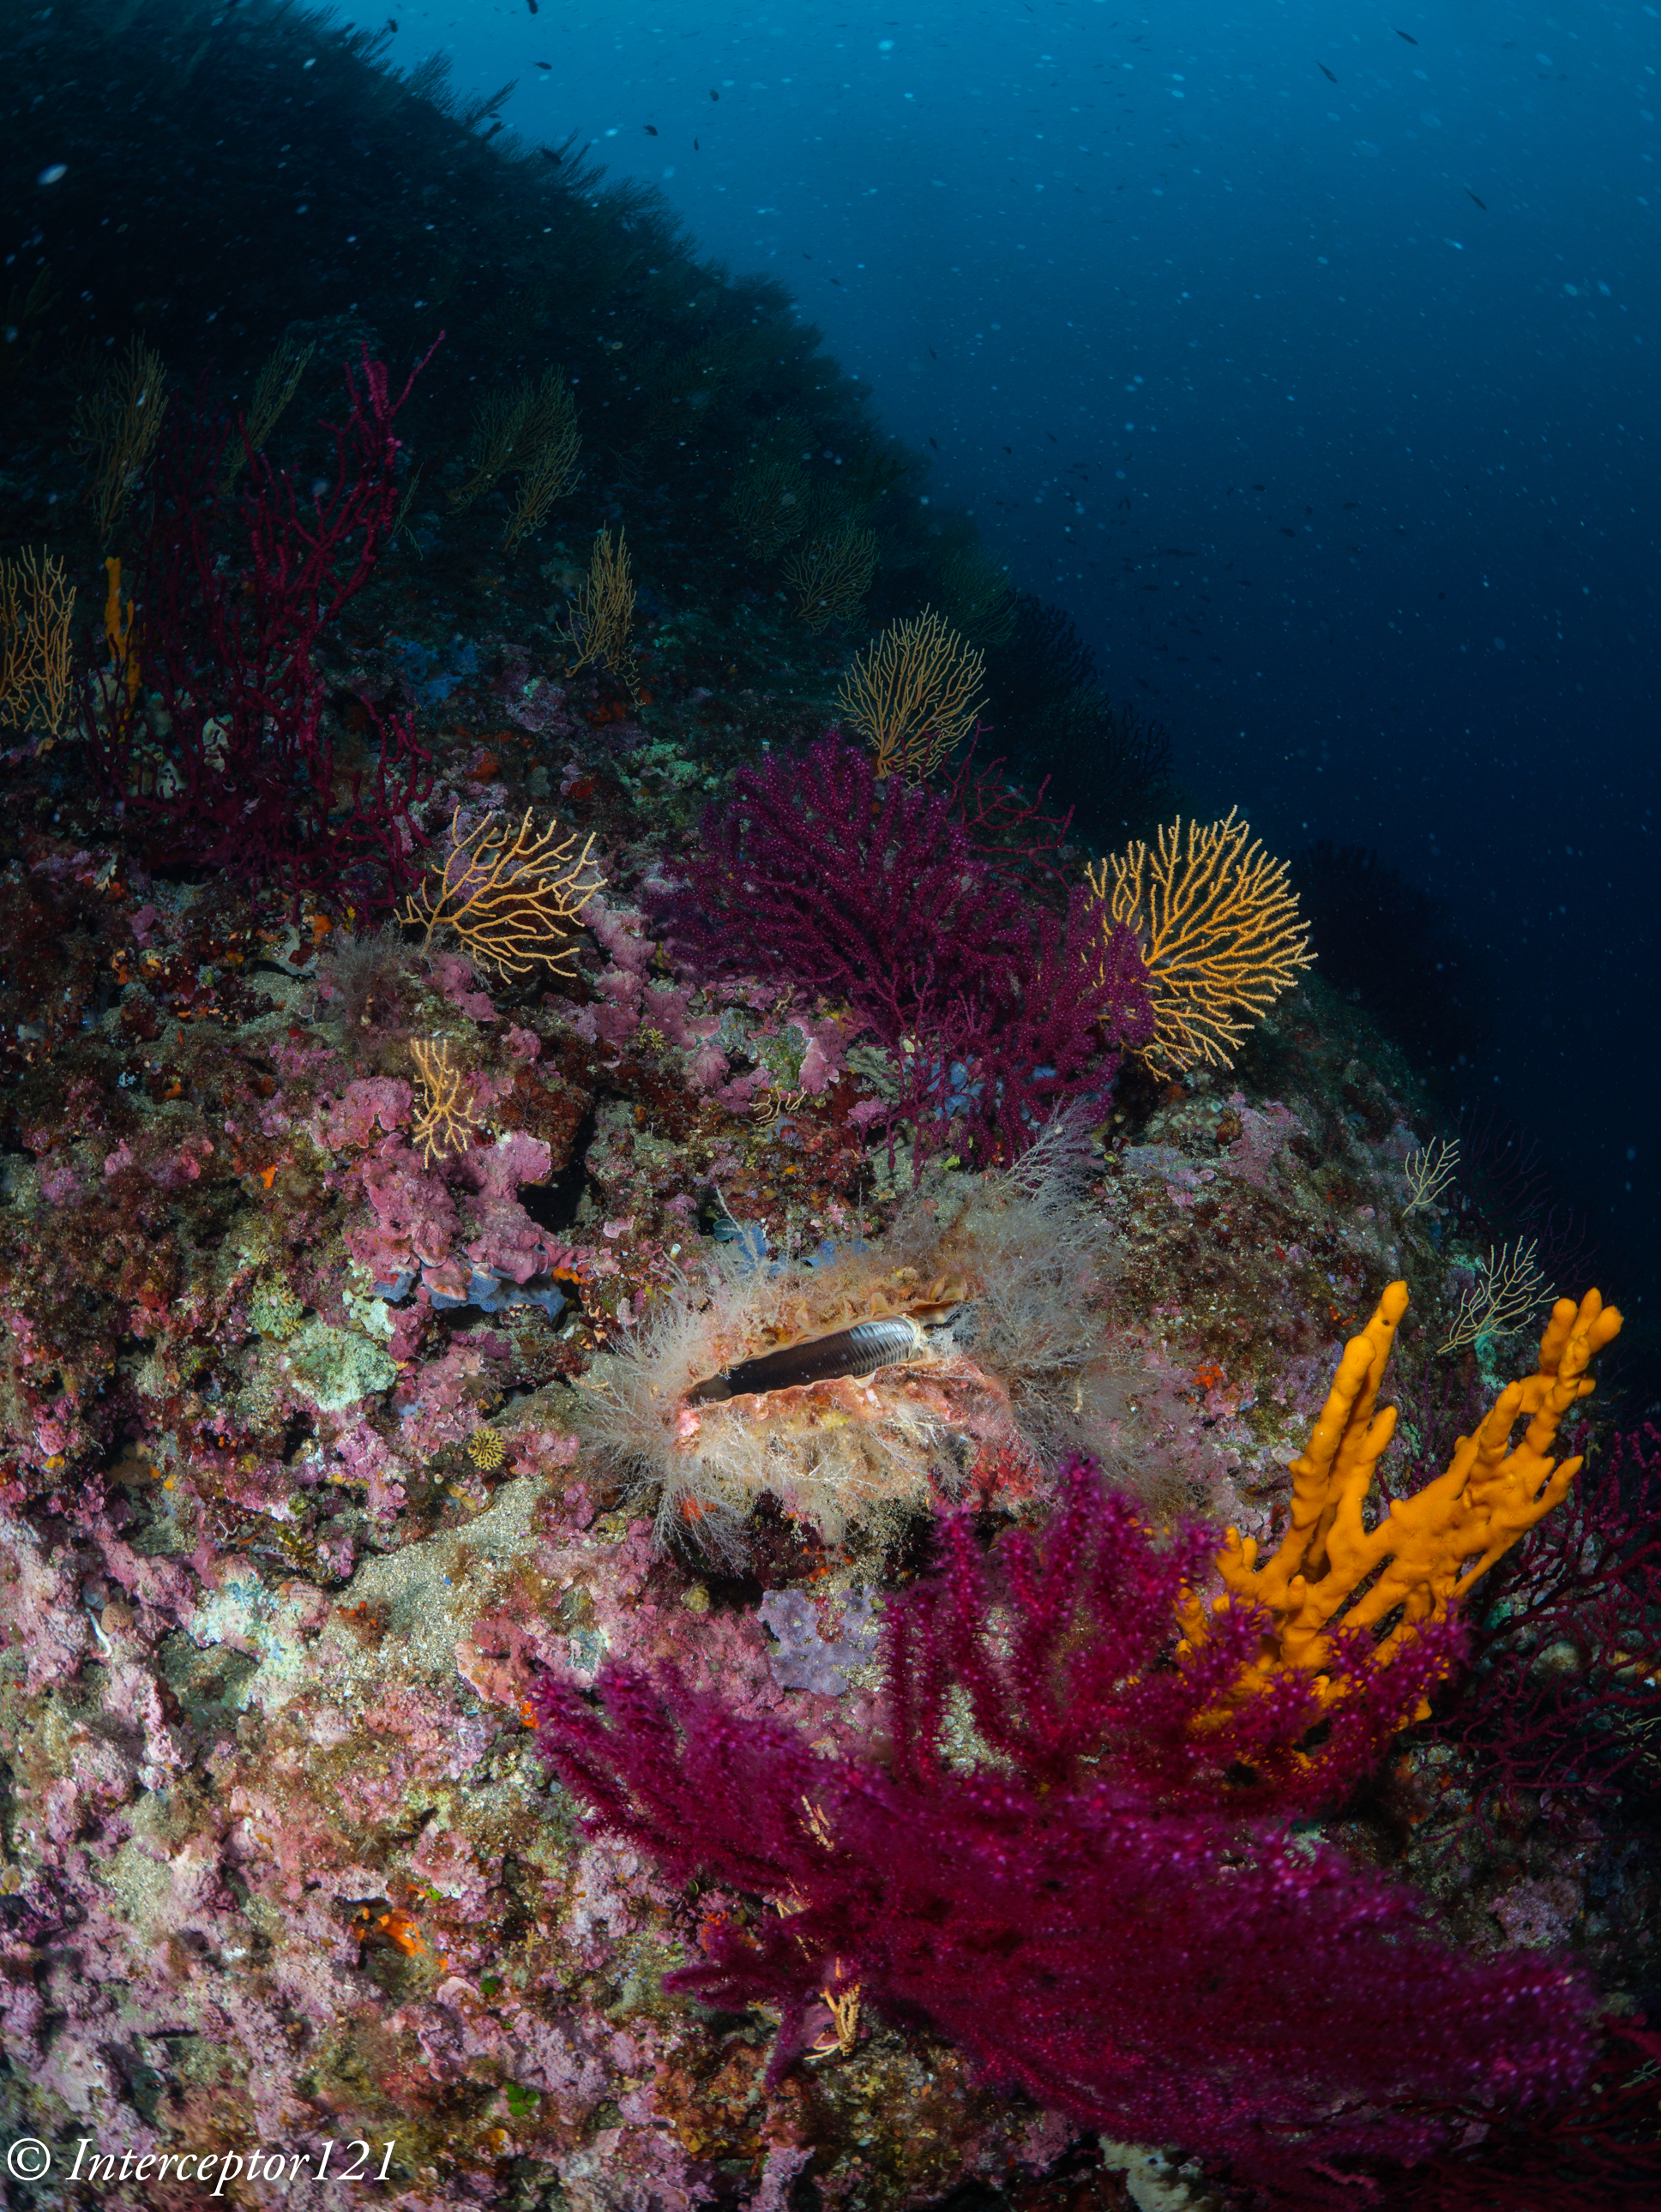
I was recently diving in Italy let me show a few examples of what this means.
This flabellina is focussed on the head however as it is turning slightly away from me part of the body is soft. You would argue the head is what matters but lets’ continue.
At f/5.6 the nudibranch is more horizontal the shot is well in focus however you can only see part of the head.
Up 8
By f/8 we have it sorted consider that this is a small nudibranch not very deep laying almost on the focal plane.
This is instead paradoxically more difficult the nudi is flat on the sea bed however the body parts come into the camera so there is a risk of running out of depth of field here I stop down to f/10.
With the focus point on the back the bottom right under is not sharp!
Here other examples at f/10 where you can see the depth of field is not sufficient to cover the fish.
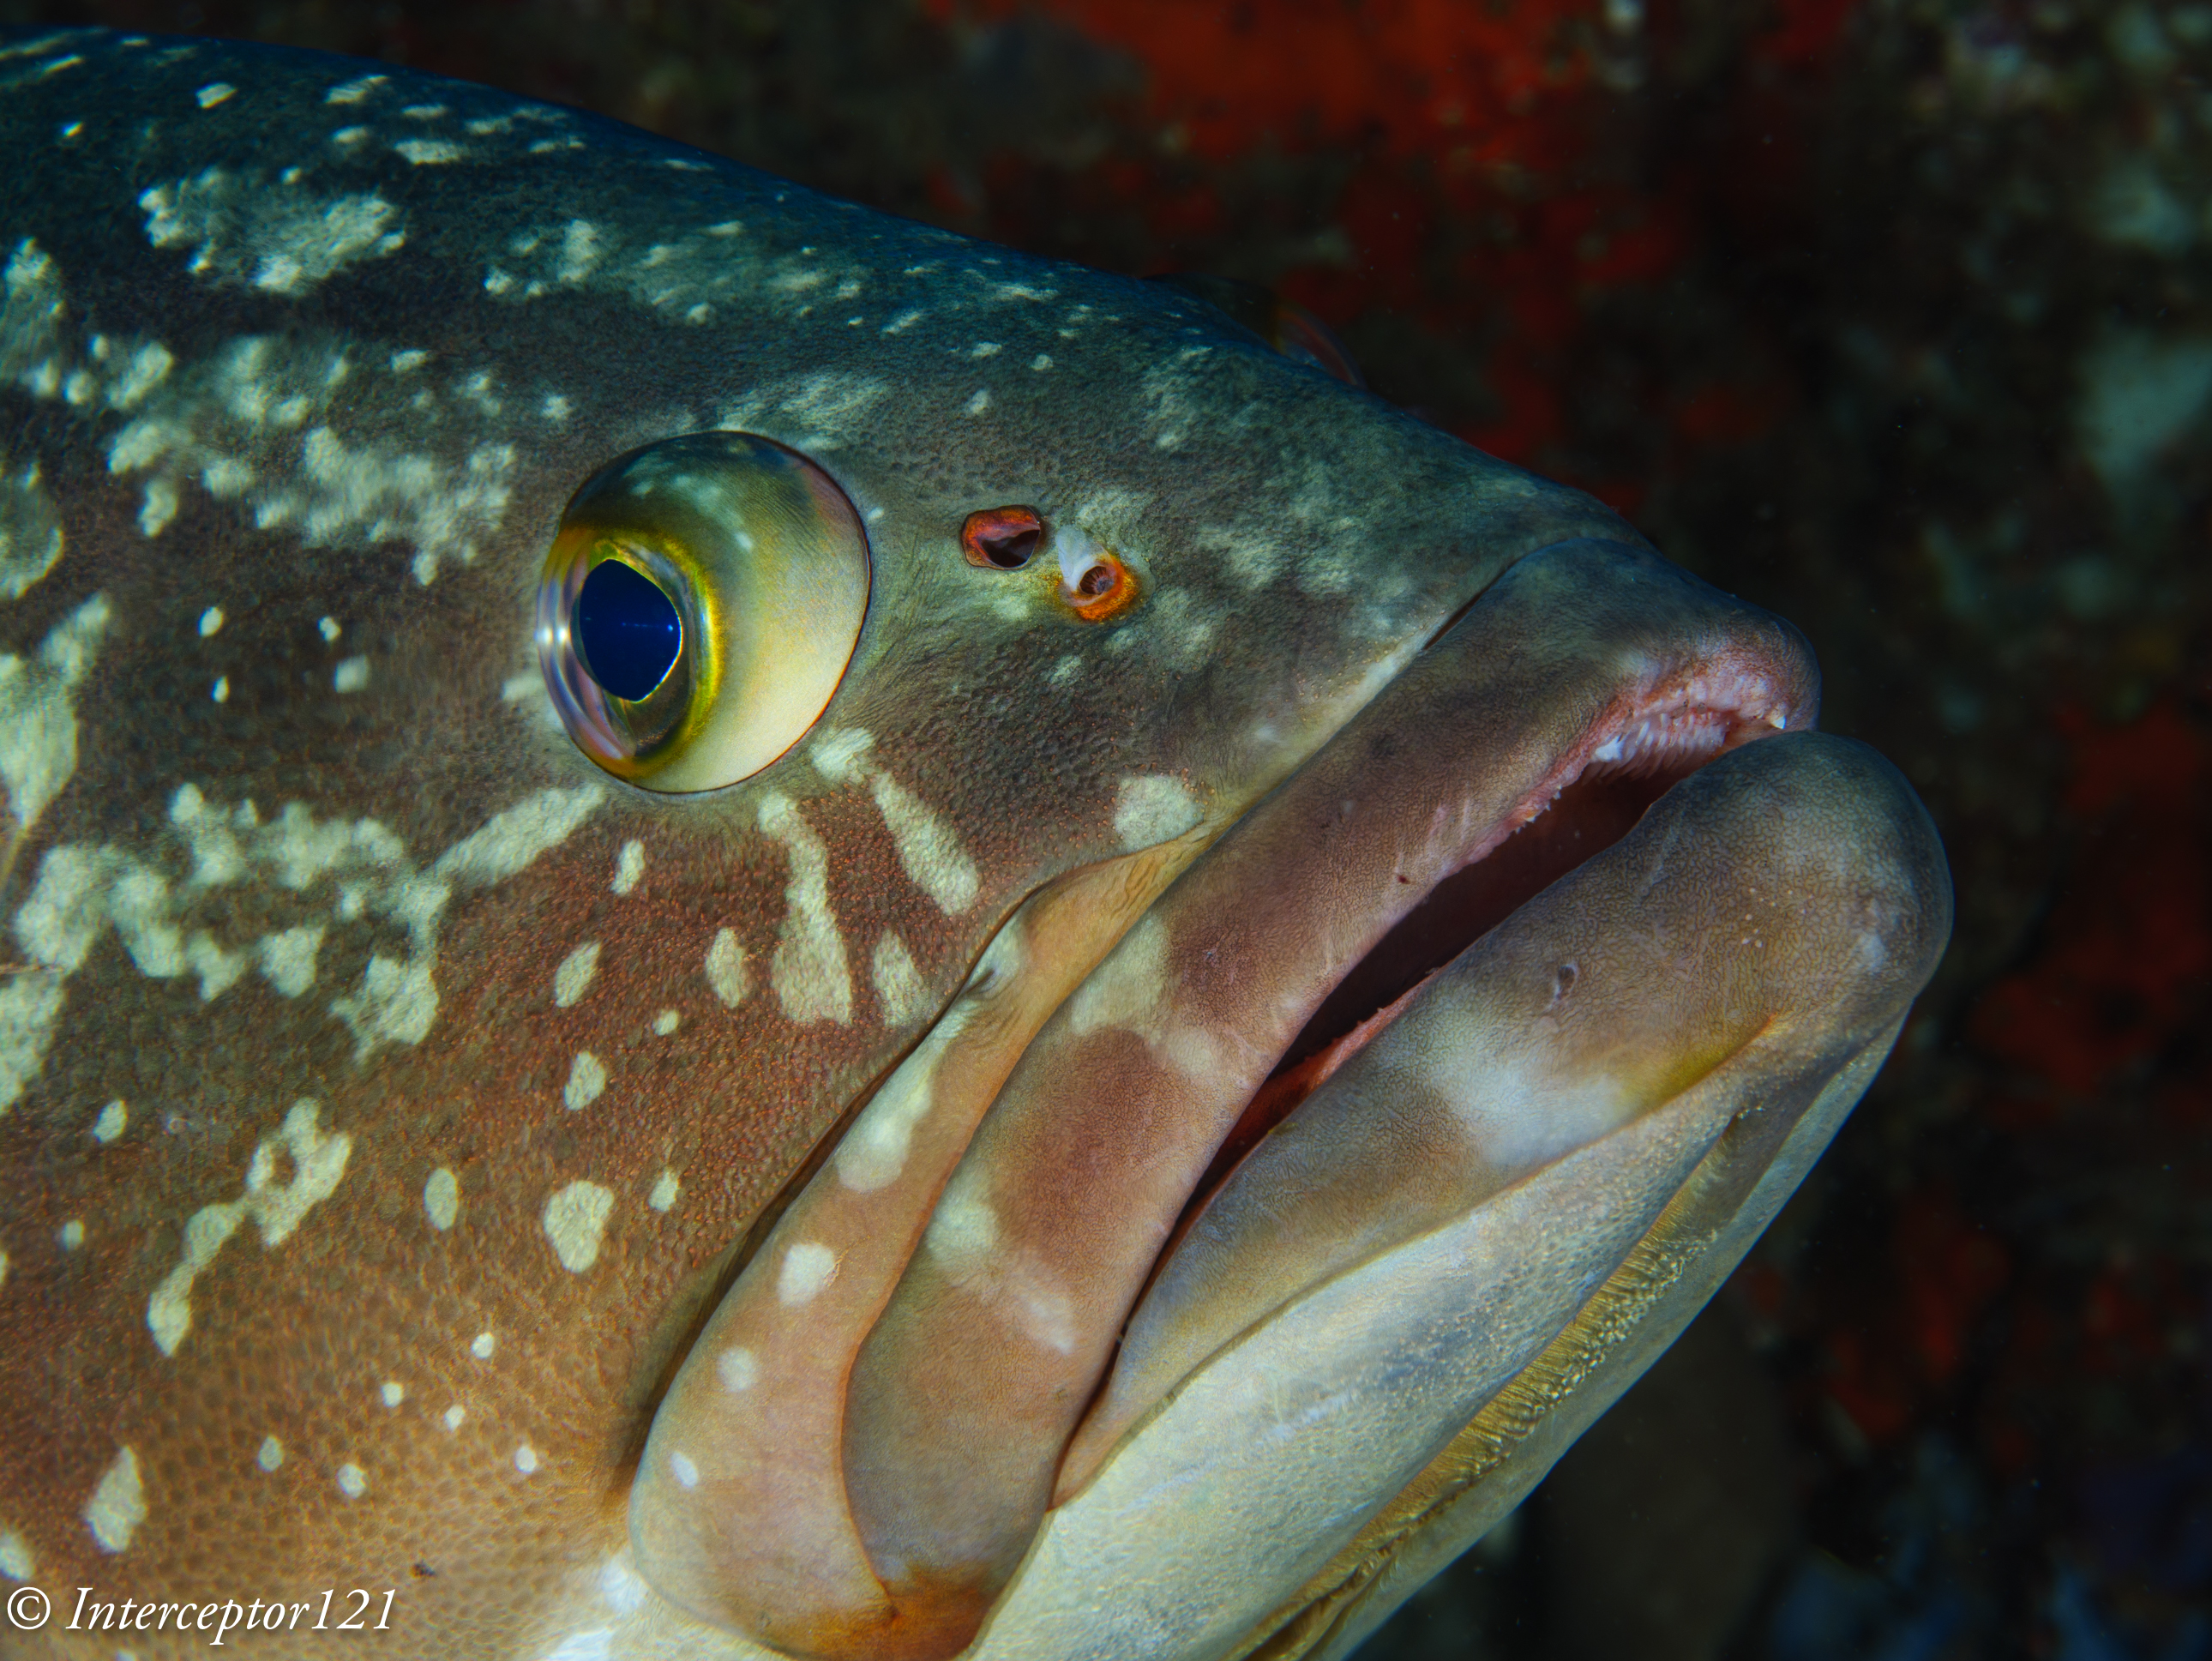
larger fish do not make necessarily things easy as in the example of this grouper.
At f/5.6 the fins are soft similar shot at f/10 improves the fins but does not cover the body.
Now you would ask why did I not go all the way to f/16 or f/22 simply because I wanted to simulate the limit of the Sony FE camera I have.
The other interesting fact is that if we look at this very old resolution chart for the Panasonic 45mm taken with a 12 megapixels Olympus E-PL1 we see that at f/11 equivalent to the f/22 of the sigma the lens hits 55 lp/mm.
This value is likely to be higher wit the GH7 that has double the pixel count indeed exceeding 60 lp/mm.
Comparing the Sigma 28 lp/mm * 24 mm frame height gives 1344 LP/PH while the Panasonic is giving 1560 LP/PH. Which means the smaller sensor seems to resist better to stopping down making it more suitable to high depth of field photography and one of the reasons why I acquired a GH7.
The problem historically with Micro Four Thirds was that autofocus even in the Olympus implementation was far behind and the camera could not track subjects. This is to an extent still true however the GH7 and OM-1 have powerful subject detection. The GH7 in particular can detect fish bodies and eyes.
In my last shots the camera would focus right on the eye on slow moving subjects. Fast moving subjects at high magnification were a few mm off but overall easy to compensate with the extra depth of field.
Conclusion
We are a times, me included, obsessed by resolution charts and pixel count and forget that images have depth. A good image needs to be tridimensional and depth of field is essential to achieve it in some cases even more important than absolute spatial resolution on the focal plane.
Micro Four Thirds cameras were historically lagging on autofocus due to weak tracking and this is to an extent still true, although the camera tracked fine my swaying in the water, however subject detection able to recognise fish means that the gap is essentially closed and overall you can produce a significant amount of good images without risk of blurred shots.
For information the GH7 like the GH5 syncs at 1/400 with the nauticam trigger and for wide angle rear sync is supported which gives another advantage to this micro four thirds camera over other formats, only the Sony A1 syncs that fast
At present I own 4 cameras: 2 Sony A1, 1 Sony A7CM2 and 1 Panasonic GH7.
With the exception of Fuji Xtrans I have practically shot any mirrorless and DSLR from MFT to Full Frame.
The race to more megapixels continue and right now you can get 25 Megapixels even from a Micro Four Thirds. My 3 models have 25, 32.7 and 50 Megapixels.
The thing with resolution tests is that they are based on flat charts while an image has 3 dimensions and depth is as important as horizontal and vertical resolution.
When you look at camera tests you get very excited because you see some really high values for spatial resolution on two axis. Some websites like Optyczne still test matrix resolution, here some charts for the 3 cameras I own or their closest proxy.
Sony A1Sony A7CM2 (A7 IV)Panasonic GH7 (G9M2)Panasonic GH5M2 (G9)
Those graph are expressed in line pair per mm so in terms of resolution at f/4 this means in Line Pairs per Picture height
A1 4368 LP/PH
A7CM2 3456 LP/PH
GH7 2886 LP/PH
GH5M2 2548 LP/PH
The A1 has 1.71x the resolution of the GH5M2, 1.51x the resolution of the GH7 and 1.27x the A7CM2. The GH7 has 1.13x more than the GH5M2 we are however omitting the third important dimension which is depth.
When we look at the shallow depth and compare f/8 on full frame to f/4 on MFT the benefit still holds for the A1 but it disappears for the A7CM2
A1 3504 LP/PH (f/8)
A7CM2 2880 LP/PH (f/8)
GH7 2886 LP/PH (f/4)
GH5M2 2548 LP/PH
In practical terms if we are interested in shallow depth of field more pixels and larger sensor matter. There is no benefit having less pixels on any sensor.
Let’s have a look at the landscape Sunny 16 scenarios
A1 2064 LP/PH (f/16)
A7CM2 1920 LP/PH (f/16)
GH7 2106 LP/PH (f/8)
GH5M2 1820 LP/PH (f/8)
We observe two things the benefit of more pixels on the full frame sensor has dropped to 10% practically halved. The benefit to MFT has reduced or even reversed.
Some example shots to prove the point all scaled to A1 resolution with lightroom standard jpeg export
What does all of this tell us? Essentially two things
At same sensor size more pixels increase resolution however the benefit drops at smaller apertures. There is no reason to get a camera with less pixels in any format. This of course does not take into account the fact that at identical sensor technology less pixels read faster.
With different sensor size and equal depth of field large sensor have an edge at wide apertures or shallow depth of field but the benefit drops at small apertures.
Certain type of photography have a clear requirement for shallow depth of field for example people and portrait photography.
Othere have a clear requirement for high depth of field for example macro (not flat surfaces) or underwater photography.
Smaller cropped sensor with lots of pixels can be very useful because they can read reasonably fast and provide lots of depth of field with acceptable image quality.
I have the housing for the GH7 and will be taking it in water in the next two weeks. I expect performance to be superb with rectilinear wide angle lenses as well as fisheye zoom. Macro is not my specialty there the most important consideration is autofocus first tests on land show that the focus speed is heavily dependant on the lens.
Recently many DSLR user have been moving to Mirrorless, while some are still waiting. The entire world of photography has practically abandoned DSLR but underwater photography is traditionally lagging and this is due to a combination of factors one of the most important being availability of appropriate lenses to fit specific use cases.
Unfortunately underwater use cases do not form part of the design criteria of lens manufacturers due to the tiny size of the market, so you need to hope something comes up that can fit that shooting situation you are trying to master. To date there is no native OEM fisheye lens for mirrorless for full frame. There are of course plenty of lenses for micro four thirds but this is only mirrorless so it does not form part of this evaluation because if you are on that format you have moved on already.
Full disclosure I am a Sony Mirrorless shooter but have owned and used Panasonic, Nikon, Canon and Fuji and I keep myself up to date with the latest innovations. This piece is based on data as you can see it not on opinions which I have little interest in.
Brand Loyalty?
One thing that is very important when making this step is to ignore entirely brand loyalty. This is somewhat difficult for the user that is accustomed to a certain menu system and look and feel or even color rendition of the camera but it is an imporant factor.
Let’s have a look at few examples considering the two main DSLR brands Canon and Nikon starting from the latter.
Nikon
Probably the market leader in underwater DSLR shooter has been delaying the transition to mirrorless and only recently catching up.
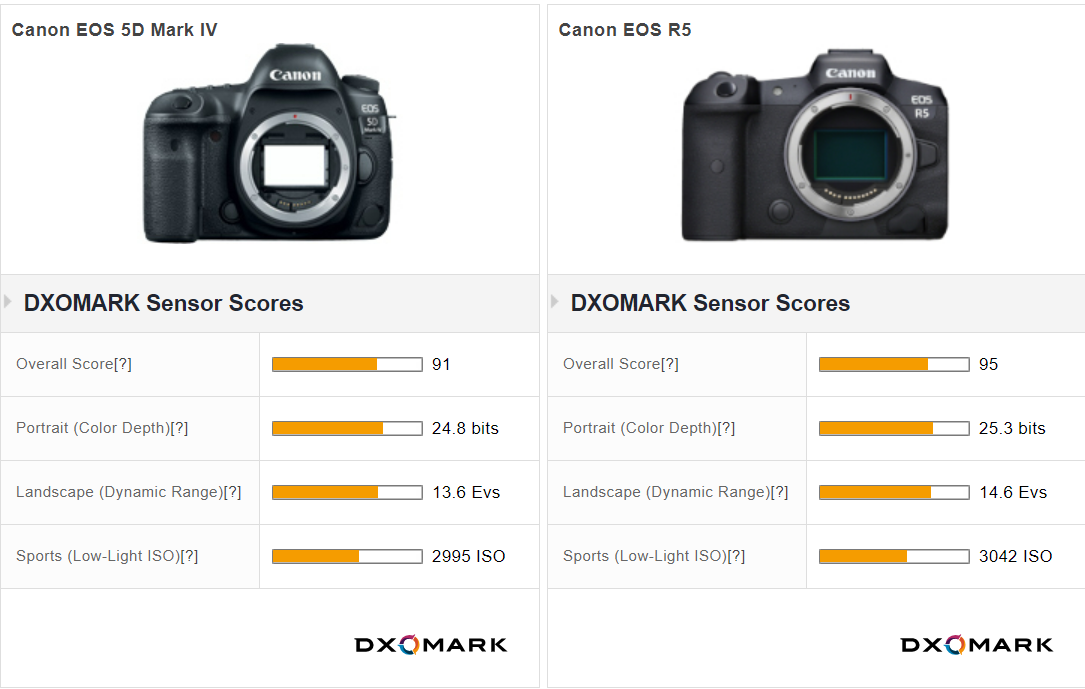
Nikon D850 vs Z8 vs Z7II
The D850 and Z7II have the same sensor and therefore identical performance, the Z8 has a new stacked sensor however according to a variety of sources the additional speed that is no doubt very useful to topside bird or sports shooters comes at price.
This is corroborated by DxOMark results
The Z8 has indeed less dynamic range and therefore scores less. Obviously this is only taking into account purely image quality however other factors are important namely the autofocus, ergonomics and the availbility of lenses.
The Z series has a limited amount of native lenses compared to the armory of FX lenses however you could say you can get by.
The autofocus has really improved in the latest Z8 while it is fair to say it was not as exciting in the Z7II.
In conclusion looking at Nikon full frame the transition from DSLR to Mirrorless looking purely at underwater use cases will not move your image quality forward and probably be on par on autofocus.
Nikon D500 vs Z50
When we look at Nikon DX format considering a transition from D500 to say Z50 the image quality is identical but here the lens assortment is even less therefore many users go full frame instead of staying on crop.
In conclusion I would say Nikon FX/DX to Z is not a really strong case and is penalised by Nikon being a total laggard in the transition to Mirrorless. Perhaps Nikon users should consider changing brand if they are keen to move forward due to topside use cases, or wait a bit longer.
Canon
Canon has been more decisive in moving to Mirrorless and it shows.
The RF series has an excellent display of macro and rectilinear lenses while it lacks a native fisheye overall the comparison is fair while certain niche lenses like the Nikkor 60 macro
Looking at sensor performance the situation is also more favourable.
Here the improvement is across the field. When we look at the cropped format the EOS90D and R7 there is a smaller improvement, however a no regret situation.
Taking as thermomether the Nauticam port chart for RF system we can see that the selection is pretty decent for full frame, the same cannot be said for APSC where the number of supported lens is small but so is the topside selection.
In summary a Canon user wanting to be loyal to the current brand will find an improvement in full frame but not in APSC having to resort to older DSLR lenses for a small improvement in image quality.
Sony
Sony is the leader in mirrorless camera having been the first brand to embrace it for full frame. At present Sony Semiconductors Corporation provides image sensors to Nikon and Panasonic amongst other and only offers the most advanced solution to Sony Consumer Cameras unless the customer pays for a custom project.
Looking at full frame sensor performance of the fast models those preferred by topside wildlife shooters we can see that the A1 and Z8 are indeed very similar with the A1 having more megapixels and offering an edge on dynamic range and high ISO performance and the Z8 edging on color depth.
Those cameras make sense if you have a variety of topside use cases and also like to do some video or if you are really needing the last bit of strength from the superior autofocus.
When you compare the Z8 to the A7R V which is a ‘slower’ camera you see that the latter has an edge this is also true if you look at the A1 of course. An underwater shooter that does not need the speed of the A1 or Z8 should stick to a model like the A7R V and benefit from additional megapixels and sensor performance with a loss of speed that underwater does not mean much. This camera has a very slow burst rate and topside will be easily affected by rolling shutter and it is not a favourite for topside wildlife shooter but more a camera for landscape, architecture and portraits.
The selection of lenses for E-Mount is vastly larger than Z mount at present and there are adapters for both Canon EF and Nikon FX formats.
Sony full frame cameras tend to be smaller and the housing cheaper so you can see why some previous Nikon DSLR users have moved to Sony Mirrorless.
Canon users instead are not migrating to Sony because of lens selection and backwards compatibility and more importantly are also gaining on image quality and features moving to Canon mirrorless.
Micro Four Thirds
Some users have done differently and gone to a smaller mirrorless format. Micro Four Thirds is where mirrorless started long time ago and offers plenty of lens choices. Contrary to what people think Micro Four Thirds cameras can closely match the performance of APSC cameras the gap is more or less half stop and operating at equivalent depth of field can match both ASPC and Full Frame cameras.
While the increased depth of field has been a strenght of this format underwater the autofocus has been historically the biggest let down.
As of today there is not a single MFT camera that can match the simple tracking without subject detection that old Canon and Nikon DSLR and current Sony Mirrorless can do. Brands have been focussed on shooting people or birds and animals but this did not include fish and so far the simplest use case which is to shoot a fish portrait with a macro lens has been where this format has lagged.
Unless you are interested in the video features or you only shoot wide angle and don’t care about the autofocus issues Micro Four Thirds is typically not a path of choice for an existing DSLR user.
Panasonic
With a strong tradition in video, Panasonic has recently mastered autofocus and released the S5II with PDAF that is a very interesting camera at reasonable price point. L-Mount has started to offer a good selection and using the sigma adapter you have access to Canon EF lenses. The Nauticam lens chart for L-Mount shows a good selection.
While cost effective the S5II has only 24 megapixels and more importantly does not offer a solid tracking autofocus as Nikon, Canon and Sony do and therefore is a risky path to take unless you are also moving to the S5II for other reasons.
Conclusion
When I write pieces like this there is always someone that comes but at the end we took amazing pictures with film camera or with Camera X that had 8 megapixels. Well that is fine but at that time this is all you had.Or even better let’s look at some open water images to have a view, which of course can’t be done as conditions can never be replicated.
Today there are many options and choices and while having options is a good thing it does make decision making more complicated. While there are many factors that make the image at the end the photo needs to be in focus and have the appropriate quality.
This short write up covers both this factors and hopefully you will find it useful. If you are regularly on underwater photography trips you will also be able to compare this article with real life scenarios. While few years ago it was rare to see a full frame sony user on a trip today the numbers have largely increased as consequence of the migration of users to mirrorless cameras.
Water contact optics have existed in various forms since film cameras however in the last 20 years with the advent of digital compact cameras the emphasis has been on wet lenses.
A wet lens would be attached to the housing of the camera and be in contact with water.
Inon has been for a long time the champion of wet lenses but since 2015 the top performer has been Nauticam since the introduction of the WWL-1 which I reviewed in this article still using a compact camera. Originally wet lenses were only designed for small sensor systems however the WWL-1 was the first wet optic compatible with the Sony full frame E-mount system. The issue with large systems is that as the lens gets bigger the wet lens gets bigger at some point you need to move to a dry mount to avoid vignetting but the optical design remains unchanged.
Dry mount wet lenses existed long before Nauticam efforts; the most notable was the FIX dry mount for the canon G16 series.
How does a wet lens work?
All wet wide angle lenses are built as afocal (focal length equal to infinity) system with magnification smaller than 1 this means things look smaller than they are when you apply a wet lens on top of the camera lens.
This has a significant benefit for all lenses that have a minimum working distance that is not compatible with a dome port, which requires lenses to focus really close.
With an afocal lens designed similar to a laser beam extender: things look further away and therefore the system is able to focus right on the surface of the wet lens.
Historically wet lenses were not corrected for distortion and, as result of having this demagnified effect, they also have barrel distortion which is commonly accepted in underwater photography.
When we look at wet lens specifications, we are given the magnification of the lens alone for example 0.36x or 0.57x. This does not mean that if your lens is 28mm it becomes 28×0.36=10.08mm during the process.
What it means is that if something is at 1 metre from the wet lens this will indeed look as if it was 2.8 metres and therefore the field of view will be larger. This is a significant benefit if you compare to the same 28mm behind a flat port which is the starting point of the compact camera market those optics have been originally designed for.
When you combine the wet lens with your camera lens the demagnification effect may be affected by the distance between the two lenses, the length of the optical path inside the camera lens and body, and inside the wet lens.
As you work at distances that are much longer than the physical size of your system the magnification factor becomes a more accurate approximation, however as you get very very close to the point of touching the class the magnification actually increases and the effect of the wet lenses decreases.
WWL-1 on Sony 28/2
Wet lens operating at very close range the depth of field has dropped far away from the notional 130 degrees diagonal but the image remains very sharp.
And this brings to a fundamental difference and key takeaway: the field of view of a water contact system, composed by a camera system and a wet lens, changes with the subject distance.
Another important point is that due to the design, a system with a wet lens can indeed focus at infinity which is totally different from a dome port system, a system with a wet optic based on focal design does not require the lens to work at close focus but in most case will allow the lens to work within the specified MOD even when subjects are actually closer.
Why a water contact optic may work better than a lens in a dome?
We have read about the marketing that states that water contact optic A has a benefit of N stops in the corners compared to a rectilinear lens of the same field of view.
What does this mean and is it true? First, the majority of rectilinear lenses are unable to offer the same diagonal field or view of a wet lens combined with a longer optic so this comparison is a bit difficult. Second majority of dome ports on the markets are limited to 14mm widest focal length so a comparison to match the field of view is not entirely possible.
If your rectilinear lens has very poor close focus performance, which is what happens in a dome where a lens works in a distance range around max 0.5 metres, and you compare it with a standard lens combined with a water contact optic which helps the lens to focus further away, you will find that on a resolution target the water contact optic may indeed offer much better sharpness as you move from the centre to the edges of the frame.
This is not an absolute truth as there are some modern mirrorless lenses that focus very close and in fact match or even beat an average lens combined with a water contact optic.
Sony 1635 F11
The Sony 16-35GMII in the example above offers superb corner sharpness and in fact wider field view at close range than the wet lens despite a smaller nominal field of view. This is due to the fact that the dome optic preserves the field of view at all shooting distances.
The 16-35GMII however costs more than the Sony 28-60mm and WWL-1 combined without accounting for the cost of the dome!
If we consider other solutions like the WACP-1 the dome solution costs become comparable or even lower.
Limitations of Water Contact Optics
Allowing the lens to focus further away than the subject may allow the lens to work in a better performing zone however this also comes with some drawbacks.
In situations where the subject is flat there are no issues with a water contact afocal system however reality is not made of flat subjects.
In this example we have our target at 1 metre and the reef at 0.5 metres while at 2 metres there is some background of interest. The examples are based on full frame system with a distance to the front of the wet lens of 19cm.
If we model a water contact optic we see that the aperture required to cover the depth of field while focussing on the target is f/8. This is based on the sensor virtual distances on the graphic.
However the f/stop goes to f/13 if our focus is very close or very far.
Take into account that in real like the magnification will be higher than 0.36 and therefore the values computed are best case scenarios.
With this type of adapter both focus position and field of view are based on the virtual image.
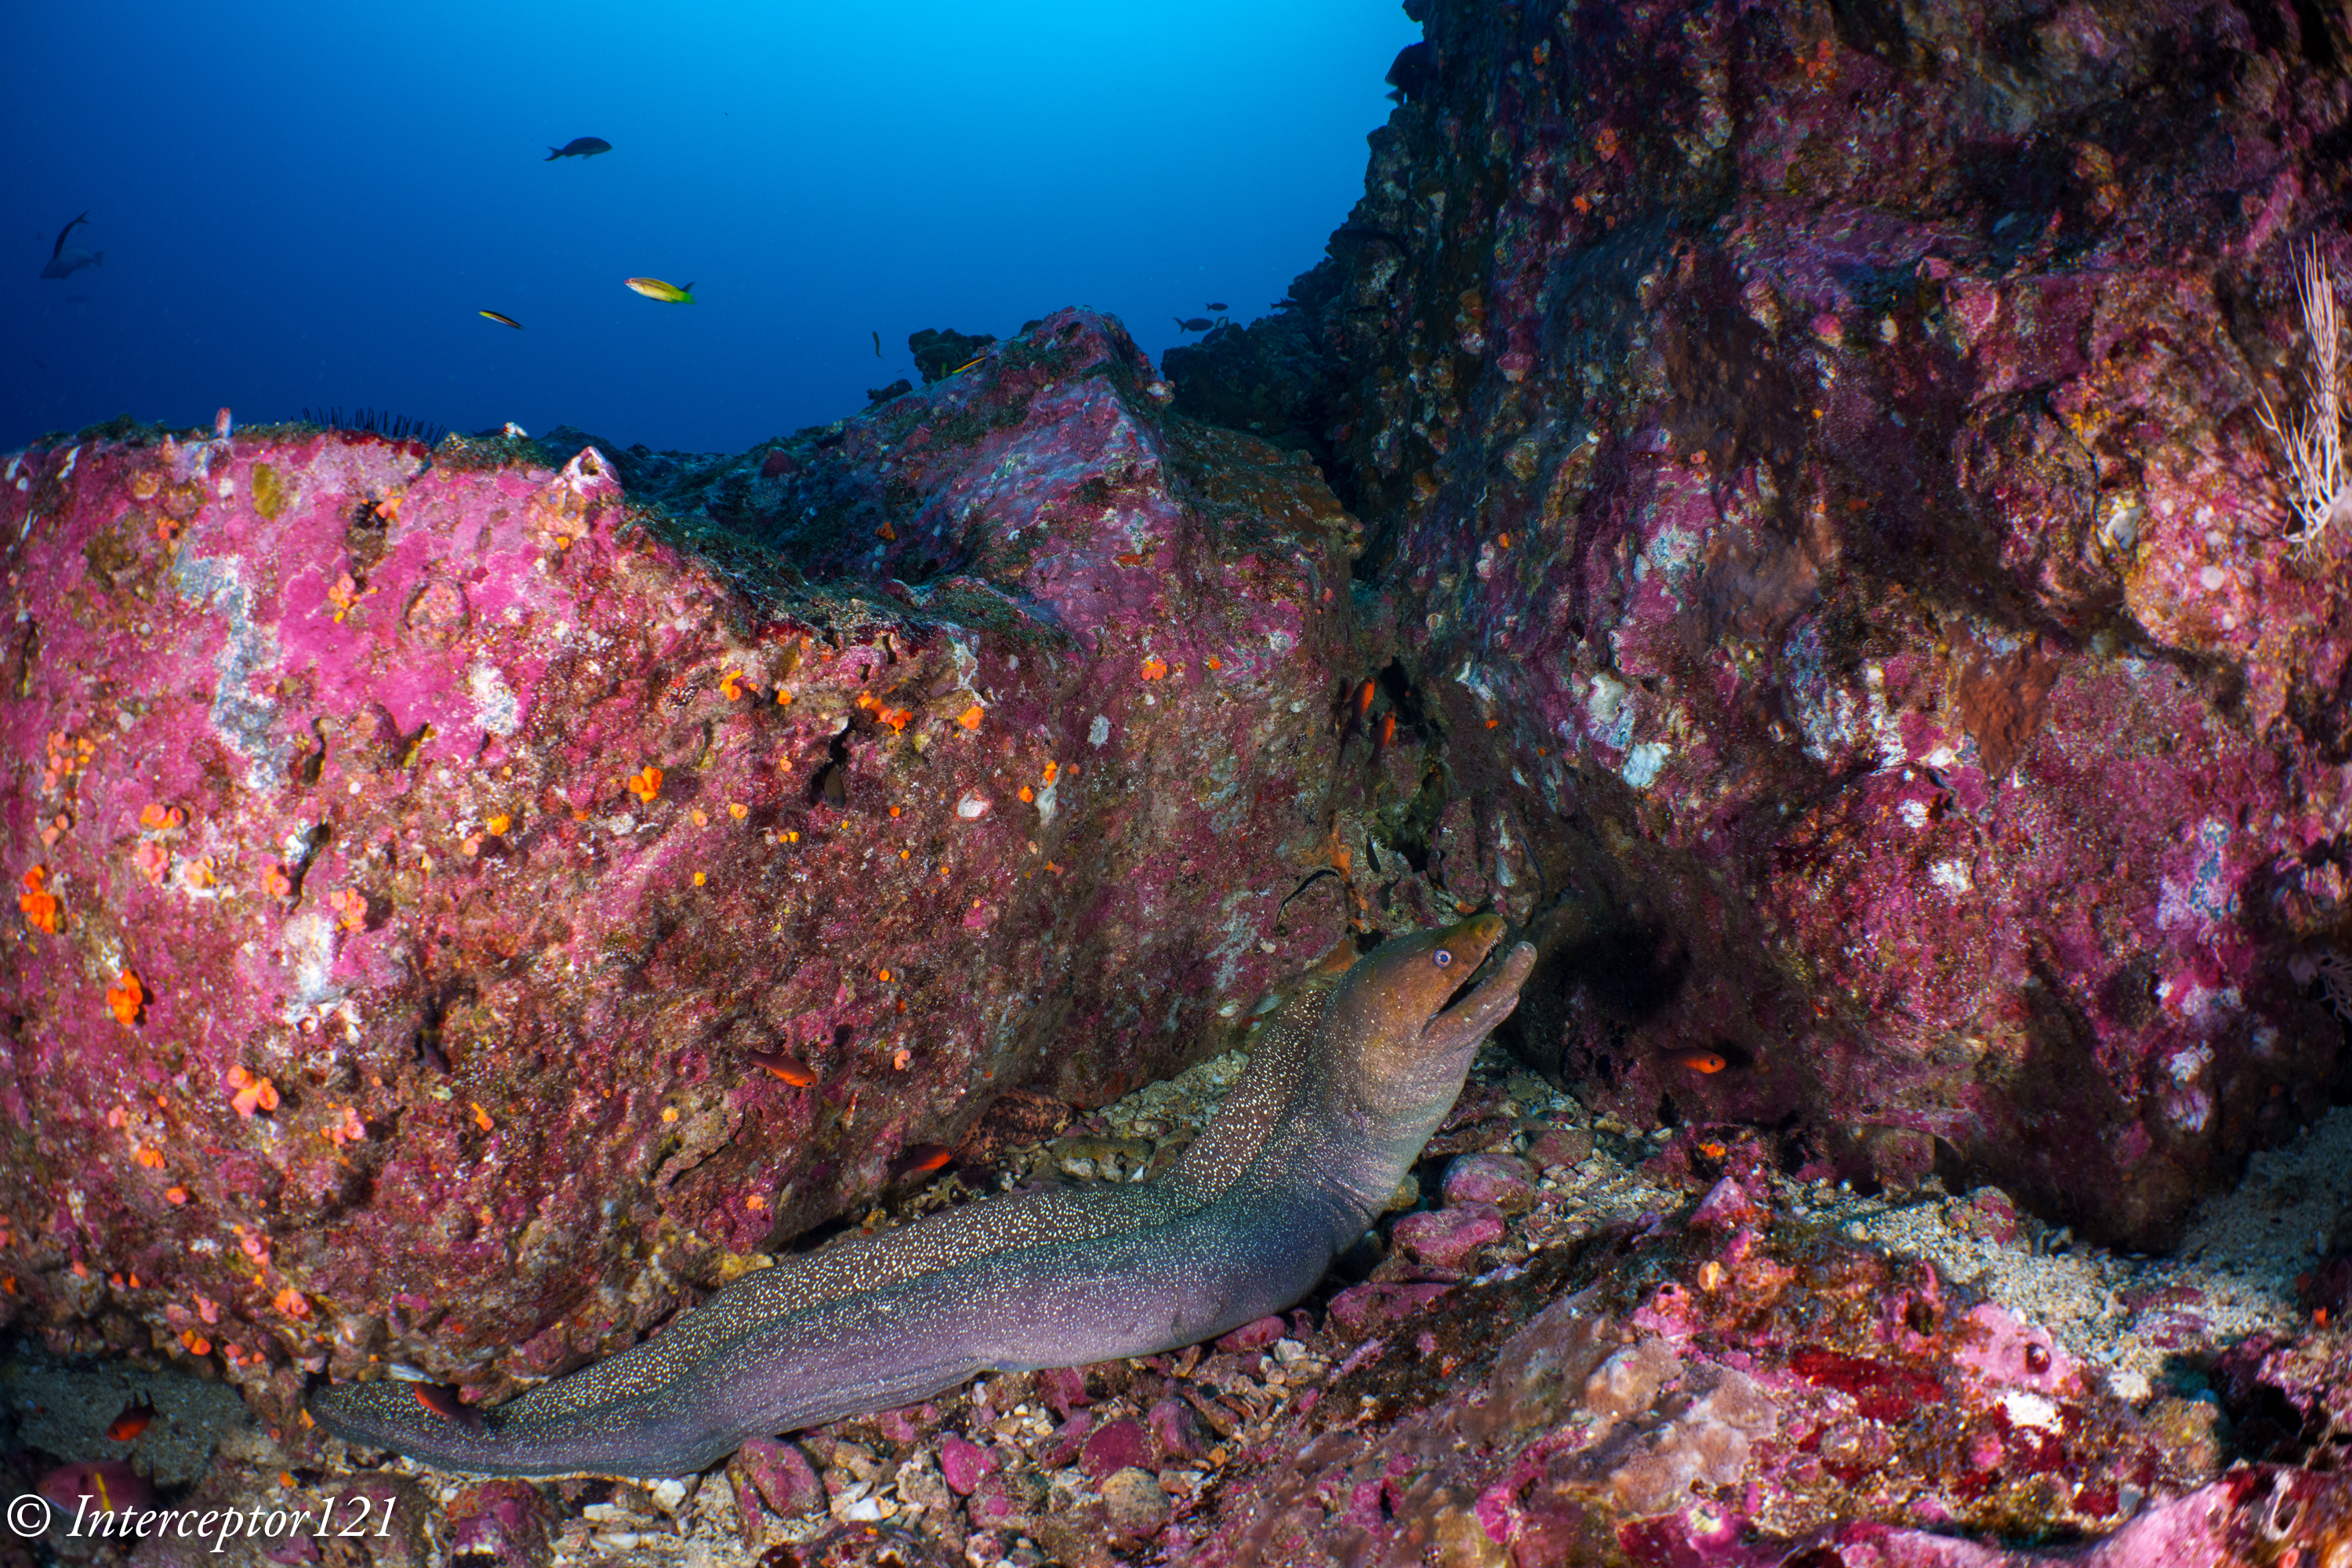
This is a classic example that shows the effect.
Moray on Red
The moray eel is at around 1.5 meters however the camera thinks the target is 5 meters away as result even shooting at f/11 results in soft edges and lack of depth of field in front of the subject.
If we do the same simulation with a lens housed in a 9” dome the results are very different due to dome port compression.
Remember that for a dome virtual image drives the focus position however field of view is based on real distances.
Example shot in a similar situation with a Canon 8-15 and teleconverter at f/11 the entire frame including the parts ahead of the coral block are sharp. The camera focus position is 27cm due to the dome port optic visual image, the dome size used is 69mm radius.
We can see that in terms of depth of field the dome system is much more effective despite the subject distance is very near, although this will be penalised by other aberrations and therefore more likely work at around f/8 still this is a benefit especially when we look at closer targets which don’t require the same small apertures of the wet lens system.
This other example with teleconverter at f/8 focal length 21mm shows decent depth of field even in the near edge. At f/11 this would have been sharp throughtout
Red Raindrops
Therefore the water contact optic typically requires smaller apertures compared to a shorter lens of comparable field of view on the horizontal axis within a dome solution.
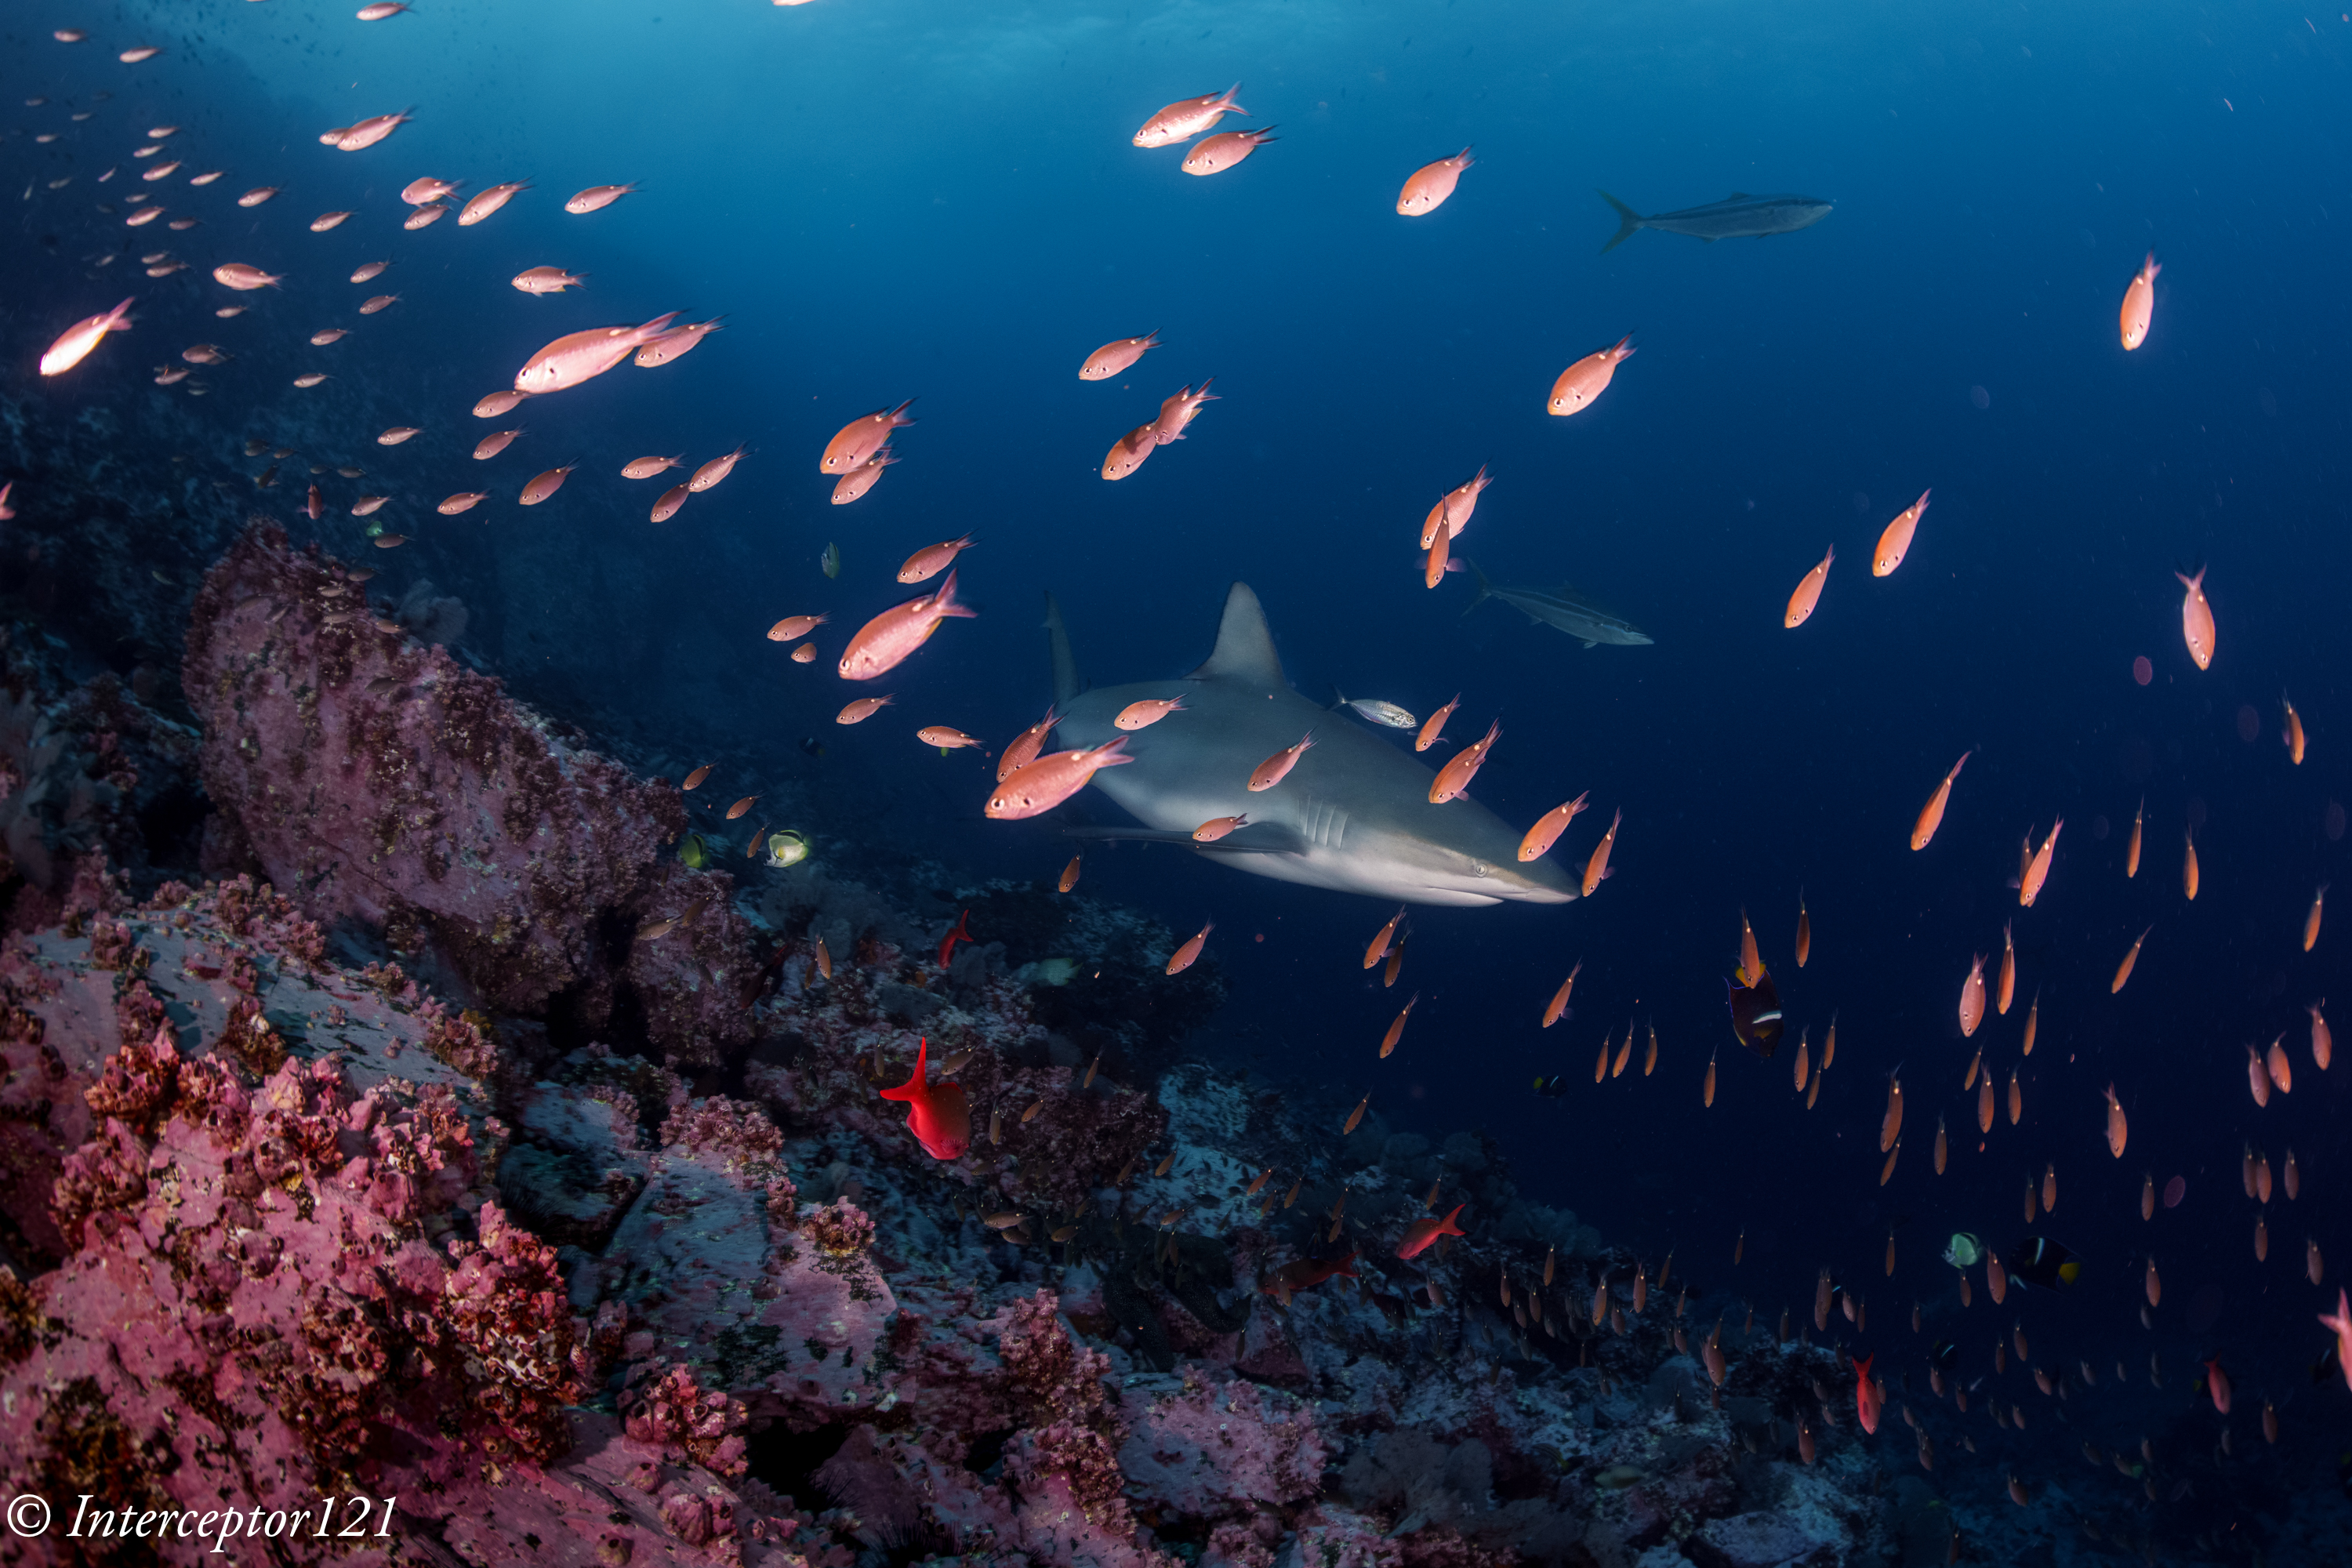
This reef scene shows a classic situation where you need to stop down the lens a lot to have everything in focus here shot at f/16 so that the coral in front of the fish is sharp.
Sway
With f numbers going past f/11 there is a sensible drop in resolution of the overall system and therefore the water contact optic appears more suitable to situations where the main subject is ahead of anything else in the frame, for example schooling fish.
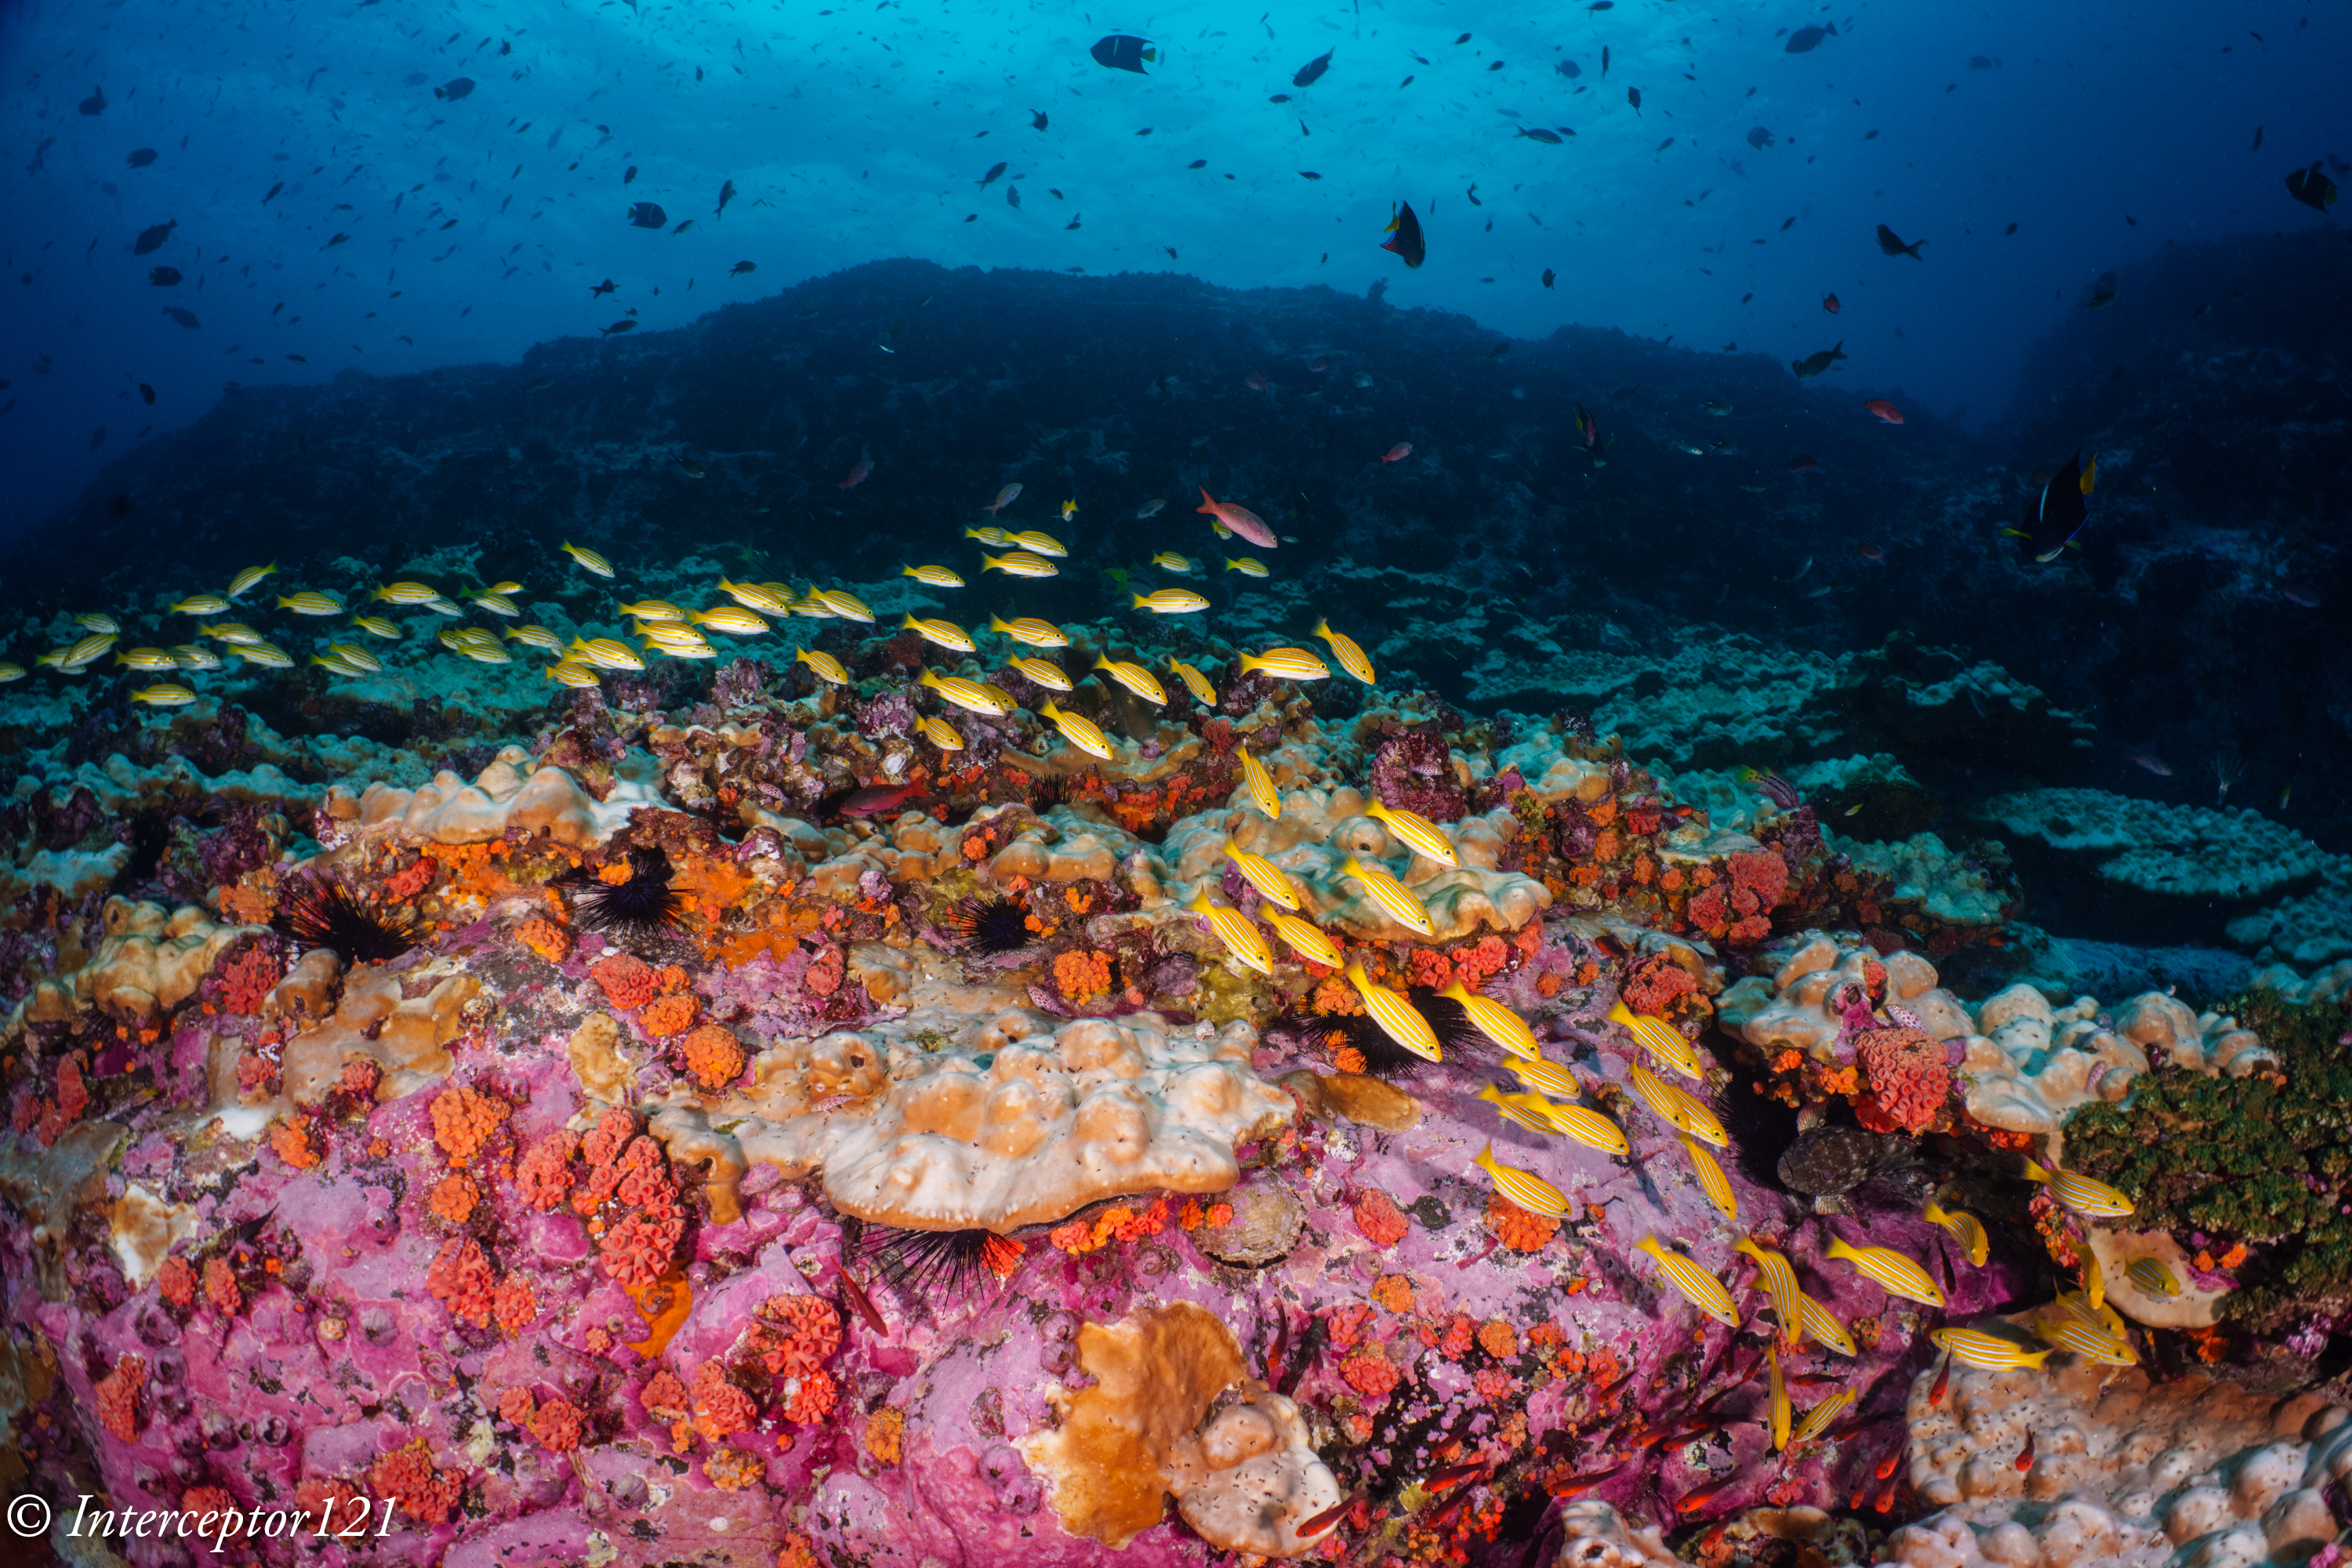
Staircase
A school of snappers in Malpelo makes the perfect target for a wet optic as the reef is behind and everything looks sharp across the frame at f/11.
Reading the exif of this image we see that the camera thinks the target was at 8.05 meters in reality it was less than 3 meter away.
Fish Shape
Summary
Water contact optic allow lenses to work in a more comfortable focus range, this is very advantegrous if we compared it to a flat port or to a wide lens that does not work well at close range.
However wet wide angle lenses are not suitable to all scenarios, in particular due to the issues of depth of field and also lower effect at close range are not particularly suited to close focus work without a significant loss of resolution on modern full frame mirrorless cameras.
If your objective is to work at close range and have reef scenes that are not clean with elements before and after the focus target a fisheye with teleconverter may offer a more fitting solution than a 0.36x wet lens with a standard zoom because it does not loose magnification and ends up in comparable aperture numbers to achieve a similar depth of field.
For targets at far distance shorter focal lenght, in our case half (14mm vs 28mm) will offer superior depth of field because of the dome port optics however will need to be stopped down to fix other aberrations yet unlikely to require aperture smaller than f/11 or in some cases even f/8 and therefore providing a potential increase also in light gathering and resolution.
Ultimately on full frame cameras wet optics are not a silver bullet and solution for all shooting scenarios but just another option to be used for example to reduce drag, consider the effort of finning with a small wwl-1 compared to a 9″ dome port in 3 knots current.
As I wrote in a previous article this lens has several strengths
Close minimum focus distance (19 cm wide – 26 cm tele)
Lens does not extend when zooming
Reasonably compact (99 mm and 420 grams)
Good sharpness at the edges from f/4 onwards
Low cost compared to other Sony lenses.
The lens will cost you $799 vs $2,299 of the Sony 16-35 GMII which is the best lens in this class however the price difference will convince most people especially those only using the lens underwater that the Tamron is the way to go.
Parts for Nauticam Housings
The Nauticam 18809 wide angle dome port is not a classic dome but has design without a flat base. The port has 11cm radius of curvature and is 85mm deep 180mm wide this means the entrance pupil needs to be 25mm behind the extension.
Nauticam 18809 180mm Wide angle dome port
Nauticam recommended extension is 40mm when combined with the 35.5mm N120 to N120 port adapter. Due to the shape of the lens this cannot be used with the N100 port as the zoom is close to the front of the lens.
Tamron 17-28mm with Nauticam zoom gear
Underwater housing manufactures unfortunately do not apply any science to the selection of domes and extension for a lens but out of pure coincidence the 40mm extension ring is what this lens requires.
Tamron 17-28mm 35.5 adapter and 40mm extension
With the 40mm extension the glass port will be exactly 11 cm from the entrance pupil and focus right on the surface.
The Nauticam parts will set you at $2,284 for the gear, extension and wide angle port.
Pool Session
I had already shot the Tamron in the murky waters of my local pool so I went to Luton that has a better filtration system and started with my usual shots.
I took shots from f/2.8 to f/22 obviously f/2.8 and f/4 are purely academic but decent results are obtained from f/5.6.
Tamron 17 2.8 Close
At F/2.8 most of the area outside centre is blurred.
Tamron 17 4.0 Close
By f/4 we have a substantial improvement.
Tamron 17 5.6 Close
At f/5.6 the lens is better than most already considering the very close shooting distance. Unfortunately at this stage I picked up a bit of debris on the dome and did not realise…
Tamron 17 8.0 Close
f/8 is very good and this is your default for shots that are not close when edges are not important.
Tamron 17 11 Close
f/11 is probably the best overall compromise between edges and centre.
Tamron 17 16 Close
By f/16 depth of field keeps everything in focus however the lens has dropped in the centre.
Tamon 17 22 Close
f/22 gives you a consistent frame but with evident resolution loss.
All the shots above have distortion correction deactivated.
I then went and shoot a tile wall to see how straight is the lens here lens correction is applied.
Tamron 17 5.6 Wall
At f/5.6 shooting from 1.8 meters performance is excellent.
Tamron 17 8.0 Wall
f/8 is even better across the frame and is your default if depth if field is not essential.
Tamron 18 11 Wall
f/11 is great
Tamron 17 16 Wall
f/16 and f/22 give consistent sharpness as expected again those apertures are normally not necessary.
Tamron 17 22 Wall
Shooting people with the Tamron
One of the things you do with a rectilinear lens is to shoot straight lines and correct proportion people and wreck interiors for example. The inside of the pool lends itself well to this.
Tamron 17 2 divers 8
With subject not close the lens has a great pop and rendering at f/8
Tamron 17 side 8
Even closer subject with not far background look great.
Tamron 17 diver 8
If you need the background to be sharper you can stop down.
Ascent 11
Again considering that even WWL-1 and WACPs really need f/11 this looks terrific.
Knee down 14
A final example shows that f/14 is enough to give you the depth of field you need when the subject is not too close.
Conclusion
There is no doubt that if you are in the market for a rectilinear wide angle and you are budget conscious this is the lens to get full stop!
Warning this is an extremely technical article that I have written on request. If you are not familiar with optics, geometry, housings do not attempt to perform a calculation by yourself and rely on expert advice.
Background
The physics of dome ports are not new to underwater practitioners although not many people understand the formulas, it is well accepted that there is a correct way to size and position a dome port in order to optimise optical performance of a lens inside an underwater housing. I do not want to repeat the theory here but if you feel you need a refresher the excellent articles from the now passed David Knight and specifically the piece on dome port theory will be useful. For the purpose of this article I will consider only underwater imaging, split shots and over and under have different considerations and will be addressed separately in due course.
Practical Implications
For our purposes, what is interesting is that a dome port is able to restore the lens air field of view when the camera and lens are inside a housing. The theory says that this happens when the centre of the dome lies on the lens entrance pupil. But what happens if it does not?
Jeremy Somerville has created a number of visualisers that although not totally correct give a good idea of the issues involved. In particular the positioning of the dome port is something you may want to check. In short if the dome is not correctly positioned we lose field of view as result of distortion and increase the amount of chromatic aberrations.
We also have to consider that the dome port being a single element lens has also issues of field of curvature and spherical aberrations which are additional to any considerations on positioning and require the user to stop down the lens to reduce the side effect. Those side effects are exacerbated when the dome is not correctly positioned to the point they cannot be corrected no matter how much you stop down the lens.
Choosing appropriate wide angle lenses
Minimum Focus Distance
One of the key takeaways of dome port theory is that if your lens is not able to focus close it may not work at all inside a dome, which in turn means your dome starts to become bigger and bigger to allow your lens to focus or you need to introduce close up lenses which further deteriorate optical quality.
More compact set ups and smaller domes require lenses that can focus close. In addition, due to the dome port optics, infinity focus will be reached at 3x the dome radius from the dome surface: your lens will work to a maximum focus distance well under one metre and closer to half a metre. This is a challenge for wide angle lenses that are designed for landscape and not usually optimised for close focus. One assumption that you cannot make is that a lens that is great for topside use will perform equally well behind a dome, or even more interesting a lens that is small and compact may require a quite sizable dome to work properly underwater which negates the size benefit to start with.
The dead Zone
The dead zone is where the camera cannot focus because our subject is too close. Our objective is to place the dead zone inside not outside our dome so that we can maximise the range we can use for imaging. It is not an issue if the dome radius is so big that the focus area falls well inside the dome, in fact it may be an advantage, but if the camera focus distance is outside the dome we are eating away useful range and at the point where the focus distance is so far that is outside the dome infinity point the camera will not focus at all.
By choosing a lens that can focus very close we accomplish two objectives:
We reduce the size of the dome required
We maximise the focus range that can be used.
I prefer lenses that have a minimum working distance around 20cm, and avoid anything that focuses from 25cm and beyond, this ensures good image quality and reasonably compact set ups.
Prime vs Zoom
Prime lenses have a fixed entrance pupil this means that once the dome is sized and positioned your job is done. Zoom lenses instead change in size or move the entrance pupil to accommodate changes in the field of view. This is bothersome as it means that if you determine your dome parameters at wide end this may not be correct at tele end. In addition as the angle of view is being reduced the curved surface of the dome will start looking more and more flat. This is a challenge but not one we need to address, as seen in the flat port theory lenses that are longer than 35mm suffer less from chromatic aberrations, therefore for our purposes we will treat zoom lenses like a prime lens whose focal length is the shortest our zoom can manage, i.e. the wide end of the zoom. At the tele end the dome with a zoom lens will look like a flat port but still have some benefit over it in terms of aberrations.
Zoom factor
Although we said we will consider the zoom lens as a wide tele, lenses with a zoom ratio much bigger than 2x will most definitely be problematic. This is the reason why zoom lenses with conservative ratios like a classic 16-35mm are bound to perform overall better than say a 20-70mm lens. Lenses in the classic 24-70mm or 28-75mm range tend to have less problems because they are not that wide to start with and generally work well as long as they focus close, otherwise they will require larger domes.
Example Cases
I have good experience after one year on e-mount and therefore I am going to list a few examples of lenses that are excellent topside quality but are bound to work not so well underwater as well as other lenses that have good potential at different price points.
Lenses requiring large domes for optimal performance
Sony 12-24mm F.2.8 GM – a high quality super wide zoom lens that is great for topside use. It has a minimum working distance of 28cm and is 13.7cm long. This lens will likely require a dome port with a radius in excess of 14.3 cm and a field of view of 122 degrees. A port like this is not standard on the market.
Sony 20-70mm F4 G – a versatile topside zoom with extensive zoom. It has a minimum working distance of 30 cm and is only 9.9 cm long this lens is likely to require a dome port over 20 cm in radius to perform at its best.
High Potential Lenses
Tamron 17-28mm F2.8 – A lens that is cost effective and sharp with a limited zoom range. It can focus as close as 19cm and with a size of 9.9cm will require a dome of just over 9cm to have the focus range inside the dome.
Sony 16-35mm F2.8 GM2 – An excellent topside lens that has a good zoom range and can focus at 22cm. With a physical size reaching 12cm this lens is likely to work with domes that are not excessively large.
Sony 20mm F1.8 G – An amazing low light lens that can focus at 19 cm. With a physical size of 9cm this lens is likely to work with relatively small domes and produce outstanding image quality.
Comparison at equal field of view and different working distance.
The graphic above illustrates how two lenses with equal field of view displayed in solid green require different dome radii depending on the minimum operating distance. The small inverse triangle is the area inside the lens up to the focal plane.
Lens1 will require the smaller dome so that the area not in focus falls inside the dome, if a larger dome is used this simply expands the focus range into the water proportionally to the increased dome radius. A lens with the same field of view but longer MOD2 will require a larger dome to ensure the area out of focus is inside the dome. A smaller dome can be used however the dead non focus area now moves into the water. As the infinity point is still set at 3x the dome radius from the surface using this smaller dome means less focus range can be used by the camera. Using too small domes deteriorates image quality because the compressed focus range has an impact on the overall image resolution.
Locating the Lens Entrance Pupil
In order to properly position the dome port we need to determine where the entrance pupil of our lens is. There are at least 4 methods that can be used to locate the entrance pupil of the lens.
Method 1 Look into the lens
It makes me smile when you read: locating the entrance pupil is easy just look into the lens and see where the aperture is. I do not find this easy at all, first lenses are increasingly complex in construction and second how do you place depth of the aperture correctly even if you can see it? The error margin of this method is very high.
Method 2 Non Parallax Point
If you are into panorama photography you know that you can locate the non parallax point which is the lens entrance pupil using a slide mount and a specific set of targets.
A demonstration of this method is beyond this write up however if you want to go deeper into this this article should help you. This method has a good level of precision and panotools maintains an entrance pupil database for many DSLR lenses.
Method 3 Trigonometry
Once you know the lens field of view you can use various filter rings to determine the thickness where vignetting occurs. At that point you can simply calculate the distance from the edge of the entrance pupil by taking the ratio between the lens radius and the tangent of the angle of view. This gives good precision and does not require anything else than the lens itself and a few filters but can be approximated also for a lens you do not own using standard roundings.
Method 4 Lens Design
There are some websites that have lens design drawings directly from patents. This will give you the exact location of the entrance pupil from the image plane and from the lens mount.
I use the site maintained by Bill Claff called the Optical Bench Hub. Unfortunately the database is not complete, some specific brands designs are scarce. The benefit of this method is that you can use it to make calculations before you buy the lens and it is 100% accurate.
Entrance Pupil Determination – Practical Examples
Case 1: Lens Design Available
Sony 20-70mm F4 G lens is a very versatile zoom, whe wide angle 20mm is sufficient for many situations and the tele end of 70mm good for close up work on land. This lens makes a good candidate for underwater use in terms of angle of view however it has a minimum operating distance of 30 cm which is far from ideal.
We locate the lens design on the Optical Bench Hub here.
The important parameters are I distance from the edge of the lens to the image plane (sensor) which is 115.04mm and P distance of the entrance pupil from the lens front.
The difference I – P = 91.79mm still accounts from the flange distance. Taking that out we get 73.79mm from the lens mount.
The lens has a minimum working distance of 300mm. If we subtract the entrance pupil distance from the image plane of 91.79mm we determine a minimum dome radius of 208.21mm which is rather large and in fact not available if not as a custom product.
Of course we can still go ahead and use a smaller dome radius however all the range between the MOD and the edge of the dome will be wasted and not produce an image in focus.
Sony 20mm F1.8 G lens is the modern equivalent of a Nikkor UW15 giving a field of view that is acceptable for most uses and excellent image quality.
The lens has a MOD of just 19cm the distance I-P=80.91 a dome with a radius of 11cm will contain the entire non focus area. The entrance pupil is 62.91mm from the lens mount.
Case 2: Lens Design Not Available
The Tamron 17-28mm F2.8 is an affordable, fast and high quality wide angle lens with a somewhat limited zoom range. The lens is 99mm long and takes a 67mm filter thread. I used an ND1000 Hoya Pro filter with a thickness of 5.6mm, the lens external radius is 69mm with the filter on.
The lens nominal field of view is 103.70 degrees however all mirrorless lenses have software corrections. Ideally I need to know the real field of view however the error is normally 1 to 3% and does not influence the calculations too much.
If we consider a length of the lens and filter of 104.6mm and a radius of 34.5 mm for an angle of 51.85 degrees we obtain a distance from the lens mount of 77.5 mm and from the focal plane of 95.5 mm. Taking into account that the MOD is 190mm this gives a minimum radius of 94.5 mm for the dome which is very good news.
Sony has recently released the 16-35mm F2.8 GM2 with a MOD of just 22 cm. Using the same logic as before we calculate the entrance pupil to be 93.5 mm from the lens mount or 111.5 mm from the sensor. This means a dome radius of minimum 220-111.5=108.5 mm is required to contain the area not in focus inside the dome.
Dome Selection Part I – Field of View
The first thing that we need to ensure is that the dome field of view can contain the lens field of view otherwise our main objective of preserving the air performance would be lost.
Unfortunately the specifications of dome ports on the market are somewhat lacking so you need to make do with what you have or ask for CAD details.
Here you can see that, ignoring the thickness of the glass for simplification purposes the various ports have the following field of view using the formula 2*arcsin(glass port diameter/curvature radius)
Part Number
Description
Angle of View (degrees)
Widest Lens mm(Full Frame Eq)
18809
180mm Optical Glass Wide Angle Port
109.8
16
18812
230mm Optical Glass Wide Angle Port II
146.8
7
18813/18815
250mm Optical Glass Wide Angle Port II
102.75
18
It is somewhat surprising to see that the larger port in terms of size is the narrower in terms of field of view I believe this is a compromise in terms of weight.
Dome Selection Part II – Curvature Radius
Looking at field of view is not sufficient, we also want to ensure that the lens MOD is contained by the dome and therefore we need to take into account the actual radius of curvature of the port
18809 180mm Optical Glass Wide Angle Port Radius 110mm
18812 230mm Optical Glass Wide Angle Port II Radius 120mm
18813/18815 250mm Optical Glass Wide angle port Radius 160mm
The port size goes with the curvature radius however somewhat surprisingly the difference between the 230mm and 180mm port is rather small making the choice between the two more a matter of field of view.
Amount of Recession of the Camera from the Port
Camera housings are not like skin, armed with a digital calliper you need to determine the distance between the lens mount and the housing port mount. Alternatively you can reverse engineer this once you have a lens port combination that is absolutely exact.
For the purpose of my calculations I have measured that my E-Mount camera is 27mm recessed inside the housing. This is important as it is needed to calculate the extension for the dome. If you are in a different format you need to measure this distance yourself.
Entrance Pupil to Housing Port
We have previously determined the entrance pupil from the lens mount and now we know how much this is recessed in the housing so we can calculate the required extension to reach the entrance pupil however this assumes the domes are hemispheres which in most cases they are not. Let’s leave this aside for one second and go back to our examples.
Sony 20-70mm F4 Entrance Pupil Distance = 73.79mm – Housing recession 27mm = 46.79mm from the housing
Sony 20mm F1.8 Entrance Pupil Distance = 62.91mmm – Housing recession 27mm = 35.91from the housing.
Tamron 17-28mm F2.8 → 50.5mm from the housing
Sony 16-35 F2.8 GM2 → 66.5mm from the housing
Wide Angle Ports
Again we need a calliper to determine the depth of the port as those are not full hemispheres. I have access to the 180mm dome and I know that the port is actually 8.5cm tall from mount to glass edge because I measured it. This means I need to add 25mm to the extension required. From the manual I estimate the 230mm port needs extra 13mm and the 250mm port 34mm. if you own those ports and want to provide me the exact measurement I will build a calculator for dummies.
Back to our examples with some real calculations:
Sony 20-70mm F4 Port required 250mm Wide angle Port. Extension required 46.79+34mm=80mm
Sony 20mm F1.8 Port Required 180mm Wide angle port. Extension required 35.9mm+25mm=60.9mm
Sony 16-35 F2.8 GM2 Port Required 180mm Wide angle port. Extension required 66.5mm+25mm=91.5mm
If we are using the 35.5mm N100 to N120 adapter this means that the actual extension rings required are
Sony 20-70mm F4 → 80-35.5=45 mm Part required N120 Extension Ring 45
Sony 20mm F1.8 → 60.9-35.5=25.4 mm Part Required N120 Extension Ring 25
Tamron 17-28mm F2.8 → 75.5-35.5=40 mm Part Required N120 Extension Ring 40
Sony 16-35mm F2.8 GM2 → 91.5-35.5=55 mm Part Required N120 Extension Ring 55
Nauticam Port Chart Check
Lens
Extension Determined
Extension Suggested
Delta
Sony 20-70mm
45 mm
40 mm
5 mm
Sony 20mm
25
NA
NA
Tamron 17-28
40 mm
40 mm
0 mm
Sony 16-35GM2
55 mm
50 mm
5 mm
We can see that for the 20-70mm where the entrance pupil is known the Nauticam port chart is off 5mm. For the 17-28mm where design information is not known there is no discrepancy with my method and for the 16-35 GM2 there is a discrepancy of 5mm.
I checked the situation for the 16-35mm GM2. This lens has some distortion and therefore the uncorrected field of view is 109 degrees which is too big for the 180mm wide angle port. With my calculated 55mm if you remove distortion correction in camera you can see a tiny bit of shading from the dome petals but this goes away when distortion correction is active. Therefore I am satisfied that my calculations are more accurate. I contacted Nauticam who ran the MFT charts in their test rig and they said 55mm works well too. Although it is ideal to have the exact extension if you have one that is 5mm off the calculated value and the dome does not vignette you need to consider if the image quality you get is satisfactory and make your call.
I also tested this lens in a pool, you can read the review in this post.
What about other brands?
The challenge with other brands is the lack of documentation however you can contact the design department to obtain information on the dome port they should not be a secret. The other challenge is the availability of extension rings. The Nauticam system has a level of precision of 5mm which is excellent however I am under the definite impression that they run their tests using in most cases steps of 10mm and using as first approach how the lens fits the port, they do not go and attempt to determine the entrance pupil.You can observe that because when you look at a specific port say the 180mm wide angle and you apply the suggested extensions in all cases the lens edge is flush with the extension.
In most cases this turns out to be accurate however there are some cases where wider lenses need to be more recessed and narrower lenses need to stick out more.
Fisheye Lenses
When you use a fisheye lens with a complete hemisphere dome port the calculations remain the same however it is a bit simpler to proceed without data. If your fisheye has a diagonal 180 degrees view and your extension is too long you will see vignette in the corners. However if you push your fisheye lens closer to the glass you may be able to use a dome with a smaller field of view but the edge distortion will increase and so will chromatic aberrations. A classic example is the 230mm wide angle port used with a fisheye lens. The port has a field of view of 146.8 degrees which is far away from the required 174 degrees of a diagonal fisheye lens.
Panotools provide entrance pupil for the Nikkor 8-15mm therefore we don’t need to go trial and error. The Canon 8-15mm Fisheye is on the Optical Bench Hub.
Following the same logic we determine that the entrance pupil is 129.98-18-17.98-27=67mm from the housing. Taking out 35.5mm for the adapter we get 31.5mm vs the 30mm on the Nauticam port chart. This means the lens will stick out from the dome opening and that is fine as a shorter lens would make it vignette. Try it if you have a 35mm extension you will see the vignette. If you have access to all extensions in steps of 5mm you can determine the correct one when the vignetting stops even without the entrance pupil position. Please note the above calculation is to use a Canon EF lens (flange distance 44mm) on E-Mount (flange distance 18mm) however if you work that out in the N120 Canon system with the additional gap for the more recessed housing you end up in exactly the same place.
Wrap Up
This article has shown that it is possible, with basic knowledge of trigonometry and access to lens, dome and camera design information to determine:
How well a lens may work
What is the minimum dome radius required to preserve the image quality
What is the extension required
How to find out the required field of view of your port
Without acquiring the actual lens camera or wide angle port. It is important to understand that if a lens is weak in air it won’t get better in water and in particular you need to appreciate that topside tests are not identical to use behind a dome that instead means working at very close focus well under one metre mostly around 30 to 50 cm. It may be worth it in some cases to rent a lens if available and take some tripod shots at close range. If you see really weak performance the lens may not be worth housing it at all.
One of the misconceptions that has propagated in the last few years is that all rectilinear lenses offer poor performance compared to water contact optics and you need to stop down to very small apertures to have good edges. From my personal experience with the Tamron 17-28mm, I can conclude that this lens is far sharper than the water contact optics that require a similar investment and even beats more expensive options (WACP-C) however the rectilinear look is somewhat not in trend in underwater photography. Majority of photos want the centre to pop and this works better using fisheye lenses or distorted optics at close range. Still there is a place for rectilinear lenses: models, wrecks where shapes are known, even fish and marine life where the exact dimensions matter for scientific purposes.
I hope that this article allows you to have a more informed view of the key factors to look for in a lens that will ensure underwater performance is as good as it can be.
The latest addition to the GM family from Sony has been the mark II of the 16-35mm wide zoom lens.
Nauticam has recently released the zoom gear for this lens and has it on the port chart with a 50mm extension for the 180 wide angle port and 60mm for th 230 wide angle port the SKU is 37175.
I have owned this lens since September and has become a favourite for topside landscape trips. It produces very sharp images across the frame with excellent rendition.
The lens is quite big and takes 82mm filters. An interesting characteristic for underwater use is that the lens is longest at wide and and shortest at tele end. It has also a minimum operating distance of 22cm and is 12 cm long leading to small dome port requirements.
My preliminary tests indicate that this lens will perform best with a 55mm extension ring and after aquiring the zoom gear from Underwater Visions I made my way to Luton Inspire last night.
During my hour in the water I was called to take photos of a scuba dive experience nonethless I managed to run a series of test.
The lens is sharpest at f/5.6 and it drops afterwards a trend of all Sony mirrorless. I took tests shots at f/5.6 f/8 f/11 f/16.
The initial test is the demanding MOD test get as close as possible to a target and shoot a wide scene.
F5.6 MODF8 MODF11 MODF16 MOD
In terms of centre performance best results are at f/5.6 decreasing as you stop down.
I then take the same shot putting the target at the bottom edge.
F5.6 MOD EdgesF8 MOD EdgesF11 MOD EdgesF16 MOD Edges
The situation changes with best edges at f/16 however good results are already found at f/11
The wall test gives similar outcomes this is taken at around 1.5 meters.
F5.6 WallF8 WallF11 WallF16 Wall
With a target that is not near f/8 and f/11 do best suggesting those aperture are those to use for general cases, this is a good result.
Time to show some example shots.
F8 ExampleF11 Example
There is no doubt that the lens is very sharp across the frame. You can zoom into the full rez images to see the detail.
Comparison with Tamron 17-28mm
So far the Tamron 17-28 held the prime spot for the best rectilinear lens on the Sony full frame format. I would say that the Sony 16-35mm GM2 is on par with maybe an edge on the overall resolution at f/11.
Consider though that the Sony is almost 3x the price is it a worthy upgrade to the Tamron? My view is that it is not.
If you bought the lens to take it underwater the Tamron is identical you cannot tell them apart, however if you own or like the 16-35GM2 as topside zoom the focal range is much more useful.
Conclusion
Strong performance from Sony and definitely recommended with the 180 wide angle port. I do not own the 230 port that has 1 cm wider radius but would expect marginally better performance.


 [D.FOCUS Movement] / [Fn] / [MENU] / [OFF]
 . Operations that can be performed by moving the joystick are disabled.