Sony RX100 – Summary of Underwater Video Performance

Few months ago this clip came out

Many people including me got really excited about this camera and had a go at underwater video with it

Now it is time for an end of year review and summary of my experience with the Sony RX100.

Without a doubt the camera is a game changer and there are some feature that are especially suited to underwater video.

Key Strengths

Bright Lens

The RX100 does very well in low light this is a strong selling point for underwater video, even in cloudy days the camera does extremely well

Low Noise

The camera performs very well in video mode up to ISO 800, the level of background noise is really low and the footage clearly benefits from it

Image Quality

The quality of video if we focus on the center, as well at the telephoto end is impressive. Color rendering is very accurate and there is even the option of using Adobe RGB. The dynamic range of the camera is excellent and the image is vibrant.

Video Mode Control

There is full manual control in Video mode and the option for aperture and shutter priority. The program mode does very well. Only an Auto ISO option in manual is missing but this is negligible. Indeed the most interesting mode is aperture priority.

Manual Focus

The peaking function works very well and it is really a strong feature of this camera, it is also very usable underwater

Battery Life

You can easily do 3 dives with the RX100 without having to open the case which is great and actually unusual these days when even a gopro does not last one hour.

Active Steadyshot

I initially slagged the RX100 stabilization system based on performance on land. However at a more in depth analysis it turns out that the RX100 active steadyshot, even if at cost of an image crop is very effective for sudden camera movement and for high magnification macro. The Stabilizer is not as sticky as others so when you eventually vibrate it does not jump. Although the performance for stills is poor to irrelevant and so is the normal mode the active mode is very effective for underwater use.

Tedious Workarounds

Some of the ergonomics of the RX100 are not the best and seriously deduct from an otherwise excellent experience, the most annoying issues:

Lack of focus lock

For some reason Sony decided to skip on this essential feature, the workaround involves switching to manual focus using the function dial however it is then possible to accidentally change focus.

Setting Custom White Balance in Video

Setting custom white balance is only possible in the still modes, while in fact if you shoot RAW don’t actually need white balancing. This is the largest non sense of this camera that requires the user to navigate out into Program to ensure white balance is set correctly and you don’t end up with the Custom WB Error message. Really an awful issue that Sony should try to fix in a firmware update

Lack of 24/25/30 progressive modes at 1080HD

Sony thought that for some reason you either shoot interlaced or you go directly at double frame rate with a 25 or 30 progressive mode only available at reduced bit rate and resolution of 1440×1080 with rectangular pixels. Why did they do that is a total mystery. You are therefore forced to shoot at the highest mode of 1080p50 or 1080p60 that produces large files difficult to digest by many programs. Sony decided to keep a bunch of interlaced modes despite the fact that there are no programs that can edit those without conversion and that CRT Tvs don’t exist since a little while.

AVCHD

Sony embraced AVCHD maybe because their software handles it well but what about the rest of the world? Mp4 is the standard for video clips on the internet and AVCHD adds absolutely no feature to it for simple video recording. Files have to be systematically converted, sometimes with commercial software, to be used with mainstream non linear editors, not only most would not recognize the files at double frame rate.

Key Weaknesses

The RX100 has also some key weaknesses that limit its own performance and can’t be cured by workarounds.

Macro Performance

The camera does an awful job at close range and needs a diopter even to shoot basic macro. To shoot super macro you need +12 diopters and this requires high quality lenses to avoid chromatic aberrations in the image. The focus mechanism with diopter is a bit of a mystery to work out at times. Once you manage to focus the image quality is great. However the need for a +5 diopter as a starter makes this set up expensive and cumbersome to handle in water compared to others.

Stabilizer

Sony has adopted a lens shift approach in this camera instead of the sensor shift of the higher end alpha, maybe due to large size of the sensor compared to the camera body. They have then added some software processing in camera but the results are just average. There are many other cameras that do better than the RX100.

Soft Corners at Wide End

I was going crazy looking at pictures taken with different wet wide-angle lens to check which lens was best, at the end of hours of observation I took some shots on lend at the wide end. The issue is not with the wet lenses is with the camera itself, it has very soft corners until at least f/5.6 and not the sharpest corners anyway afterwards. This cannot be cured and is a key weakness that is not so apparent in stills where you can crop quite a lot 20 megapixels but obvious in video.

No Neutral Density Filter

The RX100 has a bright lens and low noise however in video the ISO starts at 125, in many situation near the surface the camera maxes out at f/11 and then starts increasing shutter speeds to 200 400 800 and so on producing scatty mechanical images. Neutral density filters have been implemented for ages in cheaper camera and take away 2-3 f-stops allowing the camera to operate at wide aperture. For some reason Sony decided not to do anything about this. On land this is an even stronger limitation in bright days.

A final remark that I want to include for all those that use the RX100 for still photography that indeed is the real strength of this camera.

Another key weakness is the strobe recycle time not an issue in video of course but creating several issues of missed shots for photographer

In conclusion the RX100 can produce great footage but has some limitation that need to be taken into account.

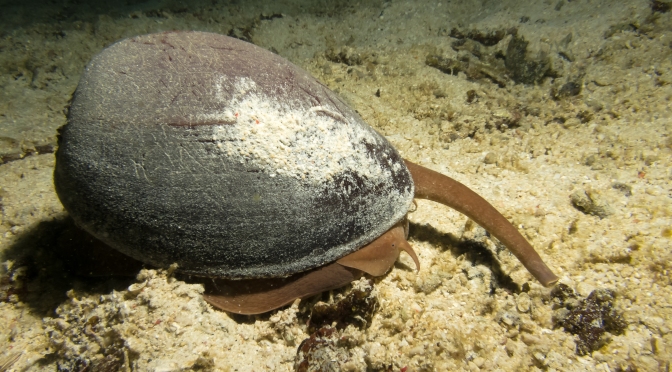
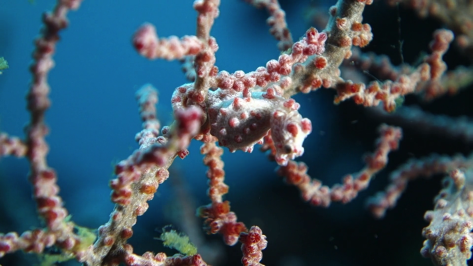
If you go muck diving on flat surfaces with a couple of diopters and good video lights it is of course all looking wonderful but the situation changes when you cannot lay down as in my seahorses video

With two Inon UCL165AD stacked it is really hard to get some decent footage and due to the large sensor the depth of field at such level of magnification is pretty much zero.

But the limits show up more in the wide angle where the soft corners come up no matter what you do as very seldom you are able to shoot at f/5.6 or higher at depth below 12 meters or 40 feet

Whoever wants to try the RX100 for video please get in touch if you have more questions and happy 2013!!!

Sony RX100 – Tips for underwater video part 9 Wide Angle Shots and Lenses

During my last trip to Raja Ampat I had finally the opportunity to take the wide angle lenses in a real life situation and test that they were working to satisfaction. As some people know I really like my set of Inon AD lenses and although the RX100 has a 28mm equivalent lens I put together a bespoke adapter to reuse the lenses I already have. At the time of the trip I did not have the final prototype but only a pre-release which meant I could no use the fisheye as I had an alignment issue with the dome so I only used the flat UWL105AD.

There are two videos that are of interest one is the Raja Ampat North sites which is below.

In the north visibility was at best fair and I was struggling with the set up as I had not tested the push up filter. What happened is that the black ring created vignetting so I had to reverse the rubber ring on the lens until I could push the filter deeper. In the video you can see clearly a vignetting issue around 3:50 on the wobbegong approach where I had not yet resolved this problem. The video has no image stabilization nor cropping and it shows! There are also occasional soft corners as due to the low level of visibility and lack of light the camera was working around f1.8 or f2.0 aperture most of the time. This does create soft corners on the RX100 when you have something in close focus because I always shoot at the lowest ISO as I have found that increasing aperture and working with high ISO creates a mayhem of chromatic issues.

Anyway once I got a few dives and the problems were ironed out we also moved down to Misool where conditions where much better. This is the Misool video.

Here because of the increase of light and better conditions the image is sharper due to smaller aperture settings. I did not use the RX100 to take any stills as I wanted to focus entirely on video.

Once I got home I bought a fix M67-28AD adapter PRO, that allows you to adjust the AD lens so that the dome petals are in the right place. I tested it in the bathtub with the UFL165AD and the UWL105AD, in terms of vignetting as we shoot stills at 3:2 the working focal length is 34mm on the zoom or 12.8mm.

This is a shot of the bare lens

Bare Port

You can see the characteristic pincushion distortion that the bare port creates, this is the main reason together to demagnification to have a wet wide angle lens note the purple fringing is evident.

This is a shot at f5.6 with the UFL165AD.

UFL165AD 12.8mm

Despite the zoom the lens performs great and it is very wide. If we look at a 100% zoom of the corner

UFL165AD 100% crop

We can see that at this aperture the corners are sharp and there is a very small amount of red and blue fringing.

Let’s look at the Inon UWL105AD

UWL105AD 12.8mm

If we zoom into the corner this is what we get

UWL105AD 100% crop

Also here there is tiny blue and yellow fringing but the results are comparable to some shots I have been sent taken with the Inon UWLH-100 28LD.

Finally this is the UWL105AD with a 16:9 aspect ratio and 33mm equivalent zoom, this is interesting as it is the way the camera behaves in active steady shot without zoom.

UWL105AD 16-9 100 crop

As you can see even better performance in the corners as the port is closer to the back of the lens with the RX100 because of how zooming is implemented.

For who is interested I sell spacer rings and special screws that you can attach to the fix adapter at $45 get in touch if you have some old AD lenses and you want to reuse them with the RX100. Especially as the UFL165AD has incredible performance with stills and nothing can beat the flexibility of this lens and its very light weight in water let alone the speedy bayonet mount.

A final word about filters, in video filters are essential to restore colour however they also take away 1 1/2 f-stop of light so in low light the footage may get too grainy and it is actually better to work only with white balance.

I have heard many people commenting about the dreaded white balance error 9900K message of the RX100. So why is this happening?

It seems that the RX100 cannot white balance if the exposure is outside the -2 or +2 Ev range. If you do continue and ignore the error message you may end up with strange results.

So how to fix this? Contrary to what I said in my post about white balance I have worked out that it is best to set a custom white balance in P mode and not in M, this is because the camera will adjust exposure and never issue an error message. If you want to keep white balancing in M make sure you are within the allowed range of exposure.

Sony RX100 – Tips for Underwater Video Part 8 – Shooting at Night

If you are not freaked out by diving at night you know that it offers unique opportunities to see behavior and creatures not usually seen during the day like the monster snail in the featured image of this post.

During my recent trip in Raja Ampat we had the opportunity to see some really unique features, now for someone this fellow here is unusual enough

We had however made an indigestion of flamboyant cuttlefish in Dauin so that was not that exciting although having one of those walking towards the lens was pretty cool.

It is useful to compare the two still pictures of the flamboyant and the snail, you will notice that in featured image you can clearly understand the shot was taken at night whilst the flamboyant could have been just a day shot for how bright it is.

This leads us to tip number 1 for taking video at night which is never exceed with the lighting. We don’t have any ambient light to help and our lights are the only light source, it is very easy to exceed and wash out a scene with too much reflection from our subject.

I have lights that can be dimmed and I did not use more than half the power at night. It is also important to leave some form of dark halo around the frame to give really that night impression.

Coming to the light having bright lights on all the time also attracts lionfish, krill and plankton. On this trip I was literally attacked by krill to the point I had to switch off the lights for few minutes.

Back scatter is also more of a problem due to the particle in the water at night and the fact that they are more clearly reflecting our lights, if possible never illuminate a subject frontally to avoid the snow effect. Sometimes though, like in some sections of the video, there is just too much no matter how you angle the lights.

The real important part is the gear, I have video light that also change to spot and work as torches and are dimmable, this saves the effort of taking a torch with you and having to juggle with all the gear.

Other factor of relevance is that during a night dive you can’t really shoot wide angle as there is no ambient light, this limits the type of shots you can take so it is important to add something else to make the clip more interesting. It is also more difficult to film divers without blinding them so really there is less selection possible.

A final note are skittish critters that require a red filter, I have never been in this situation, usually I keep the lights low until time to take the shot and then go for it like for the eupalette shark towards the end of the clip. If you need to use a filter remember to set a custom white balance.

Talking of white balance every light has a specific temperature, mine are 6500K, it is a good idea to set the camera white balance to this temperature to neutralize the coldness of the light this is possible in video more on the RX100 but not all camera offer that option so you can start with auto mode to see how it works.

Anyway the video is the collection of the 7 night dives, some were not memorable but at least 4 were excellent you can see what I mean if you watch it in full and notice some of the specific quirks. I found the RX100 to perform very well and the footage is very clear. I used Movie mode P increasing or decreasing the power of the lights until I was getting the best compromise between aperture and too much light.

Sony RX100 – Tips for Underwater Video Part 7 – Macro Shots

Just came back from a 11 nights and 10 day diving on a liveaboard in Raja Ampat and I am in the process of putting together the summary videoclip for the trip. To have an idea of the kind of diving in this remote location you can have a look at the superb pictures that my buddy and fiance has taken on Raja Ampat 2012 Flickr Set

I had already gauged that the macro performance of the RX100 is far from outstanding and this trip just confirmed it.

To understand what I am talking about have a look at these two pictures both taken at 5 cm from the front port of the camera using a 3:2 format.

RX100Macro

The first image is shot with the RX100, note the shallow depth of field of the large sensor in P mode.

All looks good however if we take the same shot with a Canon S95 that has a 1/1.7″ sensor we get this result.

S95Macro

To make matters less complicated and don’t get too technical you can measure with a ruler the size of the memory card in the pictures. The S95 presents an image that is 26% longer than the RX100. It is like saying that compared to the RX100 the S95 has a 1.26x magnification.

In video diopters are not very popular because camcorders have small chips around 1/2.5″ and a 10x optical zoom and can focus at very short distance. So usually a no diopter is needed for regular macro work and a 4D is really only for pygmy seahorses.

With our RX100 however we need a 5D just to have a decent macro performance. Actually even a good size nudibranch looks small in the RX100 underwater without any lens. Moreover the RX100 has only a 3.6x zoom so even with a diopter that allows to focus a telephoto at closer distance things don’t really look that big so we are  looking at 5D for basic macro and 9D for super small critters.

The RX100 has a number of housing options with M67 thread as standard, this is the most popular format for diopters and there is ample choice there. If instead we want to use bayonet mounts we are pretty much limited to Inon or Seatool.

As discussed above we are  looking at a starting point of +5 diopter, this cuts immediately lenses like the Inon UCL330 out of the equation, if we look at the most popular and affordable lenses we are left with:

  1. Inon UCL165 6 diopters (1.5x) this lens is stackable
  2. Reefnet subsee 5 diopters (1.25x)
  3. Dyron +7 diopter (1.75x)
  4. FIT achromatic +8 (2x)
  5. Olympus +8 diopter (2x)
  6. Epoque DML-2 8.4 diopters (2.1x)
  7. Reefnet subsee 10 diopters (2.5x)

The first three options are adequate for most of the macro work with the RX100 and get you to fill the screen for almost all subjects except the smallest pygmy seahorses.

As we increase magnification we get the RX100 to a point where is very difficult to produce any decent footage. A 10+ diopter works very well for still pictures where you only have to take a single shot but for 10 seconds of decent footage is close to impossible to achieve focus without a tripod.

Looking at the featured image on this post this is a still picture with two Inon UCL165AD stacked at full telephoto. When I was in Raja Ampat I tried using two UCL165 it was very hard to get anything in focus however the performance is pretty good this is a snapshot taken from my footage.

Pygmy Snapshot

I posted all the pygmy footage on youtube

in this short clip I have a compilation of subjects, if you believed that an hippocampus bargibanti was tiny have a look at hippocampus denise, Pontohi and especially Satomi (1cm) in this clip to have an idea. All in all I am satisfied as I shot 12 minutes of seahorses and could use around 2 that were not too shaky. I do not use software stabilization as I don’t like the warping effect that CMOS sensor camera give so this is all done by hand. I did slow down some of the footage to half speed and this is were the 50 fps of the RX100 come really handy.

Other than Pygmy seahorses that are between 1.5 and 2.5 cm in size there is no need for such high magnification, in fact for the rest of the trip a single UCL165 has been more than adequate.

Looking at cost an Inon UCL165 costs less than a subsee 5  so that is the most cost effective option if you ever think you will need a very high magnification  and you are able to be super steady to avoid shake as it can be stacked with another UCL165 or an UCL330. Specifically having experienced the two UCL165 stacked I think that is probably too hard to handle so a combination UCl165+UCL330 should be the perfect choice for pygmy and similar at 9D alternatively a subsee 10seems the logical super macro choice.

A final tip is camera modes for macro, as discussed in a previous post aperture priority is the way to go and allows you to have enough depth of field so that you have sufficient part of the subject in focus. However this brings also the consideration about lighting. I took some shots in program mode with the RX100 and two Sola 1200, in some situations is quite hard to achieve f/8 or higher numbers with the two lights at the minimum power of 300 lumens with the lowest ISO. It follows that if you operate with a single light you need to have at least 800 lumens and put the light to the max, this may scare skittish critters and prevent you taking the footage you want. A possible solution is a red filter on the light followed by in camera white balance however a single light does produce harsh shadows and this needs to be taken into account.

In conclusion a diopter for macro work with the RX100 is a must so choose one that fits your needs and ensure you have sufficient lighting to support the small aperture required by the camera large sensor.