Nauticam has recently released a new Macro port 29 that is shorter than the 35 and is designed for optimal compatibility with the following lenses and the WWL-1 Wet lens.
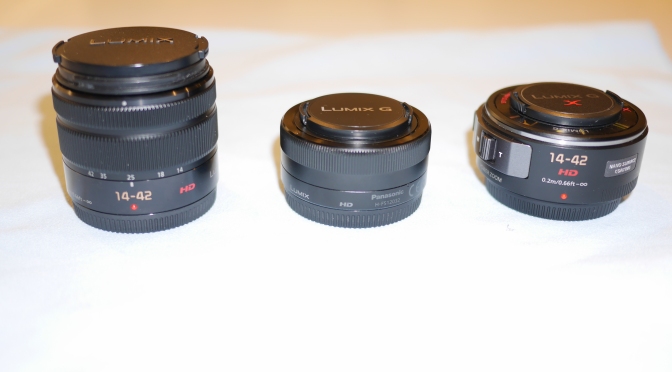
Olympus M.Zuiko Digital ED 14-42mm f/3.5-5.6 II R
Panasonic Lumix G Vario 12-32mm f/3.5-5.6 ASPH Mega OIS
Panasonic Lumix G X Vario Power Zoom 14-42mm f/3.5-5.6 Power OIS
I have had the port and wet lens for a few days and those are my observations with the Panasonic lenses as I do not own the Olympus.
In general terms none of those lenses are amazing in terms of optical quality and only the Panasonic lenses are stabilized. This is not so important for still images but an advantage for video.
The Panasonic power zoom is better than the Olympus however the lens has issue of vignetting and pretty high chromatic aberration. The Panasonic 12-32mm is surprisingly good and has similar resolution and less issues of fringing.
I attached the 29 Macro Port to my GX7 housing and took some tests shots in the sink with the WWL-1 petals touching the subject.
Panasonic G X 14-42 PZ Port 29
The image is wide and the corner sharpness is great with minimal to no chromatic aberrations.
The 12-32mm lens does not vignette at wide end and gives similar performance to the PZ lens with the benefit of increased field of view.
Panasonic 12-32mm Port 29
The shots are taken at f/4 ISO 1600.
For comparison I mounted the 4.33″ dome and the 8mm fisheye and took a similar shot.
8mm Fisheye
The field of view is wider but of course distortion in the corners is very high to the point they become garbled.
Clearly if you do need a fisheye lens the 8mm is still the choice however the WWL-1 has the advantage that you can use the full zoom and a field of view of around 130° with a 28mm equivalent lens and around 135° with 24mm equivalent.
One thing that is interesting is the use of the 12-32mm with the Macro 29 port combined with the Panasonic GH4 in 4K.
The crop factor of 1.2x means that the focal length with this lens at 4K 16:9 is 31.38mm. This makes this port compatible with a number of flat wide angle lens of the old generation.
Specifically the old Inon UWL-100 would give a field of view of 100° equivalent to 18mm in 4K. The additional benefit is that you can use the Ikelite UR/PRO push on filter and the full zoom. At the tele end 83.7mm may be a bit short however the fact that you have a fully rectilinear lens and you can use a push on filter is a big advantage.
The Macro port 29 is also compatible in normal mode with the Inon UWL-H100 at 24mm equivalent as per image.
Inon UWL-H100 Port 29
The field of view appears narrow as the lens can get closer to the subject compared to the WWL-1. The optical quality is excellent with minimum fringing.
In summary the Macro Port 29 is a must purchase for the following users:
4K Panasonic GH4 video users
4K Panasonic GX8 Users
HD and Still images micro four third users wanting a full wet lens set up
The 12-32mm lens also give almost the same field of view of the Panasonic 7-14mm with wide angle port at much lower cost when coupled with an Inon UWL-H100 allowing use at apertures of f/4 and f/5.6 with one to two stops advantages on the 7-14mm.
On a final note for the users of the Macro 35 port Nauticam has now released the zoom gear for the Panasonic 14-42mm II Mega OIS. This lens is better than all of those discussed in this post in terms of optical quality and it comes as kit lens on lower end Panasonic cameras. If you already have the Macro Port 35 and a kit lens or if you don’t have any lens or port this is definitely the best option in terms of cost and optical quality
I have done some further research on the picture profiles and found out quite a bit of information.
In this post I will focus on the luminance and black gamma.
Luminance
Luminance determines the range of black and white that are in the footage. People familiar with the Panasonic GH4 will know that you can set luminance fundamentally in two ranges: 0-255 and 16-235.
What this means that you have in the first case 256 grades of grey and the in the second 220. Some people confuse luminance with dynamic range but they are not the same thing.
You will somewhere find the definition of limited for 16-235 and full for 0-255 this is what it means.
In particular video broadcasting legal luminance is 16-235 so if you use a clip produced at 0-255 the extremes will be clipped this is anyway resolved as the levels are mediated when clips are produced for compatibility.
On the other hand if you use a clip with range 16-235 on a computer that has 0-255 luminance range it will look as lacking deep blacks or whites.
Ultimately you need to decide what is that you are shooting for and if your clips are going to be played on a computer that works in RGB or on a Tv that has YUV.
Profile Name
Description
Luminance Range
Dynamic Range
PP1
Movie
0-255
< 7 stops
PP2
Still
0-255
< 7 stops
PP3
Video Natural
0-255
7 stops
PP4
Video Vivid
0-255
7 stops
PP5
Cine1 109%
0-255
10 stops
PP6
Cine2 100%
16-235
10 stops
PP7
S-log
0-255
13 stops
So the only profile that is broadcast compatible before editing is PP6 or the Cine2 gamma curve.
You can see that the dynamic range is the same for PP5 and PP6 so the fact that the camera records more grey levels does not really change things as the cine2 curve is smoother so it can accept higher input signals.
Black Gamma
In order to increase depth of blacks it is possible to use the black gamma setting. This has 2 controls, one is the Range Narrow, Medium, Wide and the other is the level that goes from -7 to +7
If you are going to grade your footage of and if you are going to use the video gammas PP1-PP4 you should not touch the black gammas otherwise you risk crushing the blacks.
However if you intend to use the cine profiles straight out of the camera you can tweak the black gammas accordingly.
The range determines where the setting will be effective.
Broadly speaking Narrow works on the first 10% of the signal, medium around 20% and wide around 30-35%.
What it means is that Narrow really works on the deeper blacks as you move to Wide you are altering also the grey and effectively changing the balance of the whole image.
For what concerns the level a positive value will move black towards grey and a negative value shift grey towards black.
There are two main uses of the black gamma: get deeper blacks without altering the overall contrast this is obtained using the Narrow setting and a value between -3 and -7 or use the Wide setting with negative values to give the whole image a darker tone.
A setting of Wide with level around -3 gives an overall darker tone to a Cinegamma if you don’t want to change the blacks in post and remains overall balanced.
Which leads to my current favorite profile that is a customised PP6 setting the parameters that I have changed are:
I have tested the various Gamma with backlight situation and I found that Cinema2 performs best on my Tv where I watch my clips.
I prefer Cine2 even on the computer to be frank but it is true that the blacks are a bit light.
Color mode: I have tried Cinema and Pro am now on Pro with Saturation +8
Black Gamma: Range Wide Level -7 as the cine2 mode is quite dull I like to push the blacks a little overall.
As the Sony RX100 Mark IV records at 8 bit my opinion is that using S-gamut is not worth without an external recorder. And to be honest the amount of grading possible is quite limited so my approach is to get the video as good as possible out of the camera.
Nauticam entered the wet lenses market with their SMC close up wet lens that was optimized for DSLR.
Then it released the CMC compact macro converter for compact cameras and micro four thirds and finally the Wet Wide Angle Lens I that is compatible with compacts, micro four thirds and also full frame cameras with 28mm equivalent lens.
Up to now all lenses were using the traditional M67 mount as most of the lenses, even the close up ones, are pretty heavy this means going for the dive with the same lens. Nauticam has developed the flip diopter adapter for flat ports to overcome this issue.
Flip Diopter on Nauticam RX100 IV
The flip diopter is a good solution for micro four thirds and DSLR but looks rather cumbersome on compacts as the image shows.
I asked Nauticam for a bayonet adapter and specifically if they could develop something for the Inon LD bayonet system that so far has been the reference for wet lenses for compacts and micro four thirds cameras.
LD mount converter on RX100 IV
Edward told me that due to the fact that the WWL-1 lens rear element is so large the Inon LD system was not an option so they went off and developed their own system.
M67 bayonet mount converter
I would like to thank Nauticam again for making those parts available before general availability.
Looking a bit closer to it you can see that due to the specific construction with two concentric rings you need a special tool to apply the adapter on the port.
M67 bayonet mount converter The large item is to attache the mount to the port
Obviously as the Nauticam lenses use an M67 thread new adapter needed to be developed.
Mount converter for CMC/SMC
Nauticam does not use ABS plastic and uses aluminum for all their parts.
Now that the items have a bayonet adapter there is a need for a lens holder to put on the arms.
Lens holder looks too big for a 5″ arm segment
The lens holder is too big for a standard 5″ segment but looks in proportion with a longer segment.
Lens holder on 8″ arm segment
The adapter is larger than the LD mount and a bit big for compacts to the point that even with a tray the adapter tips the rig back.
Another challenge is that this system is designed for Nauticam lens that have protruding rear element so when used with standard lenses there is a gap between the port and the wet lens that can be counter productive, not the end of the world and frankly the Inon system has the same problem. This however means that if you wanted to use this system with a different wide angle wet lens this would be suboptimal.
I am waiting for Nauticam to ship me back the WWL-1 so I can show how that lens performs on this system.
Another observation of course is that if you use this system for wide angle the super heavy WWL-1 and the fact that the adapter only works on a normal segment means your rig will be very heavy in water. I am going to discuss with Nauticam the possibility to have the adapter on a float arm however their carbon arms do not have any mounting point to be used.
Stay tuned for a full review of this adapter with the new 29 macro port that looks very promising for video.
The new cameras in the RX100 and A7 series can record 4K video internally but what is more important come with significant enhancements for video shooters.
Probably the most important feature is the availability of picture profiles that have a number of presets that can be further customized by the user.
There are many forums on the internet with custom setting to try to extract cine like look from Panasonic GH4 clips but all in all we can say that the controls in a still camera have been quite limited so far.
The new software that comes with the RX100 and A7 is a real step forward in this respect and contains all characteristics and functionality previously only present on Sony professional and semi professional video cameras.
The Seven Presets
The starting point of using a picture profile is to find one that we like as a starting point for further customization; the new Sony cameras have 7 profiles already loaded with example settings. The profiles have many characteristics that can be configured but probably the most important is the shape of the gamma curve because it also determines the minimum ISO and the availability of other features.
Profile Name
Description
Minimum ISO
Knee Mode
PP1
Movie
125
Auto/Manual
PP2
Still
125
Manual Only
PP3
Video Natural
200
Auto/Manual
PP4
Video Vivid
200
Auto/Manual
PP5
Cine1 109%
200
Manual Only
PP6
Cine2 100%
200
Manual Only
PP7
S-log
1600
Manual Only
The descriptions above are my personal short description as the user guide is quite confusing.
Profiles PP1 to PP5 are usable straight from the camera, PP6 is optimized for editing and PP7 can’t be used without editing.
Standard Profiles
The profile PP1 and PP2 emulate the camera behavior in movie and still mode in terms of contrast and saturation. The main difference between the two is that the Still mode has stronger contrast and saturation than movie. Both use a minimum ISO of 125 and they allow customization of the standard camera modes.
PP1 Movie
Within a profile you have access to controls for color and sharpness at much granular detail that you have with the camera in normal mode. For example the saturation slider goes from -32 to +32 and the sharpness can be completely controlled manually. Colour depth is available in the range -7 to +7 for the whole RGCCYM palette. The customization of those controls lets you have the colours you want off the camera this can be particularly important to people looking for a specific look of certain colors typically red and blue.
Another feature that is incremental to the normal movie mode is the knee setting. The knee is particularly useful with highlights and with back lit shots. What it does it to compress the highlights within the usable signal range.
Knee Point and Slope
The knee is a way for those who like video look footage to capture more highlights and avoid hard clipping of back lit images.
Video Profiles
The profiles PP3 and PP4 use the ITU709 gamma curve that is the standard for high definition video television. The gamma curve has a low light gain of 4.5 dB and for this reason the minimum ISO is 200.
The video profiles bring substantial increase in both shadows and highlights to the image compared to the standard profiles.
PP3 Video Natural
The difference between those two profiles is the selection of the color mode. The PP3 profile has a Pro colour mode that the manual says ‘it is similar to professional Sony broadcast cameras’ the PP4 instead has an ITU709 Matrix colour mode.
PP4 Video Vivid
What it means is that the Pro colour is slightly below the standard saturation whilst the ITU709 Matrix is extremely saturated looking like the Tv program that go these days. Both settings allow usage of the knee setting in auto and manual mode. The idea is to restore the highlights and make the footage look less harsh. The issue is of course that this has only effect on the highlights and not on the shadows.
Cine Profiles
The profiles PP5 and PP6 use the two different Cine gamma curves one is limited at 109% and the other at 100%.
Gamma curves
Those are the official descriptions:
Cine1: Softens the contrast in darker image areas and emphasizes gradation changes in lighter image areas, producing a subdued tone overall (equivalent to HG4609G33). Gamma curve that obtains a dynamic range of 460% when the exposure is adjusted to 33% video output with 18% reflectance gray. The maximum value of video output is 109%.
Images shot with this gamma can be used without grading, but since the images have smooth gradation characteristics, this can be used to grade and finalize the viewed image in the post-production process.
PP5 Cine1 109%
Cine 2: Similar results to [Cine1] but optimized for editing with up to 100% video signal (equivalent to HG4600G30). Gamma curve that obtains a dynamic range of 460% when the exposure is adjusted to 30% video output with 18% reflectance gray. The maximum value of video output is 100%.
PP2 Cine2 100%
Both curves are cine like and therefore do not use the knee function by default this is because a cine gamma curve is already clipping at much higher signal levels. The Cine2 curve has less contrast than Cine1 and is limited to 100% as opposed to the standard 109% so it is optimized for editing and the footage will lack whites and look fairly grey.
Practically the cine profile achieve a higher dynamic range using a smoother curve, this compares to the video profiles where the curve is pretty much the same until the highlights get compressed using the knee function.
S-log2
The PP7 profile is for S-log2, this has the highest dynamic range but the minimum ISO is 1600, the footage looks really bland out of the camera but this can be really enhanced through editing to bring out all the details.
PP7 s-log2
My Take on the Picture Profiles
I think the whole cinema like video is a very overrated subject for underwater use. An acid test to understand where you stand is your own TV. If you use the picture settings Vivid or Standard then you are a video like person, waste no time pursuing cinema like look as in the editing you will effectively bring it back and eliminate all the detail you capture by increasing contrast and saturation.
If instead your TV is set to Cinema or is even calibrated then you are a Cine like person.
Personally I think S-log2 for underwater use at 100 mbps is a total waste of time and it is only worth with external recorders. The bitrate is too low to capture that amount of detail and resist extensive grading and actually shooting at 1600 is pretty difficult and requires ND filters (that the RX100 has) to perform decently.
You can take still shots with the picture profile so the first thing to do is to take a few pictures and see what image you like the most, then you can start tweaking.
I found myself to like the cine settings in terms of contrast but I find then too bland in color so I have settled for +20 saturation right now.
Between Cine1 and Cine2 is quite difficult to choose because although Cine2 is in theory optimized for editing actually it looks pretty good straight from the camera for my liking. I particularly like the fact that the highlights almost never clip with this setting even in harsh conditions. It is possible to mix the Cine profiles with the Pro color mode but I found that using saturation was giving the same result.
PP5 Saturation +20PP6 Saturation +20
Detail setting (aka Sharpness)
The last feature of the RX100 and A7 new controls is the fine tuning of the sharpness setting. I find that the default works pretty well except at high ISO where you want to start adjusting slightly the behavior.
But it takes a bit of time to understand the settings.
The starting point for me is the crispening setting that in perfect Sony tradition means exactly the opposite of what you would think. So a setting of +7 means actually limit the sharpening on speckles and noise where a clear shape can’t be detected. Once you set crispening to the max and you shoot at high ISO you see how it reduces the noise. However the issue is that now the sharpness has also reduced so in order to restore the effect you go back to the total level of detail and set it to 7. Once you do that you find out that now the sharpening applied correctly is actually excessive so the limit setting effectively clips the amount of sharpening applied to the edges I use this at 3, as this results in a reduction of highlights sharpening (glass reflecting objects look dull) I then set the highlight detail to +2. After I did all of that the end result was very similar to the standard setting and a bit softer on the edges, practically it was only better at very high ISO so I went back to the original setting.