Category Archives: HDR

Setting up your GH5 for HLG HDR capture

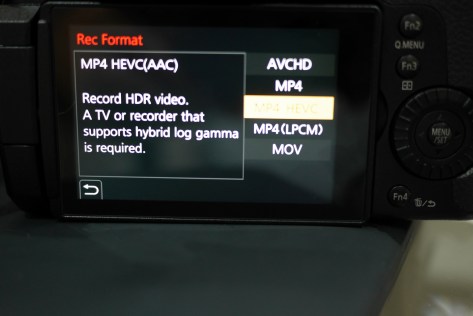
We got our GH5 ready for HDR capture in the previous post so how do we make the most of it?

If you have an external recorder or monitor that supports HDR it is easy! Also if you do you probably have a fair bit of money and you are not reading this blog…

Currently Atomos recorders that can be housed all support HDR including HLG

DSC_9783_2c838594-1601-42d1-b145-40821cd34bb2_1024x1024
Nauticam Atomos Flame

The Nauticam Atomos Flame available at list price of $3,650 will house the Shogun Inferno, Shogun Flame, Ninja Inferno and Ninja Flame

On the Atomos website you can see that for the GH5 the products recommended are the Ninja and Shogun Inferno there first is priced at $995 and the second at $1,295.

There is a difference of $300 between the Shogun  and the Ninja  however the Shogun  provides an SDI video port that may turn out quite useful in grading phase. So if you got to the point of spending $3,650 for the housing I would definitely invest the extra $300 needed for the Shogun Inferno.

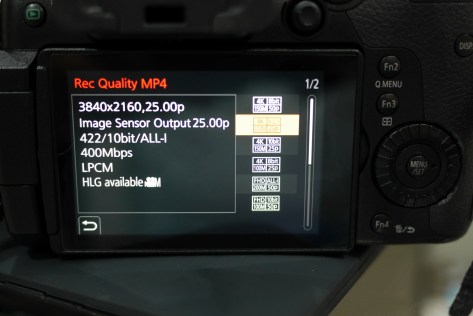
Once you get a recorder you can set up the GH5 to output 4Kp50/60 at 10 bit and be happy. The HDR screen of the Atomos device will provide the real time monitoring you need to expose footage properly in HLG. It is not my intention to start a debate about log vs HLG there is plenty of material out there.

A very good video is here

If you don’t have a recorder you are left to the GH5 screen that does not support HDR so how are you going to expose correctly? You have a couple of tools available.

The first one is Zebra Patterns that can be accessed in the Monitor subsection of the menu.

There is a great tutorial on YouTube

Now if you are working in HLG you will notice that the maximum value that can be set is 95% this is because luminance in HLG is limited to 64-940.

If you look on ITU website you can see that white ranges between 69 and 87 in HLG so using Zebra we can still attempt at exposing properly without an HDR monitor.

If you do have a reference white balance card you should set the Zebra to 75% as this is the reference for white if you are in the field without a reference your value should be set to max 90% to ensure you don’t blow highlights. Now you will find some website that tell you 95% is fine too but you do want to leave a bit of headroom. If you want you can set Zebra 1 to 75% and Zebra 2 to 95% so you cover all eventualities.

So once you have set the Zebra the next step is to decide if you want to use HLG View Assist or not. Here you have three options:

  1. Off
  2. Mode 1
  3. Mode 2

Off leaves the display in REC709

Mode 1 gives priority to background areas for example the sky

Mode 2 gives priority to the main subject

The 3 modes are really a progression of brightness, when Off the image looks completely desaturated and Log like. In Mode 1 the image appears to have a preference to show shadows in Mode 2 the image looks the brighter and the most punchy making it easy to work on the foreground but crashes the black and shadows quite a bit.

No matter what you select the Zebra value remain unchanged.

The final setting that can be useful is the Waveform monitor which is accessible in the creative video menu. As the Zebra this gives you a real time display of the image within a diagram that on the horizontal axis represent the image left to right and on the vertical has the signal. This is practically a spacial representation of your image and has the same intensity of the Zebra from 0 to 100. So anything too dark on the bottom won’t be visible and things above max will be clipped.

There are several tutorials available on YouTube

So in essence you could try to expose correctly using Zebra and waveform monitors on the GH5 LCD display but let’s face it the screen is tiny and underwater you won’t be really able to use it effectively. If you have an external monitor or recorder this becomes more useful and something to effectively try.

If you are using the camera meter to expose remember that the GH5 as most cameras has only three settings for metering: multi area, center weighted and spot those influence how the camera calculates the average exposure, this is true also if you use manual mode the reading on the meter will change depending on the metering mode. However for what we have said here if your objective is simply not to clip highlights you have a long way to go before reaching 90% IRE with HLG.

In short you have three options to set exposure on your GH5:

1. Super lazy option trust your camera meter as this was a still image, most likely you will be exposing to the right and without further checks there is a chance to have dark area or clipped highlights.

2. Use Zebra and manual exposure in combination with the camera meter to ensure you stay within safe limits.

3. Use waveform monitor and completely ignore the other parameters as this gives you full control of what you are shooting and removes any dependency on having or not an HDR monitor

As a final note it is important to remember that performing a white balance adjustment is essential in order to expose correctly it is not just to get the colour right as the IRE values on what is white actually change and the camera makes assumptions on what is white to calculate the rest. This is especially true for environment in difficult light conditions.

Getting yourself familiar with waveform monitoring is essential for editing as majority of people will not have the possibility to grade on an HDR screen. In the next post I will explain how to get the lowest possible cost HDR screen that supports HLG.


Panasonic GH5 the gateway to 4K HDR Video

It has been a while I have been busy with some personal stuff and to be frank not much has been happening the Underwater Video or Still scene that was of interest to me until pretty much September 2017 when Panasonic released the 2.0 version of the DC-GH5 firmware.

The link to the firmware updates is here and here is link to the full PDF

The section we are interested is this one

4K HDR video recording

– [HLG] (Hybrid Log Gamma) is added to [Photo Style]. HDR (High Dynamic Range) is a mode to reproduce both bright part and dark part in an image, making it look just as human eyes see. The camera records video with a designated gamma curve compatible with ITU-R BT.2100, and you can now choose Hybrid Log Gamma (HLG) in [Photo Style].
– A low-bit-rate recording mode 4K HEVC for HLG was added. This enables playback on AV equipment compatible with the HEVC compression format, such as Panasonic 4K HDR TVs.


In the PDF we read this additional information

Recording of HDR (High Dynamic Range) motion pictures in HLG (Hybrid Log Gamma) format is now supported. With this format, you can record bright images susceptible to overexposure with more natural colors than is possible with conventional formats.
• “HLG” is a standardized HDR video format that converts and expands the dynamic range of

compressed high-luminance image data on a supported device.
• The monitor and viewfinder of the camera are not capable of displaying images in HLG format. • HDR images appear darker on devices that do not support the HLG format.

If you have headache to understand what is HLG and how it differs from other HDR formats search on the internet the following short document from BBC may help.


Why does HDR matter and what can I do to record HDR?

HDR matters because the human eye is more sensible to contrast and colours than resolution. In majority of cases if you do a blind test of UHD 4K footage to anyone sitting at the recommended seating distance for cinema at home (look up SMPTE seating distance) nobody can actually see differences between HD and UHD and this is because the ability of the human eye to resolve pixels is limited by our visual acuity. So why does a YouTube video in 4K looks better than HD? Simply because the bitrate is higher and this means the quality is higher but if you look at your own 4K footage at home and scale it down to HD with good quality you are not able to tell the difference.

However try now some HDR material if you have Amazon or Netflix or even on YouTube and have a compatible Tv set the difference to normal content is staggering. This is because a normal REC709 (the standard for HDTV) display has 6 stops of dynamic range. There are no official figures of how many stops is REC2020 for HDR but good Tv sets are capable of around 10 stops. Now that is a big difference especially on the bright part of the image which is where the HDR displays really excel.

So HDR does matter more than 4K UHD in fact Sony has just produced an HD set HDR capable not sure there will be many of those but this gives an idea.

So how do I record HDR and why there are no HDR certified cameras but only certified displays? The answer is pretty easy you need a camera that offers more than 10 stops dynamic range in video and that is where our Panasonic DC-GH5 comes into the picture.

The camera is capable of 13 stops dynamic range but what is more important it can produce around 8 eV even at ISO 12800 so in essence the camera is well above what is required for REC709 and it can get to around ISO 3200 and still produce nearly 10 stops which is great. So if you have a Panasonic GH5 you have a sensor that is capable of producing the required dynamic range.

However this is not sufficient the camera needs to be able to product at least 10 bit colour depth, an image resolution of 3840×2160 and a colour palette aligned to BT.2020 specifications (wide colour gamut) and finally have the appropriate transfer function to deliver the signal. Majority of commercial cameras are not capable to deliver 10 bit colour depth and do not have a compatible transfer function. The GH4 predecessor of the GH5 was already capable of delivering 10 bit colour to an external recorder using the HDMI output now the GH5 makes this available in camera for recording on SD card at bit rate of 150 mbps IPB and 400 mbps all intra H.264.

HLG vs VLOG and why it matters

Before the firmware 2.0 the only way to produce HDR out of the GH5 was to buy the VLOG upgrade and then attempt to use the recording feature of the camera or an external recorder with Prores 422 or 422 HQ and then take a trip into grading. The reality is that once you crammed the VLOG dynamic range into a REC709 format you essentially limit yourself to 6 stops and therefore waste majority of your effort. So in order to extract real dynamic range you need to output in HDR that is possible but not so easy to do. In practical terms unless you are producing a documentary you will soon give up using vlog underwater because it is just too much work. Here now comes HLG so what is good about HLG and why this can make a real difference here my list:

  1. It is free you don’t need to pay for an upgrade
  2. It is backward compatible with standard dynamic range
  3. Requires a less intensive workflow compared to Vlog
  4. You can produce a decent file recording in camera without external recorders
  5. If you do have an HDR capable external recorder than it shows things are they are and not the washed out version of vlog

This is just my personal list of reasons there may be more.

How to set the Panasonic GH5 to record in HLG and UHD

There are 3 settings that give you the possibility to record HLG HDR compatible files, two are available in MP4 (LPCM) and MOV and one in MP4 (HEVC).

MP4 (LPCM) and MOV

P1040940
400 mbps ALL Intra
P1040941
150 Mbps LongGOP

There are not many cards that can work at 400 mbps and they are expensive. In any case do not assume that 400 mbps ALL-intra is better than longGOP as longGOP is fairly efficient and if you look into the various YouTube videos you will see it is very hard to see any difference unless you do pixel peeping.

MP4 (HEVC)

There is also a convenient low bit rate format available that uses HEVC in camera you can access it selecting MP4 (HEVC) in the REC FORMAT menu

P1040942

You then have this option available

P1040943

Tests show that when done real time HEVC produces files 50% of H.264 so the bitrate makes sense however unless you want to play the files directly on your Tv this is not such a good choice as the files are too hard to edit with any computer as there are no H265 hardware accelerated display widely available.

So the format of choice is as follows:

REC FORMAT: MP4 (LPCM)

REC QUALITY 422/10 bit/LongGOP 150 mbps

Please note the format at 50/60p does not give HLG in camera only the HDMI output is HLG compatible this is because the output is 10 bit as required by HLG. 8 bit colour does NOT qualify for UHD HDR so if you use this format in camera the HLG photo style will be greyed out.

How to convert 150 mbps HLG LongGOP files

At time of writing only programs like VLC play the H264 10 bit files produced by the GH5 and on my computer they play badly. So when you will go and edit those files your NLE program will most likely convert them into a format that is easier to digest and still supports 422 10 bit colour, this format is Apple Prores.

Unfortunately unless you have a paid software the files will only be unreadable if you use DaVinci Resolve or iMovie. However you can use a command line encoder like ffmpeg and convert all those files for free.

The command once you have the executable and you have the files in the right directory is something like this:

ffmpeg -i GH5file.mp4  -c:v prores -c:a copy GH5file.mov

This tells ffmpeg to transcode the video to prores 422 and to just copy the file as is (prores uses linear PCM for audio) here you notice that the source file has mp4 and the destination mov that is the default for prores and the reason to set your GH5 to record mp4 and not mov.

I have developed an automator script that is able to convert all selected files in the memory card and place them in a location of choice on the hard disk or else.

automator

Ffmpeg will convert using prores 422 that in my case bumped the files from 150mps to 474 mbps as prores is an all intra codec this is reasonable and there is no reason to use higher version like 422 HQ starting from a 150 mbps longGOP. Obviously if you use an external recorder feel free to use the higher bitrate available.

How to produce your HDR video clip for free

DaVinci Resolve is able to use your prores files converted from the GH5 and produce HDR compatible files.

You need to go into project settings and select colour management and change your settings as shown here

DaVinciProjectSettings

Colour Space Rec.2020 and Gamma Rec.2100 HLG will produce a file that on a compatible Tv will trigger HDR.

Now the bad news if you don’t have an HDR monitor it is very hard to grade properly on a standard monitor although you can look at luminance curves and chroma curves to see if you have situation of bad exposure or saturation this can be tricky with underwater footage so the trick is to try and get it right in camera.

Of particular interest is the HLG View Assist setting on the GH5: as the screen of the camera is not HDR this should help exposing the scene properly but I have to yet determine what is the setting that I prefer.

Well that is all for now…!