
First of all the requirements for HDR at home are:
- Log or HLG footage
- Final Cut Pro X 10.4.8
- Mac OS Catalina 10.15.4
- HDR-10 Monitor with 10 bit gamut
It is possible to work with a non HDR-10 monitor using scopes but is not ideal and only acceptable for HLG and in any case 10 bits is a must.
Recommended reading: https://images.apple.com/final-cut-pro/docs/Working_with_Wide_Color_Gamut_and_High_Dynamic_Range_in_Final_Cut_Pro_X.pdf
HDR Footage
In order to product HDR clips you need HDR footage. This comes in two forms:
- Log footage
- HLG
Cameras have been shooting HDR since years the issue has been that no consumer operating system or display were capable of displaying it. The situation has changed as Windows 10 and Mac Os now have HDR-10 support. This is limited for example on Mac Os there is no browser support but the Tv app is supported, while on windows you can watch HDR-10 videos on YouTube.
You need to have in mind your target format because Log and HLG are not actually interchangeable. HLG today is really only Tv sets and some smartphones, HDR-10 instead is growing in computer support and is more widely supported. Both are royalty free. This post is not about what is the best standard is just about producing some HDR content.
The process is almost identical but there are some significant differences downstream.
Let me explain why this graph produced using the outstanding online application LutCalc show the output input relationship of V-LOG against a standard display gamma for rec709.
V-LOG -> PQ
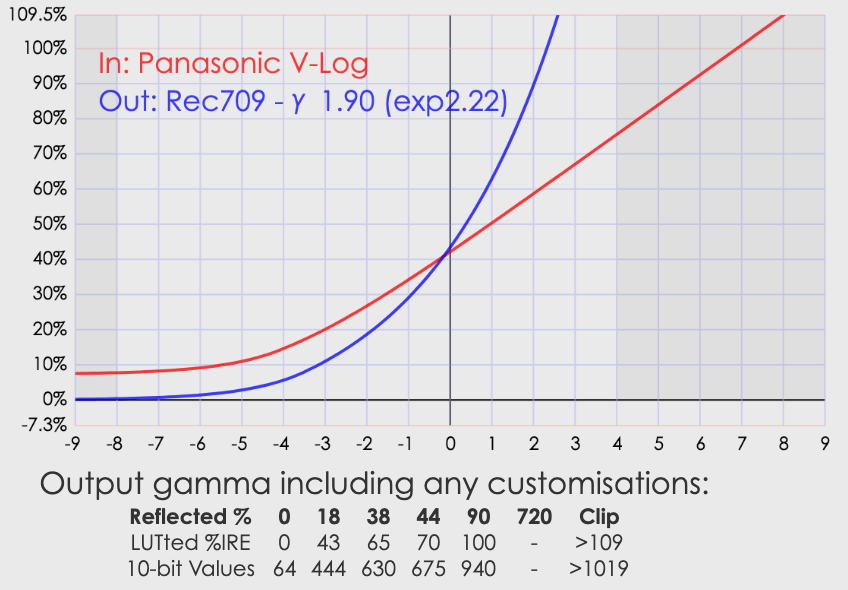
Looking at the stop diagram we can appreciate that the curves are not only different but a lot of values differ substantially and this is why we need to use a LUT.
Once we apply a LUT the relationship between V-LOG and Rec709 is clearly not linear and only a small parts of bits fit into the target space.

We can see that V-Log fills Rec709 with just a bit more than 60% IRE so there will need to be a lot of squeezing to be done to fit it back in and this is the reason why many people struggle with V-Log and the reason why I do not use V-Log for SDR content.
However the situation changes if we use V-Log for HDR specifically PQ.

You can see that net of an offset the curves are almost identical in shape.
This is more apparent looking at the LUT in / out.
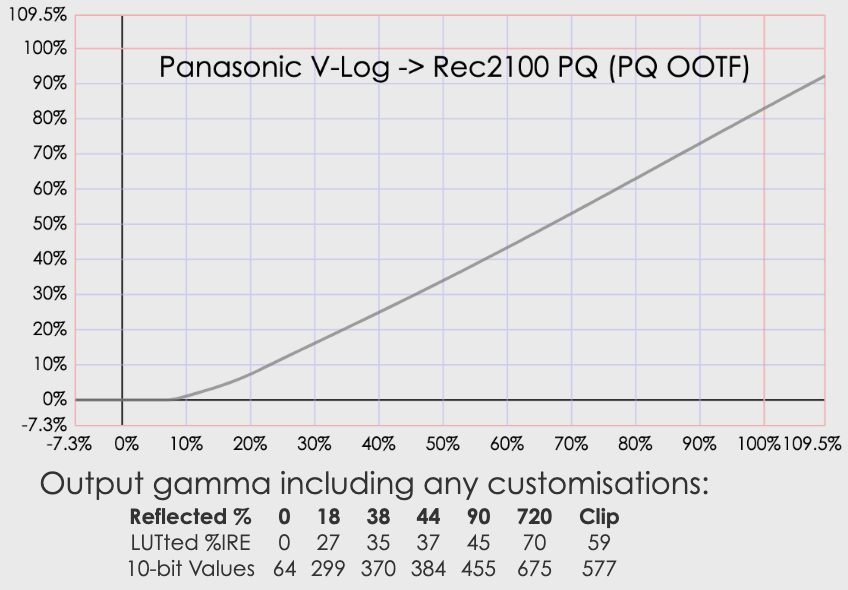
With the exception of the initial part that for V-Log is linear while PQ is fully logarithmic the curve is almost a straight line. As PQ is a larger space than that V-Log can produce on a consumer camera we do not have issues of squeezing bits in as PQ accommodates all bits just fine.
HLG
Similar to V-LOG HLG does not have a great fit into an SDR space.
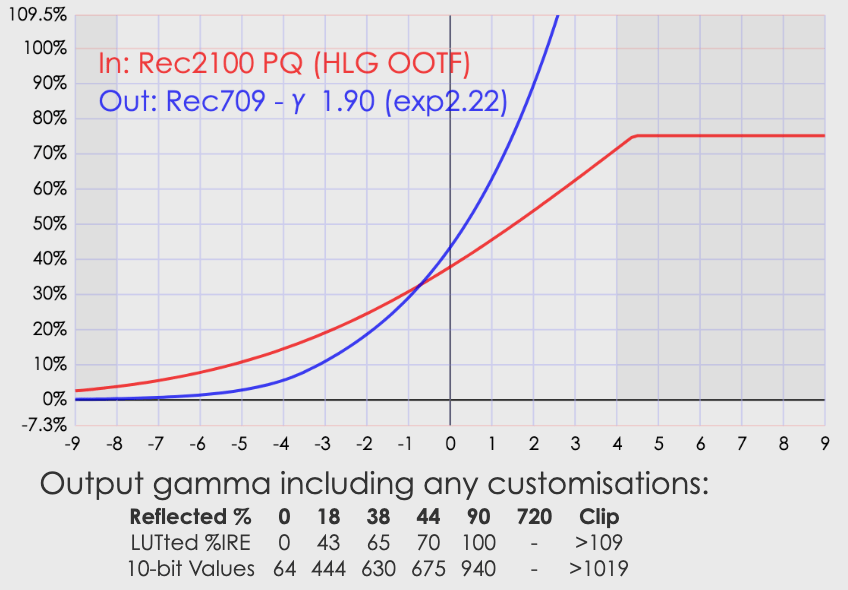
The situation becomes apparent looking at the In/Out Lutted values.
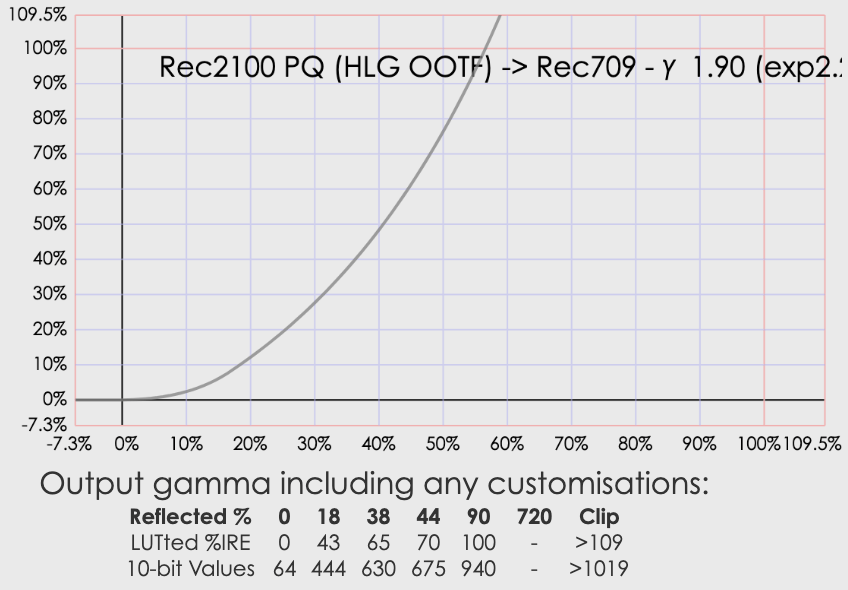
We can see that as HLG is also a log gamma with a different ramp up 100% is achieved with even less bits that V-Log.
So really in pure mathematical terms the fit of log spaces into Rec709 is not a great idea and should be avoided. Note with the arrival of RAW video we still lack editors capable to work in 16 bit depth space like photo editors do and currently all processes go through LOG because they need to fit into a 10/12 bits working space.
It is also a bad idea to use V-Log for HLG due to the difference of the log curves.

And the graph demonstrates what I said at the beginning. You need to decide at the outset your output and stick to a compatible format.
Importing Footage in Final Cut Pro X 10.4.8
Once we have HLG or LOG footage we need to import it into a Wide Gamut Library, make sure you check this because SDR is default in FCPX.

HLG footage will not require any processing, but LUTs have to be applied to V-LOG as this is different from any Rec2100 target spaces.
The most convenient way is to go into Organise workspace select all clips than press the i button and select General. Apply the Panasonic V-Log LUT to all clips.

Creating a Project
Once all files have been handled as required we create our HDR-10 project which in final cut means Rec2020 PQ.

The following screenshots demonstrate the effect of the LUT on footage on a PQ timeline.
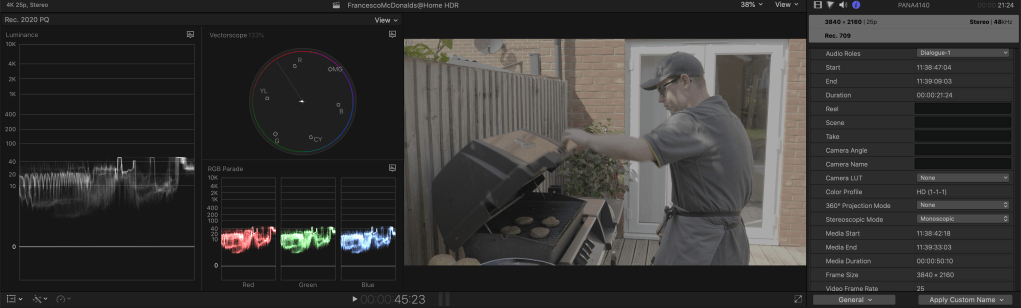
With the LUT applied the V-LOG is expanded in the PQ space and the colours and tones come back.

We can see the brightness of the scene is approaching 1000 nits and looks exactly we we experienced it.
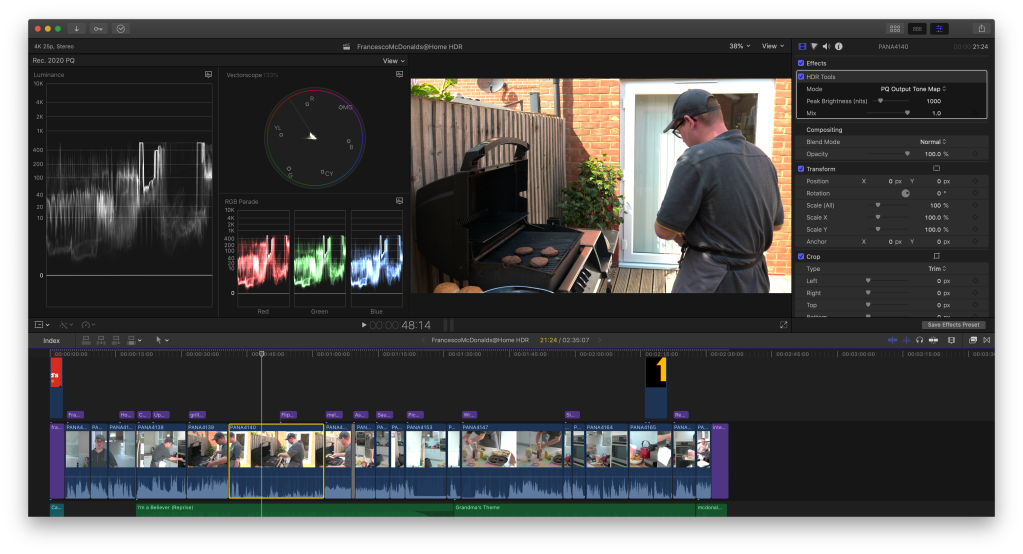
Once all edits are finished and just as last step we add the HDR Tools to limit peak brightness to 1000 Nits which is a requirement of YouTube and most consumer displays. The Scope flex slightly with an automatic highlight roll-off.
Exporting the Project
I have been using Panasonic AVCI 400 mbps so I will export a master file using ProRes422 HQ if you use a lower bitrate ProRes 422 may be sufficient but don’t go lower as it won’t be HDR anymore.
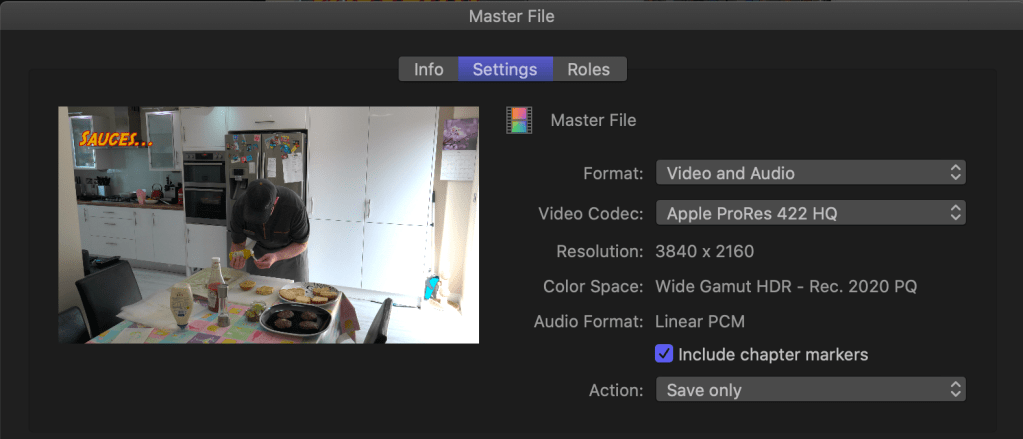
YouTube and other devices use default settings for HDR-10 metadata so do not fill the mastering display nor content information it is not required and you would not know how to fill it correctly with exception of peak brightness.
Converting for YouTube
I use the free program handbrake and YouTube guidelines for upload to produce a compatible files. It is ESSENTIAL to produce an mp4 file otherwise your TV and YouTube may not be able to display HDR correctly avoid any other format at all costs.
The finished product can be seen here
SDR version from HDR master
There are residual issues with this process one is the production of an SDR version. This currently works much better for HLG than HDR-10 which is interesting because HLG is unsupported on any computer so if you produce HDR HLG you are effectively giving something decent to both audiences.
For HDR-10 YouTube applies their own one fits all LUT and the results can be really bad. You may experience oversaturated colours in some cases, dark footage in others, and some clips may look totally fine.
At professional level you would produce a separate SDR grade however it is possible to improve the quality of YouTube conversion using specific techniques I will cover in a separate post.
Final Remarks
Grading in HDR is not widely supported the only tools available are scopes and Tone Mapping of your display. There is no concept of correct exposure for skin tones, in one scene those have a certain brightness and in another this changes again because this is not a 0-100% relative scale but goes with absolute values.
If you invested in a series of cinema LUT you will find none of them work and compresses the signal to under 100 nits. So there is less headroom for looks. There are other things you can do to give some vintage look like adding grain but you need to be careful as the incredible brightness of the footage and the details of 10 bits means if you push it up too much it looks a mess. Currently I am avoiding adding film grain and if I add it I blend it to 10%-20%.
One thing that is interesting is that Log footage in PQ does have a nice feel to it despite the incredible contrast. After all Log is a way to emulate film specifically Cineon, this is true for almost all log formats. Then you would have the different characteristics of each film stock, this is now our camera sensor and because most of them are made by Sony or Canon the clips tend to look very similar to each other nowadays. So if you want to have something different you need to step in the world of Red or ARRI but this is not in the scope of what I am writing here and what you my readers are interested in.
Am keeping a playlist with all my HDR experiments here and I will keep adding to it.
If you find this useful please donate using the button on the side and I will have a drink on you…Cheers!
