Category Archives: macro

Underwater Video Tips: Using 24mm Compact Cameras

Some people will recognize the Canon PowerShot A570IS, the Canon S95  and the Panasonic LX7. The first shot VGA video, the second 720p HD and the last AVCHD 50/60p. If you look carefully you can also see how the front aperture of the lens gets progressively bigger and bigger.

Year after year compact cameras are becoming more powerful having electronics that allow higher resolution and image quality, I think the GoPro is a demonstration of what you can do pushing the limits of simple optics using ultra integrated electronics.

Compact cameras like the A570IS used to have lenses that would be equivalent to a full film camera with a 35mm lens, this has been a popular choice for long time. Some years go Olympus and afterwards Canon, Sony and others started offering plastic housing for those cameras to take them underwater this was the start of consumer underwater photography.

There are however a number of challenges using a 35mm camera for underwater photos and the most obvious is the field of view, because of the magnifying effect of water those compact had really narrow coverage that limit them to close up of macro shots. However a little time after wet wide angle lenses come into the market and offered range of coverage up to 100º some manufacturers also produced seme-fisheye lenses with coverage of 165º the most well known being the Inon UFL165AD.

All went well and compact camera photographer could take wet lenses with them and in one dive take pictures of a nudibranch as well as of a wreck thanks to removable lens in water.

Then the consumer market pushed manufacturers to increase field of view so it was the start of 28mm equivalent cameras like the Canon S90, this format is still very popular with the Canon G series and the new Sony RX100, in addition to that there was more and more demand for extended zoom so that the camera could be useful in all situations, today is not uncommon to have compact cameras with 20x zoom.

The introduction of 28mm equivalent cameras meant that the cameras would vignette with a lens designed for 35mm so wet lenses had to be readjusted and re-designed. The extensive zoom by this you mean over 4x meant that the wet lens would be so far from the camera lens that effectively no wet lens would be useful, this has been the curse of the Canon G series a great camera that never had any good wet wide angle solution until very recently with introduction of zoom wide lenses from Inon.

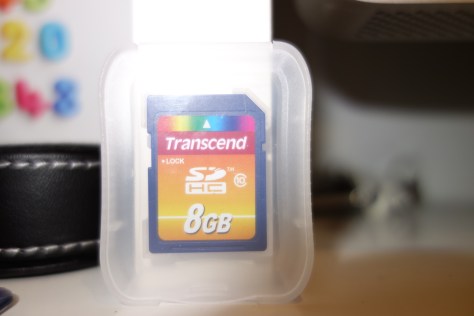
The other bad news is that at 28mm the flat port of the housing introduces already pincushion distortion and fringing as we can see from this photo

Bare Port RX100 wide end

We can see the effect of pincushion distortion in the deformation of the shape of the slate, it is quite apparent when you look at the lines and how skewed they are you can also see a purple tinge to it.

A wet wide angle lens not only expands field of view but also corrects pincushion distortion and chromatic aberration, this is the key reason why some form of wide angle is always required.

In the last two years manufacturers have come up with 24mm equivalent cameras, such as the Canon S100, Olympus XZ-1 and Panasonic LX5, unfortunately those camera have even more pincushion distortion, and for this reason should never be used in water at wide end  to take pictures without post correction that can be quite hard to achieve so as a matter of fact many people live with ugly deformed pictures.

Those cameras make it even more difficult for wet lenses to work and to date there are very few lenses that work without vignetting, those lenses require a wide aperture on the side of the camera also to allow larger and larger image sensors that camera makers use like the LX7 in the feature image.

LX7 Flat port Widend
LX7 Flat port Wide end

To give a demonstration of why is a bad idea to take your 24mm camera in water without any wide angle lens we just have to look at the picture above. Shocking!

So with 24mm cameras we are stuck, the wet lenses with dome that work well with the 28mm cameras end up vignetting so badly that all the advantage is lost when you zoom in. In effect with a 24mm camera all we can aim is 100-110° field of view that for stills is not really that much, there are exceptions like the Canon S100 but in general terms options are limited.

Camcorders on the other hand always had a range between 30mm and 150mm if not more with extensive zoom, you would have needed a dome port atteched to the housing that would allow zoom to give the same functionality in water or diopters to zoom at close range.

A user of a Sony camcorder in a gates housing would be looking at 30mm like a very wide lens!!! Typically you need fathom lenses to reach 90° and lenses with 110° coverage cost $4,000+ so definitely not affordable to the average shooter.

Where does this leave us? Well surprise good news for all 24mm compact users that want to shoot high quality video there are plenty of options that don’t break the bank!!!

When zoom cameras like the Canon G7 come into the market some manufacturers like Fantasea, H2O tools, Ikelite started producing wet domes.

Those domes are made of two lenses with an air space and if set really close to the housing port have the effect of restoring the original field of view of the camera. Now for a 28mm equivalent like the Canon G series this is not that exciting as we are talking about 75º diagonal but for the 24mm camera users we are talking of 84° diagonal coverage, a value that a professional camcorder user would be very happy with. In addition you can also use the zoom which means that if the camera has really close focusing distance a wet dome is all you may need for 85% of shooting circumstances.

So when I got the Panasonic LX7 this is what I was planning and I got a Nauticam Wet-Mate this is the slate from before at the same distance

LX7 with Nauticam Wet-Mate

As you can see the image is not only wider but also rectilinear no barrel distortion as if we were shooting on land.

Personally I do not like barrel distortion for video, and this is the reason I don’t like videos shot with fisheye lenses so this suits me fine. Of course 84° are not really wide for large wrecks, whale sharks or similar for those situations you still need a wet-wide angle lens but the Nauticam Wet-Mate costs $250 plus taxes so you really can’t complain.

At telephoto the flat port does not have pincushion distortion but it could be painful to remove the wet mate in the water the good news is that with the wet-mate you can still make use of the full zoom so if your camera has a really short focusing distance this may be good enough for most situations.

To finish off this is the Nauticam Wet-Mate, there are as I said similar products made by other brands. It is build of Aluminum with two lenses with a sealed airspace, construction seems very similar to some fix products.

Nauticam Wet Mate
Nauticam Wet Mate

So if you have a 24mm compact camera that takes HD video and you are frustrated with still there is a whole world in front of you with those dome adapters you could be well set for underwater video at very little investment.

Those are just some cameras that have high quality HD video the list is of course longer:

  • Canon S100/S110
  • Panasonic LX5/LX7
  • Olympus XZ-1/2

And the good news is that you do not need an aluminum housing just something that takes a wet dome, Ikelite for example has 67MM thread on most housings for those cameras.

Sony RX100 – Tips for Underwater Video Part 8 – Shooting at Night

If you are not freaked out by diving at night you know that it offers unique opportunities to see behavior and creatures not usually seen during the day like the monster snail in the featured image of this post.

During my recent trip in Raja Ampat we had the opportunity to see some really unique features, now for someone this fellow here is unusual enough

We had however made an indigestion of flamboyant cuttlefish in Dauin so that was not that exciting although having one of those walking towards the lens was pretty cool.

It is useful to compare the two still pictures of the flamboyant and the snail, you will notice that in featured image you can clearly understand the shot was taken at night whilst the flamboyant could have been just a day shot for how bright it is.

This leads us to tip number 1 for taking video at night which is never exceed with the lighting. We don’t have any ambient light to help and our lights are the only light source, it is very easy to exceed and wash out a scene with too much reflection from our subject.

I have lights that can be dimmed and I did not use more than half the power at night. It is also important to leave some form of dark halo around the frame to give really that night impression.

Coming to the light having bright lights on all the time also attracts lionfish, krill and plankton. On this trip I was literally attacked by krill to the point I had to switch off the lights for few minutes.

Back scatter is also more of a problem due to the particle in the water at night and the fact that they are more clearly reflecting our lights, if possible never illuminate a subject frontally to avoid the snow effect. Sometimes though, like in some sections of the video, there is just too much no matter how you angle the lights.

The real important part is the gear, I have video light that also change to spot and work as torches and are dimmable, this saves the effort of taking a torch with you and having to juggle with all the gear.

Other factor of relevance is that during a night dive you can’t really shoot wide angle as there is no ambient light, this limits the type of shots you can take so it is important to add something else to make the clip more interesting. It is also more difficult to film divers without blinding them so really there is less selection possible.

A final note are skittish critters that require a red filter, I have never been in this situation, usually I keep the lights low until time to take the shot and then go for it like for the eupalette shark towards the end of the clip. If you need to use a filter remember to set a custom white balance.

Talking of white balance every light has a specific temperature, mine are 6500K, it is a good idea to set the camera white balance to this temperature to neutralize the coldness of the light this is possible in video more on the RX100 but not all camera offer that option so you can start with auto mode to see how it works.

Anyway the video is the collection of the 7 night dives, some were not memorable but at least 4 were excellent you can see what I mean if you watch it in full and notice some of the specific quirks. I found the RX100 to perform very well and the footage is very clear. I used Movie mode P increasing or decreasing the power of the lights until I was getting the best compromise between aperture and too much light.

Sony RX100 – Tips for Underwater Video Part 7 – Macro Shots

Just came back from a 11 nights and 10 day diving on a liveaboard in Raja Ampat and I am in the process of putting together the summary videoclip for the trip. To have an idea of the kind of diving in this remote location you can have a look at the superb pictures that my buddy and fiance has taken on Raja Ampat 2012 Flickr Set

I had already gauged that the macro performance of the RX100 is far from outstanding and this trip just confirmed it.

To understand what I am talking about have a look at these two pictures both taken at 5 cm from the front port of the camera using a 3:2 format.

RX100Macro

The first image is shot with the RX100, note the shallow depth of field of the large sensor in P mode.

All looks good however if we take the same shot with a Canon S95 that has a 1/1.7″ sensor we get this result.

S95Macro

To make matters less complicated and don’t get too technical you can measure with a ruler the size of the memory card in the pictures. The S95 presents an image that is 26% longer than the RX100. It is like saying that compared to the RX100 the S95 has a 1.26x magnification.

In video diopters are not very popular because camcorders have small chips around 1/2.5″ and a 10x optical zoom and can focus at very short distance. So usually a no diopter is needed for regular macro work and a 4D is really only for pygmy seahorses.

With our RX100 however we need a 5D just to have a decent macro performance. Actually even a good size nudibranch looks small in the RX100 underwater without any lens. Moreover the RX100 has only a 3.6x zoom so even with a diopter that allows to focus a telephoto at closer distance things don’t really look that big so we are  looking at 5D for basic macro and 9D for super small critters.

The RX100 has a number of housing options with M67 thread as standard, this is the most popular format for diopters and there is ample choice there. If instead we want to use bayonet mounts we are pretty much limited to Inon or Seatool.

As discussed above we are  looking at a starting point of +5 diopter, this cuts immediately lenses like the Inon UCL330 out of the equation, if we look at the most popular and affordable lenses we are left with:

  1. Inon UCL165 6 diopters (1.5x) this lens is stackable
  2. Reefnet subsee 5 diopters (1.25x)
  3. Dyron +7 diopter (1.75x)
  4. FIT achromatic +8 (2x)
  5. Olympus +8 diopter (2x)
  6. Epoque DML-2 8.4 diopters (2.1x)
  7. Reefnet subsee 10 diopters (2.5x)

The first three options are adequate for most of the macro work with the RX100 and get you to fill the screen for almost all subjects except the smallest pygmy seahorses.

As we increase magnification we get the RX100 to a point where is very difficult to produce any decent footage. A 10+ diopter works very well for still pictures where you only have to take a single shot but for 10 seconds of decent footage is close to impossible to achieve focus without a tripod.

Looking at the featured image on this post this is a still picture with two Inon UCL165AD stacked at full telephoto. When I was in Raja Ampat I tried using two UCL165 it was very hard to get anything in focus however the performance is pretty good this is a snapshot taken from my footage.

Pygmy Snapshot

I posted all the pygmy footage on youtube

in this short clip I have a compilation of subjects, if you believed that an hippocampus bargibanti was tiny have a look at hippocampus denise, Pontohi and especially Satomi (1cm) in this clip to have an idea. All in all I am satisfied as I shot 12 minutes of seahorses and could use around 2 that were not too shaky. I do not use software stabilization as I don’t like the warping effect that CMOS sensor camera give so this is all done by hand. I did slow down some of the footage to half speed and this is were the 50 fps of the RX100 come really handy.

Other than Pygmy seahorses that are between 1.5 and 2.5 cm in size there is no need for such high magnification, in fact for the rest of the trip a single UCL165 has been more than adequate.

Looking at cost an Inon UCL165 costs less than a subsee 5  so that is the most cost effective option if you ever think you will need a very high magnification  and you are able to be super steady to avoid shake as it can be stacked with another UCL165 or an UCL330. Specifically having experienced the two UCL165 stacked I think that is probably too hard to handle so a combination UCl165+UCL330 should be the perfect choice for pygmy and similar at 9D alternatively a subsee 10seems the logical super macro choice.

A final tip is camera modes for macro, as discussed in a previous post aperture priority is the way to go and allows you to have enough depth of field so that you have sufficient part of the subject in focus. However this brings also the consideration about lighting. I took some shots in program mode with the RX100 and two Sola 1200, in some situations is quite hard to achieve f/8 or higher numbers with the two lights at the minimum power of 300 lumens with the lowest ISO. It follows that if you operate with a single light you need to have at least 800 lumens and put the light to the max, this may scare skittish critters and prevent you taking the footage you want. A possible solution is a red filter on the light followed by in camera white balance however a single light does produce harsh shadows and this needs to be taken into account.

In conclusion a diopter for macro work with the RX100 is a must so choose one that fits your needs and ensure you have sufficient lighting to support the small aperture required by the camera large sensor.