Category Archives: Full frame

DSLR to Mirrorless Migration Paths

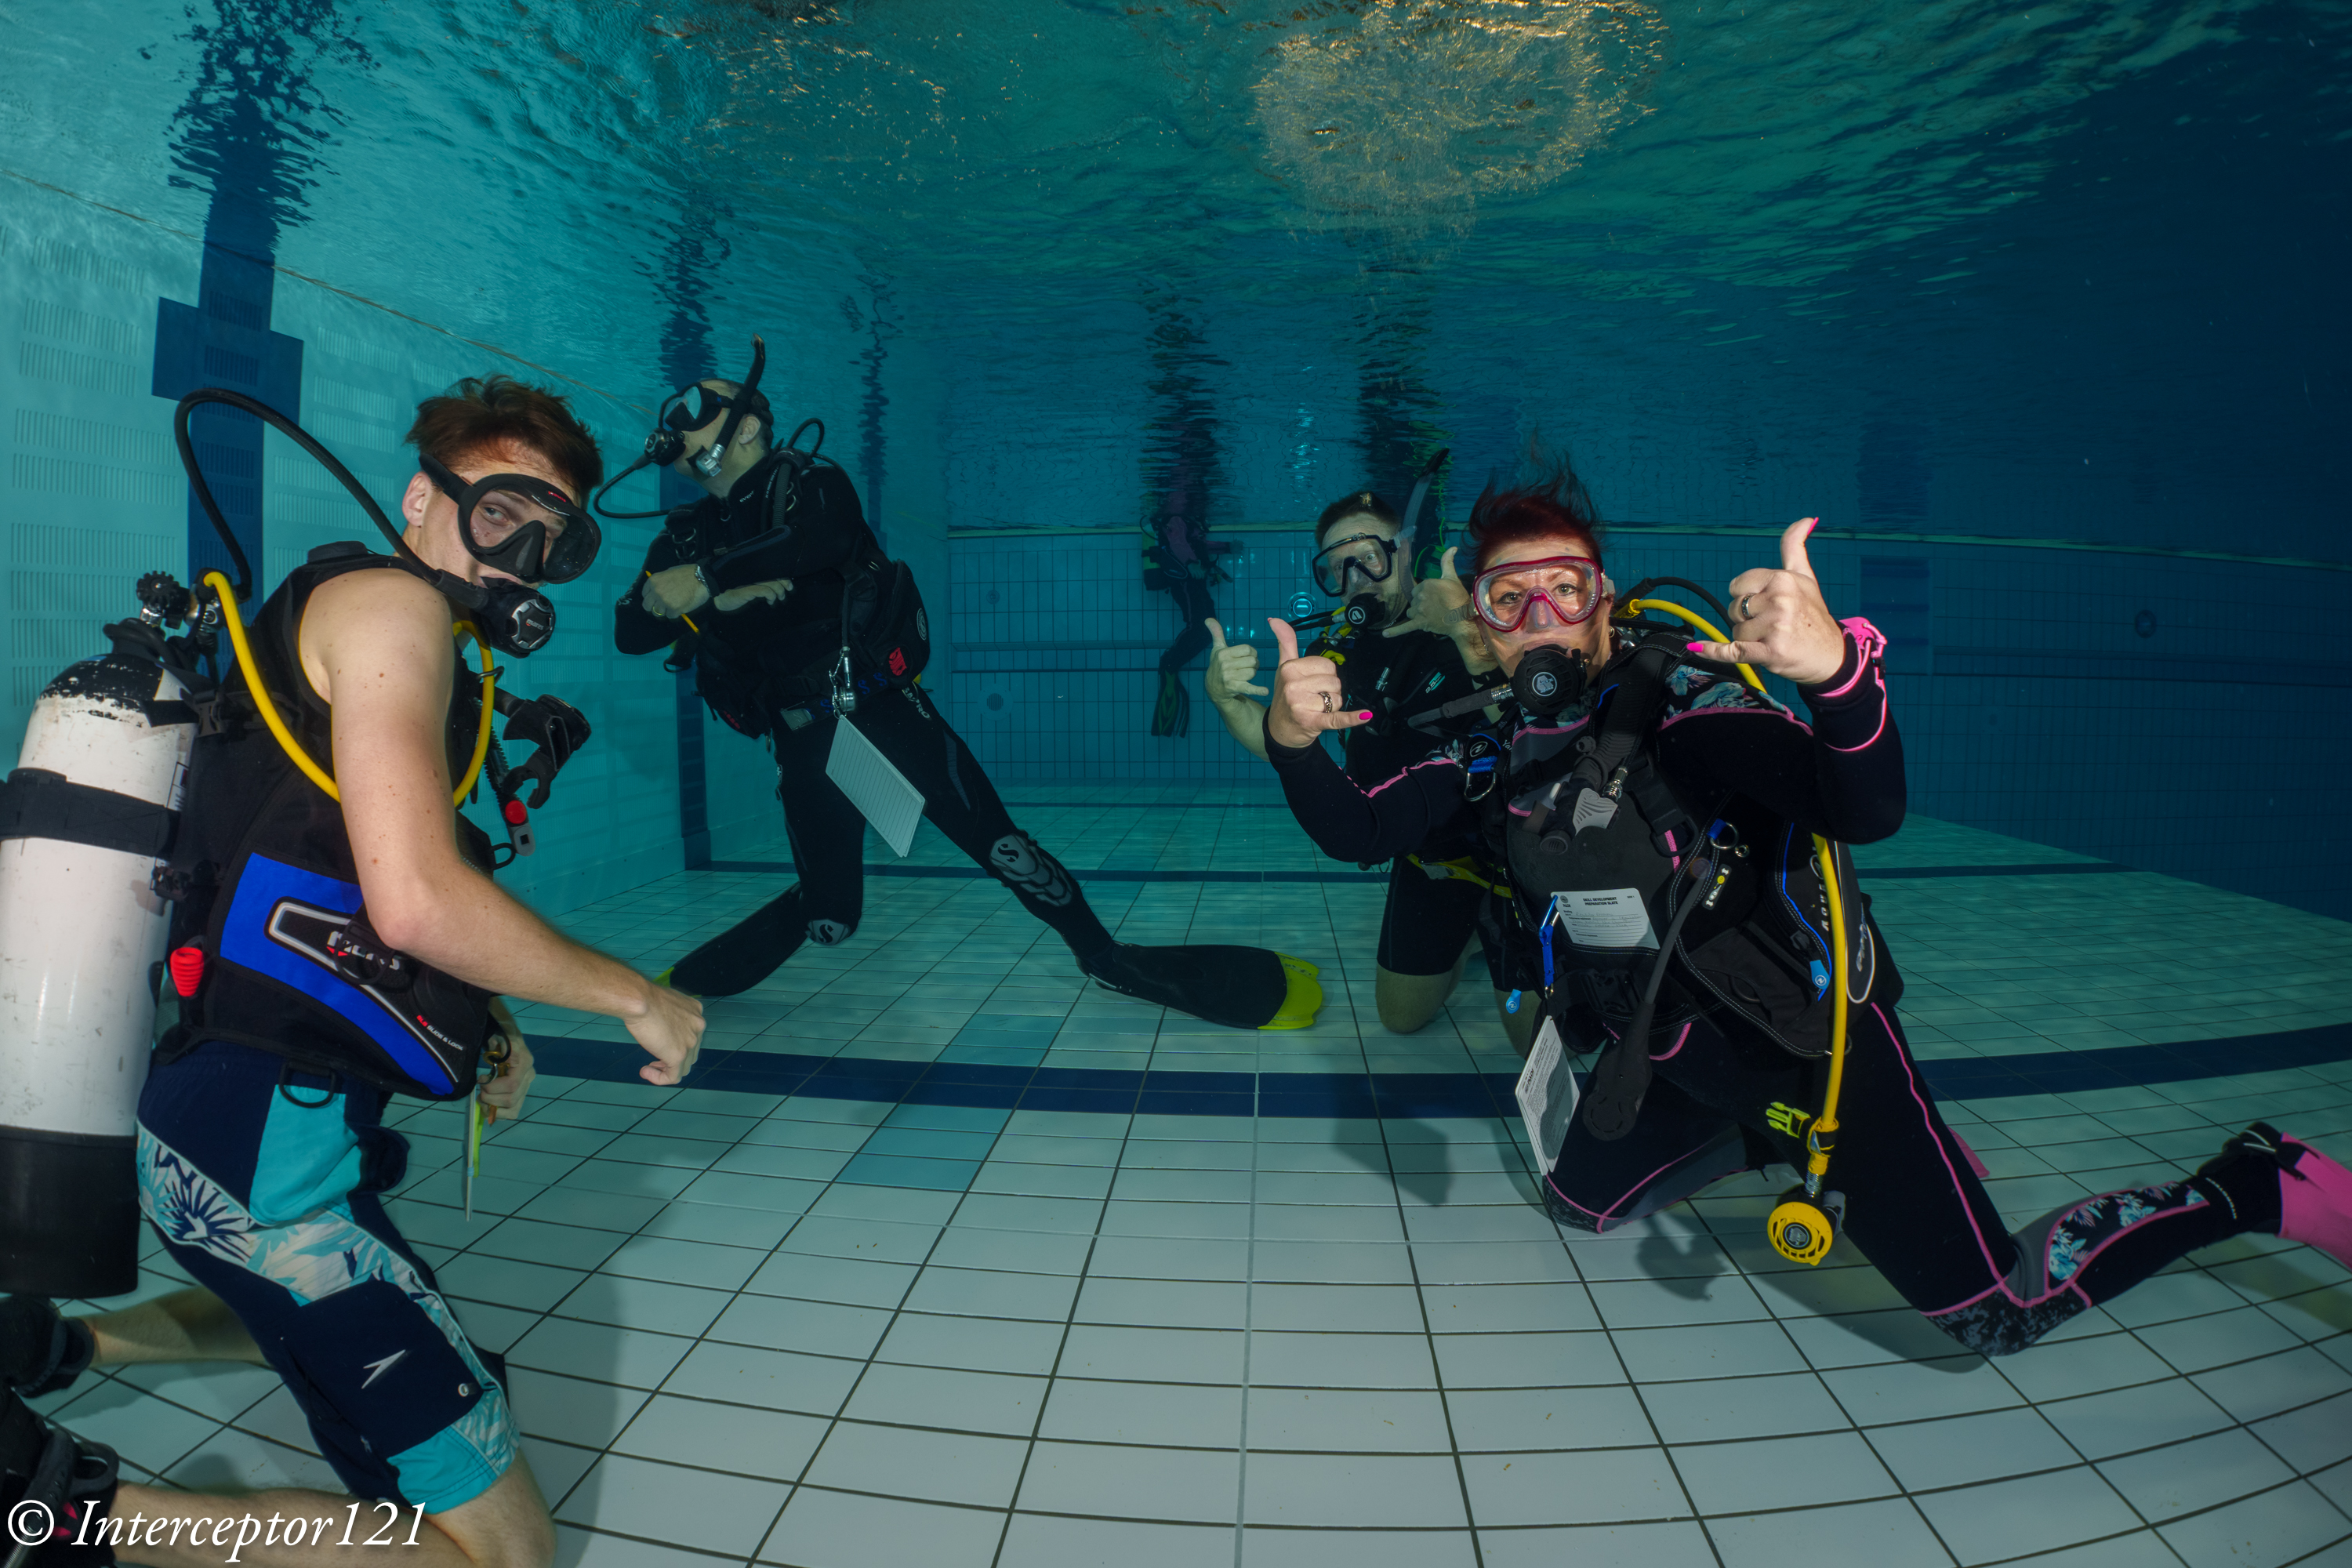
Recently many DSLR user have been moving to Mirrorless, while some are still waiting. The entire world of photography has practically abandoned DSLR but underwater photography is traditionally lagging and this is due to a combination of factors one of the most important being availability of appropriate lenses to fit specific use cases.

Unfortunately underwater use cases do not form part of the design criteria of lens manufacturers due to the tiny size of the market, so you need to hope something comes up that can fit that shooting situation you are trying to master. To date there is no native OEM fisheye lens for mirrorless for full frame. There are of course plenty of lenses for micro four thirds but this is only mirrorless so it does not form part of this evaluation because if you are on that format you have moved on already.

Full disclosure I am a Sony Mirrorless shooter but have owned and used Panasonic, Nikon, Canon and Fuji and I keep myself up to date with the latest innovations. This piece is based on data as you can see it not on opinions which I have little interest in.

Brand Loyalty?

One thing that is very important when making this step is to ignore entirely brand loyalty. This is somewhat difficult for the user that is accustomed to a certain menu system and look and feel or even color rendition of the camera but it is an imporant factor.

Let’s have a look at few examples considering the two main DSLR brands Canon and Nikon starting from the latter.

Nikon

Probably the market leader in underwater DSLR shooter has been delaying the transition to mirrorless and only recently catching up.

Nikon D850 vs Z8 vs Z7II

The D850 and Z7II have the same sensor and therefore identical performance, the Z8 has a new stacked sensor however according to a variety of sources the additional speed that is no doubt very useful to topside bird or sports shooters comes at price.

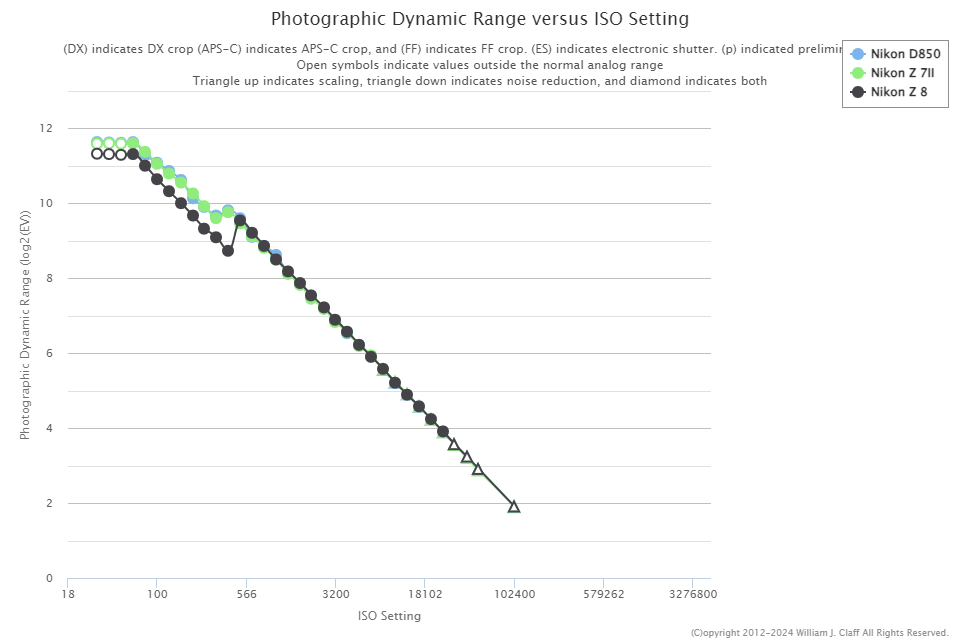
This is corroborated by DxOMark results

The Z8 has indeed less dynamic range and therefore scores less. Obviously this is only taking into account purely image quality however other factors are important namely the autofocus, ergonomics and the availbility of lenses.

The Z series has a limited amount of native lenses compared to the armory of FX lenses however you could say you can get by.

The autofocus has really improved in the latest Z8 while it is fair to say it was not as exciting in the Z7II.

In conclusion looking at Nikon full frame the transition from DSLR to Mirrorless looking purely at underwater use cases will not move your image quality forward and probably be on par on autofocus.

Nikon D500 vs Z50

When we look at Nikon DX format considering a transition from D500 to say Z50 the image quality is identical but here the lens assortment is even less therefore many users go full frame instead of staying on crop.

In conclusion I would say Nikon FX/DX to Z is not a really strong case and is penalised by Nikon being a total laggard in the transition to Mirrorless. Perhaps Nikon users should consider changing brand if they are keen to move forward due to topside use cases, or wait a bit longer.

Canon

Canon has been more decisive in moving to Mirrorless and it shows.

The RF series has an excellent display of macro and rectilinear lenses while it lacks a native fisheye overall the comparison is fair while certain niche lenses like the Nikkor 60 macro

Looking at sensor performance the situation is also more favourable.

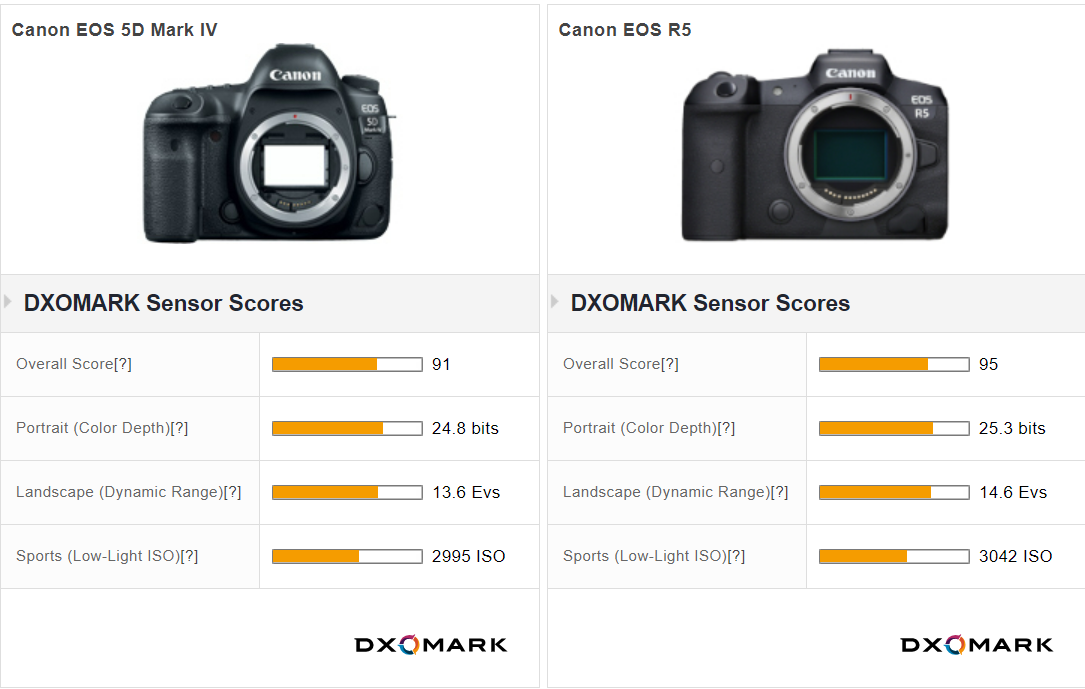
Here the improvement is across the field. When we look at the cropped format the EOS90D and R7 there is a smaller improvement, however a no regret situation.

Taking as thermomether the Nauticam port chart for RF system we can see that the selection is pretty decent for full frame, the same cannot be said for APSC where the number of supported lens is small but so is the topside selection.

In summary a Canon user wanting to be loyal to the current brand will find an improvement in full frame but not in APSC having to resort to older DSLR lenses for a small improvement in image quality.

Sony

Sony is the leader in mirrorless camera having been the first brand to embrace it for full frame. At present Sony Semiconductors Corporation provides image sensors to Nikon and Panasonic amongst other and only offers the most advanced solution to Sony Consumer Cameras unless the customer pays for a custom project.

Looking at full frame sensor performance of the fast models those preferred by topside wildlife shooters we can see that the A1 and Z8 are indeed very similar with the A1 having more megapixels and offering an edge on dynamic range and high ISO performance and the Z8 edging on color depth.

Those cameras make sense if you have a variety of topside use cases and also like to do some video or if you are really needing the last bit of strength from the superior autofocus.

When you compare the Z8 to the A7R V which is a ‘slower’ camera you see that the latter has an edge this is also true if you look at the A1 of course. An underwater shooter that does not need the speed of the A1 or Z8 should stick to a model like the A7R V and benefit from additional megapixels and sensor performance with a loss of speed that underwater does not mean much. This camera has a very slow burst rate and topside will be easily affected by rolling shutter and it is not a favourite for topside wildlife shooter but more a camera for landscape, architecture and portraits.

The selection of lenses for E-Mount is vastly larger than Z mount at present and there are adapters for both Canon EF and Nikon FX formats.

Sony full frame cameras tend to be smaller and the housing cheaper so you can see why some previous Nikon DSLR users have moved to Sony Mirrorless.

Canon users instead are not migrating to Sony because of lens selection and backwards compatibility and more importantly are also gaining on image quality and features moving to Canon mirrorless.

Micro Four Thirds

Some users have done differently and gone to a smaller mirrorless format. Micro Four Thirds is where mirrorless started long time ago and offers plenty of lens choices. Contrary to what people think Micro Four Thirds cameras can closely match the performance of APSC cameras the gap is more or less half stop and operating at equivalent depth of field can match both ASPC and Full Frame cameras.

While the increased depth of field has been a strenght of this format underwater the autofocus has been historically the biggest let down.

As of today there is not a single MFT camera that can match the simple tracking without subject detection that old Canon and Nikon DSLR and current Sony Mirrorless can do. Brands have been focussed on shooting people or birds and animals but this did not include fish and so far the simplest use case which is to shoot a fish portrait with a macro lens has been where this format has lagged.

Unless you are interested in the video features or you only shoot wide angle and don’t care about the autofocus issues Micro Four Thirds is typically not a path of choice for an existing DSLR user.

Panasonic

With a strong tradition in video, Panasonic has recently mastered autofocus and released the S5II with PDAF that is a very interesting camera at reasonable price point. L-Mount has started to offer a good selection and using the sigma adapter you have access to Canon EF lenses. The Nauticam lens chart for L-Mount shows a good selection.

While cost effective the S5II has only 24 megapixels and more importantly does not offer a solid tracking autofocus as Nikon, Canon and Sony do and therefore is a risky path to take unless you are also moving to the S5II for other reasons.

Conclusion

When I write pieces like this there is always someone that comes but at the end we took amazing pictures with film camera or with Camera X that had 8 megapixels. Well that is fine but at that time this is all you had.Or even better let’s look at some open water images to have a view, which of course can’t be done as conditions can never be replicated.

Today there are many options and choices and while having options is a good thing it does make decision making more complicated. While there are many factors that make the image at the end the photo needs to be in focus and have the appropriate quality.

This short write up covers both this factors and hopefully you will find it useful. If you are regularly on underwater photography trips you will also be able to compare this article with real life scenarios. While few years ago it was rare to see a full frame sony user on a trip today the numbers have largely increased as consequence of the migration of users to mirrorless cameras.

WACP Prototype Experiments

Few days ago Alex Mustard popped in to drop his WWL-DRY aka WACP-C prototype so that I could conduct some experiments for the enjoyment of the entire underwater community on Sony E-mount.

This lens is not the same of the current WACP-C but it is very similar. It does not have a float collar, a bit like the original WWL-1 dimensionally appears a few mm different from the WACP-C specs.

The lens seems a bit shorter.

140 mm length instead of 145 mm of current production version

The dome diameter is identical somewhere in the region of 130mm.

Dome port perspective masks the real diameter of 130mm

The lens is very heavy in water so I needed some floatation.

Stix float belt carved to fit a dome

I rented a Tamron 28-75mm G2 from lenspimp only to discover it would not fit any of my extensions. Alex Tattersal has sent me an adapter on loan but it did not make it for my pool session.

I therefore decided to use my Tamron 17-28mm although the extension was 5mm too long I got no vignetting at 26mm.

Ready to dive

I exchanged notes with Alex who told me he tried all sorts of optics with his Nikon only to use a 1990 lens now discotinued as all modern fast lenses would refuse to work properly. I was determined to try anyway confident I would get good results.

Pool Tests

Arrived in Luton for a short one hour session last night I took my usual props. The first set of tests show already some interesting results.

I always start as close I can get to the props to fill the frame.

CFWA f/5.6 T28

At f/5.6 the centre is very sharp however I noted the background and were not particularly crisp while the centre was but not in the background. There is an issue of depth of field so I started stopping down the lens.

CFWA f/8 T28

By f/8 results were already very good considering the shooting distance. Consider that a shot like tha requires f/16 on a fisheye or rectilinear to have sufficient depth of field.

By f/11 we are in a really good place.

CFWA f/11 T28

The depth of field is not quite enough for the plant in the back but the edges are sharp.

To show that this is a genuine depth of field issue look at this shot at 17mm in APSC.

17mm APSC f/5.6

It looks very much identical although this is even wider at 25.5mm equivament.

The second step is to look at edge sharpness the pool provides a nice tiled wall for this purpose. Here am shooting at around 1.5 meters.

You can see immediately that the frame is sharp throughout at f/5.6

wall f/5.6

Moving to f/8 improves edges

wall f/8

f/11 brings better edges but in my opinion not the best centre.

wall f/11

This reflects very much the nature of the master lens which is outstanding in the centre at f/5.6 with so so edges but very good on both accounts at f/8. F/11 starts showing an overall resolution loss.

I then moved to test field of curvature.

grid f/5.6

The lens has virtually no field of curvature and the edges are good already at f/5.6.

grid f/8

By f/8 the result is excellent.

grid f/11

At f/11 better edges but slightly worse centre.

Having completed the lab tests it was time to shoot some divers however I was coming to the end of the hour and they had started surfacing!

group f/5.6

Shots at distance with f/5.6 look great.

surface 3 f/5.6

Consider the shutter speed is low as I was trying to get some ambient light and the subject far so there is some motion blur.

surface f/5.6

f/8 is probably the sweet spot for underwater use.

Wide f/8 T28
group f/8

F/11 is really not needed unless you have a close up shot.

Self Potrait f/11 T28

Conclusion

There are some obvious strengths to the Tamron 17-28mm which in my view performs at 28mm way better than the Sony 28-60mm even with a too long extension.

Upon reflection I have decided not to invest on the Tamron 28-75mm as I already have thr Sony 24-70mm GM2 and there is an overlap topside.

Edit 8 April: I received today the adapter ring I needed for the 28-75mm G2 and unfortunately there is vignette at 28mm ruling this lens out entirely for the WACP-C.

If you want to use the Tamron 17-28mm with the WACP-C you need an N120 to N100 25mm adaptor ring, in addition to the zoom gear (not necessarily unless you want to shoot also APSC) and the 35.5mm N100 to N120 port adapter.

The Tamron 17-28mm costs $799 on Amazon.com and it is the best rectilinear wide angle for underwater for the e-mount and we now discovered also compatible with WACP-C.

I will try other lenses in due course but the lesson learnt is that if you do your homework you will find something.

Thanks to Alex for the loan and bear with me a little longer!

Nikkor UW15 on Sony Mirrorless for photography – Worth it?

Nauticam makes some really interesting adapters and ports for Sony cameras, one of them allows you to use vintage Nikkor lenses on full frame mirrorless cameras.

I decided to source the UW15 as I am planning to use it for video after seeing the results on the movie Avatar.

The challenge of the Nikkor lenses is that they are entirely manual with aperture and focus knobs. This is generally not an issue for videography which is my intended use but I wanted to check how does this lens work for photography as many people still rave about it.

Lenses compatible with the adapter are UW 15, UW 20 and UW 85 full manual. Later autofocus lenses are not supported.

The Rig

My rig is a classic derivation from wide angle with 8″ and 12″ arm segments and my trusty (!) Sea and Sea YS-D2.

Nikkor 15mm rig

The Nikkor weights around 600 grams and gives almost zero lift so this rig was over 300 grams negative in fresh water.

Before using it you need to assemble the lens on the adapter.

Nauticam Nikonos Adapter

You have two parts that can be removed to allow the lens to mount depending on your preference. I set the lens with the display upright so I could try and see it while shooting.

Nauticam Nikkor adapter top side

The controls are located on the left side side and bottom which is where I normally have my levers.

Nauticam Nikkor adapter controls

On the right you will see the display scales.

Nikkor UW15 Aperture and Focus Display

I have to say I was a bit nervous setting this on my A1 considering that this is a lens that is 25 years old at least but the vacuum test was fine so ready to go to the pool with the friends at Rec2Tec Bletchley.

The UW 15 Construction

The Nikkor lenses were generally rectilinear. The 15mm has a field of view equivalent to 20mm so only 94 degrees on the diagonal.

The approach was to correct the water distortion until such point when the image becomes rectilinear and eliminate other aberrations.

I have to say that the amount of chromatic aberrations is practically non existant.

White balance slate

Rectilinear lenses have gone out of fashion since dome ports with fisheye distortion being the preferred look for wide angle in modern underwater photography. For video though straight lines have a value.

Pool Session

Using this lens on the Sony A1 proved challenging for photography. Nailing the focus using peaking did not feel particularly precise.

Not so sharp focus

Some shots may have been sharp enough on film resolution but with the 50 megapixels of the A1 even the slightest misfocus shows.

Is it in focus?

My productivity was quite low at the beginning as I was trying to get a hand of the lens.

The lens itself is by all means extremely sharp even for my camera.

Grid

I worked out that I could not do what I normally do which is to frame first and focus after as by the time I had nailed the focus things would have moved so I decided to set the focus and move forward or back until I thought I had my target in focus.

The situation started to improve.

DSD student with Instructor David Allen

I felt I had worked out how to use the lens so started looking for some subjects. During those sessions you see all sort of stuff as people practice their skills.

Riding

Considerations on the controls

I believe that the average underwater photographer shooting digital will find it very hard to use this lens and will end up shooting at f/8 or smaller apertures so that focussing becomes easier. The lens is especially challenging as it is not particularly wide so you do need strobe power.

DSD Student

I found really hard the lack of display of aperture and focus position. The lens is designed for much smaller Nikonos housing, with my A1 housing being more bulky you need to actually turn and look at the lens to check your settings so many times I did not have the right aperture of focus and it all was pretty laborious. In a video situation for wide angle this lens will work just fine with set and forget at 4K but to nail focus on a high megapixel camera is a hard task.

When you do get the focus though the image is outstanding.

Just married

I tried a selfie to check the focus scale and it worked well.

Selfie

Consider that the most shots were at f/5.6 or f/8.

Dave

As you have no exif data it is impossible to remember what you shot unless you write it down on a slate.

Is it worth it?

The answer depends on your use case and if you already had the lens.

The following use cases fit the Nikkor UW 15 pretty well:

  1. Videos of sharks or pelagic that do not come too close where ambient light is low
  2. Photos at mid range with fairly static scenes where you want straight lines for example fashion models

The lens is definitely not easy to use for dynamic shots, situations where you need to get very close (as it does not focus very close) and where you need to continuosly adjust focus.

In terms of costs in GBP you are looking at:

£474 Nauticam Nikonos Adapter 37202

£300-500 Second hand Nikkor UW15

Obviously if you already have the lens and you are in one of the above use cases I would recommend you get an adapter and give it a go perhaps looking on the second hand market.

If instead you do not have the lens I would say not to bother unless money is no object, you are in the two use cases above and you have sufficent dexterity to control this lens.

Undewater photography has moved forward a great deal thanks to autofocus and although the Nikkor UW 15 is really sharp getting critical focus right is not easy. When it comes to video where you do not normally use autofocus for wide angle this lens is really interesting.

You can shoot at f/5.6 even f/4 subjects in the distance in ambient light with extremely clear and sharp detail at a fraction of the cost of other water contact optics. If you do not own any of the WACP or WWL I would say the UW 15 deserves some considerations but only if your command of depth of field and focus is very good otherwise it is better to pass.

Choosing the appropriate gamma for your video project

The previous post on the technical nature of V-LOG has stirred up quite a bit of unset among those people that advocate the use of it as a preferred gamma for video capture. In this post I will show some data point to help you make an informed decision based on what you are planning to shoot in your video project.

Basics of Display Gamma and Dynamic Range

First of all a bit of background on gamma curves. The standard video gamma is based on a correction factor of 0.45 as screen decode it with the reciprocal value 2.22.

Cinema gamma is historically based on a value of 1/2.6 as projectors decode with a gamma of 2.6.

Today most of our content is consumed on phones, monitors or Tv screens as well as of course cinemas but for the purpose of this post I will assume we do not have a real ambition to project in cinemas.

To give some ideas of the dynamic range of the display consider those values

Phone (HDR)9+
Computer Monitor10
Tv (1886 HDTV)11
HDR Tv13+
Projector16+
Typical Display Dynamic Range

It is important to understand how the content we produce will be consumed when we capture our source material as otherwise our video pipeline may be suboptimal.

Mobile phones and tablets are now the predominant platform to consume content and looking at the table above this means that in terms of dynamic range there is not a high requirement. In addition phones and computer monitors may also not be particularly accurate in terms of colour rendition.

HDR content, due to lack of widespread compatibility, is growing on mobile phones but remains a product for high end platforms such as HDR TVs and Projectors.

It follows that content that will be displayed at the best quality on the most common platforms has pretty limited requirements in terms of dynamic range and other qualities are perhaps more important such as sharpness, low amount of noise, colour rendition and delivery of what looks high contrast on a limited contrast medium.

A further obvious consideration is that standard rec709/sRGB video is limited to 10 stops of dynamic range in the display (contrast ratio 1000:1) while new TV sets aligned to BT.1886 can display 11 stops )(Contrast ratio 2000:1). So no matter how you acquire if you end up in rec709 the dynamic range is limited and it becomes more important to accurately capture tones and colors.

Gamma Curves for Capture

As explained capture gamma is the reciprocal of display gamma and therefore majority of cameras capture a standard video gamma (0.45) or in some cases an HDR gamma (logarithmic). I do not want this post to become a deep dive on HDR video of which I have written enough however to stay on course I want to compare traditional gamma (non linear) and log gamma.

In the following graph you see the bit codes output vs input of a standard video gamma (1/2.2) a cine gamma (1/2.6) and a log gamma (v-log).

Bit code mapping for 14 bits linear sensor data

In broad terms you can see that a video gamma produces an output of 3865 vs 16383 bits, a cinema gamma sets at 3166, while a Log gamma can take all 14 bits of data and still be within bit value 960.

It follows that to store the whole set of values read at 14 bits into a 10 bits container a standard gamma needs to do some scaling while a log gamma does not need scaling to fit into a 10 bits container. This also explains why exposure values in log are 2 stops higher than standard video for a 14 bit range, while for a 12 bit range the offset is one stop. As the meter is using a standard RGB gamma all values are rescaled back.

You notice that at no point here I have made references to dynamic range. The camera dynamic range is solely related to the maximum well capacity vs the read noise and it does not relate to the gamma curve being used, however the different compression of the gamma curve have an effect on how tones are mapped and on the perceived dynamic range.

Camera Dynamic Range vs Display Dynamic Range

The overall camera dynamic range influences what you can do with your content and if it is worthwhile to produce an HDR version or not.

If we compare the previous table of display dynamic range vs camera dynamic range and we focus on nominal values (SNR=1) and photographic (SNR=20) we can see what device we need for our purpose.

Camera TypeDRPDR (SNR=20)
Compact 12.99.8
MFT12.310.3
APSC1411.1
Full Frame1412.2
Dynamic Range by Sensor Type

We can see that if all we need to do is to output on a mobile device or a computer monitor smaller sensor are adequate, however for HDR production larger format are preferred. Obviously we can stretch SNR to lower values and this will upgrade the above table of 1 stops or so but not change our reasoning substantially.

Gamma curves vs Bit codes mapping

The various gamma curves have a different distribution of tones (bit values), in this table I compare a video gamma vs cinema a reduced 12 stops log and a full Vlog for a full frame sensor camera.

For the purpose of this comparison blacks are bit codes in the lowest 10%, Shadows are up to 18%, midtones up to 75%, highlights up to 90% and whites above. Blacks and whites do not have color information but just brightness while shadows, midtones and highlights contain respectively dark, medium and light hues.

Distribution of tones vs Gamma

A standard video gamma has over 45% of midtones, those are the colors and tones with intermediate values so produce softer tones. Shadows are just above 35% with highlights under 10% and blacks and whites around 5%.

If we look at a cinema gamma we can see that shadows are now predominant and very close to the midtones, highlights, whites and blacks are compressed.

V-LogL (12 stops DR 12 bit implementation) has the largest range in shadows, midtones are compressed around 50% compared to a video gamma, blacks are subtantially more than a video gamma, and while highlights are compressed, whites are super whites are greatly expanded.

Full VLog is dominated by whites that make 38% of the bit values, Shadows are at 32% with midtones now under 20% and highlights compressed. Blacks remain expanded.

Choosing a Gamma Curve for your Video Project

Our decision tree starts from the content which determines the device we need. Once we have a device capable of a given dynamic range we can make appropriate choices in terms of gamma curve.

Broadly speaking compact cameras and micro four thirds do not have enough device dynamic range at sufficient level of SNR to justify a high dynamic range gamma. There are some very specific exception where this may be worth it (Panasonic GH5s) but in general terms a standard MFT camera for photography should be limited to video or cinema gamma for optimal results as the dynamic range is limited and compression is not required.

If you own an MFT camera your choice is between a video gamma and a cinema gamma. Depending on the look you want to achieve you may choose one or the other. Video gamma has generally more contrast (more blacks and highlights and whites) while Cine gamma has a balance between midtones and shadows but not strong blacks and whites giving overall a softer look.

If you own a full frame or apsc camera you have more options which means you need to think more about the gamma curve to be used. HDR content requires a log curve you can then decide to use a cinema or video gamma if you do not want to output HDR or want to achieve a different look. It is important to note that log gamma have lots of bit values in whites and super whites and those do not exist in many typical scenes.

Scene vs Dynamic Range

While the current effort of camera manufacturers is to promote high dynamic range the reality is that in most cinematography situation you use devices that reduce contrast and therefore dynamic range (think about pro mist filters).

The DR of a scene can be evaluated looking at the histogram. This is of course influenced by the gamma curve so it is important to do this evaluation taking a photograph not video.

The following are example of scenes with the underlying histogram.

High Dynamic Range scene note the shape of the histogram with peaks on darks and lights
indoor scene with mostly midtones
Low contrast portrait despite the light background
Underwater landscape that does not have as much DR as you would think
Moth image predominant in midtones
Outdoor image with low dynamic range
Typical indoor party scene with flash does not have significant dynamic range
The same portrait with a cine gamma sees enhanced shadows and lighter overall image but with bright tones subdued

It may be useful to see the effect of LOG using the LUTs in photoshop on the raw data

Original image
Vlog image
Vlog + LUT back to Rec709

The example above shows that a significant number of midtones have been lost in the conversion with no DR benefit as the scene essentially lacked it.

Conclusion

For underwater video purposes as the water reduces contrast and smooths highlights I would not recommend shooting log or HDR with the exception of very specific scenarios. Likewise if I am shooting a v(ideo)log or an interview there is no requirement for extra dynamic range and log compression is not required.

Outdoor scenes especially in bright conditions, snow, are appropriate for HDR and should be shot with a log format assuming of course the luminance of the scene is not being reduced with ND filters or similar.

Events like weddings can have challenging conditions with a mix of low contrast indoor and bright outdoors with the bride typically dressed in white so in effect those can be very demanding on the equipment but you need to bear in mind that if your delivery format is just HD video the benefit of log gamma are greatly reduced and extensive work may be required to bring colours back in check, always account for the limitations of your equipment as well.