Tag Archives: white balance

Matching Filters Techniques

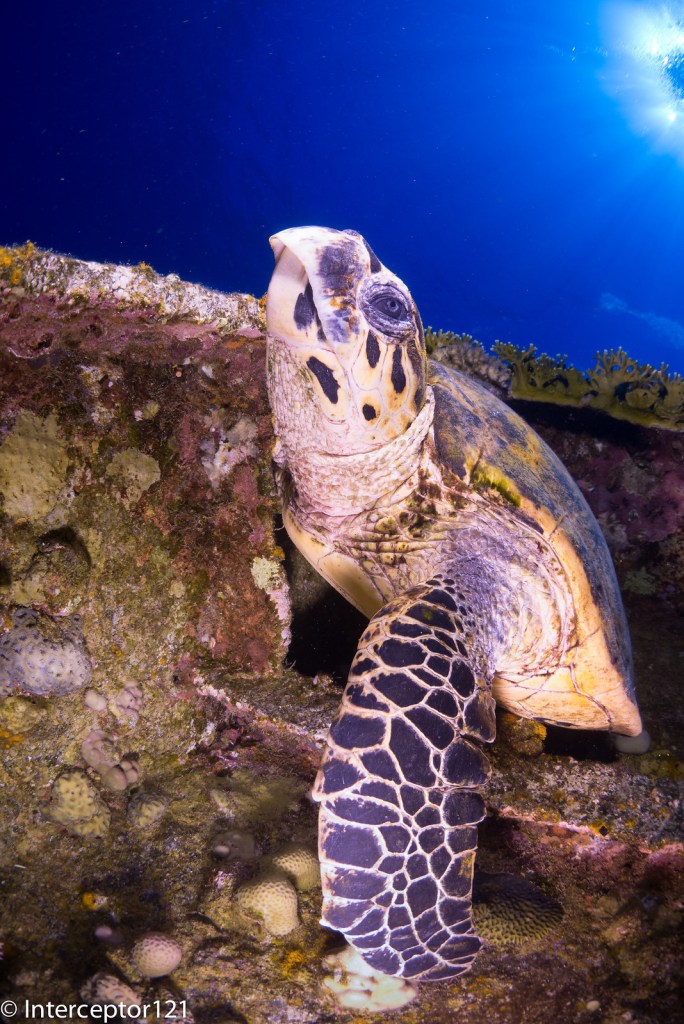
The issue is that the Ambient light filters are set for a certain depth and water conditions and does not work well outside that range. While the idea of white balancing the scene and getting colour to penetrate deep into the frame is great the implementation is hard.

Thinking about Keldan we have a 6 meters version and a 12 meters version as listed on their website. The 6 meters version works well between 4 and 12 meters and the other between 10 and 18. At the same time the Spectrum filter for the lens works down to max 15 meters and really performs better shallower than 12 meters.

With that in mind it follows that if you plan to use the spectrum filter -2 you are probably getting the 6 meters ambient filters. So what happens if you go deeper than 12 meters? The ambient light filter is not aligned to the water ambient light and the lights start to look warm this is not such a bad thing but can get bad at times.

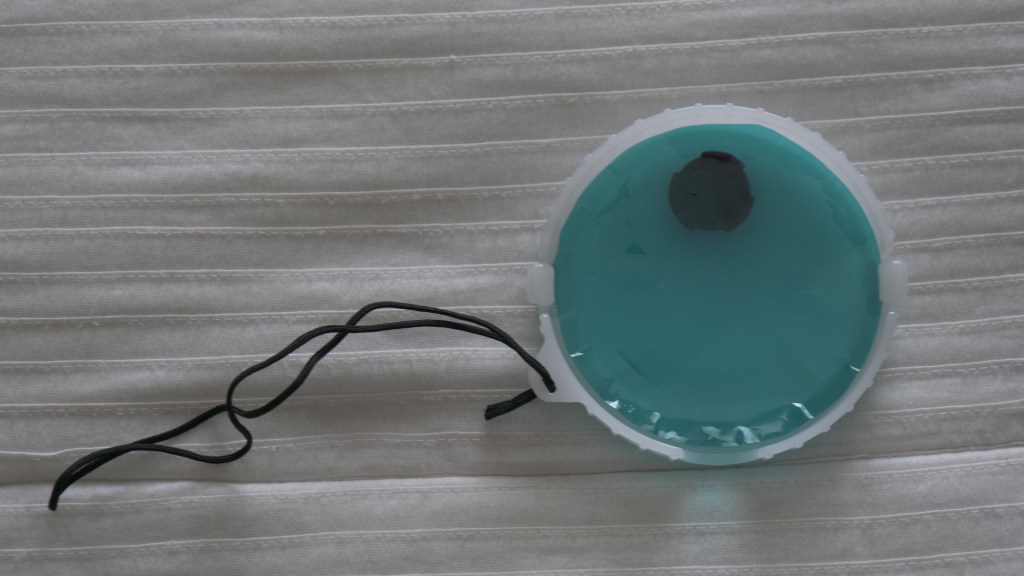
You can of course white balance the frame with the lights however this becomes somewhat inconvenient so I wanted to come out with a different technique. In a previous post I have described how to match a lens filter to a light/strobe filter. Instead of matching the light filter to the ambient light I match the filters on land between each other in daylight conditions to obtain a combination that is as much as possible neutral. I have done this for URPRO, Magic Filter and Keldan Spectrum filter and worked out the filter that when combines give a neutral tone.

Magic filter combined with 2 stops cyan filter giving almost no cast

This tone tends to emulate the depth where the filter has the best color rendition. So in case of Keldan this is around 4 meters and so is Magic with URPRO going deeper around 6-9 meters.

The idea is that you can use the filter without lights for landscape shots and when you put the lights into the mix you can almost shoot in auto white balance or set the white balance to the depth the two were matching. I wanted to try this theory in real life so I did 3 different days of diving testing the combination I had identified the results are in this video.

The theory of matching filters worked and the filter more or less performed all as expected. I did have some additional challenges that I had not foreseen.

Filter Performance

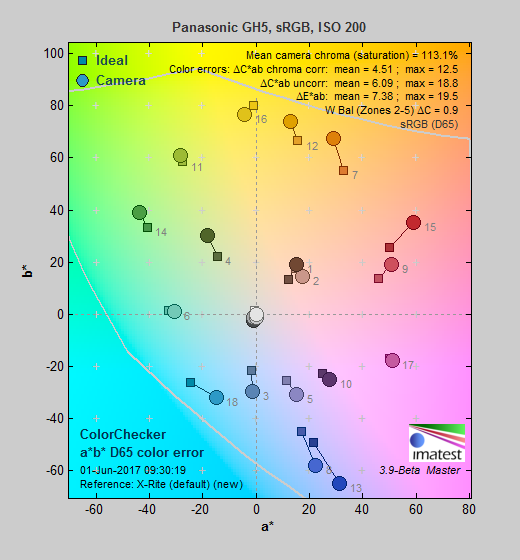
The specific performance of a filter is dependant on the camera color science. I have had great results with URPRO combined with Sony cameras but with Panasonic I always had an orange cast in the clips.

Even this time the same issue is confirmed with the URPRO producing this annoying cast that is hard if not impossible to remove also in post.

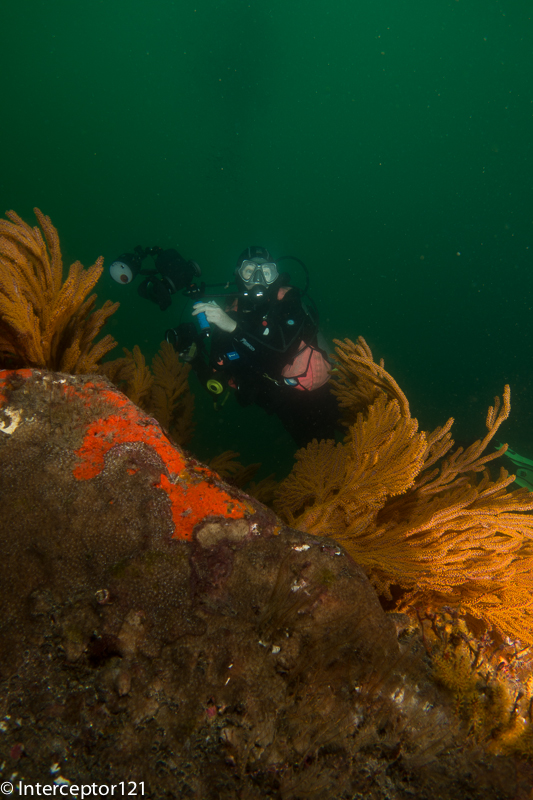
The Magic filter and the Spectrum filter performed very close, with magic giving a more saturated and baked in image with Keldan maintaining a higher tone accuracy. This is the result of the design of the filters: the Magic filter has been designed to take outstanding picture better than life, the Spectrum filter has been designed using tools to give accurate color rendition. What it means is that the magic images look good even in the LCD while Keldan are a bit dim but can be helped in post.

Looking at the clip in the first 3 and half minutes you can’t tell apart Magic and Spectrum down to 9 meters, with the URPRO giving consistent orange cast.

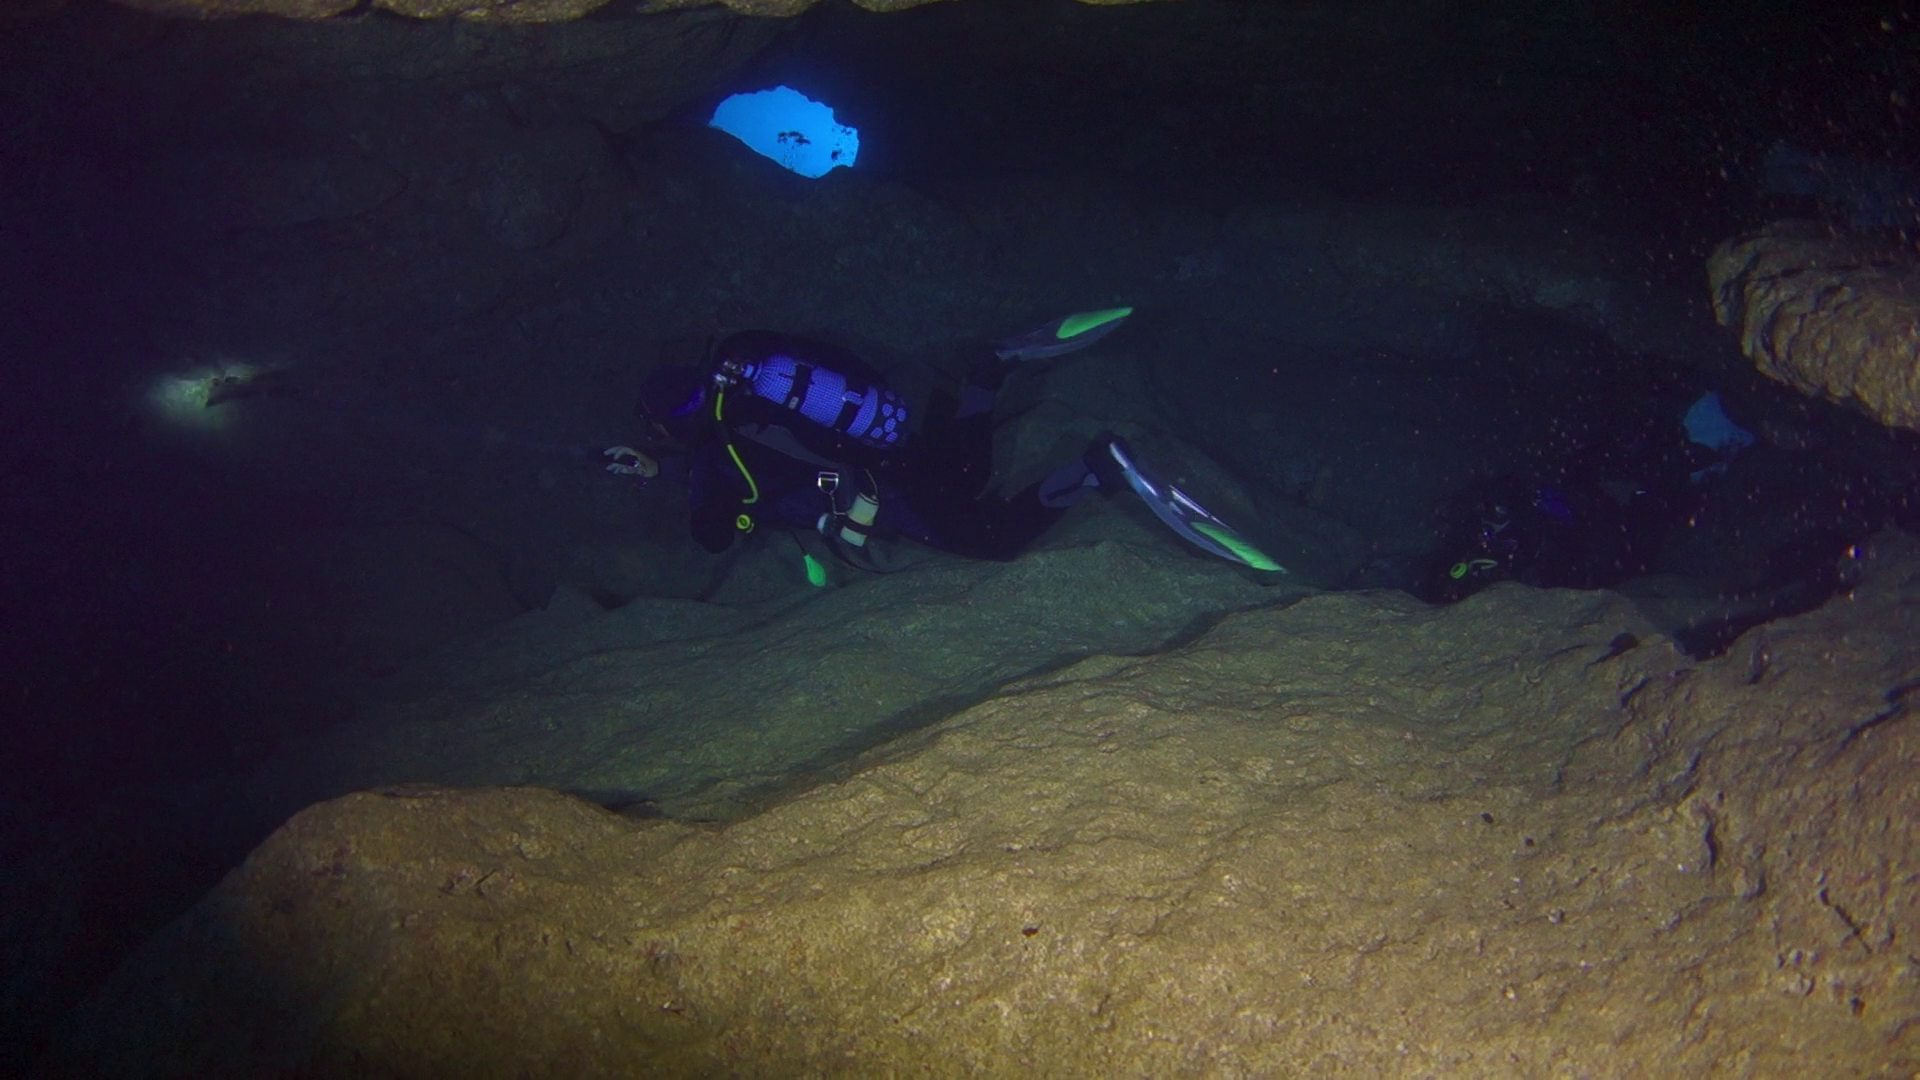
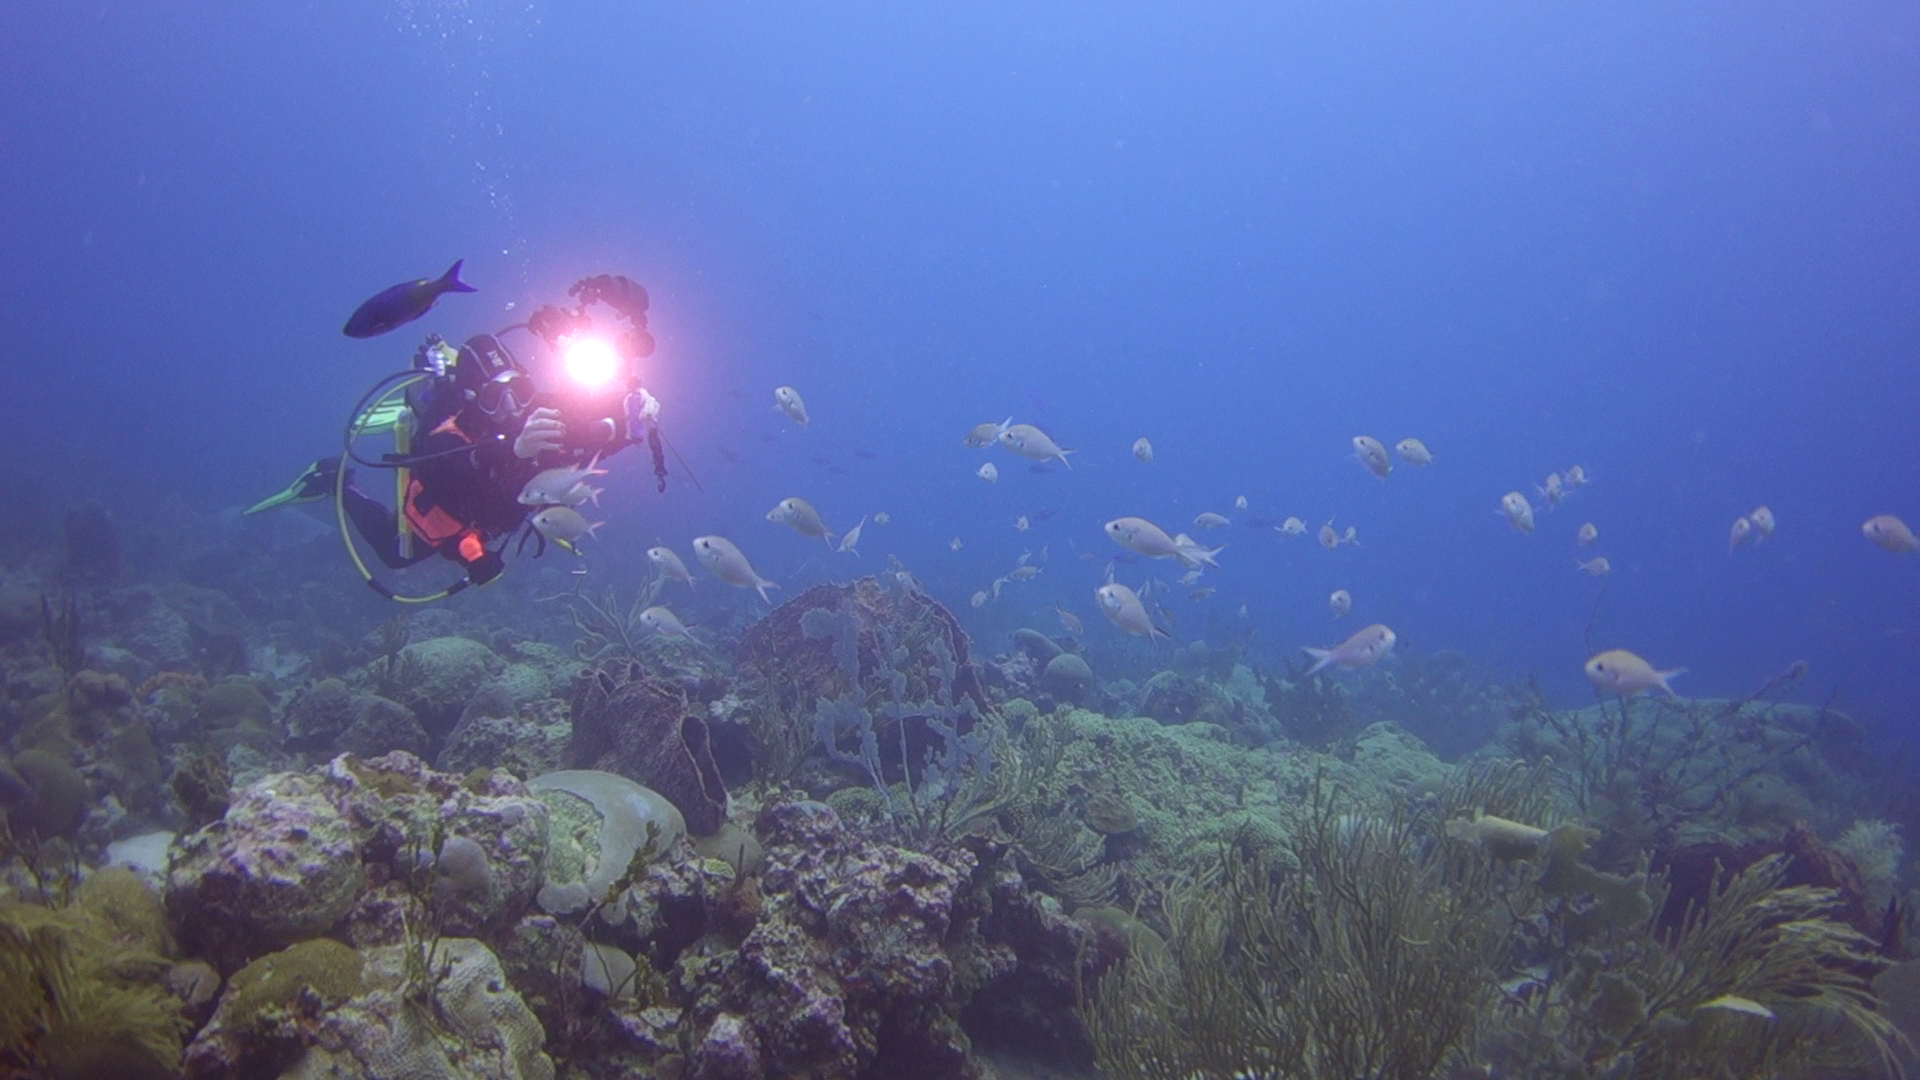
Going a bit deeper I realised you also need a scenario where you are swimming closer to a reef and want to bring some lights in the frame because you are outside the best working range of the filter. In order to avoid excessive gap when approaching the reef I had stored white balance readings at 6 9 12 15 meters so when I had a scene with mixed light instead of balancing for say 15 meters and then having an issue with the light I used the 9 meters setting so the image is dim when you are far and gets colorful as you approach which is somehow expected in underwater video.

The section at 15 meters are particularly interesting

You can see that URPRO gets better with depth but also how at 5:46 you see a fairly dim reef at 5:52 I switch on the lights and the difference is apparent.

At 6:20 the approach with Keldan was directly with the lights the footage still gives an idea of depth however the colours are there and the background water looks really blu as I had white balance set for 9 meters.

Key Takeaways

All filters produced acceptable results however I would not recommend URPRO for the Panasonic GH5 and settle for the Magic Filter or the Spectrum filter. Today the spectrum is the only wet filter for the Nauticam WWL-1 but I am waiting for some prototypes from Peter Rowlands for the magic. I would recommend both the magic and the spectrum and the choice really depends on preference. If you want a ready look with the least retouching the magic filter is definitely the way to go as it produces excellent ready to use clips that look good immediately in the LCD.

The Keldan Spectrum filter has a more desaturated look and requires more work in post but has the benefit of a more accurate image.

I think this experiment has proved to work and I will use this method again in the future. This method is also potentially available using the keldan or other ambient light using a tone that closely matches the lens filter.


Filter Poll

CREATIVE strobe filters for wide angle

When people think about creating lighting technique for underwater photography a few things come to mind and usually it is about tools. Snoots for example have become very popular and help the underwater photographer to increase separation of the subject from the background. I have seen some people jumping in the water with a black slate to create an artificial black background, clearly is much easier to do that for macro as everything is at end and typically the subjects are not fast moving or the diver is not fast moving.

Then of course there is strobe positioning, classic, inward, crossed, rabbit ears, backlighting etcetera here goes a long list of options.

At the end however some pictures just seem to “pop” more than others, and this usually has to do with the colours and the contrast and with the blue.

It is not a coincidence that the term Mustard Blue is what has made some shots from Alex Mustard re-known and if you read his underwater photography masterclass there is a whole section ‘The sea is blue’ where Dr. Mustard goes on about the importance of exposure and background blue.

His suggestions are to:

  1. Dial in an underexposure (for the water) around -2/3 to -1 1/3 Ev
  2. Using warm strobes

It is worth stressing out that the primary reason why the camera gets fooled by the conditions underwater is because colours gets absorbed and blue lights gets scattered instead creating that milky glare at times when the water has lots of suspended particles.

If shoot an auto mode with exposure compensation at zero your pictures will for most part come out washed out and lacking contrast underwater and this is one the primary reasons photographer like Dr Mustard do not follow the expose to the right rules.

Underexposure for the water is obtained by keeping the aperture and ISO constant as they are aligned to the strobes and changing the shutter speed accordingly. Obviously if you are shooting video your shutter speed is most likely fixed so you need to find alternative ways to get your blue as you want it but generally you would still underexpose probably not as much.

With regards to warm strobes this is a fairly subtle point linked to the camera auto white balance mechanism.

Most flash strobes have colour temperatures between 5500 and 6500 K and therefore are not at all particularly warm.

Inon Z240 Standard and Warm diffuser

Inon has developed warming diffusers for their Z240 range and I believe also for the most recent Z330 range. They are available in 4600K and 4900K temperature. I definitely recommend the 4600K version over the 4900K as it has a stronger effect.

So how does a warm strobe work in order to get a richer blue?

Table of light sources – Olympus education

When we shoot with strobes the camera is set to auto white balance, and will average for most the subject we hit with our strobes to calculate the average colour temperature and tint.

The camera auto white balance operates between 2500K and 7500K typically so a warm strobe is likely to set the colour to 4600K instead of the typical 5500K the ‘extra’ 900K do not really do anything to the subject that will anyway we white balance but give an extra kick to the blue background. Underwater colour temperature is usually higher than 9000K and easily reaches 14000K (purple tone in the water) at depth. So the warm strobes are particularly effective in shallower and clearer water as they push the blue to a darker tint like in this example taken around 12 meters.

f/8 1/125 ISO 125

You can see how deep is the blue other example taken on the Barge at less than 10 meters.

Portrait in deep blue…

So what happens if you don’t have a warm strobe or if there aren’t warm diffusers for the strobe you have, or maybe you don’t want to spend the money for them?

Amazon comes to the rescue

If your strobe is around 5250 with diffusers (like Sea and Sea YS-D2 or Inon S2000/Z240/D200) get a 1/8 CTO

Rosco Cinegel sun 1/8 CTO, 20×24″ Color Correction Lighting Filter

You can find this filter also under Lee on colour 231, with a little amount you can get a half sheet that is enough for a few strobes.

This filter has a negligible -0.3 Ev light loss and will bring your strobe down to around 4600K .

If you have a fairly cool strobe you need a 1/4 CTO

Rosco un 1/4 CTO 20X24 Amber – Rosco RS340911

If you have something different you can try a mired shift calculator here

http://www.leefilters.com/lighting/mired-shift-calculator.html

Be careful not to exceed with this technique or subject will turn too warm.

An alternative and perhaps counterintuitive approach is to use cooling filters.

In this case the strobe light will become colder to emulate the water colour and the camera will need to be set to custom white balance.

In almost all cameras except Olympus that reach 14000K colour temperatures are limited to 10000K however they can be further enhanced to reach 11000K if you have an adjustment panel like the Panasonic or Sony cameras. Pushing the adjustment to the A gives extra 1K. This technique with a bare lens has however a limitation as when the custom white balance caps the colours go completely off.

In order to see what can the colour temperature setting do we can compare a normal grey card shot with one where the colour temp is 11000K and magenta is pushed to the max.

Grey card bare lens
Maxed out Custom White balance on Panasonic GH5

In order to cool down the strobes you need a cyan filter, the custom white balance can correct up to 2 stops Cyan but no more. You can trim a sheet of Rosco 4360 to fit into your diffuser as below. This takes around 1 stop Ev off the strobe.

Sea and Sea diffuser with a Cyan 60 gel

It important to stress that the predominant colour in blue and blue water is cyan not blue and this is what gives the washed out scattering. We want to keep the deep blues and get rid of light blue and green which ultimately is cyan the colour of water.

So the strobe will emulate the water and the camera custom white balance will set the colour restoring what was lost and giving us a full correct spectrum. This however only works until the water colour temperature gets to 11000K and this is not as deep as you may think it could be a low as 9-10 meters. A cyan 60 filter is approximately 9500K. You can see the colour in the image below.

Cyan 2 Stop results in Colour Temperature around 9500K

In this technique the strobe is not used to give colour but to eliminate shadows the custom white balance is going to give a deep colour that penetrates the whole frame so any subject in the distance will be colourful as well.

The benefit of this technique is that you may use wider apertures and even slower shutter speeds like in this 1/60 example here.

batfish formation 1/60 f/5.6 ISO 200

You can clearly see the orange colours of the anthias far behind in the frame.

The ultimate stretch of this technique is to combine a filter like the magic filter this can be used with both a Cyan 2 stops and also a Cyan 3 stops in deeper water. This technique is taxing on exposure as your strobes are half power and your exposure has 1 2/3 stops less however this is easily recovered as you tend to shoot at slower shutter speeds of 1/30 to 1/60 instead of 1/125 to 1/200 because the filter will give you the deeper blues.

Magic filters on WB slate

The magic filter adds around 3000K to you camera custom white balance ability reaching the 14000K where the water starts turning purple blue. To that regards due to the amount of red I do not recommend going to deep with the magic and keep it to a max of 13 meters as recommended on their website.

The magic filter is almost a perfect match for the Cyan 60 filter if you overlap them over the lens you get almost a neutral grey card the temperature is only 150K off while the tint is around 5 notches toward green in Lightroom.

Magic Filter + Cyan 60 results in almost neutral grey card

This cave shot I believe gives an idea and is taken with filter on lens and strobes.

Magic filter plus Cyan 60

I have also tried the magic filter with Cyan 90 however there are some side effect to consider. Firstly you get Cyan cast on the image at shallower depths. Second the magic filter has a tendency to turn purple below a certain depth so I recommend to use the magic with the Cyan 60 as you are certain that the foreground subject and the strobe filter will give you a neutral colour. If you are in deeper water and the temperature is above 10000K this will only result in a deeper blue and a warmer light on the subject that once RAW corrected will look just fine.

Conclusion

In this post I have tried to give you some tips on how to use gels to give deeper blue or richer colours to your wide angle. I would recommend to start with warming diffusers and then move to cyan filters and finally to magic filter and cyan filter in combination.

I will be demonstrating extensively this techniques during my 2020 Red Sea Liveaboard

A final word for video shooters. I am not aware of any add on warming diffusers for video lights and generally I have not seen LED warmer than 5000K therefore unless you shoot at 60p 1/125 it will be very hard to get deep blue at shallow depths without a lens filter.

See my other post for video specific tips.

Full size images are available on my flickr pages all images here are reduced to 1600 pixels for storage purposes.

The importance of Underwater white balance with the Panasonic gh5

One of the key steps in order to get the best underwater colours in your video is to perform a custom white balance.

This is true on land and on water because auto white balance only works in a specified range of color temperatures.

Panasonic GH5 advanced user manual

For our GH5 the range where auto works goes is approximately 3200-7500K. When the camera is working outside this range you get a colour cast. Let’s see with some examples:

Grey card Auto White Balance 8mm
Grey card Custom White Balance 8mm

In the example above I am taking a picture of a white balance reference card under warm lights that have a colour temperature of 2700K.

As you can see the auto white balance fails resulting in a yellowish tinge, while the shots taken after the custom white balance is accurate.

In terms of white balance card I use the Whibal G7 Studio 3.5″x6″ (8.9×15.2 cm). I found this card to work well underwater and I use it with a lanyard attached to a clip that I hook on my BCD D rings.

More info on the whibal here

It is possible to buy a larger card such as the reference that is 7.5″x10″ however this is cumbersome and I found the Studio version to work well with the Panasonic GH5 as it only uses the central part of the frame for white balance.

Custom white balance with the 8mm fisheye

Going back to our GH5 instruction manual you can also see that the camera white balance is limited to 10,000K which is the colour of blue sky.

Underwater due to light absorption at longer wavelengths red and orange disappear at depth and blue tends to scatter over suspended particles. So the colour temperature of water tends to be higher than 10,000K and also the blue is somewhat washed out by scattering.

This is the reason filters are essential because reduce the amount of blue or to say better cyan and bring the camera into a range where custom white balance works again.

I have already posted a whole range of observations on filters in a previous post so am not repeating here.

With the right filter for the water colour I dive in and with the appropriate white balance card you can get some pretty decent results with custom white balance.

To help the colour accuracy I have experimented with the Leeming Luts and I want to thank Paul Leeming for answering my obscure questions. Obviously you do not have to use the LUTs and you can design them yourself however I found that using the Cinelike D LUT I have a very good starting point for colour correction.

The starting point is a CineLike D profile with saturation, noise reduction and sharpness set to -5 all other settings to default as suggested by Paul, there is no need to lower the contrast as CineLike D is already a flat curve.

*Noise and sharpness have actually nothing to do with grading but are set to -5 as the GH5 applies sharpening and noise reduction even at -5 setting. Sharpening has generally a negative effect all around while noise reduction if required is better performed in the editor.

Looking at imaging resource tests of the GH5 we can appreciate that the camera colours are oversaturated by default.

the GH5 has around 113% over saturated colours

The GH5 tends to push deep colour and wash out cyan and yellow. This becomes apparent when we look at a white balanced clip uncorrected.

White balanced clip in final cut pro you can see how the water column is washed out whilst red and other dark colours are accurate

The Leeming Lut helps rebalancing the camera distorted colours and when you apply the camera LUT, provided you have followed the exposure instructions and applied the profile as described, the improvement is immediate.

The previous clip now with the CineLike D Leeming LUT applied

From here onwards it is possible to perform a better grading and work to improve the footage further.

For the whole read please look at Leeming Lut website

One other thing that I believe it is interesting is that while generally for ambient light or balanced light shots I do not actually trust the camera exposure and go -1/3 to -2/3 for close up shots exposing to the right greatly helps highlights recovery

In the two frames you can see the difference the LUT brings restoring the correct balance to the head of the turtle.

Turte detail the highlights appear blown out
Turtle detail with Leeming Lut applied

To be clear the turtle detail has been white balanced in water on the whibal card while using a Keldan Spectrum filter -2, then in fcpx automatic balancing is applied. The LUT brings out a better dynamic range from the same frames.

Obviously you are free to avoid lens filters and LUTs and to some extent it is possible to get similar results however the quality I obtain using automatic settings I believe is quite impressive.

I found myself most times correcting my own wrong exposures or wanting to increase contrast in scene where I had little however this only happens in sever circumstances where white balance and filters are at the limits.

Conclusion

There are many paths to get the right colours for your GH5 underwater videos in my opinion there are four essential ingredients to make your life easier and give your footage a jump start:

  • Take a custom white balance using a professional grade white balance card
  • Set the right picture profile and exposure when shooting
  • (Recommended) Use appropriate filters for the water conditions
  • Apply the appropriate LUT to eliminate the errors in the GH5 colour rendering in post processing

With the following settings producing a video like this is very simple and all your efforts are in the actual cutting of the clip.

Short clip that applies this blog tips

Please note some of the scenes that look off are shot beyond the working conditions of filters and white balance at around 25 meters…

Getting the best colors in your underwater video with the panasonic gh5

There is no doubt that the Panasonic GH5 is a very capable camera and in given conditions the video performance you can get is truly impressive.

Broadly speaking a video clip needs to be:

  1. Sharp
  2. Colorful
  3. Contrasty
  4. Clean

Those 4 characteristics are tightly related to:

  1. Resolution
  2. Color depth
  3. Dynamic range
  4. Low Noise

Resolution

Today everyone shoots 4K and after all resolution is well supported by almost any camera, broadly is unaffected by other factors and unless the noise is really high sharpness of your frame is not going to be a real issue shooting at 4K.

Color depth

In normal conditions and not underwater a camera can resolve many colors. However underwater due to the diffraction of light and selective absorption of colours the starting point is very different from land. So generally is not the camera that cannot resolve the colors but the colors that are missing to start with. This post will focus specifically on this aspect. The Panasonic GH5 can resolve 23.8 bits in RAW and therefore technically has less than 8 bits color depth – do not confuse this with the 8 or 10 bit recording setting.

Dynamic Range

Underwater scenes tend to have limited dynamic range, with the exception of sunbursts or shooting against the light this is going to be an issue only in specific circumstances of very bright scenes with shadows. In all scenes taken with video lights dynamic range is not an issue at all. The GH5 has 13 stops of dynamic range but rarely this is an important consideration.

Noise

Noise is an important consideration as when the noise goes up the camera looses the other characteristics, color, dynamic range and resolution will be affected when the camera is outside the sweet spot. Broadly speaking the Panasonic GH5 does not do well once you pass the ISO 1600 setting and I tend to cap the ISO in video at 800 in most cases.

Diving Conditions

To understand how those variables play we can see how the same set up reacts very differently in scene where there is less light and therefore the camera uses high ISO like this one.

The same camera with exactly the same equipment in brighter water produces this

So the reason for the above is that with less light there are less colours and the clip looks what it is really.

OK moving on to the main subject of this post how do I get the colors right? It is a combination of techniques and the trick is to use the right one in the right conditions.

Generally every site has specific conditions that change depending on weather, time of the day, visibility and other factors. So in broad terms a site will have more or less light and therefore more or less colours. It is therefore impossible to categorically define what to do at a given depth but is more about typical values. With this in mind we have typically 3 scenarios:

  1. Ambient light shots
  2. Artificial light shots
  3. Balanced light shots

Close up Shots

In general close up shots especially of small subject fall within the scenario 2 for which a video light with high color rendering is important as this will define the colours you see. With a lot of power it is possible to extend artificial lighting to larger subjects but eventually you run out of power due to distance or size of the subject.

Wide angle shots and seascapes

True wide angle shots are generally ambient light shots which also means when it gets too dark the colors will be missing and it will look blue not matter the equipment.

In order to make the most of ambient light shots for wide angle it is essential to balance the colours in water even when you use a RAW format on a still image because RAW files are not as RAW as you think and are actually compressed.

Custom White Balance

Using Custom White balance with a grey card it is possible to obtain decent results until the camera hits the maximum color temperature in the case of the Panasonic GH5 this is 9900K. Depending on conditions you may get to 10-12 meters and this still works, in darker water this stops working much sooner.

Chrisoula K Bow
Chrisoula K Ambient Light 5 meters

Color Filters

Color filters push the limit of custom white balance further down. Some add more or less 4 meters others up to 6-8 meters at the expense of an overall loss of light. Filters are useful when there is a lot of light because also help to keep the Panasonic Gh5 in the best aperture range (not smaller than f/11)

Filter in action at 10 meters

Right now there are predominantly 3 filters on the market:

  1. UR PRO
  2. Magic filter
  3. Keldan Spectrum

All those filters will improve the performance and color rendering of your footage, under the conditions that the loss of light is not pushing the camera above reasonable ISO values.

In terms of depth range the magic filter and the Keldan Spectrum -2 version can be pushed to 15 meters depth on a bright day in clear water. The URPRO is capable of getting a few meters more down to around 17-18 meters although it does generate an orange cast (as there is no red left) it is still workable.

FilterLight LossTypical Max Depth
Magic Filter1 2/3 Ev15 meters
Keldan Spectrum -22 stop (WWL)15 meters
URPRO 1 2/3 Ev18 meters

This image gives an idea of the 3 filters as you can see they are very different one from the other.

Keldan top URPRO bottom Magic filter

Balanced Wide Angle Shots

This is an entirely new technique that has started with the Keldan Ambient light filters. I wrote a whole piece on wetpixel

The principle is to use custom white balance with or without filter to obtain color rendering and then put filters on the video light so that the color of the light emulates the ambient light and therefore it only gives texture not color.

Keldan has developed a whole range of filters for various situation that match their light and therefore are not applicable to any other light.

As I do not own a set of Keldan I have done some tests and found that a gel of Cyan filter 2 or 3 stops makes my divepro G18+ practically ambient light in the conditions I dive into.

FilterCyan Strength
Magic Filter2 stops
Keldan Spectrum2 stops
URPRO3 stops

The above value are based on my experience use at your own risk especially with different lights.

Square Cyan 2 stops Round Cyan 3 stops

To give an idea I overlapped the filter to my iPhone lens

This is the shot without any filters

Original Shot

URPRO and Cyan 3 stops (darker)
Magic filter and cyan 2 stops accurate
Keldan and cyan 2 stops accurate

This example shows that the two filters cancel themselves the result is almost daylight with no cast which means in water if you use a video light or a strobe you will not see a red or orange spots on the image.

For those taking pictures the same combination remains true with Inon Z240 and Sea and Sea YS-D2

Example picture here

five in a row
My own filter and Cyan 3 stop note that the light is coming from the other side

One thing to take into account is that you need to find a way to hold the gel on the video light or the strobes. The flat surface strobe diffusers make this process easy, finding something you can use with your video lights is not easy and also the gels may melt after continuous use.

Artificial lights

It comes a point and a depth where filters stop working, this could be as shallow as 8 meters in green water. As the scene is dark using lights is what is required. There is nothing specific about this technique except making sure you don’t get burned highlights or backscatter. As it happens in photography using long arms (maybe not as long as for stills) is key to get good lighting on your subject.

My Camera Settings

I use CineLike D with saturation, sharpness and noise reduction to -5. I shoot at 24/25p AVCI 400 mbps and follow the 180 rules, it is entirely possible to shoot at 1/100 if you like more crisp look.

Clearly there are people out there that do not like filters and think white balance is best etc but I think a good read on magic filters explains it all.

http://www.magic-filters.com/need.html

Panasonic GX7 First Test

So time has come for my first video with a micro four third camera the Panasonic GX7. I had only 3 dives in Sharm and conditions on Naama Bay beach were not the best but still good enough to give the set up a good try, this is the resulting video.

I used the Nauticam housing with the Macro 35 port and the M67-LD adapter so that I could use the Inon UWL-H100 wet lens.

As it is not possible to fix the position of the lens I had to take the hood off and therefore I used an Ikelite UR/PRO filter for the 100mm lens. I had to use gaffer tape on the lens and inside the filter or it would be loose but it worked.

The first dive was with the URPRO filter in auto white balance, I was hoping this would give me good results but instead everything came with a strong yellow cast.

From the second dive I used custom white balance and the results were much much better.

To give an idea of the issue this is a shot of a grey card with the UR/PRO filter on land with white balance fixed.

URPRO test card
URPRO test card

You can see what kind of effect the filter bear it is orange in colour.

Other than this I was pretty happy with the GX7 especially because I could use the full zoom with the wide angle lens this is the first time I see it working. The moray eel shot towards the end of the video is an example.

Back home I was not happy at all about the UR/PRO and the inability to work with auto white balance. Probably I could have played with the tint but it did not come to mind. So I got in touch with Peter Rowlands of Magic Filters to see if they had an option that would fit on the Ikelite mount. Peter sent me two sample and they fit perfectly in the ikelite frame, though this is not commercially available I guess you can request those if you are not happy with the ikelite UR/PRO.

This is the same test card with the magic auto filter.

DSC04030

You can see that it looks less orange and also slightly colder.

I did some tests and the UR/PRO is a warmer filter with 2700K temperature whilst the magic auto is 3200K. The magic is however more red and has more magenta tint than the UR/PRO.

For me this means that the magic will work better in auto and will require less custom white balance. However those 500K difference mean you will eventually need to custom white balance once you go below 18-21 meters. I know people say filter work until 21 meters anyway but I have tried with deeproof down to 30 and on a bright day it was still good.

So if you are not happy with the yellow cast of your UR/PRO in auto white balance is definitely worth giving magic filters a go.

The GX7 confirmed all the good features including the ex tele mode

Here the shrimps are shot with a single Inon UCL-165 and then the close up of the head uses ex tele that pushes well over super macro.

Look at the incredible ability to refocus in video mode. See how focus locks on the shrimps when I press the button.

Overall the GX7 can do pretty much everything on a single dive with a wet wide angle lens and a close up lens. You can cover from 100 degrees wide to super macro. The fact you can zoom with the wide angle removes the need to take the lens off at every occasion and in fact in the red sea you barely need to have any other lens.

I was not particularly happy with the lack of hood that the ikelite filter wants removed so I experienced the occasional flare. Still pretty good result.

The clip looks much better at home than it does on youtube where the gap with the RX100 seems much smaller.

So as far as video is concerned if you don’t need 4K the GX7 gives you extremely high quality footage and reasonable cost.

A final note I shot this video in 24p at home I can’t tell the difference with 25p see if you can see it!

Video Feature Sony RX100 Mark II in Malta

Following from my previous post I managed to get together a clip out of the 5 dives I did

The first day was somewhat plagued by visibility a bit lower than the norm for the location but the second day was fabulous

For this trip I brought with me the Inon UWL-H100 and the red push on filter from deep roof H20 and the Inon UCL-330 as I was expecting medium size fish and nothing really small

Here is the outcome

I am quite happy how things turned out so let me share the settings with you

First I shot most of the footage in 25p AVCHD mode only some small sections are shot at 50p and actually I did not need to slow down any of the material.

For the wide shots I used steady shot in normal mode and shutter priority at 1/50th. With the filter on I had auto white balance with tint correction G2 A1. I noticed that the camera was giving red tint in some situation and so added a bit of green back. The Amber correction instead is for the RX100 itself the camera does not have vibrant yellow and is a bit blue.

Tunas
Tunas – AWB with filter

For the first time I use creative mode changing the standard contrast to -3 in order to prevent crushing of blacks.

Exposure was set all along to -1/3 and metering to multi area with AUTO ISO limited 160-800.

I think the results are so good that in fact I have performed no colour correction to any shots in ambient light.

Opening the tuna farm
Opening the tuna farm – AWB with filter

For shots with lights I set up first colour temperature to 6500K and A1 to match the lights but then in some of the far shots this resulted a bit cold so I adjusted very slightly in post the temperature.

Seahorse
Seahorse – AWB UCL330

Only 40″ are adjusted in the whole video in essence is as shot and the editing took me half hour.

In cave
In cave –  AWB no filter

I did a bit of analysis and the camera was operating for most at ISO200 with aperture around f/3.5 – f/4.0 which is really the sweet spot of the lens.

I did have some challenges using the UCL330 for some nudibranches  that really required a stronger lens so they look a bit small, there was also surge so I had to fight with focus problems but all in all very happy.

Nudibranch
Nudibranch – AWB UCL330

The longer working distance of the UCL330 (20-30 cm or 8″ to 1′) proved challenging on walls as you are too far to hang on to anything or use a stick. I will bear this in mind in the future.

For the close up shots I used steady shot active.

I also wanted to say that a few times the camera did manage to white balance properly however the results were not exciting and frankly not worth the hassle. Using the filter is just so much better with the auto white balance.

Sony RX100 White Balance Woes

In one of my first posts on this blog I covered the subject of setting white balance with the Sony RX100.

It may be useful to have a quick recap on the topic:

  • For pictures setting a custom white balance is not useful if you shoot in RAW as the amount of correction in post processing is far superior*
  • For video (that is shot in compressed format) setting the appropriate white balance for your shots is essential

There are exceptions to this rule, some people like to set custom white balance even in RAW when they shoot ambient light pictures. This is because changing the white balance shifts the histogram and therefore if you had taken a shot with an incorrect white balance you may retrieve wrong information from the histogram. Personally I do not do this most of the ambient light shots I judge by eye and not histogram or are silhouettes anyway but may be useful to know.

The other exception is when you shoot a raw video format with bit rates in excess of 100 Mbps, in that case the footage is captured in a bland format lacking any real depth and contrast and things are corrected in post processing. This does not apply to any consumer camera that works in AVCHD or Mp4 with bit rate lower than 50 Mbps in any case.

It follows that setting the appropriate white balance for our videos is something that is important otherwise our clips will look dull, green or have some sort of color cast we do not like.

As many of you RX100 I have experience with the infamous Custom White Balance 9900K error. In theory if you set your custom white balance with the camera in P mode over a neutral target this error should only occur if the color temperature is out of range (>9900K) unfortunately this is not the case and you get this error pretty much always with our beloved camera. At the beginning I thought that this was due to my cheap PADI slate, but after various attempts against my hand, sand, buddy’s tank, the sun I have to think there is some genuine issue here.

So I got myself whibal card, that on my test on land performs amazingly well with both the RX100 and the Nikon D7100.

The first thing we can realize is that the auto white balance setting is rather cool in outdoor scenes, whilst it tends to be warmer in indoor scenes with artificial light.

Auto White Balance
Auto White Balance

When you take a custom white balance the colors appear warmer and the bluish cast departs and the yellows come back.

DSC01608

This is particularly bad news if you shoot underwater without a filter and think of using auto white balance as those results will be pretty ugly.

The whibal card has a specific black mark that if illuminated tells you the white balance reading is incorrect because of reflections. I thought this was the key to the 9900 Error, unfortunately I was wrong.

It just fails 100% reliably really painful so I could not get rid of my trusted red filter for the Galapagos trip. I even tried setting the white balance with the filter and it would fail as well.

So I went back to auto white balance and red filter and I am pretty happy with the results, many people have asked me if I have manipulated the footage in post processing as the colors look very deep and some have even said unnatural. Even so shooting at 1/50 means a relatively low ISO and in the specific trip another f/stop of aperture was not really significant but I would have like to have the option of working without the filter, sadly this was not an option.

For what concerns white balance just a few things I want to say:

1. At depth there is no color anyway so what your eye can see it is not what it is, the proof is when you use lights or strobes things look much better than the naked eye. Using your visual as a reference can produce dull results.

2. You have to set an appropriate white balance for your scene, this means removing the cast. If a scene has no cast and the colors look saturated this is not a white balance issue on its own but may due to the camera settings. The RX100II is one of the less saturated camera on the market. The mark I instead is pretty saturated take this into account.

3. Footage that looks dull IS in fact ugly. The fact you set custom white balance with or without a filter does not mean that results is the perfect result, there is no such thing in fact and as colors disappear at depth white balance is not that effective anyway

Nick Hope sometime ago published some interesting tests on wetpixel

http://wetpixel.com/forums/index.php?showtopic=16970&page=8#entry122288

It turns out that there is more than meets the eye.

Just to clarify the only color correction in my Galapagos clip is:

1. In the scene of the dolphins I was pointing the camera upwards and did not have time to take the filter off so ended up with a red cast, I performed a white balance adjustment in iMovie on the opposite value of the tint I was getting until I liked it.

2. In the scene where there is a group of Galapagos sharks and the close up of the eagle ray I have reduced the blue gain as it was over saturated

In all other cases the only changes were increase of contrast or reduction of brightness. When the water was green like at the end in the Punta Vicente Roca scene I did not touch it to make it look artificially blue.

Again for those who ask I use a deeproof push on filter for the Inon UWL-H100 this filter is my preferred for the only reason that is actually the only one available on the market that fits on the lens. Personally I would much prefer a plastic filter like the ikelite/URPRO but this one is glass. It seems to correspond to a deep sunset 2700K with magenta tint of +5 on the RX100 but I have no tools to measure it I can only say it works.

So my recommendation for the RX100 is to get this solution as the Inon lens has the best optical quality and a hood that comes very handy to reduce flare. There are other lenses that fit the RX100 but have no hood. Obviously an not even considering the fisheye style lenses as distortion is ugly and placing a filter under the lens is a very bad idea.

Galapagos: Sony RX100 Mark II Video

The time finally came for our trip to Galapagos and I was ready with a set of think rubber suits to overcome the cold water. I just bought a 5mm Oneill Sector (wonderful suit) a 3mm hooded vest, kevlar gloves and a 5mm 4th Element short john. Well the short john was not used and for most I used just the wetsuit and a set of O’Neill Thermo X unders (very recommended) as El Nino is coming and the water was warmer at 25-27C or 77-80F.

This means lack of schooling hammerhead at shallow depth close to the reef, they were in the blue. We had however our good dose of schooling barracuda, tuna (in the 1000s) and even galapagos sharks

This is the video I produced

If you have problems with playing in your country use vimeo instead

The conditions were difficult with low visibility and in some sites very green water as you can see here

Green waterQuestions will come about what I used etc etc so here is the list

  • Sony RX100II in Nauticam housing
  • FIx adapter for Inon LD mount
  • Inon UWL-H100
  • Deeproof blue water filter
  • Sola video lights 1200 (just few shots of the barracudas and some close ups)
  • Combination of arms and sometimes no arms
  • Ultralight tray TR-DM with extension and handles

The video has been produced with iMovie 9.0.4 no stabilization performed except the scene with the moray eels mating (very mild)

I shot the whole trip in shutter priority 1/50th of a second in the 25 fps 24 Mbps format. After some tests at home I have decided to use this mode as I can’t physically play the 50 fps files the camera produces on any of my devices differently. The 25 fps gives a film look and very smooth footage. This format is only available on the RX100II and not on the original RX100 so the consideration I made at the time for video settings of the RX100 remain valid.

The benefit of 1/50th shutter speed is a full f/stop of light the disbenefit is that at the surface and for backlit shots this is too slow, in those cases I go back to program mode or increase shutter speed to 1/100 or 1/200 or more.

For what concerns the editing I import the raw files in iMovie without using the conversion and then export with x264 using very slow preset and level 4.0 compatibility to use it with my appleTv.

I do minimal color correction in some cases I had to eliminate the red color cast of the filter when shooting upwards, to do that I change the white balance to top yellow until i remove the cast.

In some cases I had to put the green gain to the max for the same problem but in all other cases there is NO color correction in post.

When you work with AVCHD cameras the footage is compressed and the key is to get it right in camera.

As Galapagos conditions were challenging, although less than I expected, I used gloves in some dives to hang on to the barnacles and I also modified the set up to completely eliminate the lights.

I would dive with two 3″ segments and two 6″ Inon Mega float arms when I had the lights on and for other shots in ambient light I would have this set up here that looks odd but it is very effective and almost neutral at only 120 grams in water. The position of the floats means the camera stays upright at all times.

Compact tray for ambient light

I would put a single Sola light on top of the housing not for video purpose but to signal the dive master when I was a bit far in the murky or dark waters. I used this set up on almost all blue water dives (Darwin and Wolf) and the normal set up with lights for the South and West sites with murky or green water.
There will be a separate post on the photos, I did a total of 18 dives with the camera of which 4 where photo and 14 video. You can see an example in the featured image.

I have now ran some statistics on the final clip that I produced

I used a total of 41 video clips:

ISO average was 273 with the following breakdown

  • 2 clips at 160
  • 30 clips at 200
  • 6 clips at 400
  • 3 clips at 800

f/stop average was 3.1 hyperfocal distance on average 1.16 meters. So if I were able to shoot without filter I would have not gained anything in terms of sharpness as most subjects were further away

I would consider the Galapagos and the dive trip I did not the best in terms of brightness and visibility so I would conclude that the RX100II with the Inon UWL-H100 and a red filter is the best set up for wide angle video in terms of performance, ease of use and flexibility.


Barbados: First Sony RX100 Mark II Feature

So after a few months since I got the Nauticam housing I finally had the time to get in the water and try it on.

I was in Barbados for a week and although the diving was not exactly outstanding I did have enough to test the camera behavior.
The link to the videos are here for YouTube at 1080p

or if you prefer Vimeo at 720p

The footage was all taken at 1080p50 the highest mode of the RX100. The RX1oo can work in both PAL and NTSC standard but I chose the PAL mode just to avoid the annoying NTSC message at startup. The clip has been edited with iMovie 9.0.9 and then exported in 1080p25 using Xencoder codec for quicktime in high profile. Youtube then reconverts it to its own specifications, but at least I have the highest possible starting point.

As mentioned the RX100 shoots at shutter speed of 1/100 in 50p mode and this suited me fine in case I wanted to produce a 60p clip for viewing on the computer as currently no online system supports it.

As discussed in the previous post I shot all wide angle in camera Program mode. This allowed me to use the left control wheel button to call the white balance set menu that in video is not available. I set the picture format to 16:9 so that would show similar on the screen. I did notice that when I actually started the movie recording the crop of the active steadyshot kicked in with a reduction of field of view of around 9 degrees or a 1.14 zoom equivalent.

However the active steady shot was well worth it as I have not used any stabilization for any part of this clip and therefore not introduced any extra cropping.

The wide angle shots with the RX100 are an absolute breeze when you use a filter and there is no need for custom white balance until it gets too deep to actually use a filter. I struggled getting decent results with custom white balance, the 9900 K error came pretty much every time except when in shallow water and balancing on sand. Also the results were off with too much magenta tint to the point I had always to correct it.

Ultimately I kept the filter and the camera in Auto White balance and did not bother doing a custom reading at all. The results were excellent.

SS Stavronikita
SS Stavronikita AWB

In deeper water the filter started making the image a bit dark so I took it off and used a temperature setting of 9900K with Magenta and Amber at the maximum.

For close up at distances over 20cm I still shot in program and had good results. When getting super close or macro I used Movie mode in Aperture priority mode with aperture set at f/11. Towards the end of the clip you can see a shot of a small pink frogfish that is done like that. The close up on the eye is shot with two stacked Inon UCL165 the depth of field is really small as you can see but still workable considering I hand held the camera at all time.

Pink Frogfish f/11
Pink Frogfish f/11

When I shot this arrow crab I had left the camera in program mode so it chose an aperture of f/5.6 you can see that whilst the mouth is in focus the arrow is not

Arrow Crab
Arrow Crab f/5.6

Similar situation with the pedersen shrimp where not everything is sharp in focus

Pedersen Shrimp
Pedersen Shrimp f/5.6

Obviously I am being very exigent with my footage and in normal condition this is already good to very good.

So what I liked and what I did not like about the RX100 Mark II:

I liked:

  • The ergonomics and ease of use are outstanding
  • The camera performs incredibly well with a filter in auto white balance
  • The manual focus with peaking works extremely well
  • Dynamic range and colors are outstanding and not just for a compact
  • Image crisp even in the corners at f/1.8 compared to the Mark I this is extremely significant
  • The active stabilizer was great and meant to manipulation in post
  • Battery life is incredible
  • Performance in low light is excellent and better than the Mark I the camera never reached the ISO MAX of 800 I had set hitting a top of 640 at 30 meters
  • Autofocus at wide end in bright conditions is superb

The only think I hated was the custom white balance results an absolute disgrace, to the point that there is no benefit doing it. Not only that the few parts of the clip I had used it and correct it were still a bit off and required correction in post to a small extent.

Also to consider some of the topside capabilities of the RX100 Mark II just to give an idea though this is not exactly the same location have a look as this shot with a Nikon D7100 with sigma 17-70 in comparison with the RX100 Mark II

Nikon D7100 Beach Landscape

RX100 Beach Landscape

There is a difference but considering the size of the RX100 and the fact it fits in a pocket I don’t think there can be that many complains. Obviously once you look at specific lenses for the DSLR things change but in the 28-100mm all purpose range I would say that the gap is not as much as double as the price of the two set ups.

So is the Sony RX100 the best compact underwater video set up? Definitely

Is the Mark II better than the original RX100? Yes and well worth an upgrade for video

How does it compare with the Panasonic LX7? The dynamic range and the colors are superior and produces footage that is simply better and sharper. Where the LX7 excels is at macro in clear waters, this is not because of magnification as the RX100 and LX7 perform exactly the same with diopters, and this is because of the LX7 amazing autofocus. However with a bit of silt or other objects in range there is need to switch to manual focus and there the RX100 is actually superior when using peaking even if the depth of field is actually less, the manual focus on the LX7 with the magnifier is not as good unfortunately.

So my ranking for video is:

1. Sony RX100 Mark II

2. Panasonic LX7

3. Sony RX100

I would also add that for stills the LX7 is even more rewarding at macro range due to the performance of autofocus.

Any questions please drop a comment

Underwater Video Tips: Best video settings for Sony RX100

It is not a mystery that the RX100 is capable of shooting excellent video. In fact in some comparisons with SLRs cameras there is little to no difference in the footage quality. The RX100 has many settings and options so which ones are important for underwater video? I will go and explain those that I find useful.

RX100 Video Behavior

Although the RX100 offers full manual control in video this option is not as useful as it seems. Now that many video editors support AVCHD progressive the 50p or 60p options are the more relevant as the footage can be slowed down to half speed and still offer a standard frame rate (50/60p at half speed is 25/30p).

The RX100 shoots video in program mode with shutter speeds of double the frame rate so 1/100 for PAL and 1/125 for NTSC that is excellent news. The camera will then drop to 1/50 or 1/60 when the max ISO is reached which is still acceptable. In Movie Program mode the camera shoots at the lowest possible ISO for the set shutter speed at the widest required aperture. The RX100 has a minimum ISO in video of 125 and the RX100 has it at 160, which is quite high.

Shooting Wide angle

I shoot all my wide-angle footage with the camera in Program Mode. By that I actually mean Photo Program Mode. Pressing the movie button in P mode results in the same behavior that shooting video in P mode. In order to be able to frame correctly I set the image format to 16:9 also for stills. This is also useful to capture ambient light landscapes. I started shooting in P because this allowed me to white balance quickly however I found out that the custom white balance on the RX100 Mark II is a total disaster and in fact I never use it as it gives weird results. I shoot with a red filter with Auto white balance on until approximately 25/27 meters and then I move to White Balance set to K (colour temperature) 9900K Tint set to M7+Y7. When shooting with lights I also use auto white balance. Generally speaking I only use the movie button and the white balance settings for wide angle.

Deep Wreck in Program Mode

Shooting Macro

When shooting with diopter at tiny subjects focus with the RX100 is a challenge. I set my video mode to Aperture priority with an aperture of f/11 and Auto ISO, the camera will always keep a shutter speed of double the frame rate which is ideal. If you light the subject properly the RX100 will always shoot at the lowest ISO maybe at 200 but not more. I use auto white balance for all my macro. I find it convenient to leave the video mode like this so that I only have P for wide angle and Movie – Aperture priority for video. If you prefer you can set those as memory recall 1 and 2 but I find that not as useful except you don’t need to use the control dial.

Frogfish at f/11
Frogfish at f/11

Settings for the Function Buttons

Many features that can be assigned to the function button are not available in video or not useful. I only have 4 settings in the function wheel:

  1. ISO
  2. Metering Mode – Always on evaluative
  3. DRO – I set it to auto
  4. Focus Mode – in video only constant and manual are available

To be perfectly honest I rarely change any of those except for testing the camera exposure. Even the metering mode can be left to evaluative all the time as when you shoot macro the area is so small and evenly illuminated that I have never had an issue with exposure.

Settings for the Control Wheel

I use the following assignments and I find them very useful:

  • Left: White balance
  • Centre: Manual Focus Toggle
  • Right: Exposure Lock

The bottom arrow is always assigned to exposure compensation and can’t be changed I set it to -0.3 eV all the time.

White Balance

The performance of custom white balance with the RX100 Mark II is shocking worse than the original RX100, 9 out of 10 I get a white balance error and the results are usually off with too much magenta. The only occasions where I do not get an error is in 6 meters or water (20 feet) on a sandy bottom. In other conditions it does not matter if you try with sand, tanks, hand, slates the outcome is shocking. The results can be used changing the tint to an M2 or even zero but generally using a filter and auto is just much easier and better. I assign the K setting to 9900K M7 for shooting at depth, This is painful because it means that unless you have a flat lens like an Epoque or Inon you can basically forget shooting video with the RX100 as the custom white balance is erratic at least.

The Inon UWL-H100 has only one red filter that is compatible and is made by deeproof. I find this filter excellent though I prefer plastic to glass I have to say it works a treat.

Results with White Balance Error 9900
Results with White Balance Error 9900 Note the Magenta tinge

Similar scene with auto white balance and red filter

Focus

The RX100 focus automatically on the center when shooting video and does it very well,. Tracking focus is not as useful and by assigning the center button to manual focus it can be eliminated. When shooting macro it is essential to use peaking. I set it to low with white color. Generally with diopters there is only one focus distance so I move the camera until the peaking shows nice white and then press record trying to be steady. That’s pretty much it.

DRO

I keep the dynamic range optimizer to Auto. This means the ISO is most of the times set automatically to 200 to preserve dynamic range. When the scene is perfectly lit the ISO is chosen to be 160. I don’t see much difference between ISO 160 and 200 but if this bothers you set the DRO to off which means the camera will mostly shoot at ISO 160 in good light conditions.

ISO and Max ISO

I set the ISO Max to 800, having analysed a lot of my footage I have not found one example where the camera shot at ISO800 yet unless I had a filter and was at 30 meters. However I prefer the camera to drop the shutter speed and keep the ISO to 800 instead of going all the way down to 3200.

Zoom

In video the RX100 activates digital zoom even when you set it to off. This deteriorates the image so you need to pay attention that the middle notch corresponding to 3.6x is not exceeded or you will see artifacts in your footage.

Stabilizer

I use active steady shot thought this reduces the field of view as it does help with shake quite a lot with macro footage.

Other Settings to disable

There are a number of settings that are harmful in video either because they use battery or because they are counter productive I disable them all list includes:

  • Smile / Face Detection
  • Picture effects
  • Audio recording ( I do not like bubble sound)
  • Wind Noise Reduction

The following are only relevant for still but I like them off regardless.

  • AF illuminator
  • Red eye reduction
  • MF Assist