
One of the key steps in order to get the best underwater colours in your video is to perform a custom white balance.
This is true on land and on water because auto white balance only works in a specified range of color temperatures.

For our GH5 the range where auto works goes is approximately 3200-7500K. When the camera is working outside this range you get a colour cast. Let’s see with some examples:


In the example above I am taking a picture of a white balance reference card under warm lights that have a colour temperature of 2700K.
As you can see the auto white balance fails resulting in a yellowish tinge, while the shots taken after the custom white balance is accurate.
In terms of white balance card I use the Whibal G7 Studio 3.5″x6″ (8.9×15.2 cm). I found this card to work well underwater and I use it with a lanyard attached to a clip that I hook on my BCD D rings.
More info on the whibal here
It is possible to buy a larger card such as the reference that is 7.5″x10″ however this is cumbersome and I found the Studio version to work well with the Panasonic GH5 as it only uses the central part of the frame for white balance.

Going back to our GH5 instruction manual you can also see that the camera white balance is limited to 10,000K which is the colour of blue sky.
Underwater due to light absorption at longer wavelengths red and orange disappear at depth and blue tends to scatter over suspended particles. So the colour temperature of water tends to be higher than 10,000K and also the blue is somewhat washed out by scattering.
This is the reason filters are essential because reduce the amount of blue or to say better cyan and bring the camera into a range where custom white balance works again.
I have already posted a whole range of observations on filters in a previous post so am not repeating here.
With the right filter for the water colour I dive in and with the appropriate white balance card you can get some pretty decent results with custom white balance.
To help the colour accuracy I have experimented with the Leeming Luts and I want to thank Paul Leeming for answering my obscure questions. Obviously you do not have to use the LUTs and you can design them yourself however I found that using the Cinelike D LUT I have a very good starting point for colour correction.
The starting point is a CineLike D profile with saturation, noise reduction and sharpness set to -5 all other settings to default as suggested by Paul, there is no need to lower the contrast as CineLike D is already a flat curve.
*Noise and sharpness have actually nothing to do with grading but are set to -5 as the GH5 applies sharpening and noise reduction even at -5 setting. Sharpening has generally a negative effect all around while noise reduction if required is better performed in the editor.
Looking at imaging resource tests of the GH5 we can appreciate that the camera colours are oversaturated by default.
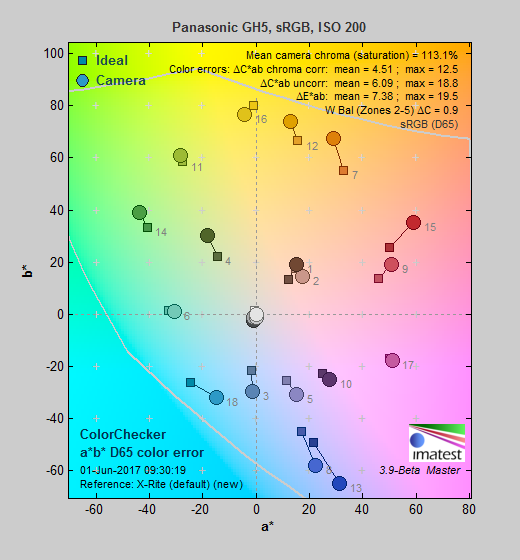
The GH5 tends to push deep colour and wash out cyan and yellow. This becomes apparent when we look at a white balanced clip uncorrected.

The Leeming Lut helps rebalancing the camera distorted colours and when you apply the camera LUT, provided you have followed the exposure instructions and applied the profile as described, the improvement is immediate.

From here onwards it is possible to perform a better grading and work to improve the footage further.
For the whole read please look at Leeming Lut website
One other thing that I believe it is interesting is that while generally for ambient light or balanced light shots I do not actually trust the camera exposure and go -1/3 to -2/3 for close up shots exposing to the right greatly helps highlights recovery
In the two frames you can see the difference the LUT brings restoring the correct balance to the head of the turtle.


To be clear the turtle detail has been white balanced in water on the whibal card while using a Keldan Spectrum filter -2, then in fcpx automatic balancing is applied. The LUT brings out a better dynamic range from the same frames.
Obviously you are free to avoid lens filters and LUTs and to some extent it is possible to get similar results however the quality I obtain using automatic settings I believe is quite impressive.
I found myself most times correcting my own wrong exposures or wanting to increase contrast in scene where I had little however this only happens in sever circumstances where white balance and filters are at the limits.
Conclusion
There are many paths to get the right colours for your GH5 underwater videos in my opinion there are four essential ingredients to make your life easier and give your footage a jump start:
- Take a custom white balance using a professional grade white balance card
- Set the right picture profile and exposure when shooting
- (Recommended) Use appropriate filters for the water conditions
- Apply the appropriate LUT to eliminate the errors in the GH5 colour rendering in post processing
With the following settings producing a video like this is very simple and all your efforts are in the actual cutting of the clip.
Please note some of the scenes that look off are shot beyond the working conditions of filters and white balance at around 25 meters…

2 thoughts on “The importance of Underwater white balance with the Panasonic gh5”