Tag Archives: grading

Producing and grading HDR content with the Panasonic GH5 in Final Cut Pro X

It has been almost two years from my first posts on HLG capture with the GH5 https://interceptor121.com/2018/06/15/setting-up-your-gh5-for-hlg-hdr-capture/ and last week Apple released Catalina 10.15.4 that now supports HDR-10 with compatible devices. Apple and in general computer are still not supporting HLG and it is unlikely this is ever going to happen as the gaming industry is following VESA DisplayHDR standard that is aligned to HDR-10.

After some initial experiments with GH5 and HLG HDR things have gone quiet and this is for two reasons:

  1. There are no affordable monitors that support HLG
  2. There has been lack of software support

While on the surface it looks like there is still no solution to those issues, in this post I will explain how to grade HLG footage in Final Cut Pro should you wish to do so. The situation is not that different on Windows and DaVinci Resolve that also only support HDR-10 monitors but I leave it to Resolve users to figure out. This tutorial is about final cut pro.

A word about Vlog

It is possible to use Vlog to create HDR content however VLOG is recorded as rec709 10 bits. Panasonic LUT and any other LUT are only mapping the VLOG gamma curve to Rec709 so your luminance and colours will be off.  It would be appropriate to have a VLOG to PQ LUT however I am not aware this exists. Surely Panasonic can create that but the VLOG LUT that comes with the camera is only for processing in Rec709. So, from our perspective we will ignore VLOG for HDR until such time we have a fully working LUT and clarity about the process.

Why is a bad idea to grade directly in HLG

There is a belief that HLG is a delivery format and it is not edit ready. While that may be true, the primary issue with HLG is that no consumer screens support BT.2020 colour space and the HLG gamma curve. Most display are plain sRGB and others support partially or fully DCI-P3 or the computer version Display P3. Although the white point is the same for all those colour spaces there is a different definition of what red, green and blue and therefore without taking into this into account, if you change a hue, the results will not be as expected. You may still white balance or match colours in HLG but you should not attempt anything more.

What do you need for grading HDR?

In order to successfully and correctly grade HDR footage on your computer you need the following:

  • HDR HLG footage
  • Editing software compatible with HDR-10 (Final Cut or DaVinci)
  • An HDR-10 10 bits monitor

If you want to produce and edit HDR content you must have compatible monitor let’s see how we identify one.

Finding an HDR-10 Monitor

HDR is highly unregulated when it comes to monitors, TVs have Ultra HD Premium Alliance and recently Vesa has introduced DisplayHDR standards https://displayhdr.org/ that are dedicated to display devices. So far, the Display HDR certification has been a prerogative of gaming monitors that have quick response time, high contrast but not necessarily high colour accuracy. We can use the certified list of monitors to find a consumer grade device that may be fit for our purpose: https://displayhdr.org/certified-products/

A DisplayHDR 1000 certified is equivalent to a PQ grading device as it has peak brightness of 1000 nits and minimum of 0.005 this is ideally what you want, but you can get by with an HDR-400 certified display as long as it supports wide colour gamut. In HDR terms wide gamut means covering the DCI-P3 colour space at least for 90% so we can use Vesa list to find a monitor that is HDR-10 compatible and has a decent colour accuracy. Even inside the HDR-400 category there are displays that are fit for purpose and reasonably priced. If you prefer a brand more orientated to professional design or imaging look for the usual suspects Eizo, Benq, and others but here it will be harder to find HDR support as usually those manufacturers are focussed on colour accuracy, so you may find a display covering 95% DCI-P3 but not necessarily producing a high brightness. As long as the device supports HDR-10 you are good to go.

I have a Benq PD2720U that is HDR-10 certified, has a maximum brightness of 350 nits and a minimum of 0.35, it covers 100% sRGB and REC709 and 95% DCI-P3, so is adequate for the task. It is worth nothing that a typical monitor with 350-400 nits brightness offers 10 stops of dynamic range.

In summary any of this will work if you do not have a professional grade monitor:

  • Look into Vesa list https://displayhdr.org/certified-products/ and identify a device that supports at least 90% DCI-P3, ideally HDR-1000 but less is ok too
  • Search professional display specifications for HDR-10 compatibility and 10 bits wide gamut > 90% DCI-P3


Final Cut Pro Steps

The easy way to have HDR ready content with the GH5 is to shoot with the HLG Photo Style. This produces clips that when analysed have the following characteristics with AVCI coded.

MediaInfo Details HLG 400 Mbps clip

Limited means that it is not using the full 10 bits range for brightness you do not need to worry about that.

With your material ready create a new library in Final Cut Pro that has a Wide Gamut and import your footage.

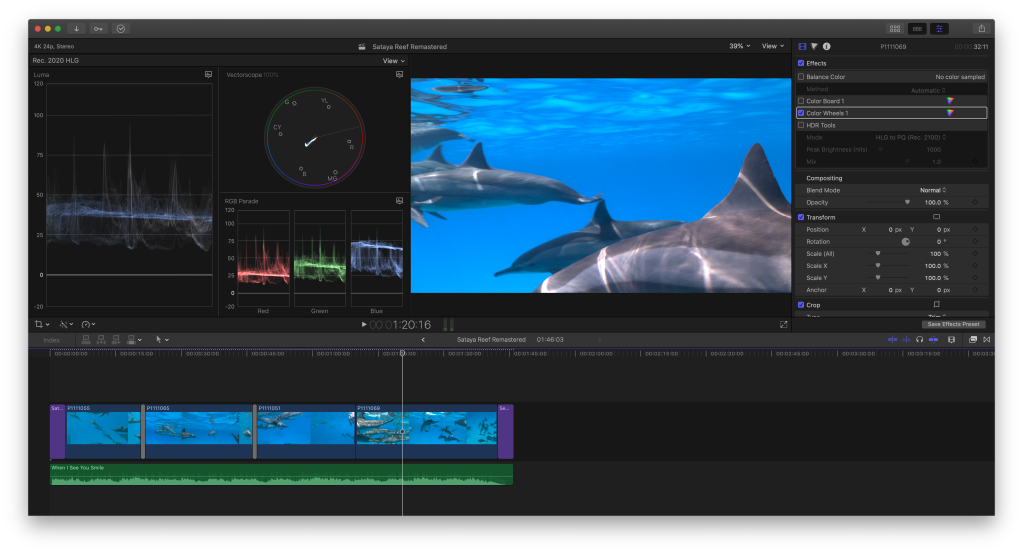
As we know Apple does not support HLG so when you look at the Luma scope you will see a traditional Rec709 IRE diagram. In addition, the ‘Tone Mapping Functionality’ will not work so you do not have a real idea of colour and brightness accuracy.

At this stage you have two options:

  1. Proceed in HLG and avoid grading
  2. Convert your material in PQ so that you can edit it

We will go on option 2 as we want to grade our footage.

Create a project with PQ gamut and enter your display information in the project properties. In my case the display has a minimum brightness of 0.35 nits and max of 350 and it has P3 primaries with a standard D65 white point. It is important to know those parameters to have a good editing experience otherwise the colours will be off. If you do not know your display parameters do some research. I have a Benq monitor that comes with a calibration certificate the information is right there. Apple screens are typically also P3 with D65 white point and you can find the maximum brightness in the specs. Usually around 500 nits for apple with minimum of 0.5 nits. Do not enter Rec2020 in the monitor information unless your monitor has native primaries in that space (there are almost none). Apple documentation tells you that if you do not know those values you can leave them blank, final cut pro will use the display information from colour sync and try a best match but this is far from ideal.

Monitor Metadata in the Project Properties

For the purpose of grading we will convert HLG to PQ using the HDR tools. The two variants of HDR have a different way to manage brightness so a conversion is required however the colour information is consistent between the two.

Please note that the maximum brightness value is typically 1000 Nits however there are not many displays out there that support this level of brightness, for the purpose of what we are going to do this is irrelevant so DO NOT change this value. Activate tone mapping accessible under the view pull down in the playback window this will adapt the footage to your display according to the parameters of the project without capping the scopes in the project.

Use HDR Tools to convert HLG to PQ

Finalising your project

When you have finished with your editing  you have two options:

  • Stay in PQ and produce an HDR-10 master
  • Delete all HDR tools HLG to PQ conversions and change back the project to HLG

If you produce an HDR-10 master you will need to edit twice for SDR: duplicate the project and apply the HDR tool from HLG to SDR or other LUT of your choice.

If you stay in HLG you will produce a single file but is likely that HDR will only be displayed on a narrower range of devices due to the lack of support of HLG in computers. The HLG clip will have correct grading as the corrections performed when the project was in PQ with tone mapping will survive the editing as HLG and PQ share the same colour mapping. The important thing is that you were able to see the effects of your grade.

Project back in HLG you can see how the RGB parade and the scope are back to IRE but all is exactly the same as with PQ

In my case I have an HLG TV so I produce only one file as I can’t be bothered doing the exercise two times.

The steps to produce your master file are identical to any other projects, I recommend creating a ProRes 422 HQ master and from there other formats using handbrake. If you change your project back to HLG you will get a warning about the master display you can ignore it.

Colour Correction in underwater video

This is my last instalment of the getting the right colour series.

The first read is the explanation of recording settings

https://interceptor121.com/2018/08/13/panasonic-gh5-demystifying-movie-recording-settings/

This post has been quite popular as it applies generally to the GH5 not just for underwater work.

The second article is about getting the best colours

https://interceptor121.com/2019/08/03/getting-the-best-colors-in-your-underwater-video-with-the-panasonic-gh5/

And then of course the issue of white balance

https://interceptor121.com/2019/09/24/the-importance-of-underwater-white-balance-with-the-panasonic-gh5/

Am not getting into ambient light filters but there are articles on that too.

Now I wanted to discuss editing as I see many posts on line that are plain incorrect. As it is true for photos you don’t edit just looking at an histogram. The histogram is a representation of the average of the image and this is not the right approach to create strong images or videos.

You need to know how the tools work in order to do the appropriate exposure corrections and colour corrections but it is down to you to decide the look you want to achieve.

I like my imaging video or still to be strong with deep blue and generally dark that is the way I go about it and is my look however the tools can be used to have the look you prefer for your materials.

In this YouTube tutorial I explain how to edit and grade footage produced buy the camera and turn it into something I enjoy watching time and time again.

I called this clip Underwater Video Colour Correction Made Easy as it is not difficult to obtain pleasing colours if you followed all the steps.

A few notes just to anticipate possible questions

  1. Why are you not looking to have the Luma or the RGB parades at 50% of the scale?

50% of the IRE scale is for neutral grey 18% I do not want my footage to look washed out which is what happens if you aim at 50%.

2. Is it important to execute the steps in sequence?

Yes. Camera LUT should be applied before grading as they normalise the gamma curve. In terms of correction steps setting the correct white balance has an influence on the RGB curves and therefore needs to be done before further grading is carried out.

3. Why don’t you correct the overall saturation?

Most of the highlights and shadows are in the light grey or dark grey areas. Saturating those can lead to clipping or noise.

4. Is there a difference between using corrections like Vibrancy instead of just saturation?

Yes saturation shifts equally the colours towards higher intensity vibrancy tends to stretch the colours in both direction.

5. Can you avoid an effect LUT and just get the look you want with other tools?

Yes this is entirely down to personal preference.

6. My footage straight from camera does not look like yours and I want it to look good straight away.

That is again down to personal preference however if you crush the blacks or clip the highlights or introduce a hue by clipping one of the RGB channels this can no longer be remediated.

I hope you find this useful wishing all my followers a Merry Xmas and Happy 2020.

The importance of Underwater white balance with the Panasonic gh5

One of the key steps in order to get the best underwater colours in your video is to perform a custom white balance.

This is true on land and on water because auto white balance only works in a specified range of color temperatures.

Panasonic GH5 advanced user manual

For our GH5 the range where auto works goes is approximately 3200-7500K. When the camera is working outside this range you get a colour cast. Let’s see with some examples:

Grey card Auto White Balance 8mm
Grey card Custom White Balance 8mm

In the example above I am taking a picture of a white balance reference card under warm lights that have a colour temperature of 2700K.

As you can see the auto white balance fails resulting in a yellowish tinge, while the shots taken after the custom white balance is accurate.

In terms of white balance card I use the Whibal G7 Studio 3.5″x6″ (8.9×15.2 cm). I found this card to work well underwater and I use it with a lanyard attached to a clip that I hook on my BCD D rings.

More info on the whibal here

It is possible to buy a larger card such as the reference that is 7.5″x10″ however this is cumbersome and I found the Studio version to work well with the Panasonic GH5 as it only uses the central part of the frame for white balance.

Custom white balance with the 8mm fisheye

Going back to our GH5 instruction manual you can also see that the camera white balance is limited to 10,000K which is the colour of blue sky.

Underwater due to light absorption at longer wavelengths red and orange disappear at depth and blue tends to scatter over suspended particles. So the colour temperature of water tends to be higher than 10,000K and also the blue is somewhat washed out by scattering.

This is the reason filters are essential because reduce the amount of blue or to say better cyan and bring the camera into a range where custom white balance works again.

I have already posted a whole range of observations on filters in a previous post so am not repeating here.

With the right filter for the water colour I dive in and with the appropriate white balance card you can get some pretty decent results with custom white balance.

To help the colour accuracy I have experimented with the Leeming Luts and I want to thank Paul Leeming for answering my obscure questions. Obviously you do not have to use the LUTs and you can design them yourself however I found that using the Cinelike D LUT I have a very good starting point for colour correction.

The starting point is a CineLike D profile with saturation, noise reduction and sharpness set to -5 all other settings to default as suggested by Paul, there is no need to lower the contrast as CineLike D is already a flat curve.

*Noise and sharpness have actually nothing to do with grading but are set to -5 as the GH5 applies sharpening and noise reduction even at -5 setting. Sharpening has generally a negative effect all around while noise reduction if required is better performed in the editor.

Looking at imaging resource tests of the GH5 we can appreciate that the camera colours are oversaturated by default.

the GH5 has around 113% over saturated colours

The GH5 tends to push deep colour and wash out cyan and yellow. This becomes apparent when we look at a white balanced clip uncorrected.

White balanced clip in final cut pro you can see how the water column is washed out whilst red and other dark colours are accurate

The Leeming Lut helps rebalancing the camera distorted colours and when you apply the camera LUT, provided you have followed the exposure instructions and applied the profile as described, the improvement is immediate.

The previous clip now with the CineLike D Leeming LUT applied

From here onwards it is possible to perform a better grading and work to improve the footage further.

For the whole read please look at Leeming Lut website

One other thing that I believe it is interesting is that while generally for ambient light or balanced light shots I do not actually trust the camera exposure and go -1/3 to -2/3 for close up shots exposing to the right greatly helps highlights recovery

In the two frames you can see the difference the LUT brings restoring the correct balance to the head of the turtle.

Turte detail the highlights appear blown out
Turtle detail with Leeming Lut applied

To be clear the turtle detail has been white balanced in water on the whibal card while using a Keldan Spectrum filter -2, then in fcpx automatic balancing is applied. The LUT brings out a better dynamic range from the same frames.

Obviously you are free to avoid lens filters and LUTs and to some extent it is possible to get similar results however the quality I obtain using automatic settings I believe is quite impressive.

I found myself most times correcting my own wrong exposures or wanting to increase contrast in scene where I had little however this only happens in sever circumstances where white balance and filters are at the limits.

Conclusion

There are many paths to get the right colours for your GH5 underwater videos in my opinion there are four essential ingredients to make your life easier and give your footage a jump start:

  • Take a custom white balance using a professional grade white balance card
  • Set the right picture profile and exposure when shooting
  • (Recommended) Use appropriate filters for the water conditions
  • Apply the appropriate LUT to eliminate the errors in the GH5 colour rendering in post processing

With the following settings producing a video like this is very simple and all your efforts are in the actual cutting of the clip.

Short clip that applies this blog tips

Please note some of the scenes that look off are shot beyond the working conditions of filters and white balance at around 25 meters…