Following from a previous article about not increasing bulk I have considered a few options for the Canon 8-15mm fisheye.
The 8-15mm is not a small lens and due to the different flange distance between Canon EF mount for DSLR (44mm) and Sony E-Mount (18mm) we have a chunky 35.5mm N100 to N120 adapter port that makes the whole set up not that compact.
Dome Options 140mm vs 4.33″
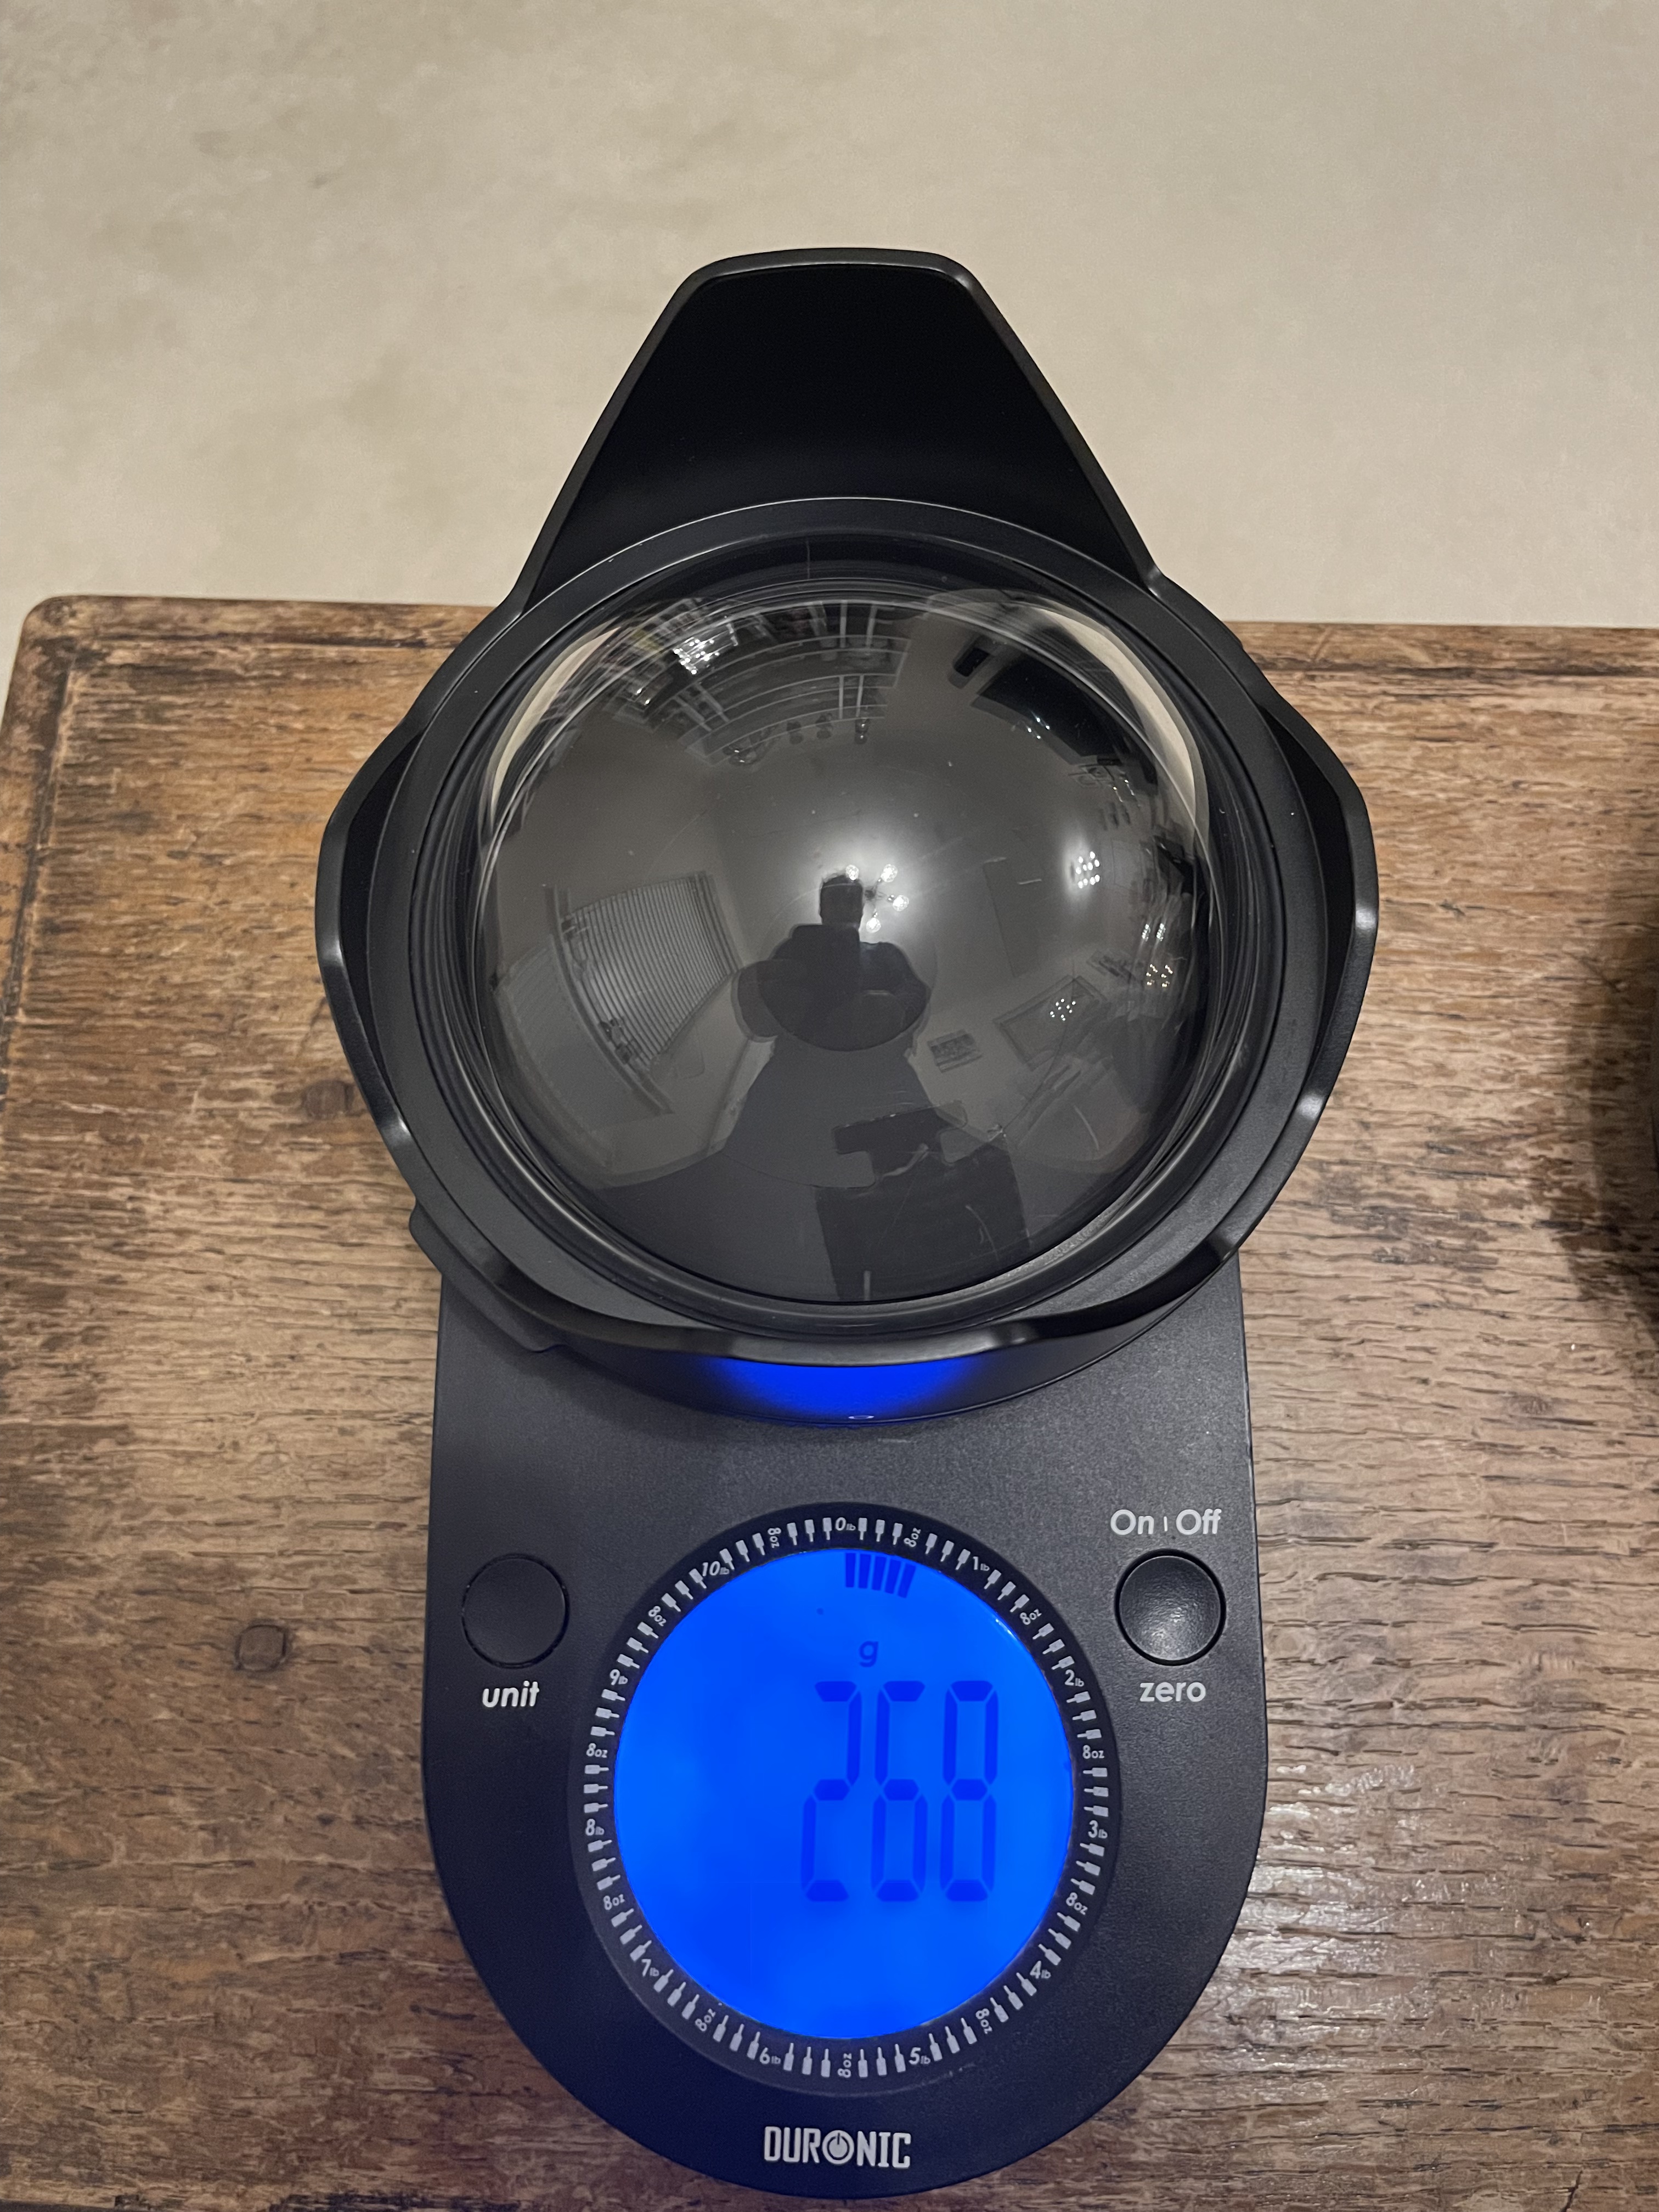
The Nauticam port chart recommends the 140mm glass fisheye dome for the 8.15mm, this port is 69mm radius and is made with anti reflective optical glass and weights 630 grams.
140mm Glass Dome on Scale
There is another dome from Nauticam the 4.33″ acrylic but this does not feature on the port chart for the Canon 8-15mm.
I did some calculations and this dome should require the same extension so I ordered one conscious that this would be lighter but not necessarily increase the underwater lift due to a reduced volume.
4.33″ dome weight
Although there is a difference of 362 grams the smaller volume will result in less buoyancy 348g lift vs 688g lift for the 140mm so overall the additional buoyancy is only 22 grams.
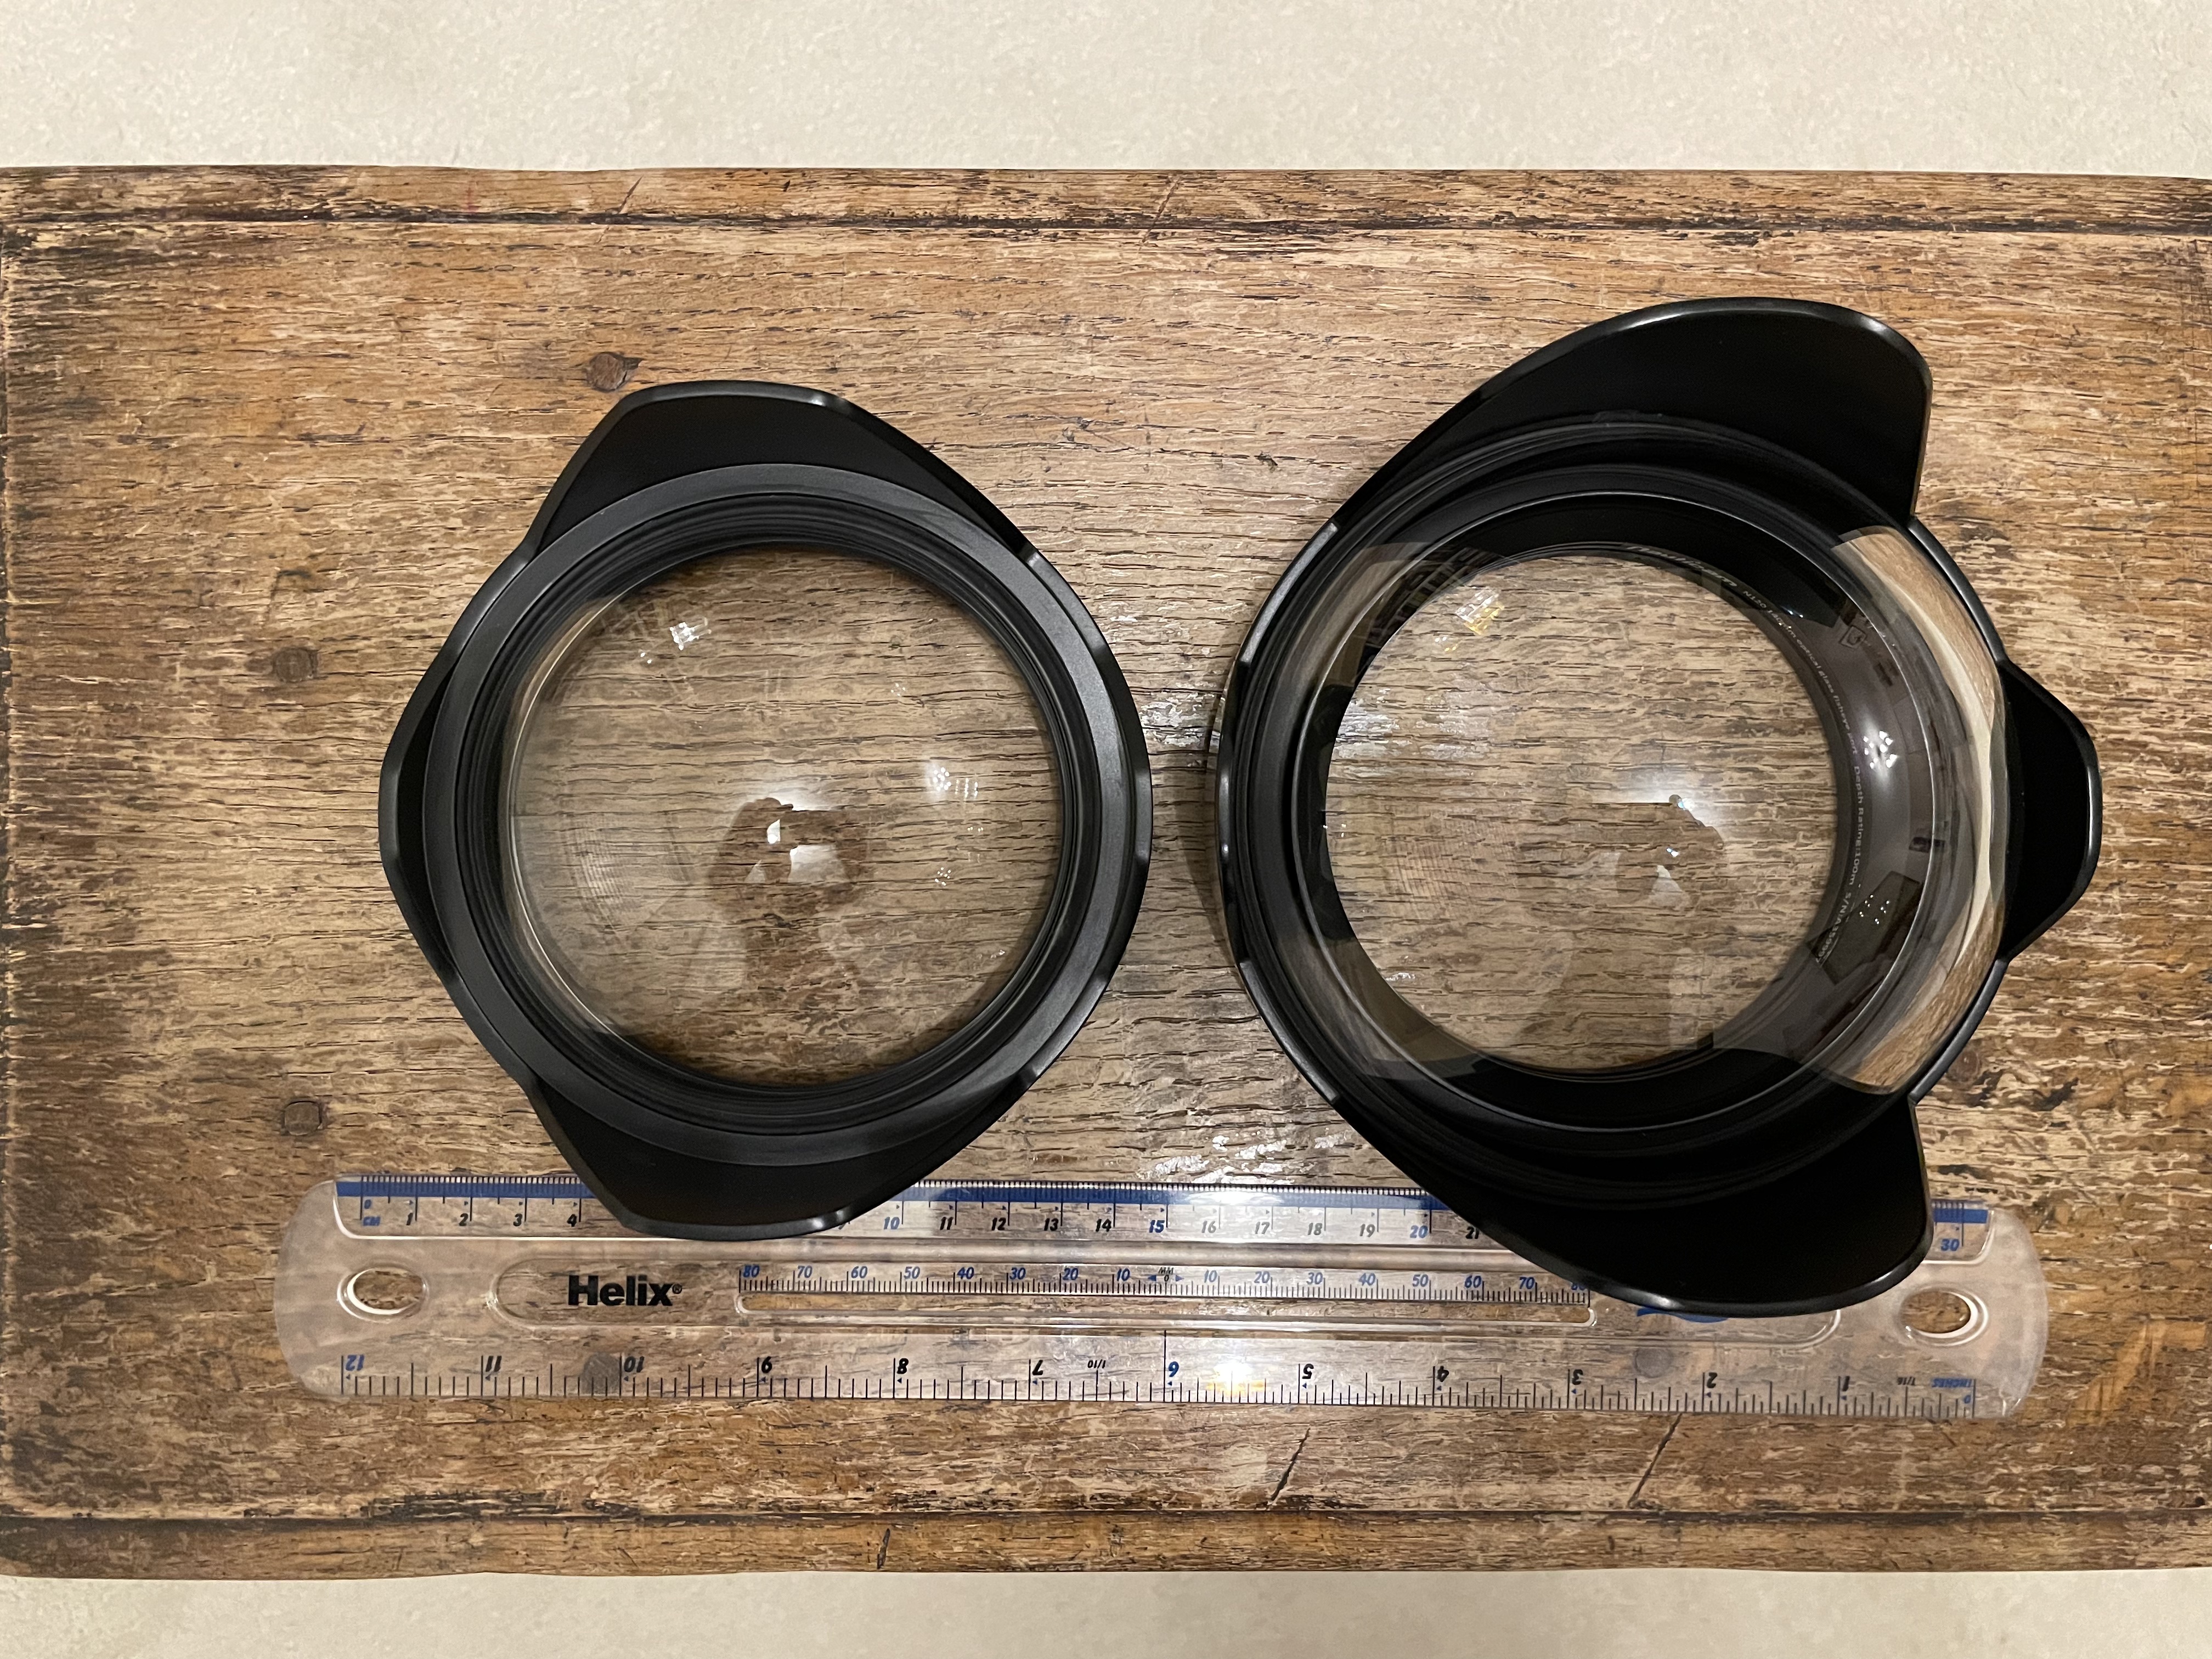
4.33″ vs 140mm
The primary benefit of this smaller dome is that it gets you closer this in turn means that things will look bigger and as consequence depth of field will drop. Depth of field depends on magnification and as you will get closer it will drop compared to other domes. So larger domes have more depth of field not because they are larger when you are at close range but simply because your camera focal plane is standing further back.
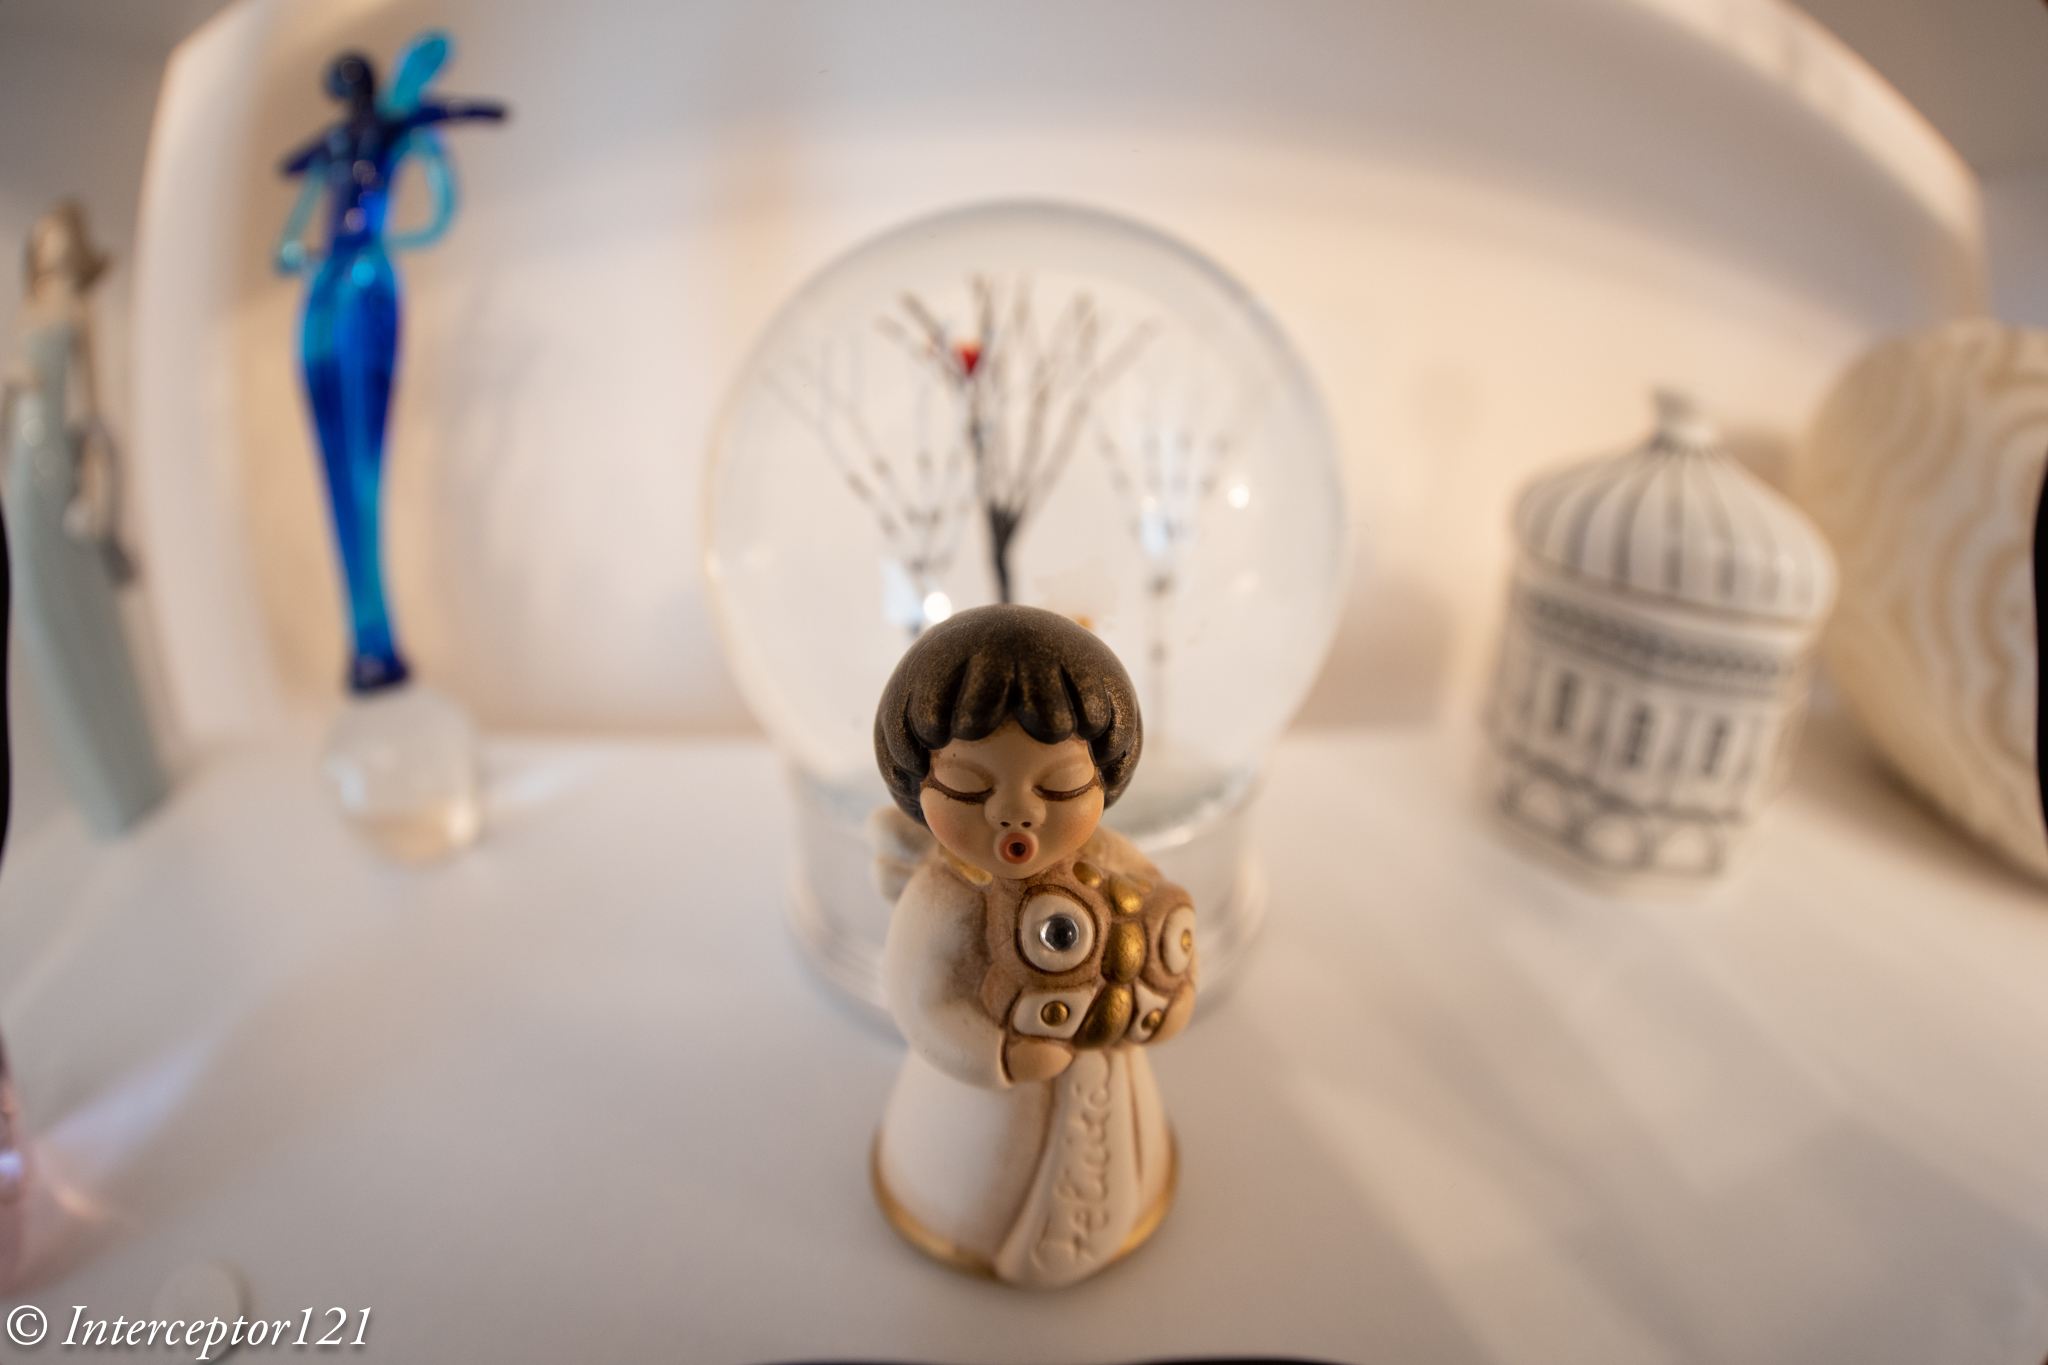
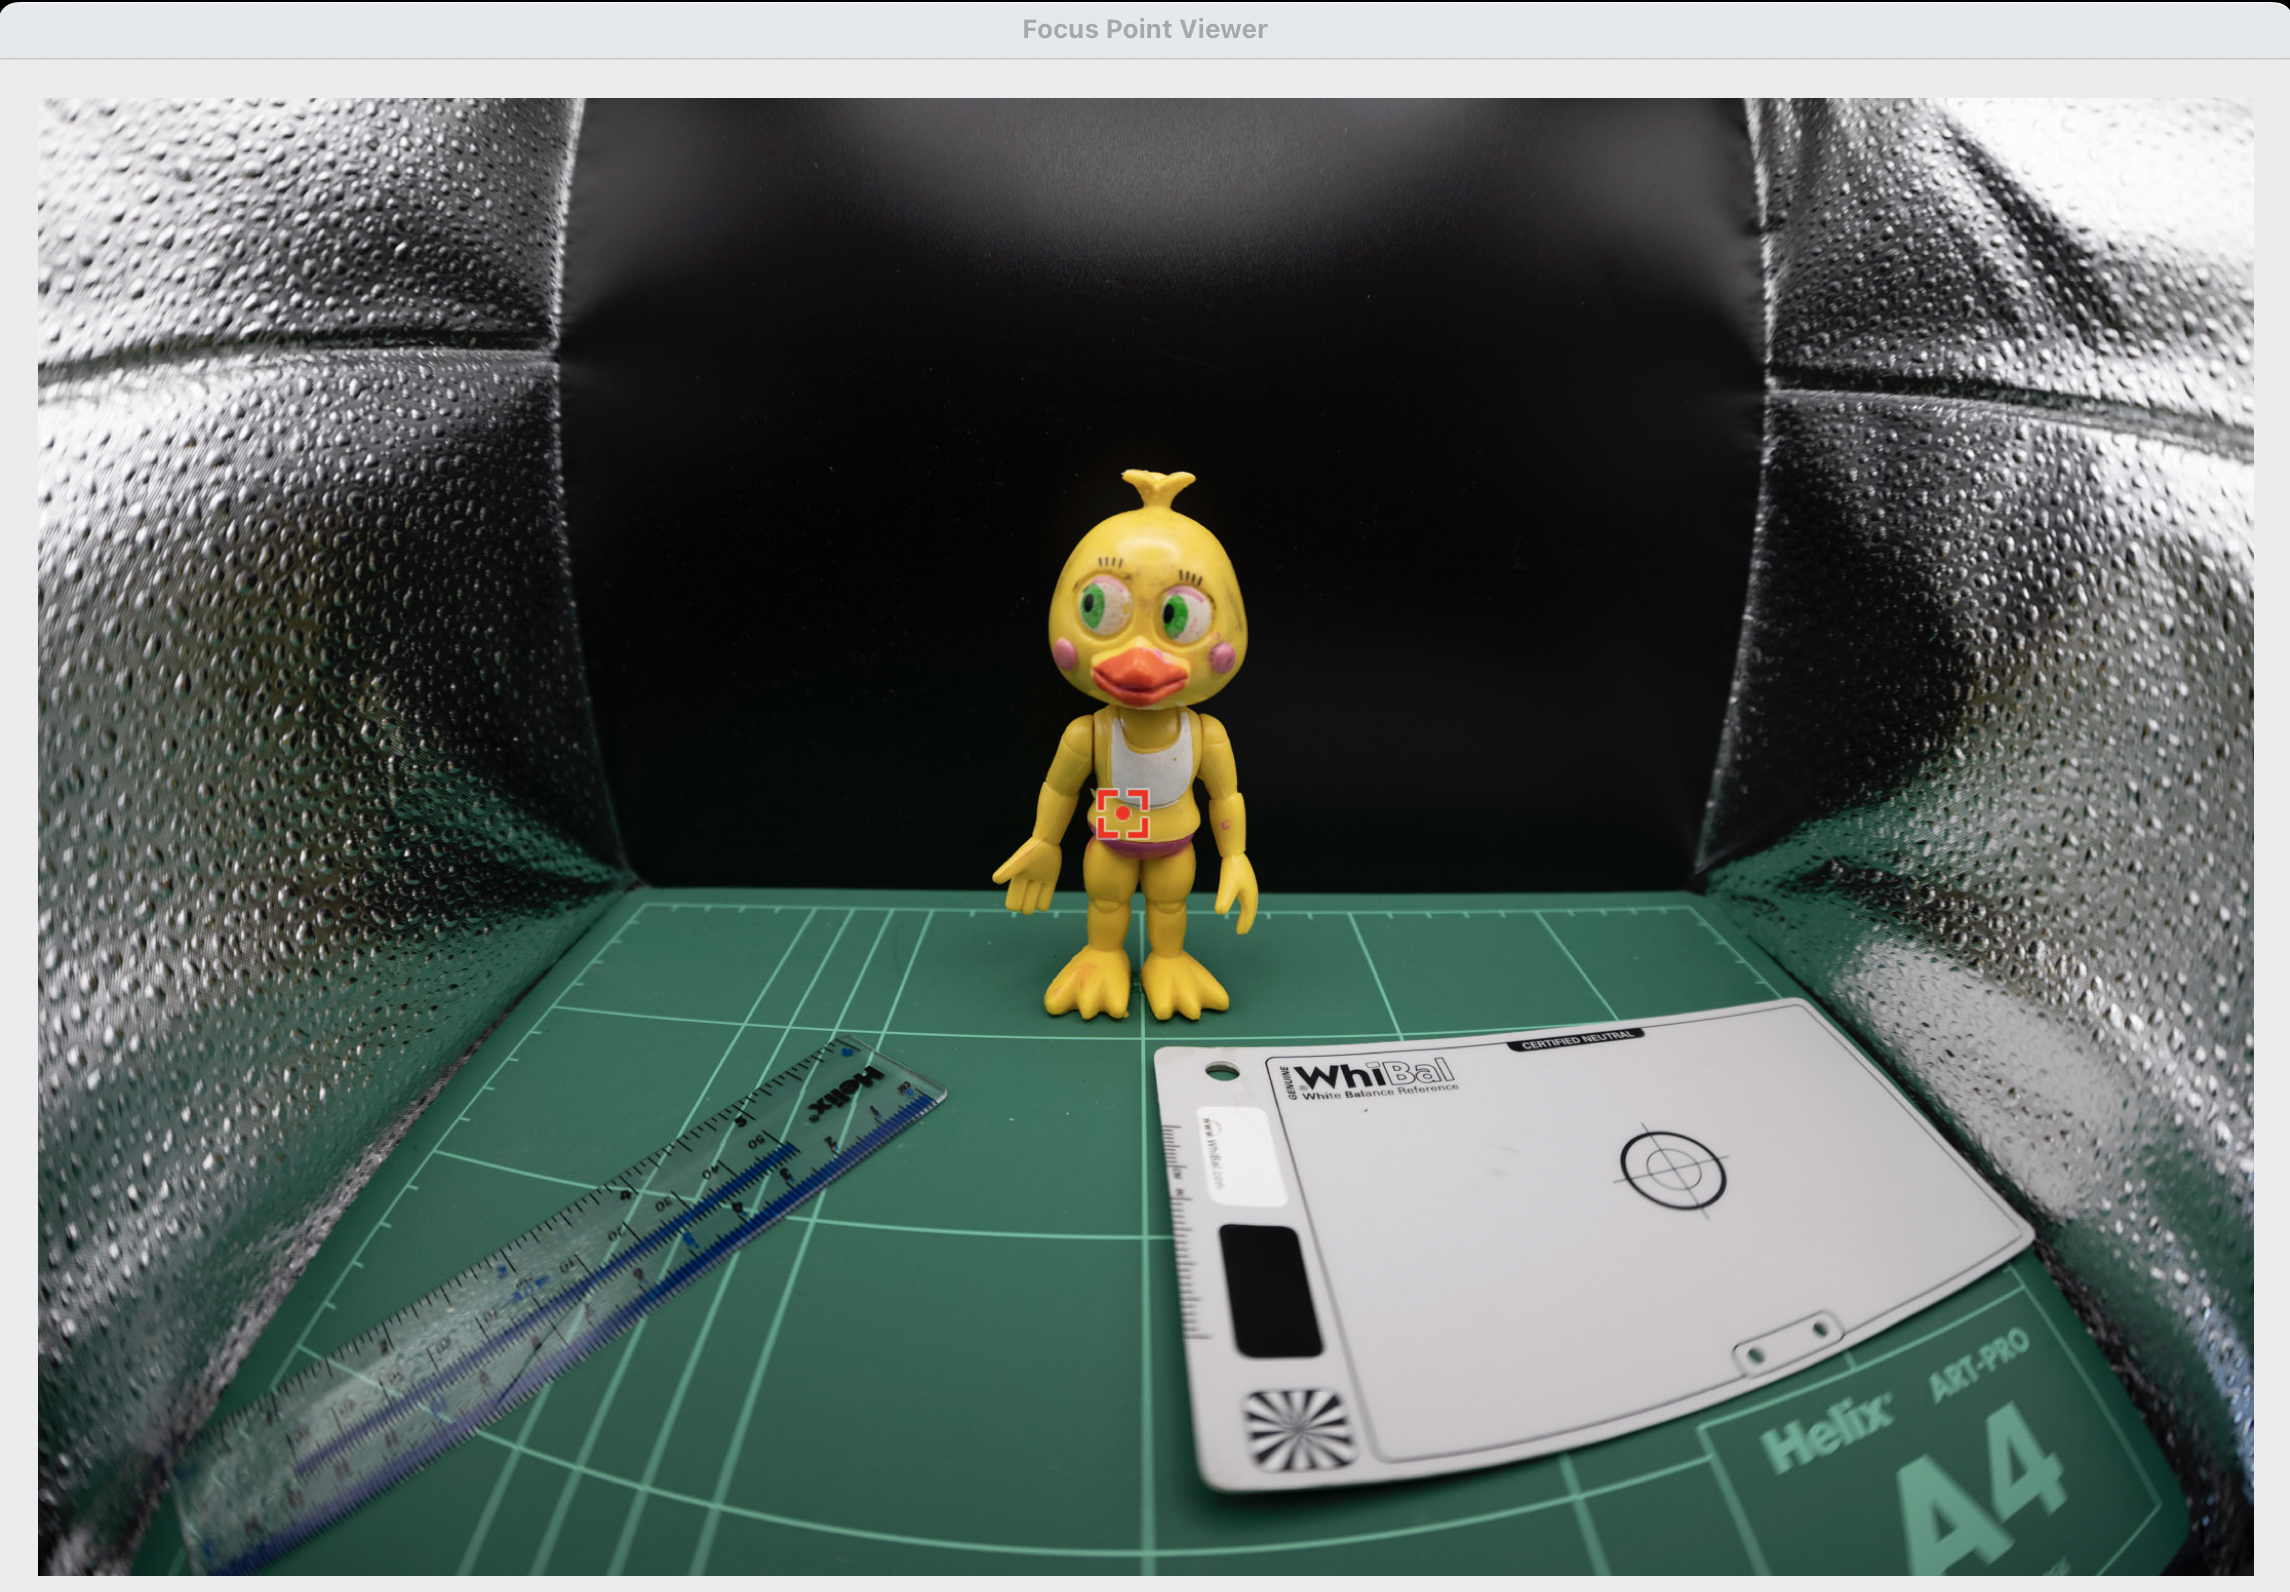
To give an idea this is a little miniature shot with the 140mm dome with the target touching the glass port.
140mm dome close up
This is the same target with the 4.33″ dome.
4.33 dome
Side by side shows the difference in magnification.
Left 4.33″ dome right 140mm dome
If we look at the same detail we can see that the 140mm dome image detail is less blurred.
4’33 dome vs 140mm dome
We are on land here there is no water involved and the 140mm image is sharper at the edge simply because it is smaller.
As depth of field must be compared at equal magnification we can also bust another myth of larger domes vs smaller domes there is no increased depth of field you are just standing further back if you compared the front of the port instead of the focal plane.
Building the Rig
The extension required is still 30mm as for the 140mm dome,
Acrylic dome profile
The overall size of this dome means it is flush with the extension ring.
Port details the lens hood must be removed
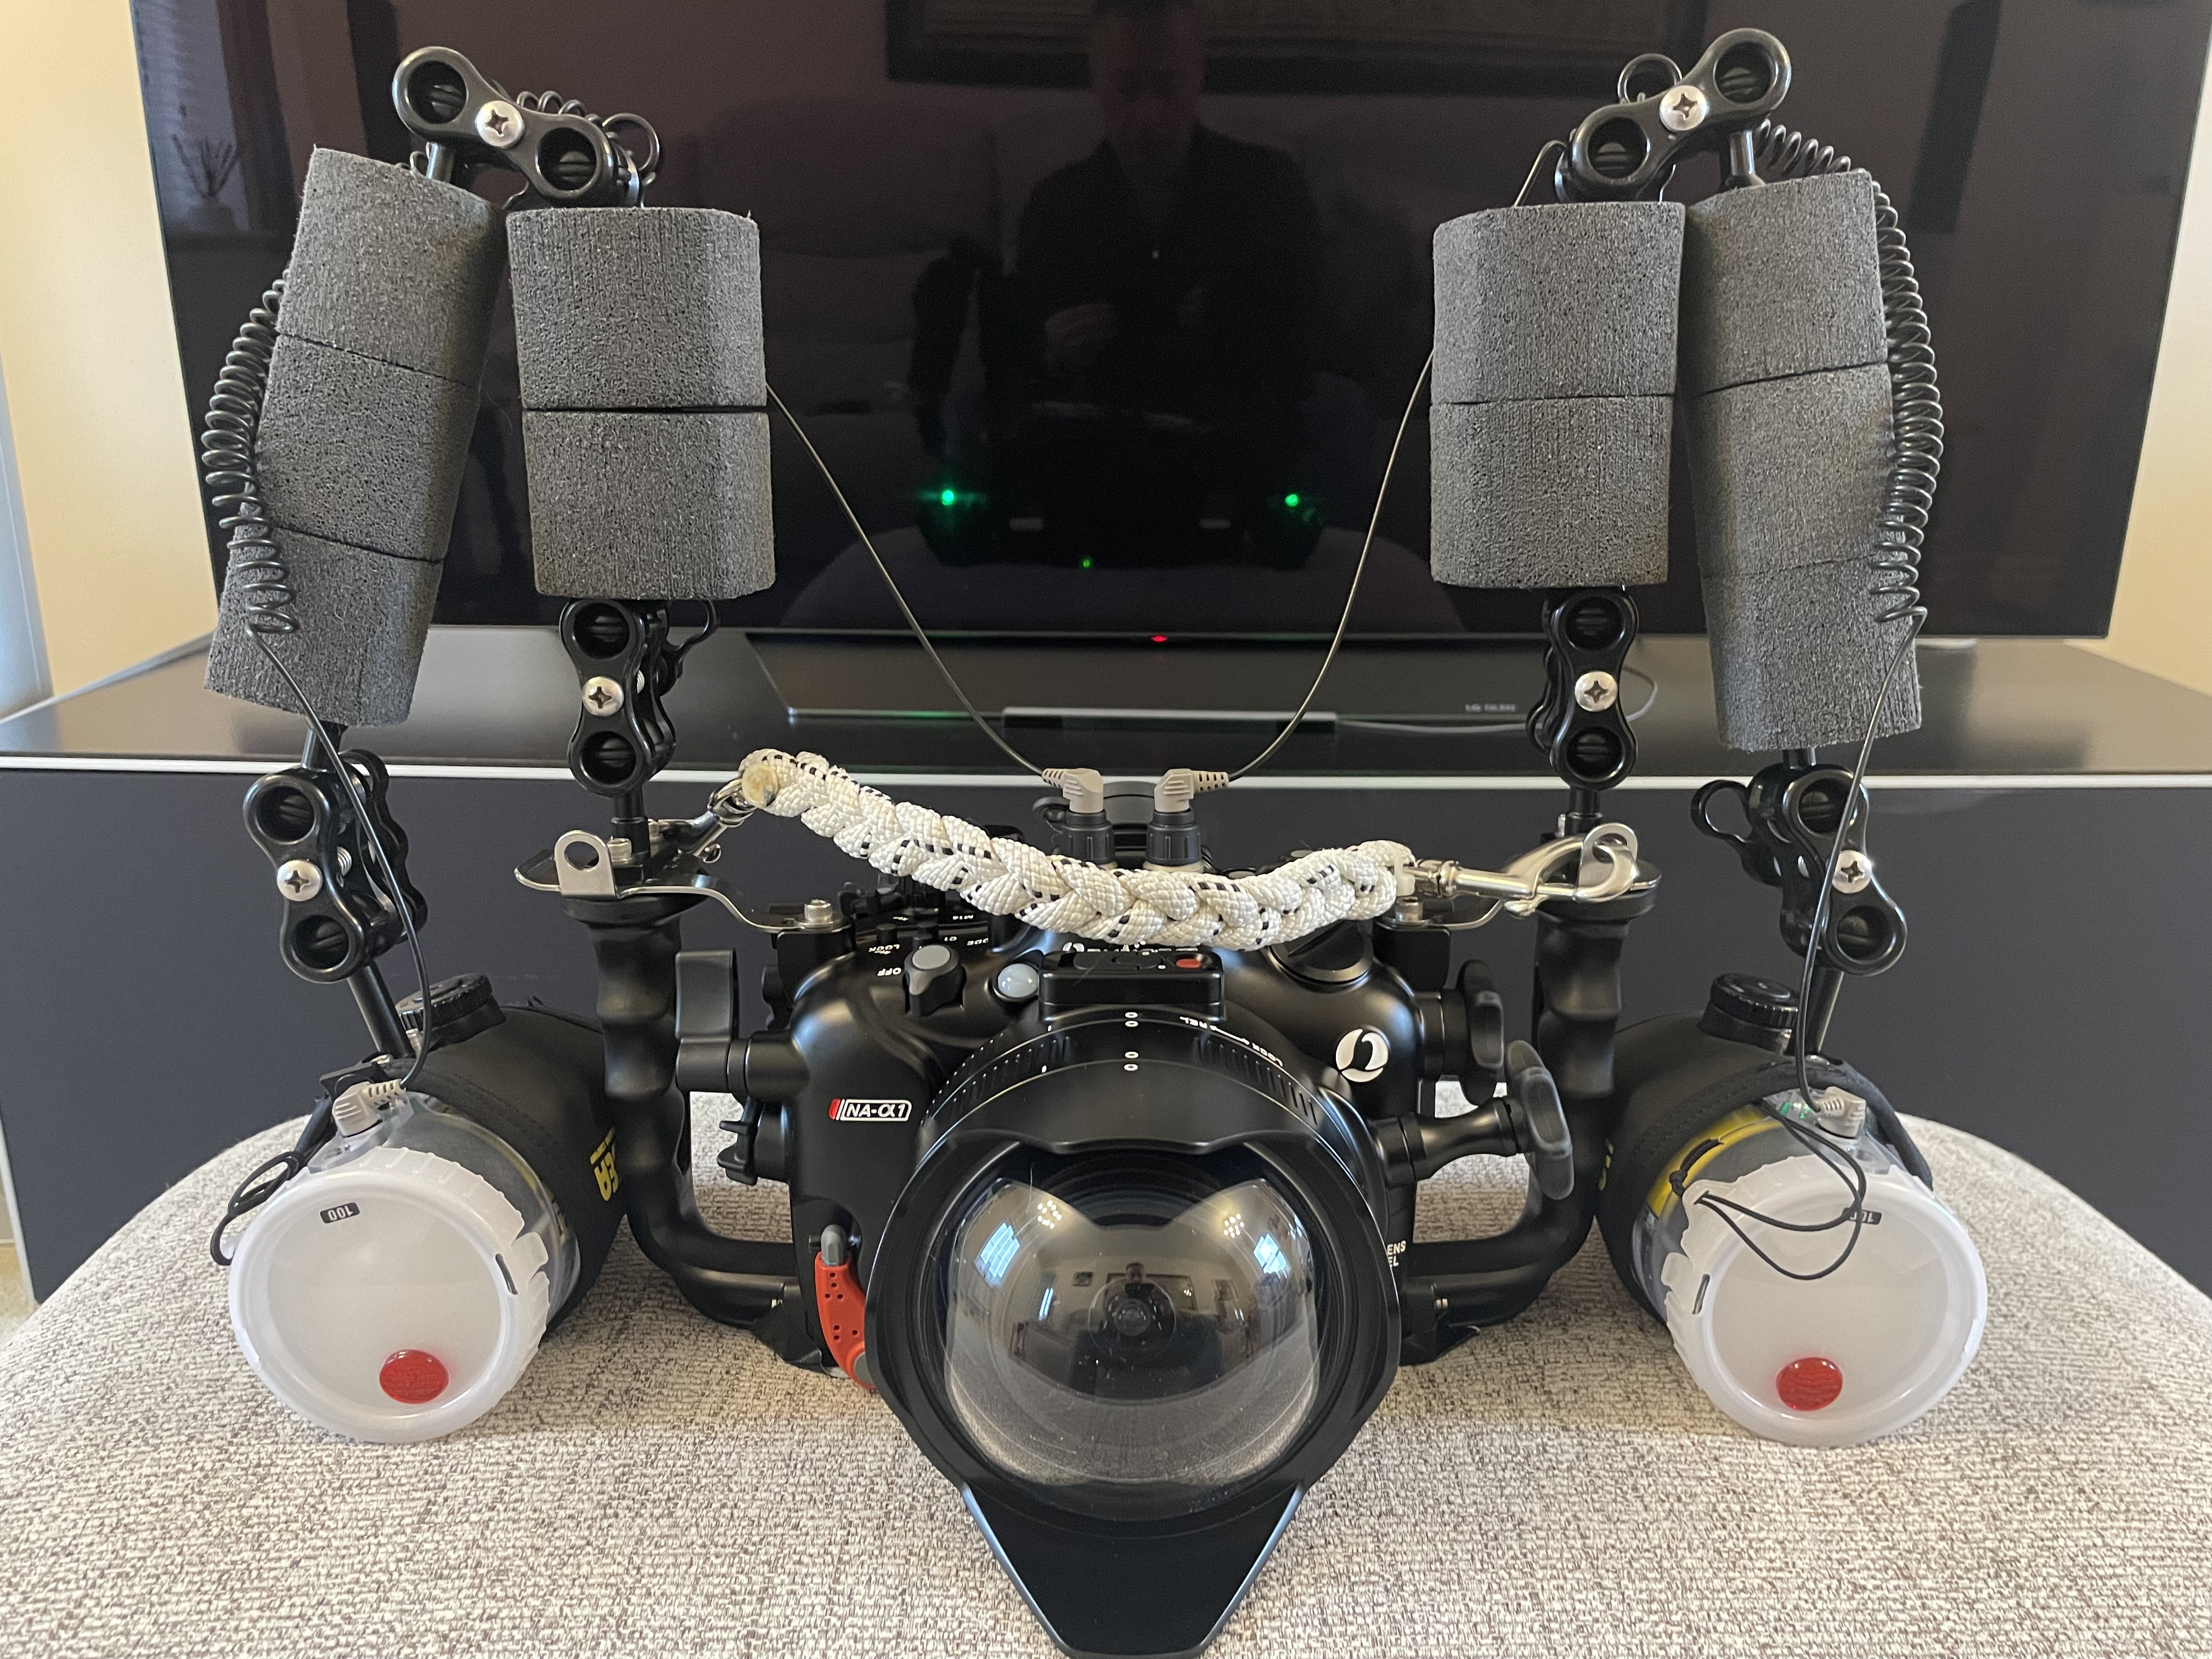
This is the overall rig with the amount of flotation in this image it is around 600 grams negative in fresh water.
4.33 rig
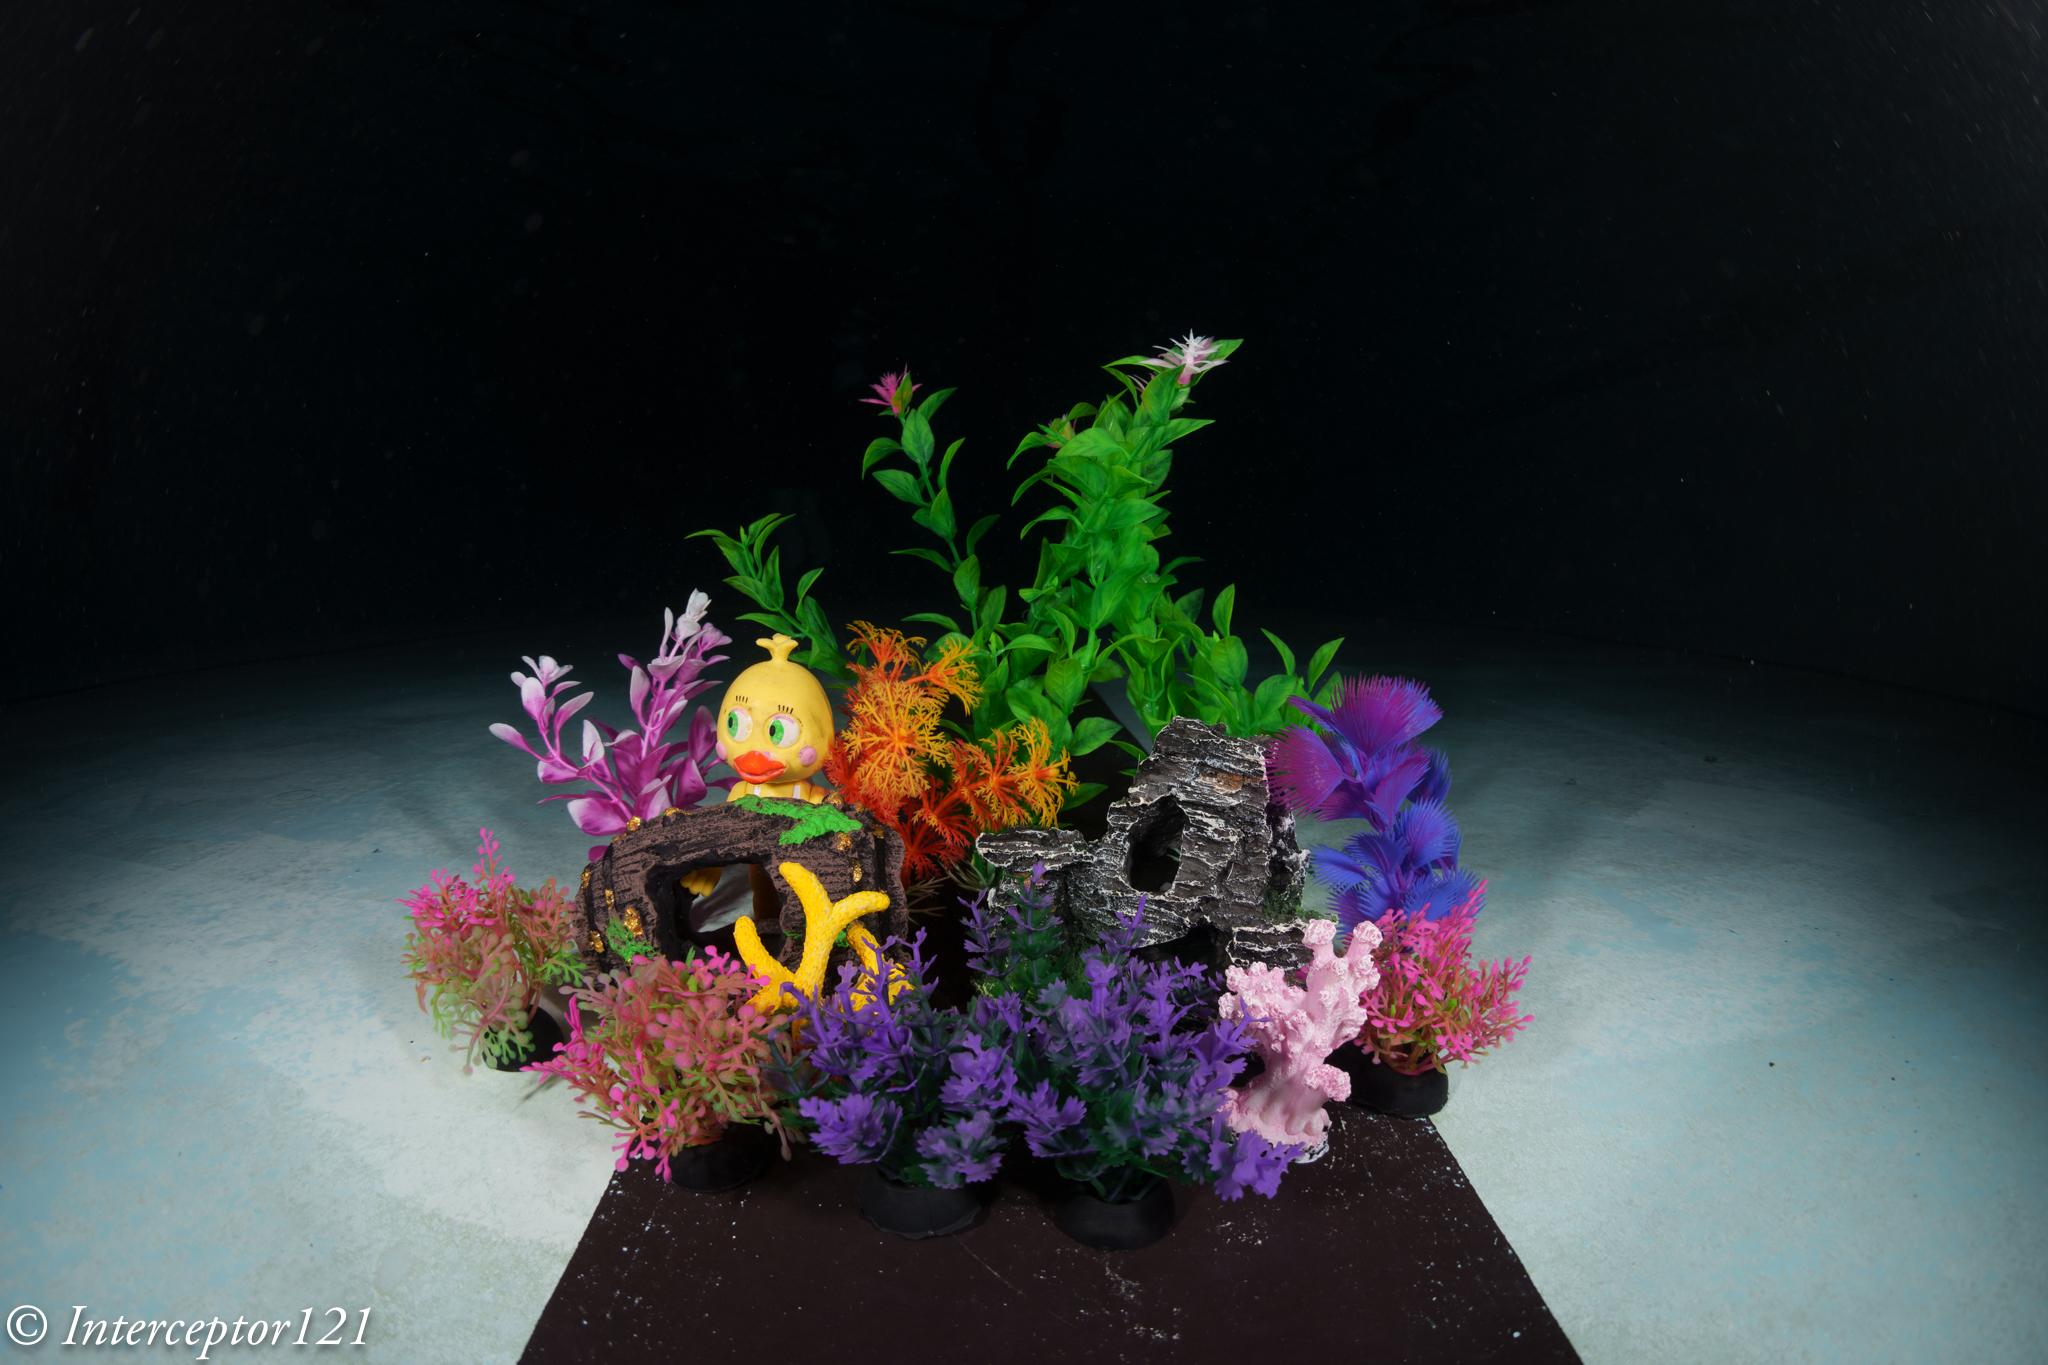
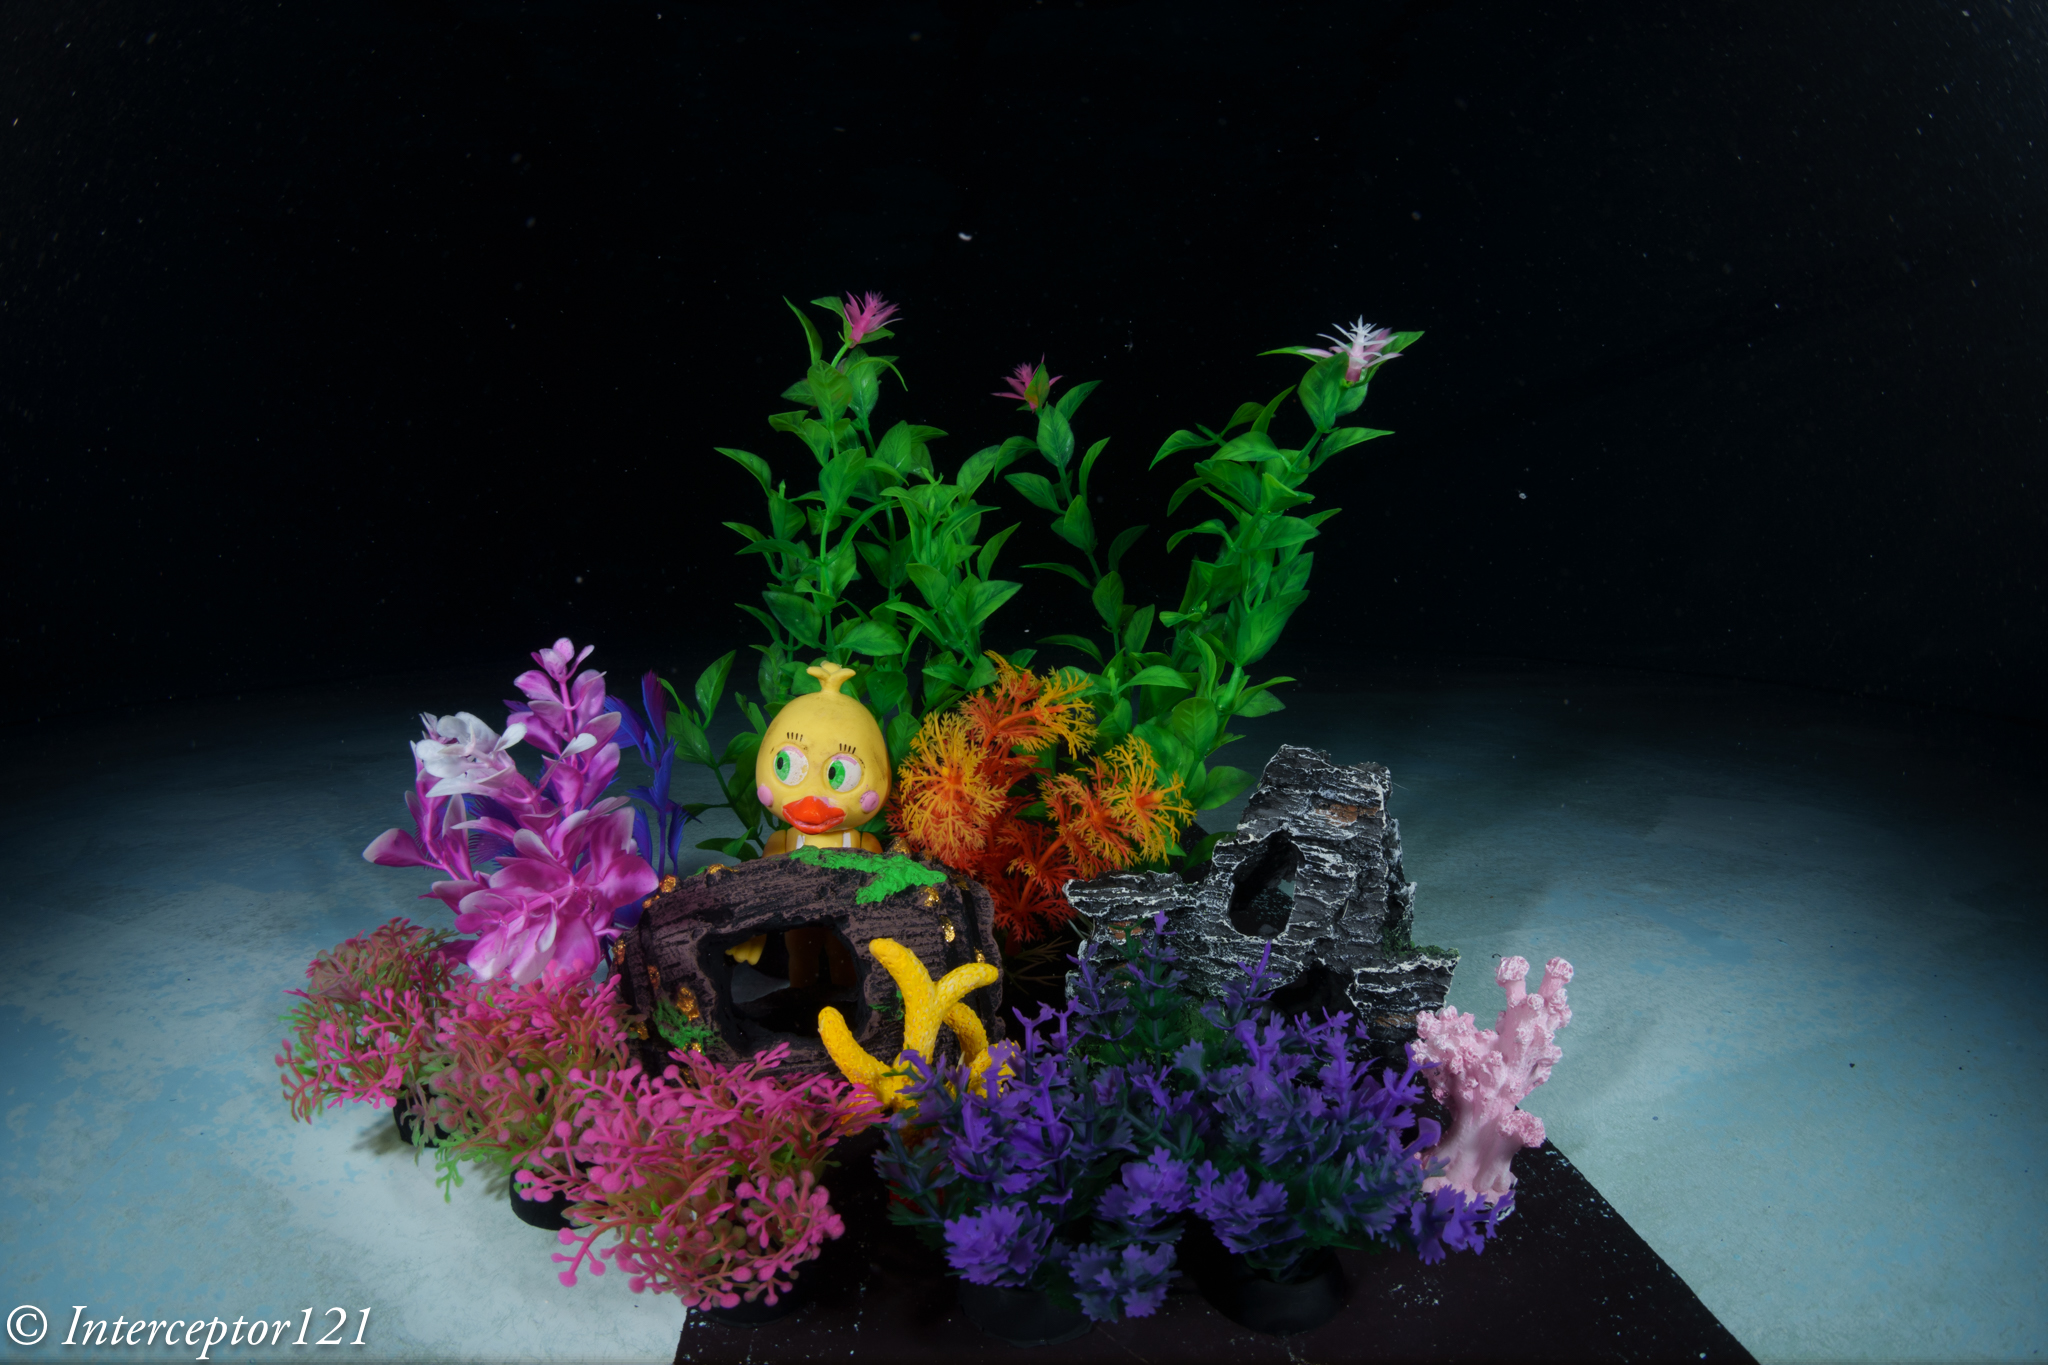
Now that we know what to expect is time to get in the pool and take some shots. I got some miniature aquarium fixtures to simulate a close focus wide angle situation.
Pool Session
Once in water I set up my artificial reef and got shooting.
I was at the point of touching the props so I had to stand back a little. As expected the issue is depth of field.
Shots at f/11
For starter we try to get as close as possible and focus in line with the chick.
Fisheye f/11 Focus on back
Due to the extreme magnification the front details are quite soft. So from here I start moving backwards a little.
Still focussed on the chick the sharpness improves due to reduced magnification this is a simulation of a larger dome.
Fisheye f/11 Focus on chick
There still is severe blurring of the front detail at f/11. However due to the increased depth of field that the dome brings behind the focus point the rest looks pretty good.
Focussing on the middle of the frame at f/11 results in blurry details for the features in the front of the frame but much less blurry than before and the chick is still relatively sharp.
fisheye f/11 Focus on edge front
Focussing on the pink reef detail results in a better overall result in a counterintuitive way.
Shots at f/16
Stopping down the lens results in increased depth of field so more of the image is in focus however the overall sharpness drops. This is a good place to be if you don’t want to be too sophisticated with the choice of focus point and you are close.
You can get closer but the front detail is still a bit soft but acceptable.
Fisheye f/16 Focus on back
If you move your focus point a bit further in front the situation improves.
fisheye f/16 Focus on middle
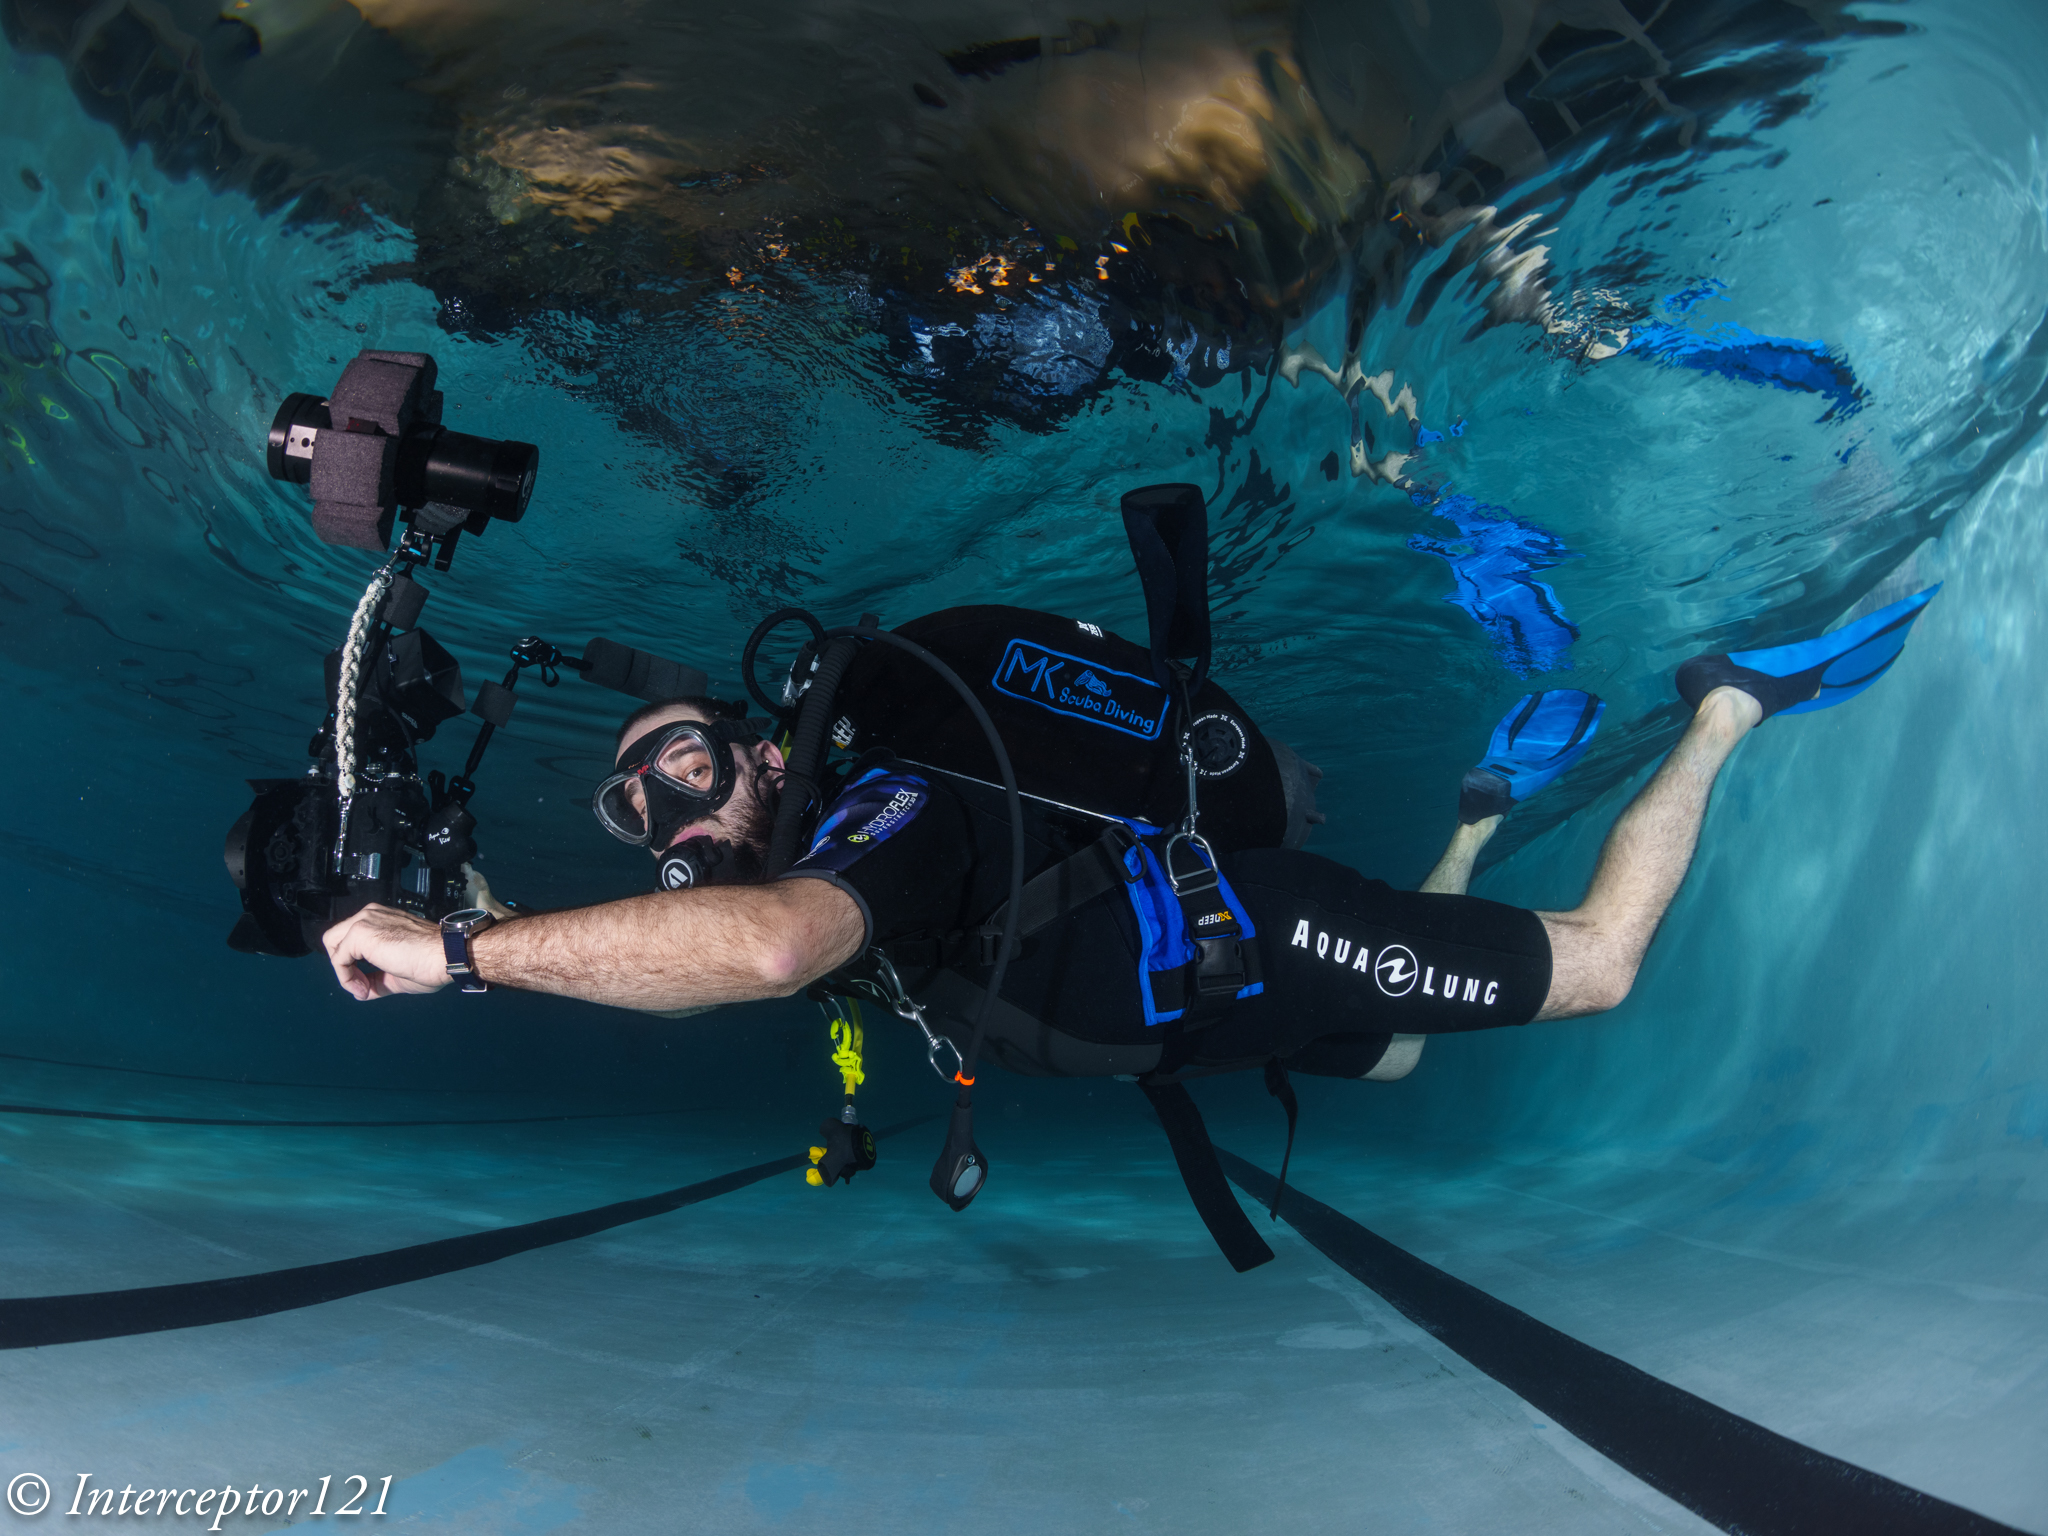
At this point I decided to get into the picture with a white balance slate.
Fisheye f/16 Focus on back diver
Although the front is quite blurry due to the extreme close range the result is acceptable for the non pixel peeper.
Shots at f/22
We are here hitting diffraction limit and the image looses sharpness but we are after depth of field so be it.
fisheye f/22 Focus on duck
Now the depth of field is there although the detail in the centre is less sharp.
fisheye f/22 Focus on middle
Moving the focus point makes the image a bit better.
Time to insert the diver in the frame.
Fisheye f/22 Focus on back diver
Overall ok not amazing consider the dome is on the parts.
Conclusion
The small acrylic dome does quite well at close range, the limitations come from the depth of field and not from the water and the dome increases the depth of field behind the focus point. This is something that you can use to your advantage if you remember when you are in open water.
For shots that are further away you can shoot at f/11 and get excellent IQ there is no need to stop down further to improve the edges. Consider however that f/8 may be just too wide on full frame and introduce additional aberrations regardless of depth of field.
VideoDiver at f/11
Some numbers:
Nauticam 140mm Glass dome: £911
Nauticam 4.33″ Acrylic dome: £550
Price difference £361 or 40% however bear in mind that the primary benefit of the glass dome is to resist reflections and ghosting due to the coating and the fact you can keep the 8-15mm hood on.
When shooting ultra-wide angle, you benefit from a large depth of field
You can get very close to large subjects, maximizing color and sharpness
They perform well behind dome ports with good corner sharpness, and they don’t need a diopter
You usually need at least 2 strobes with good angle of coverage to properly light the entire area.
Some of the above statements are correct in absolute, some are correct but not specific to fisheye lenses and some are just incorrect.
Fisheye lenses usually focus very close -> true for the most recent fisheye lenses, not true for some older models
They are small and light -> Not true. Canon 8-15mm and Nikon 8/15mm are fairly chunky lenses with lots of glass
When shooting ultra-wide angle, you benefit from a large depth of field -> not a property of the fisheye lens but of the focal lens. In fact due to the extreme field of view Fisheye lenses have issues of depth of field.
This is a tea towel shot with a rectilinear lens. Note how sharp the target is at f/5.6
Rectilinear f/5.6
This is the same target at the same distance with the Canon 8-15mm at f/5.6 note how the edges are blurry and the blur starts very near centre.
fisheye f/5.6
You need to stop down the lens to f/16 to start getting coverage for the edges.
fisheye f/16
You can get very close to large subjects, maximizing color and sharpness -> This is a consequence of close working distance and wide field of view however sharpness is another story
As we have seen before fisheye shots at close distance are generally not that sharp especially at the edges.
They perform well behind dome ports with good corner sharpness, and they don’t need a diopterThis happens to be true in practice and it is a major benefit for the underwater shooter
We will dive in detail in this topic.
You usually need at least 2 strobes with good angle of coverage to properly light the entire area.Fisheye lenses cover an aspect ratio wider than the format aspect ratio and result in limited vertical angle of coverage. Fisheye lenses are ideal for two strobes except the very far edges.
A barrel gives an idea of the fisheye lens distortion
Let’s ignore the edges and assume we are a one meter.
Horizontal field of view 2*tan(71)=5.8 meters
Vertical field of view 2*tan(45.5)=2.03
Aspect Ratio = 2.85:1
The issue with fisheye lenses is that the frame is really very wide much wider than it is tall. This means some of the edges on the horizontal axis will be normally dark unless you are very very close.
Fisheye lenses and Dome Ports
A dome is simply a lens with a single element that has the property to retain the air field of view of a lens.
A dome is a lens with a lot of field of curvature simply because it is bent.
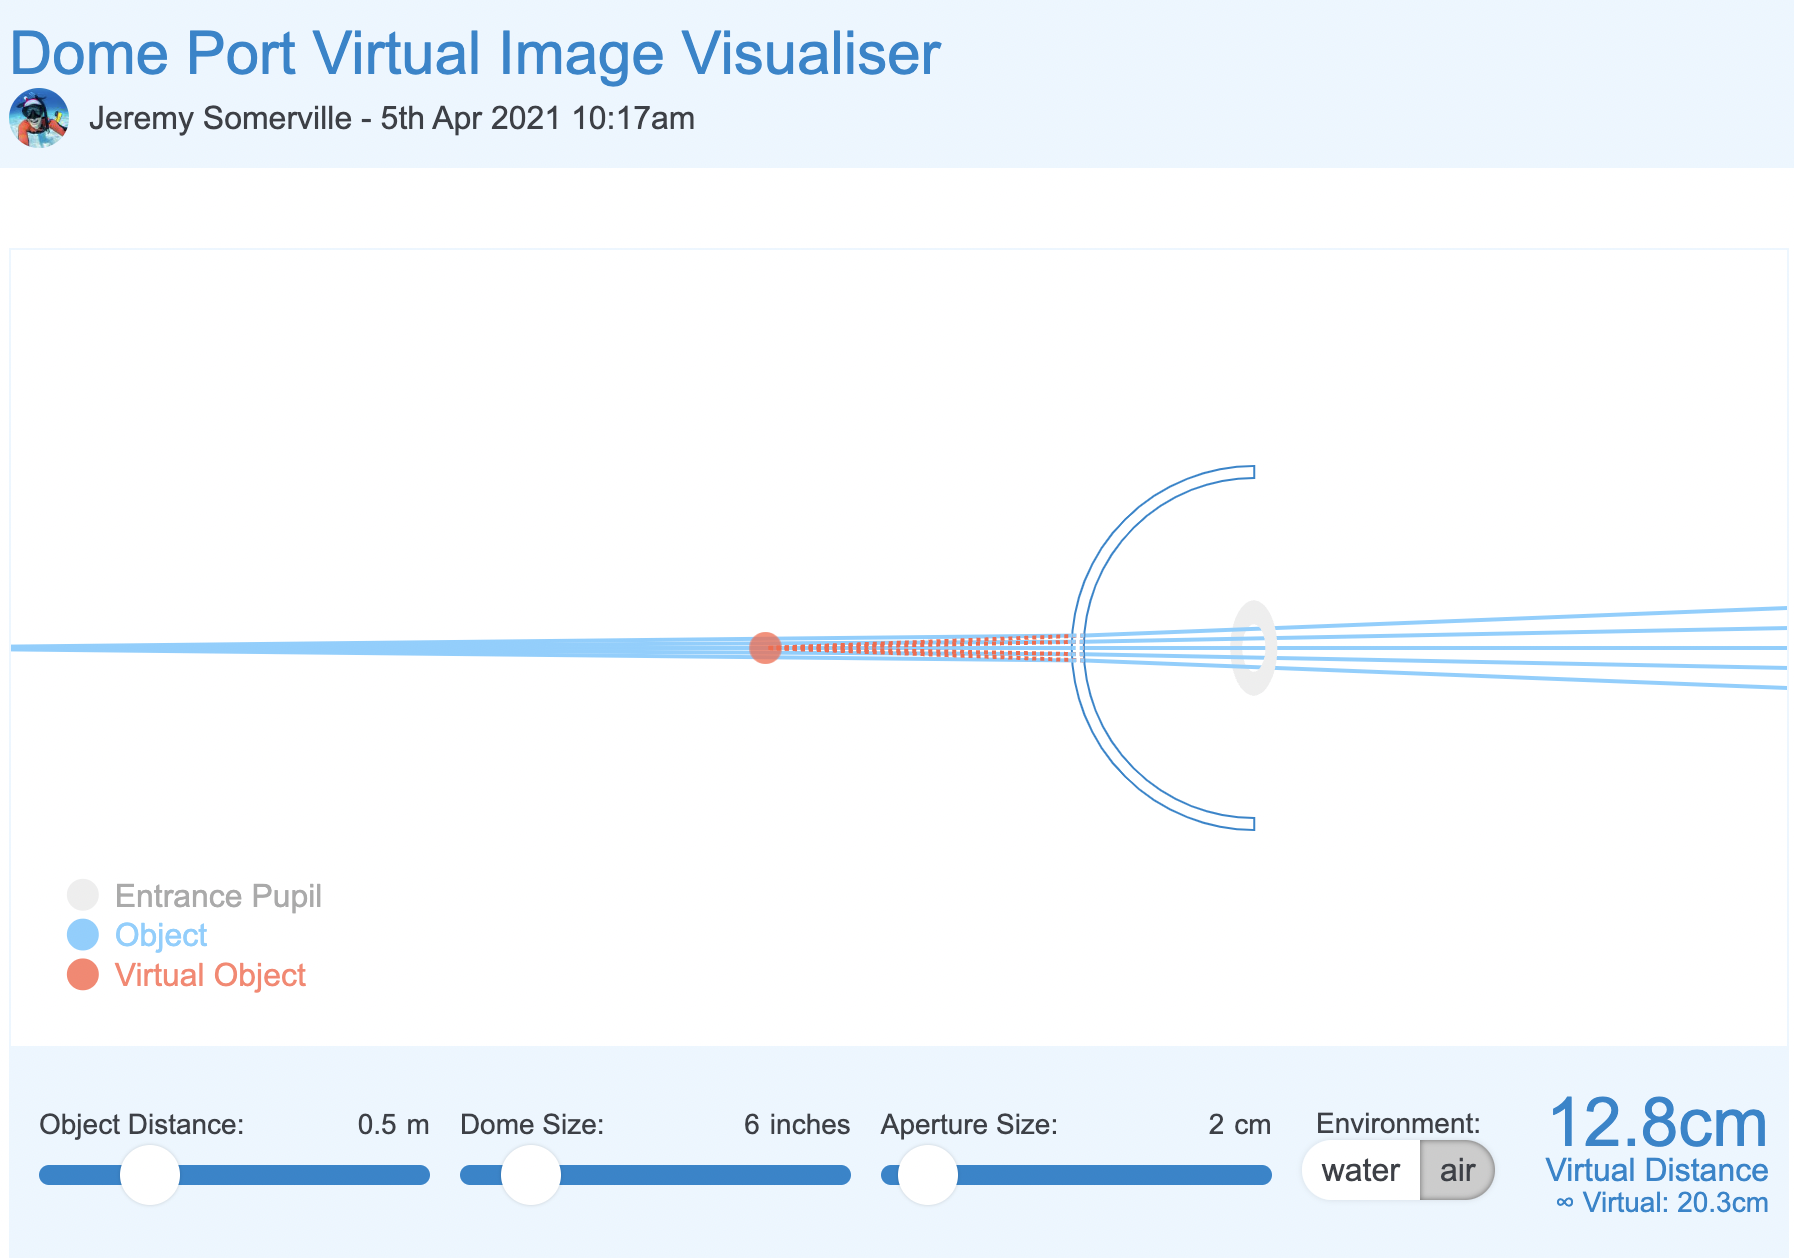
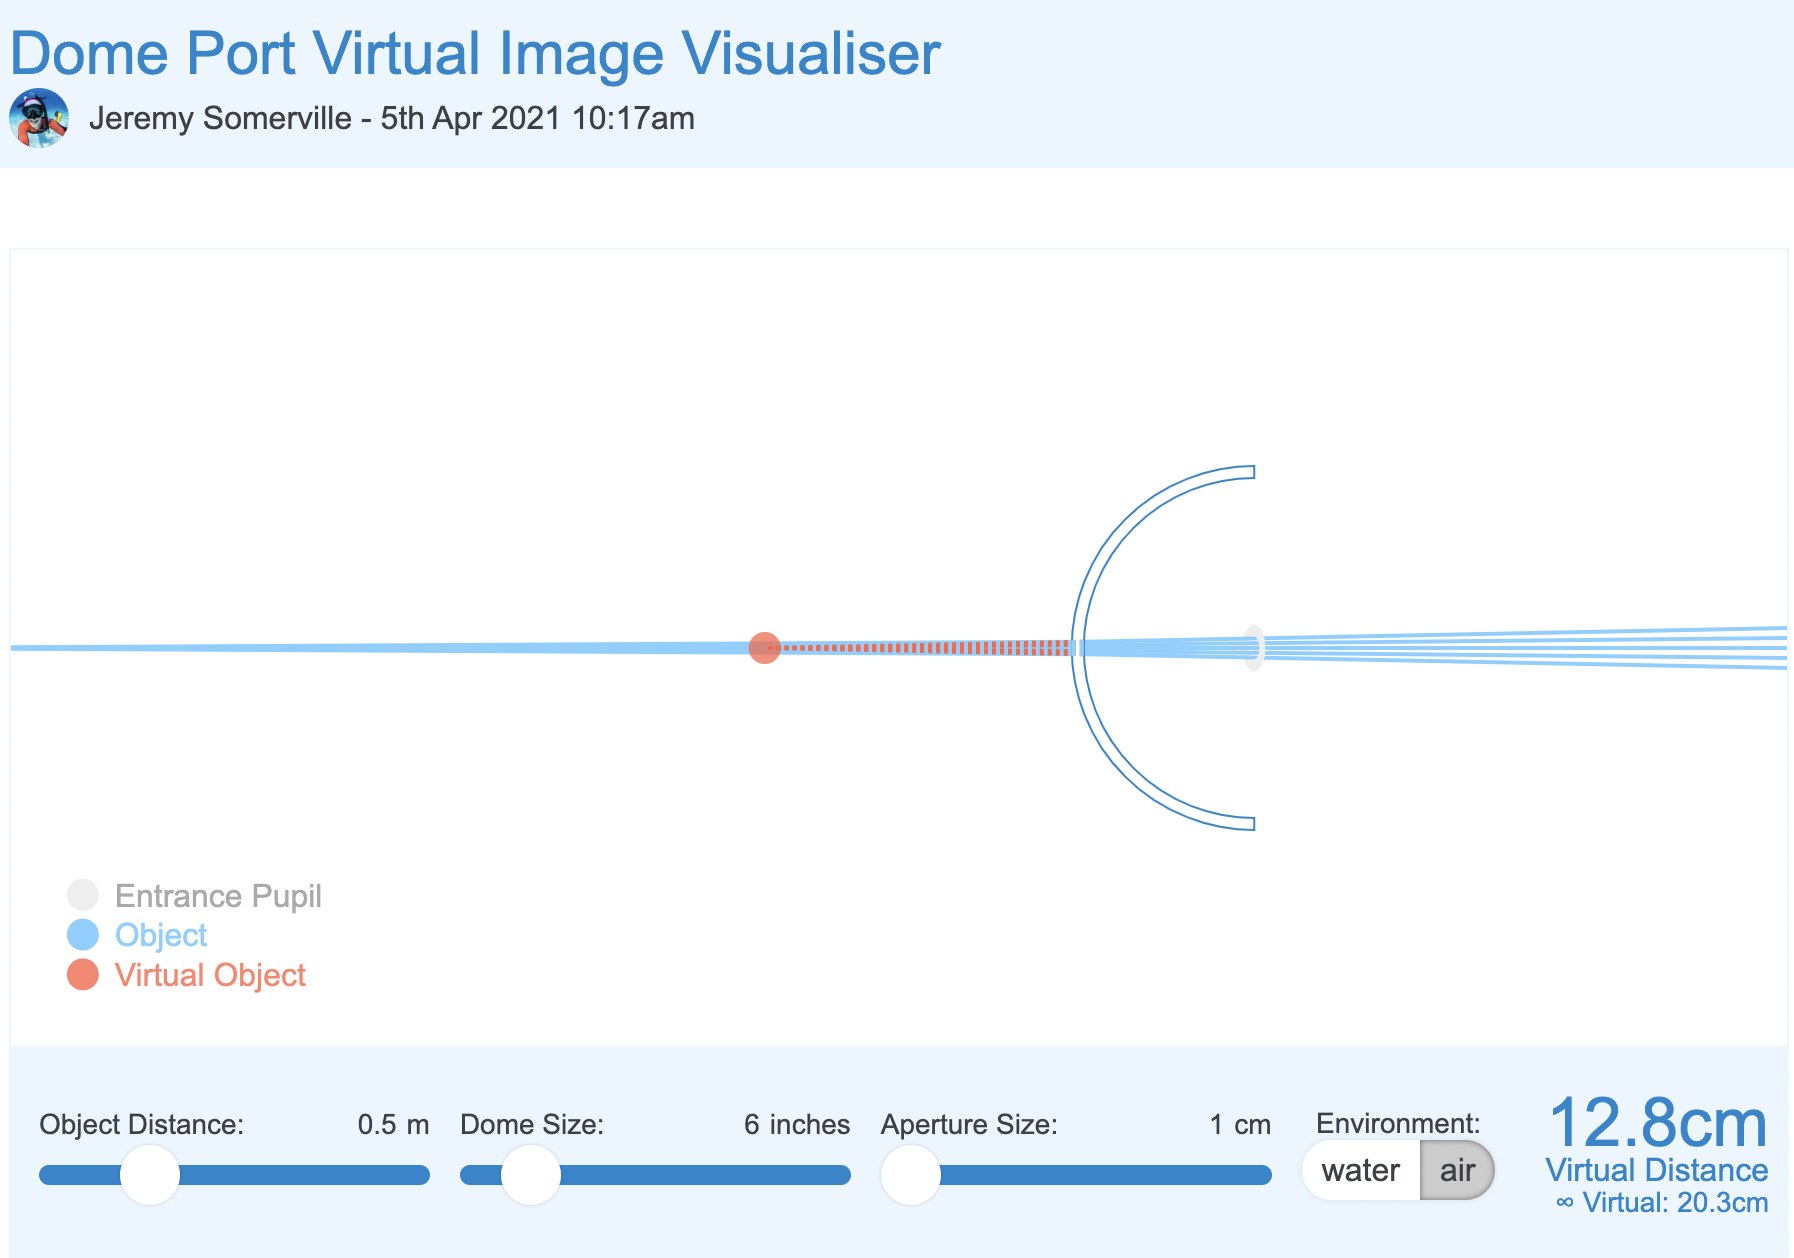
Using the dome port visualiser we can see that the effect of a dome is to bring the image closer to where it really is.
The net effect of a dome port is to increase the depth of field as infinity focus is reached much sooner.
A dome port has several side effects the main ones are:
Spherical aberration
Field of curvature
A fisheye lens works opposite to a dome. The centre of the frame is closer to the lens the edges are further away.
Domes, field of curvature and Fisheye lenses
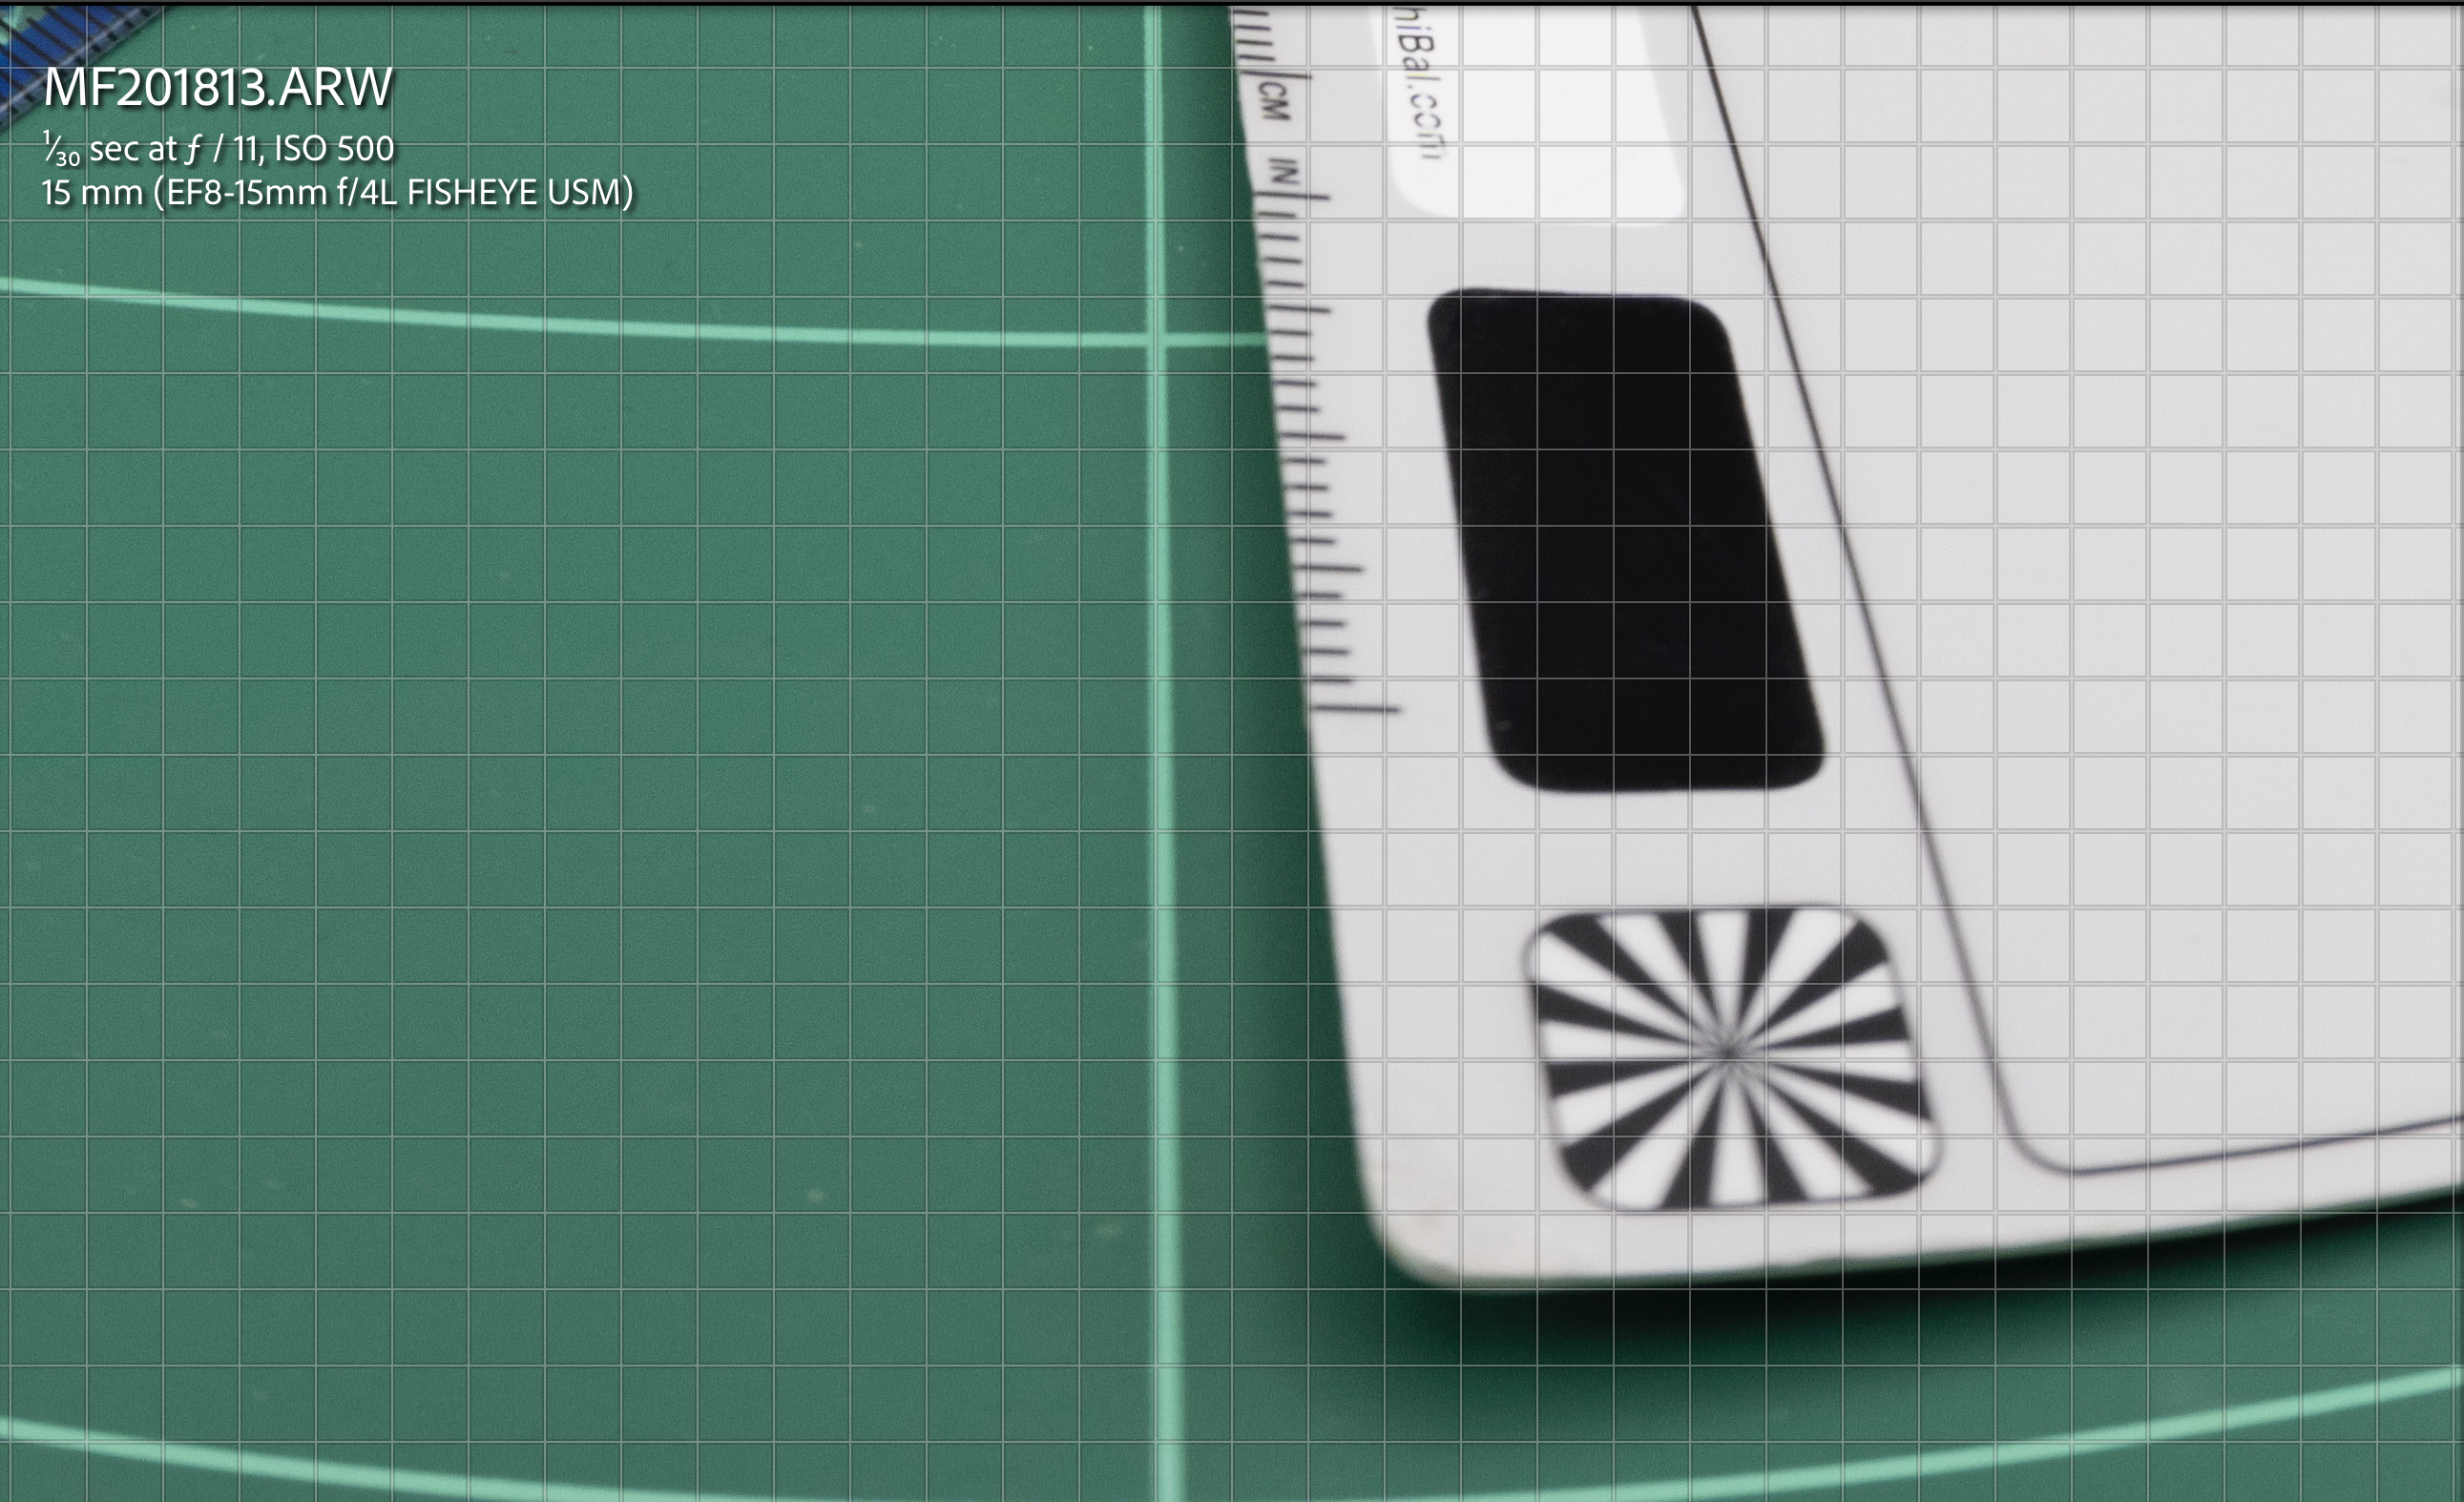
In order to understant how the barrel distortion works in combination with a dome port and a fisheye lens we can build a small simulation in a light box where the edges of the frame are closer than a flat target.
Target in a lightbox focussed head on
We can see that despite the edges are quite blurry this image is actually better than our flat target.
f/11 centre
At f/11 the image is not perfect but we can see that most details off centre are not looking bad at all.
f/11 edgef/11 detail crop
it is definitely blurry but not as bad as the tea towel as if the way the element are laid out improves the image in the corners.
And this is exactly the point: the items as laid out emulating the curvature of a dome improve the fisheye lens performance.
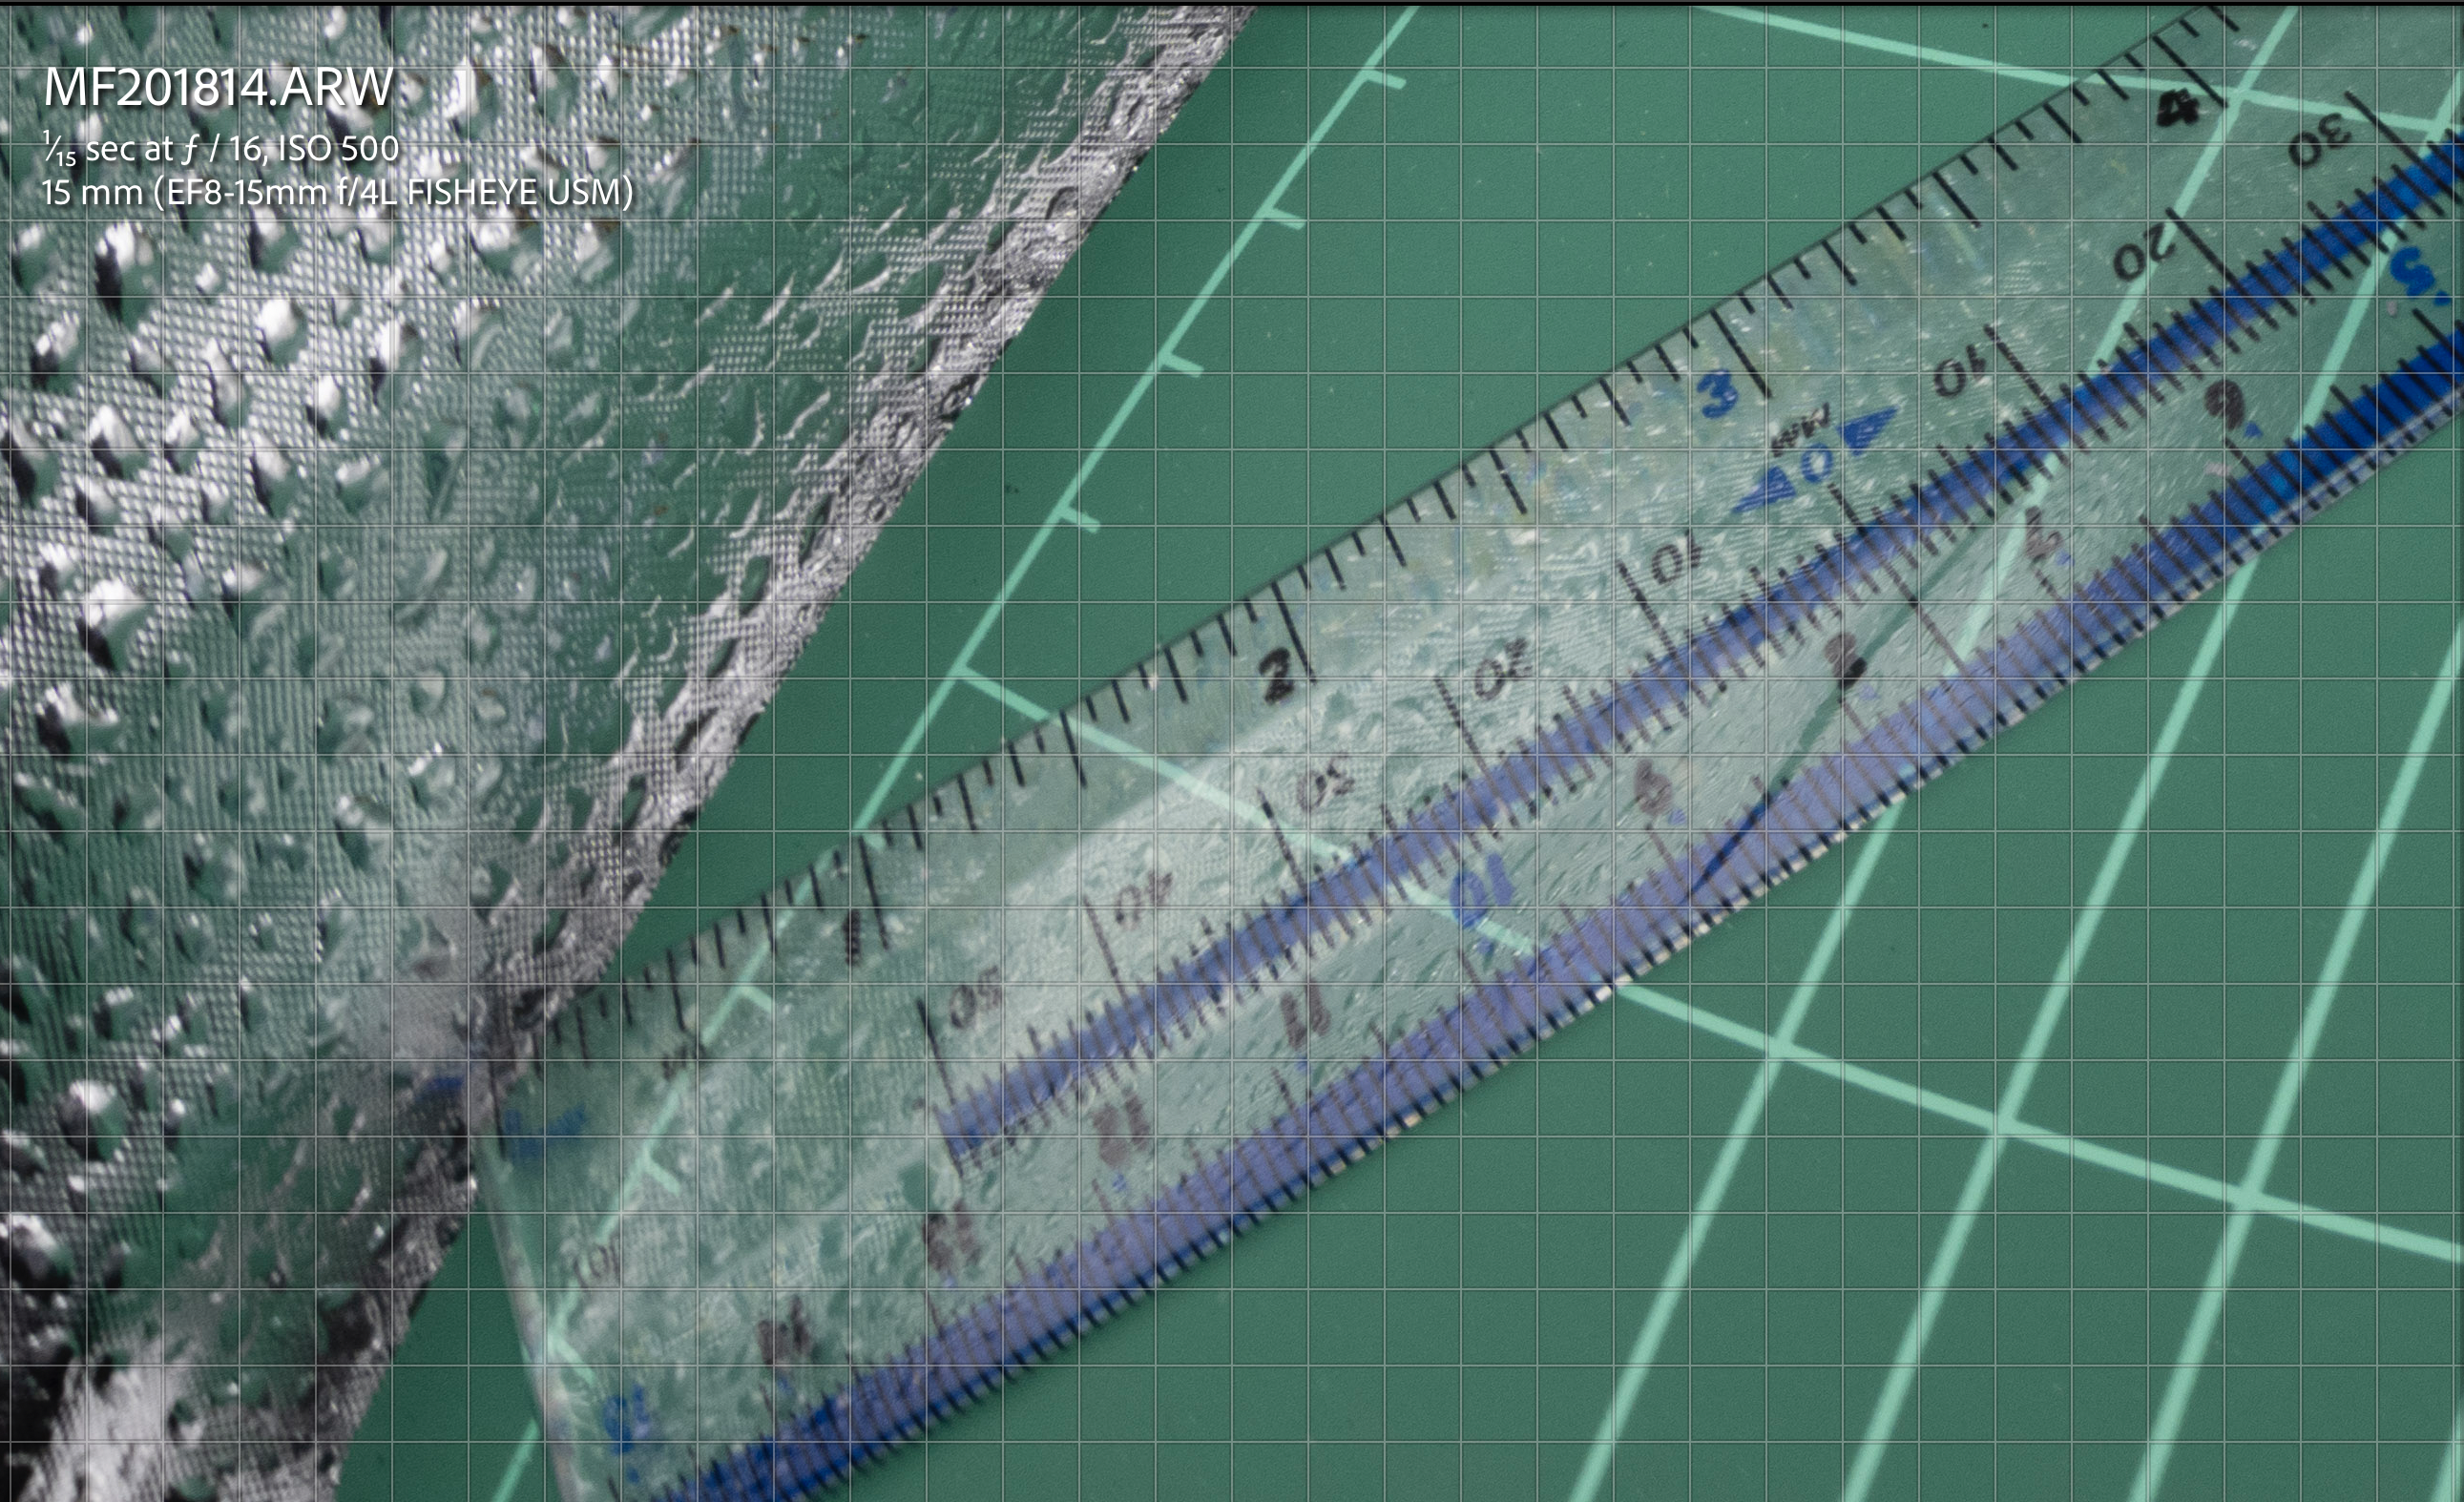
By f/16 the image is almost all sharp.
f/16 centref/16 edgeF/16 Centre 100%
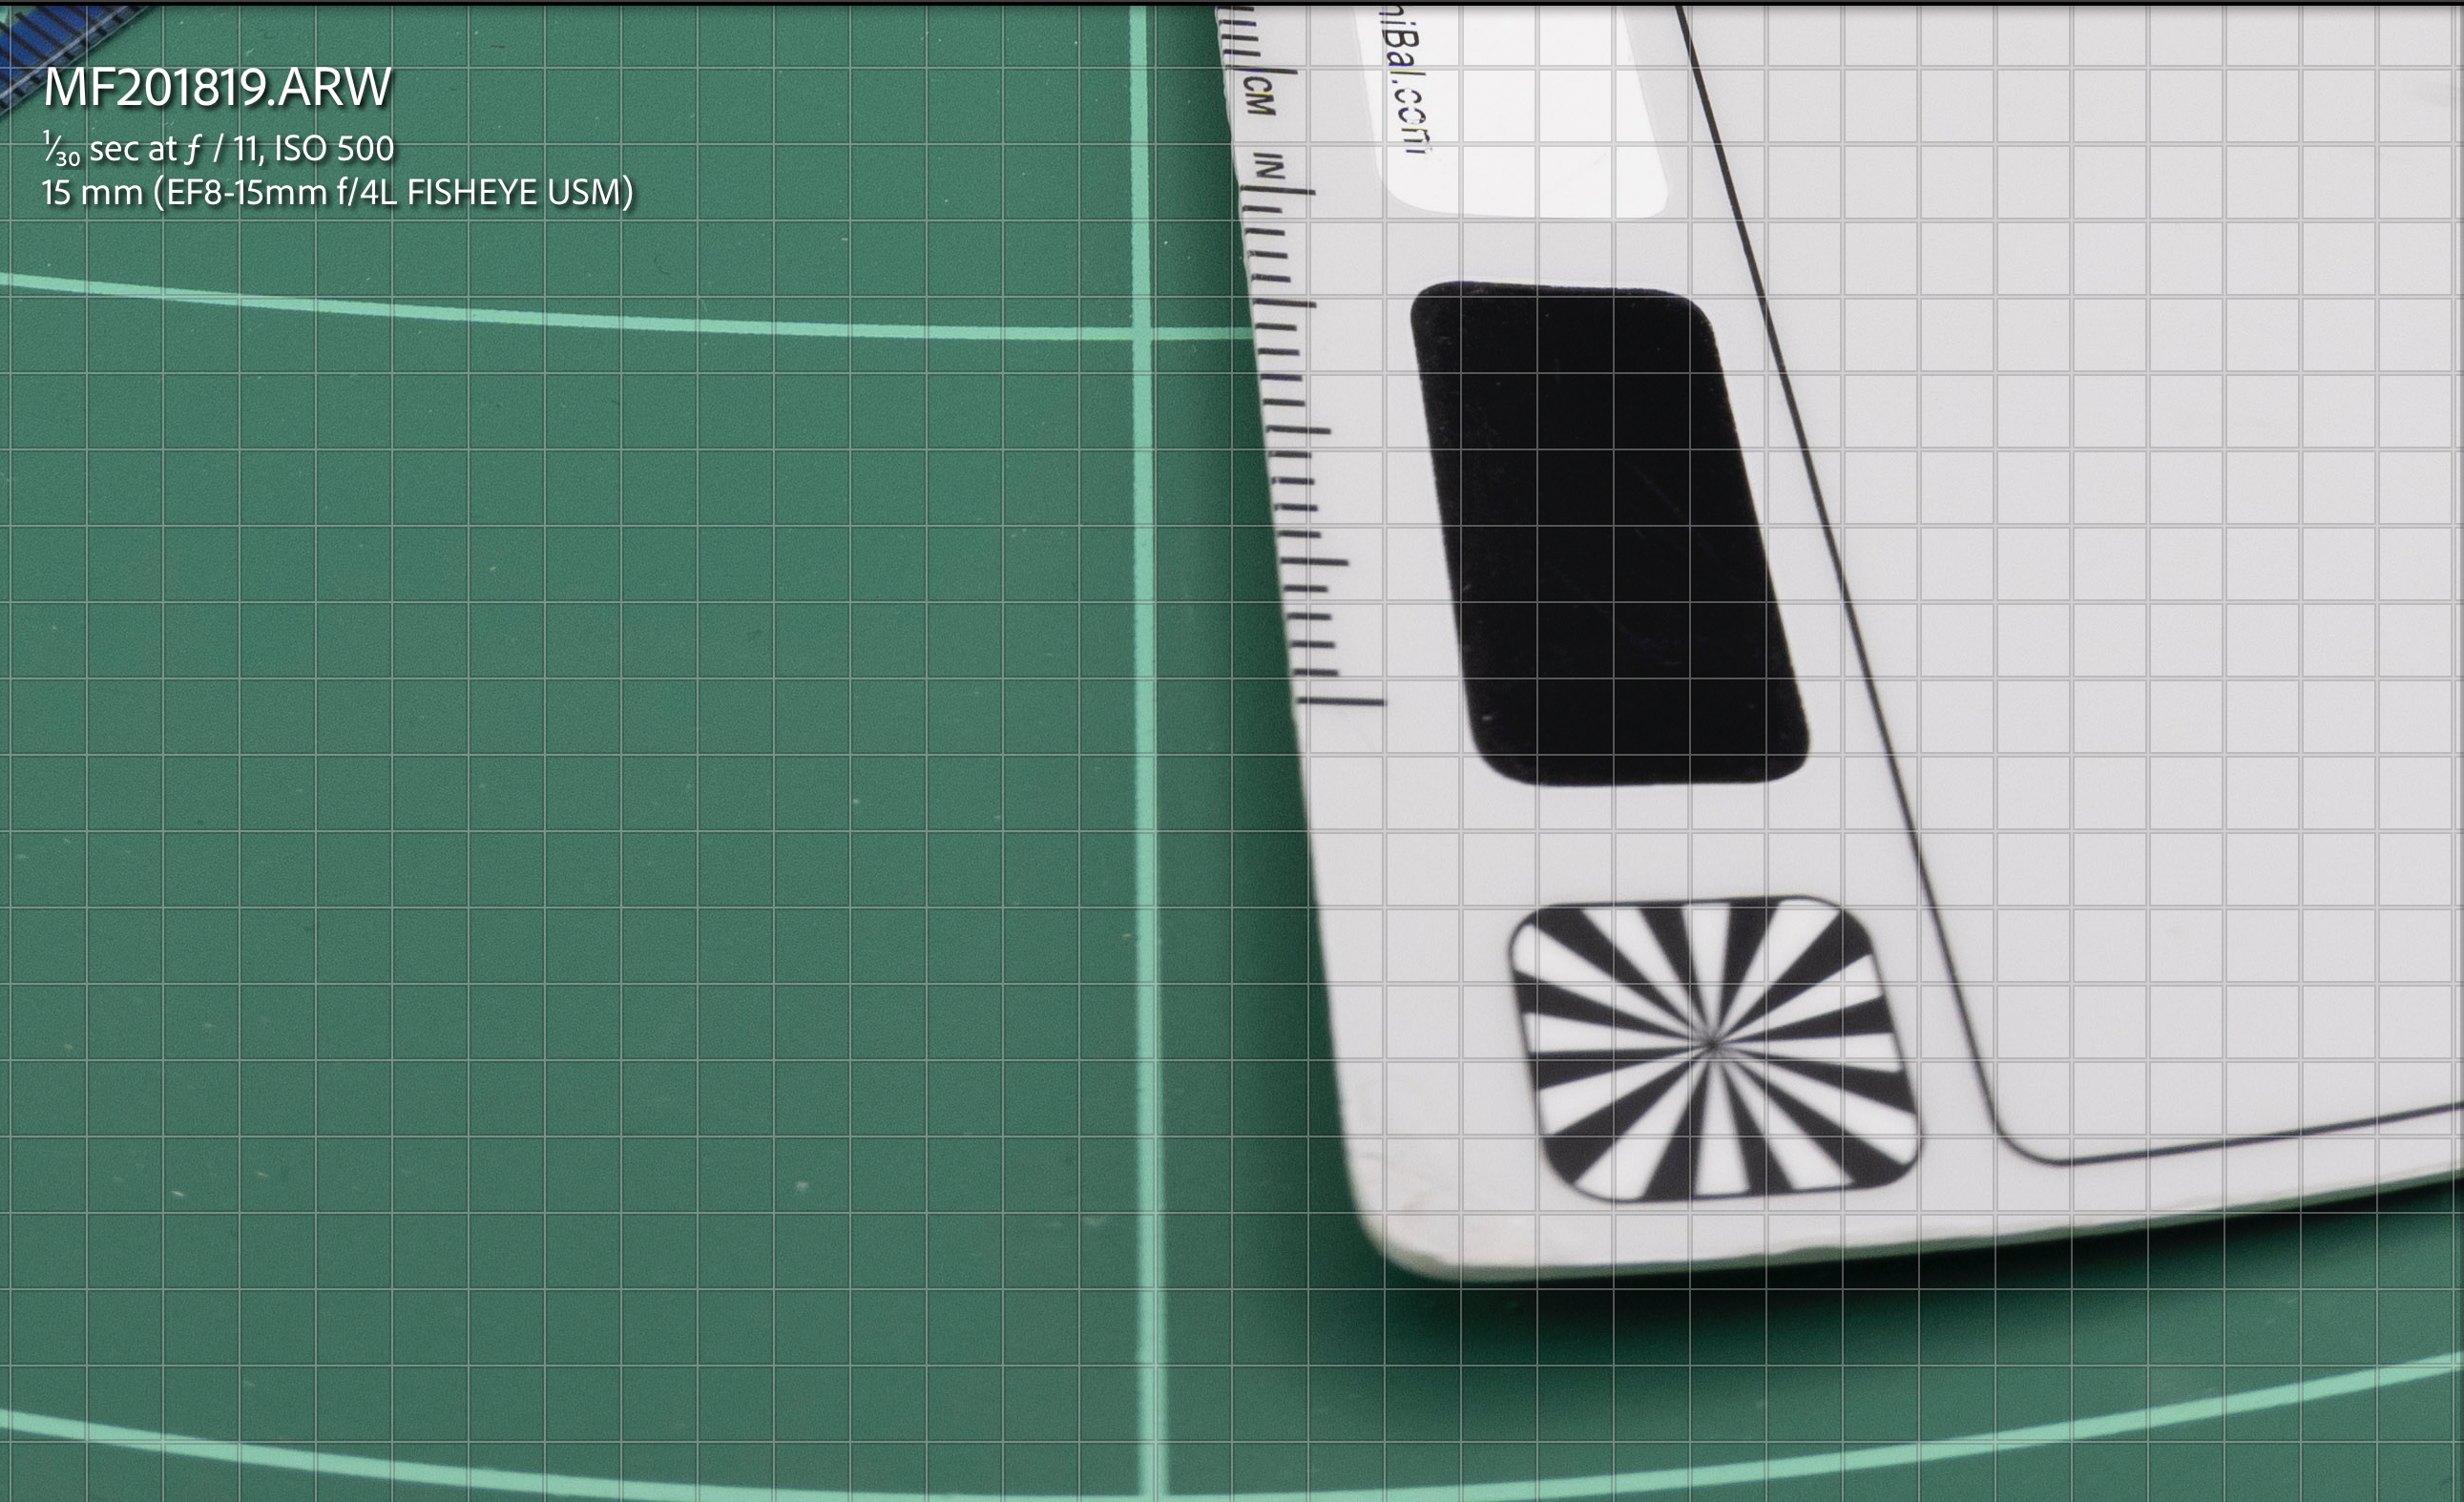
One trick is not to focus in the back of the frame but find a middle point this means we can find additional depth of field in front of the target.
Focus mid way
Let’s see how this goes. at f/11 we already get some better results.
f/11 off centref/11 edge off centre
f/11 off centre crop
At f/16 we get some additional improvement but is not as major as the original f/16
f/16 off centre
Looking at the other areas there are some minor improvements but generally less as we close down the aperture.
f/16 off centref/16 off centre 100% crop detail
In conclusion the layout of the image elements helps the fisheye lens to achieve better image quality this can be futher improve focussing off centre however closing down the aperture results in the best results regardless.
In short we can improve an image at f/11 by shooting off centre in a strategic point to improve depth of field but ultimately aperture plays a bigger role in improving performance of the fisheye lens.
A similar reasoning can be applied to dome size vs closing down the aperture.
We can plot a scenario in the dome simulator tool.
In the starting example our aperture is 4cm to similate our 15mm lens at f/4.
6″ dome f/4 simulator
We now reduce the aperture to 2cm which is more or less f/8
6″ dome f/8 simulation
And finally to 1cm which is more of less f/14. In reality this is mm not cm but should make you understand that aperture matters more than anything else.
6″ dome f/14 smulation
What we can see is that by reducing the aperture the light rays passing through the dome converge and this means stray light is reduced and as consequence spherical aberrations are decreased.
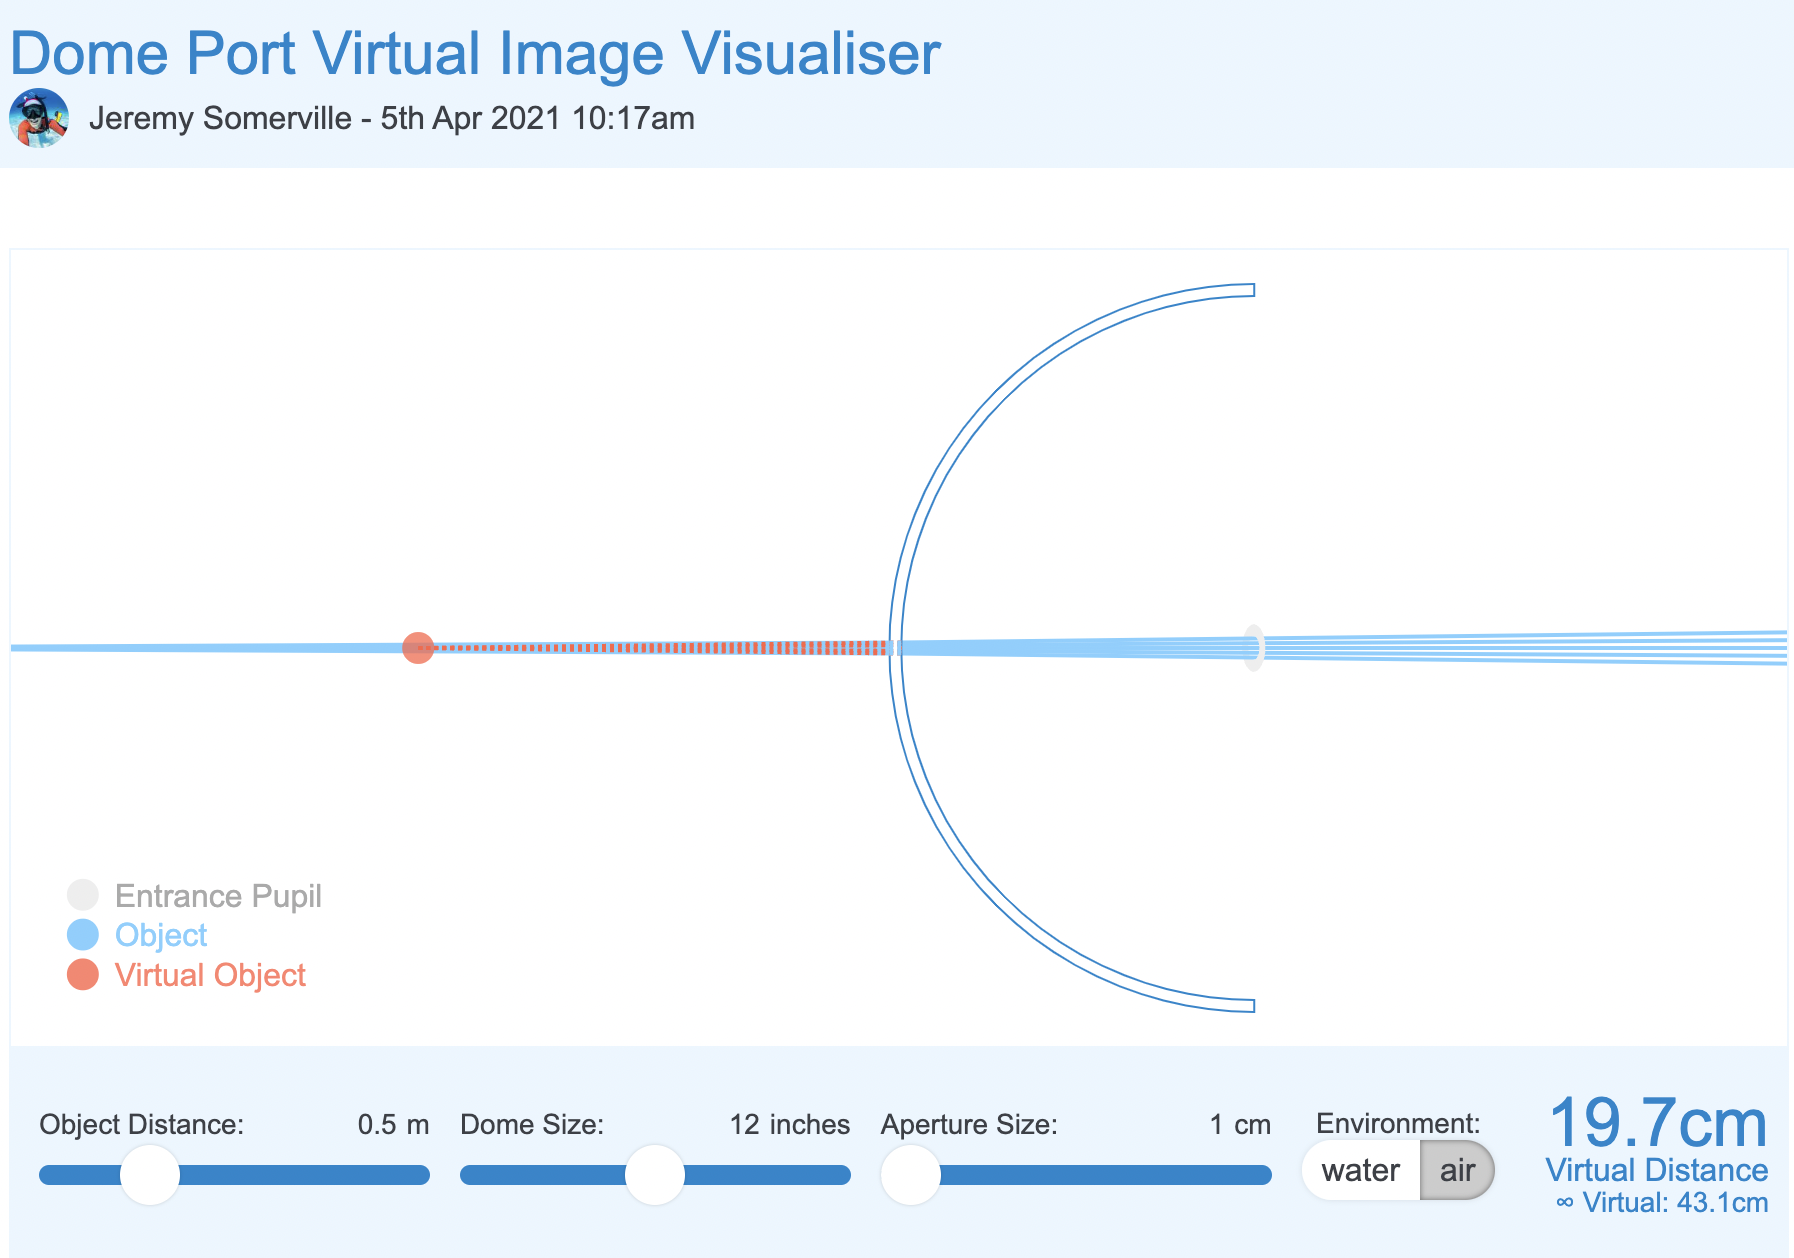
Let’s now introduce dome size which is the equivalent of depth of field in the mix in our light box shooting off centre.
12″ dome f/8 simulation
We can see that with a double size dome the converging effect on the light rays is not as significant as the aperture is already small, but nonetheless is present. This is consistent with our f/11 off centre use case.
Finally at aperture completely closed.
12″ dome f/14 simulation
Although virtual distance has increased significantly the effect of the large dome on the stray rays is not significant here aperture rules.
What does all of the above mean?
I realise this was a bit geeky.
To summarise a dome has two issues one is spherical aberration for the very shape of the dome. This is mostly cured by closing down the aperture. Dome size has limited effect here unless you shoot wide open and with apertures from f/14 we can see that large dome vs small dome does not really matter.
However when it comes to field of curvature large dome helps the situation but because fisheye lens have barrel distortion and this has a counter effect to dome shape curvature therefore dome size matters much less to a fisheye lens than it would to a rectilinear lens.
Some additional insight in this post. And the summary finding here.
The takeaway message is this: stopping down the aperture improves field curvature and astigmatism somewhat, improves coma a lot, and improves spherical aberration most of all. The sum total of these effects changes our ‘area of best focus’, which is what we photographers really mean when we say ‘field curvature’.
We could paraphrase this by saying:
A dome port increases depth of field and a fisheye lens, due to barrel distortion, benefits from a dome port. Optical aberrations introduced by the dome are mostly addressed by stopping down the aperture. The size of the dome port does not matter too much when using a fisheye lens and the benefit on aberrations of a much larger size dome is likely to be minimal when we look at that simulator. Focussing appropriately mitigates residual issues of field of curvature of the dome for the fisheye lens.
Underwater proof of concept
I took my Sony A1 with a Canon 8-15mm first and then with a WWL-1 that behaves very much like a fisheye lens.
Let’s have a look at some images shot with Nauticam 140mm dome.
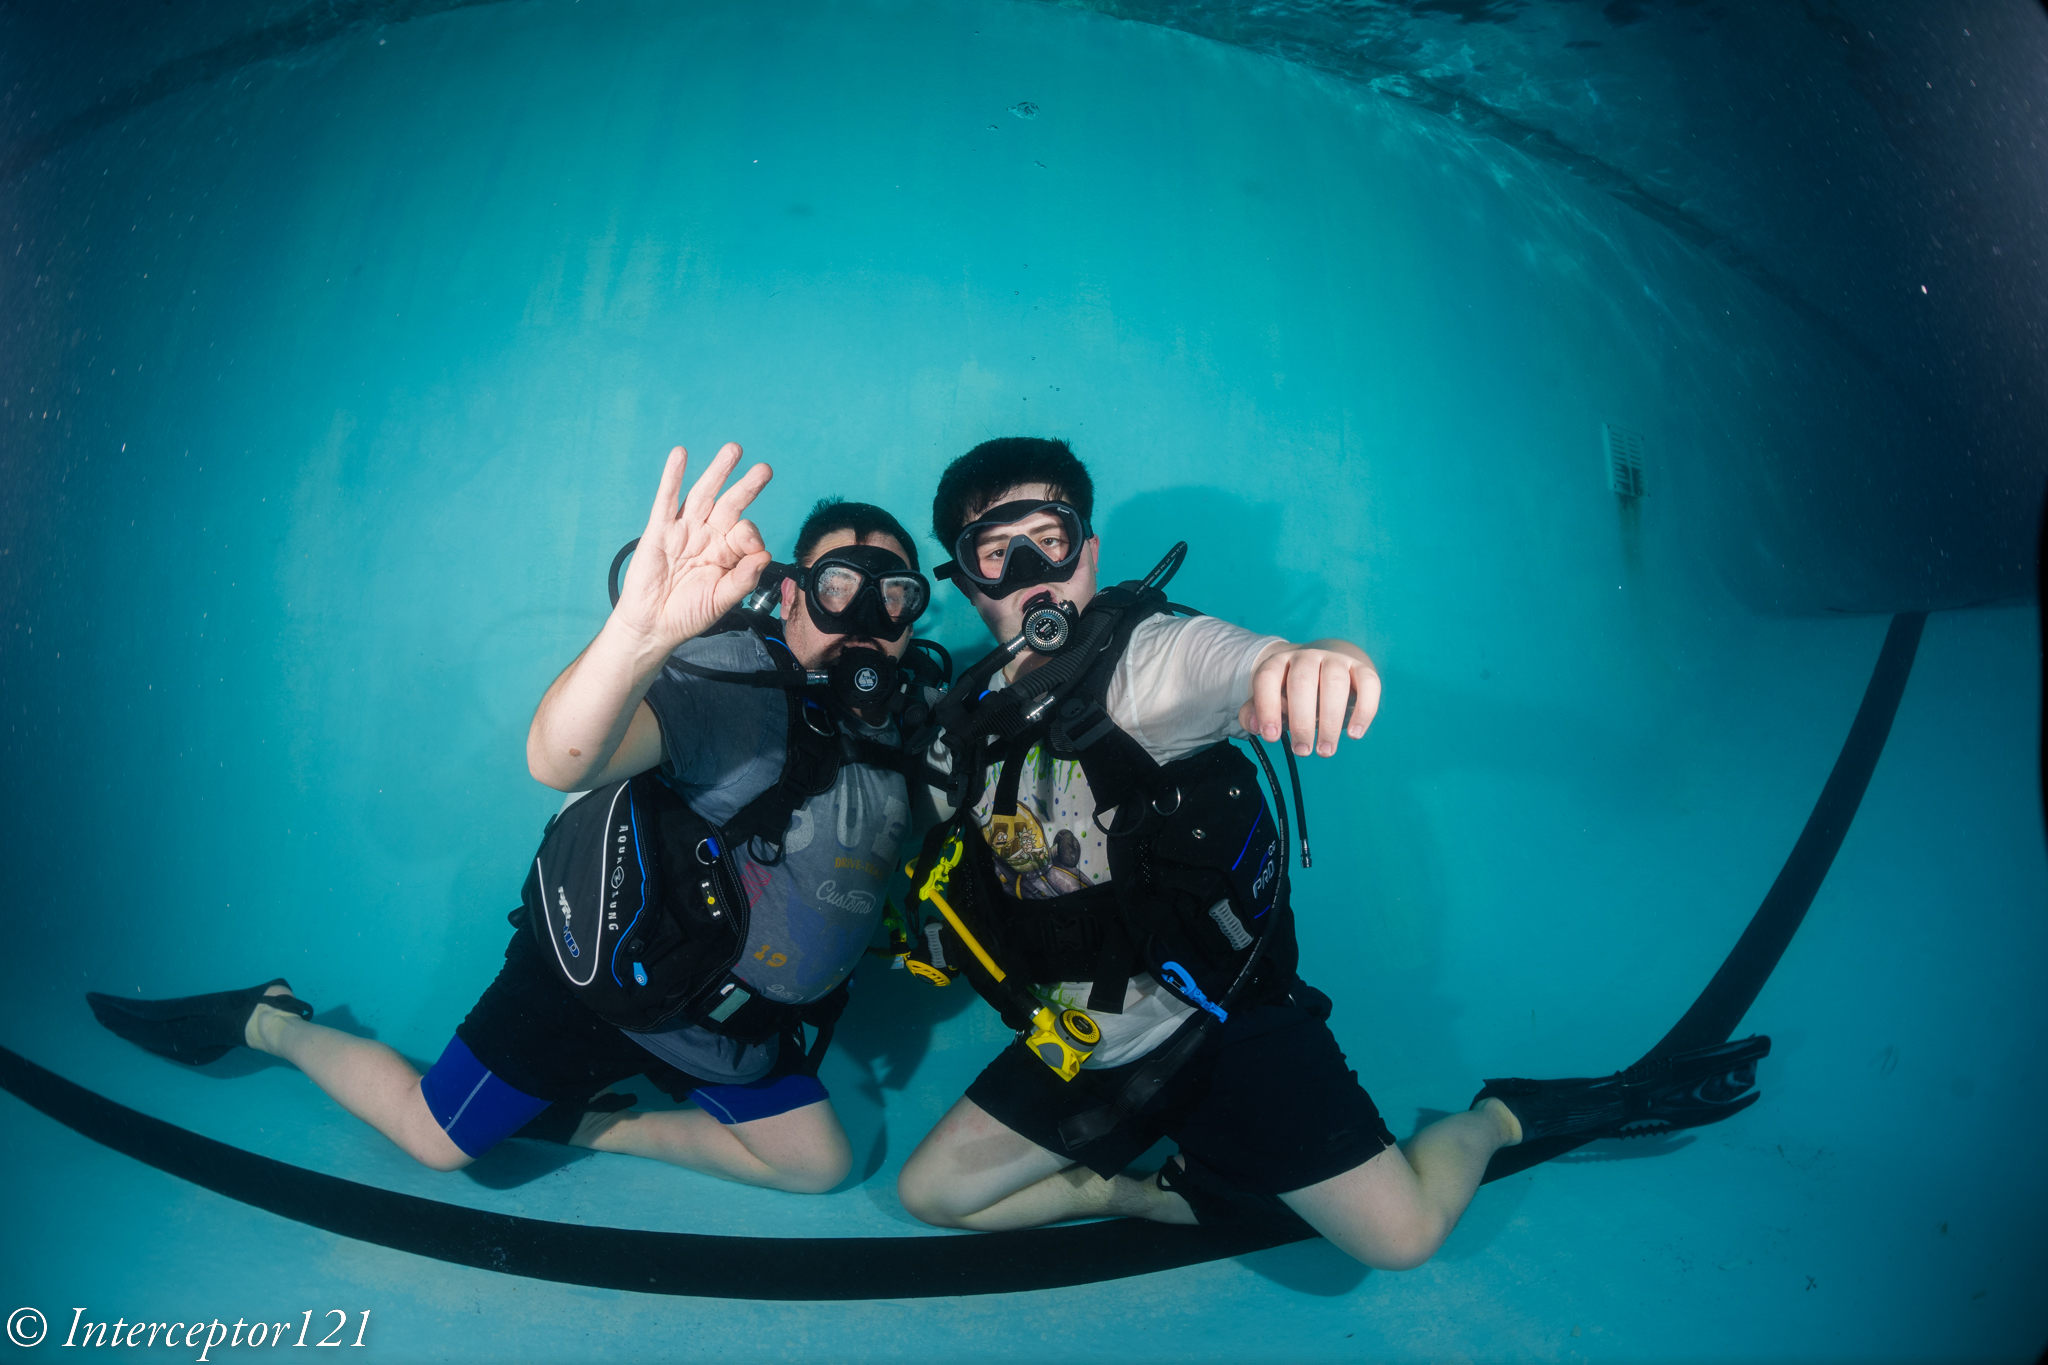
The two buddies at f/8
The image above sees two buddies in the frame almost flat with their fins going back in the frame however the result is much better than the lightbox example as result of distance and dome port increasing field of view and adding curvature to bring the fins in.
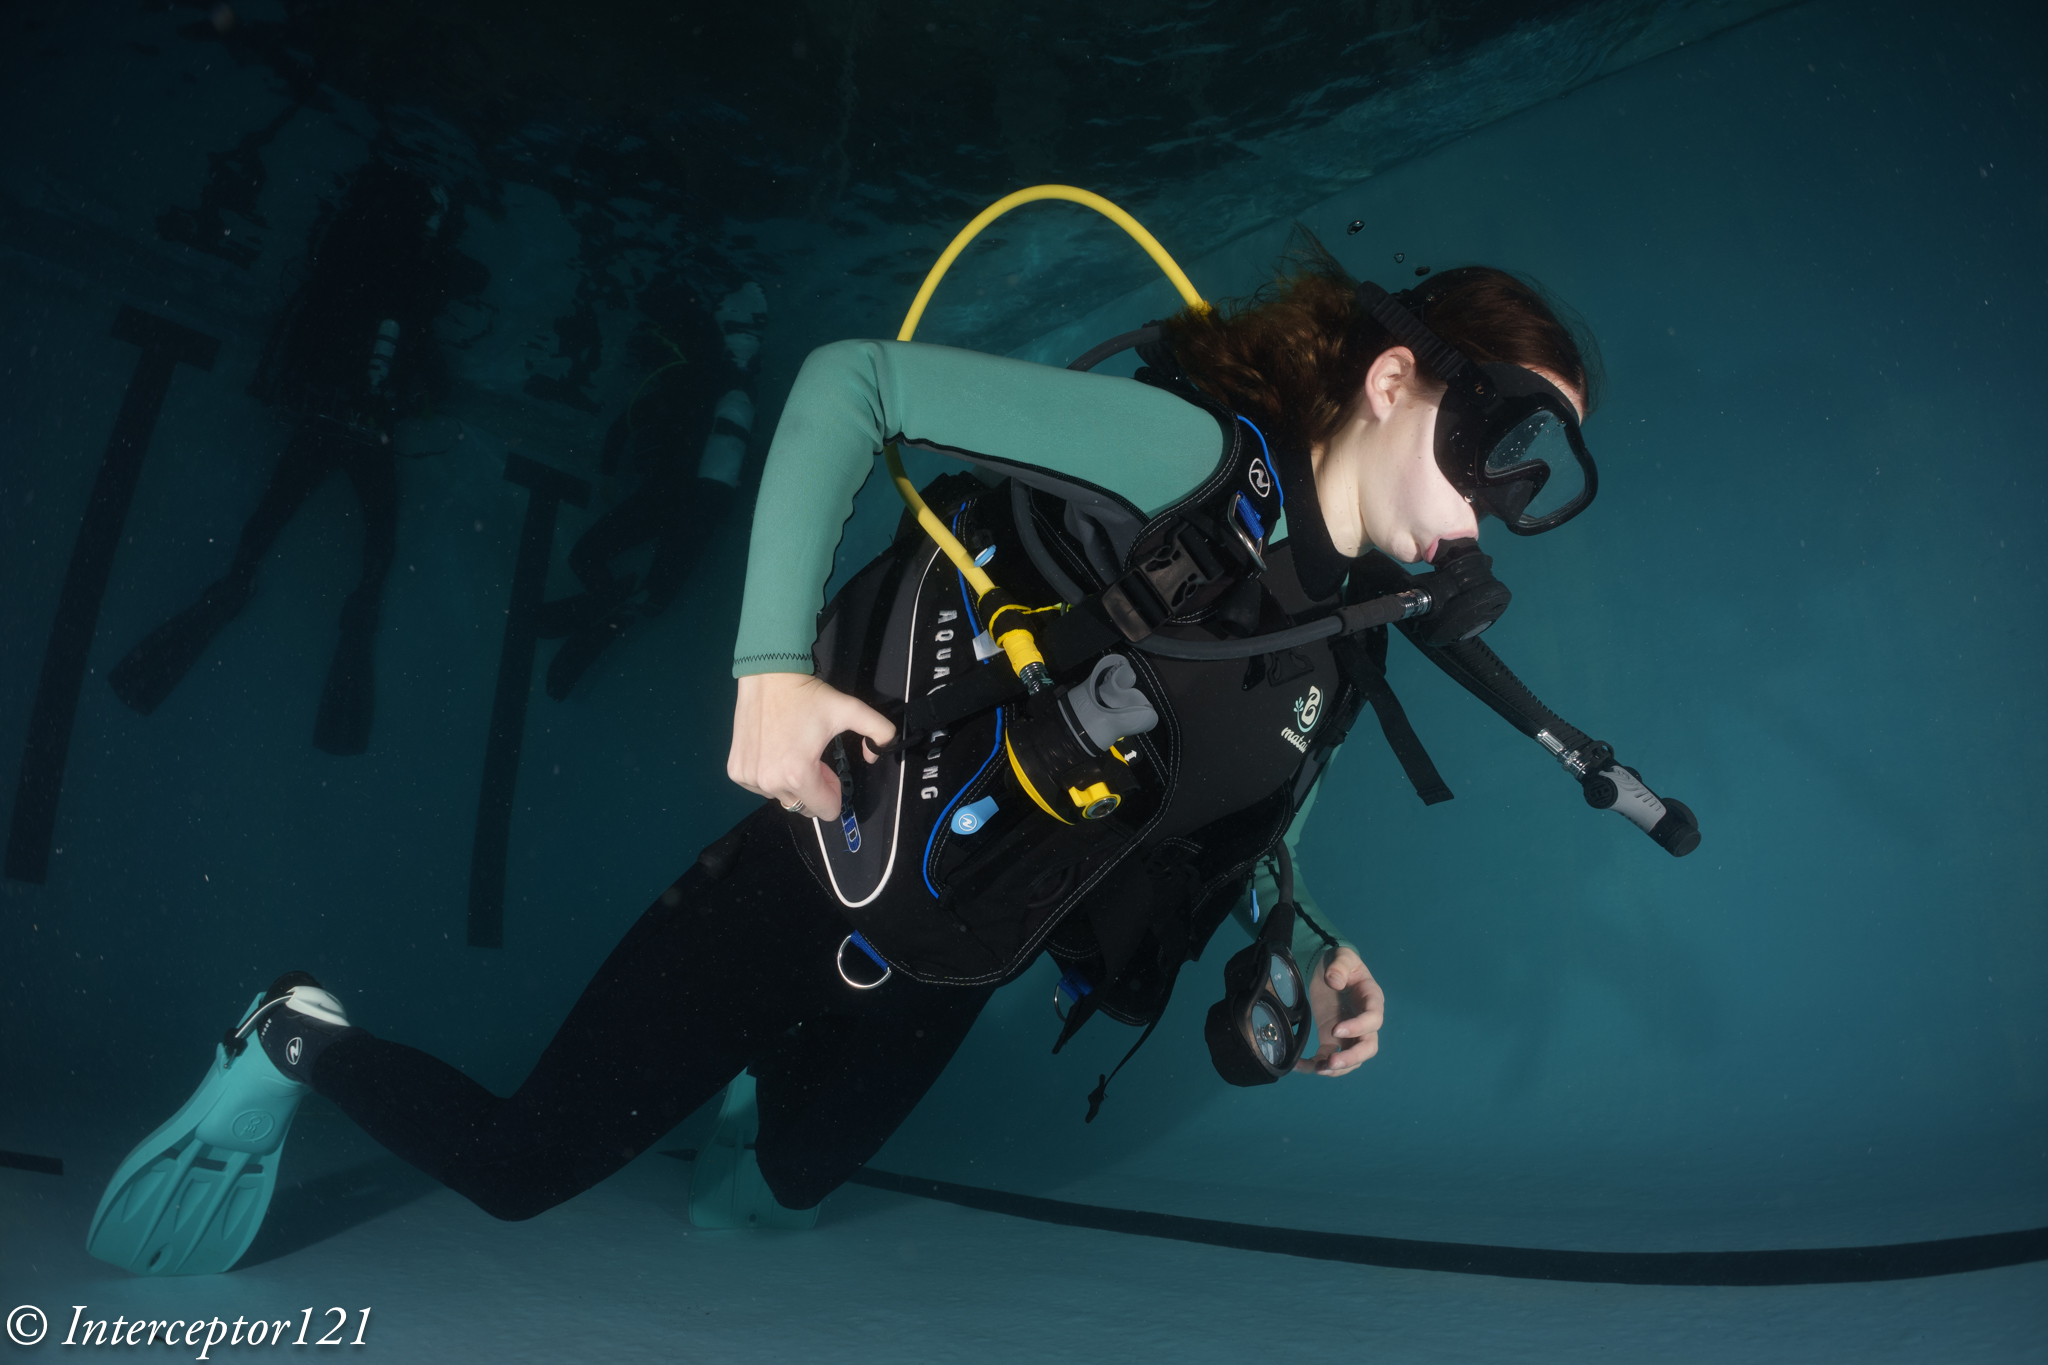
This however does not resolve all issues if you focus near like in this example focussed on the eye of the croc
Focus on the eye at f/8
Here the eye is close resulting in the tail being blurred this is an effect of close distance and lack of depth of field despite the dome.
More interesting the nose is even more blurred as the dome brings that even close and blurs away due to field of curvature as the focus point is behind.
In this other example instead of focussing on the eye the focus goes mid frame so the fins are still in decent shape even if deep in the frame at f/8.
Focus midway
In order to prove the concept even more I took some props underwater.
First let’s have a look a shot at f/8 with the WWL-1.
Close up at f/8
As we can see the image is not too bad even in the close area but it is definitely better at f/11
Close up at f/11
What happens if we position the target off centre?
Contrary to our topside example the situation does not improve by focussing on the edge to further prove the issue here is NOT depth of field.
Focus off centre f/8
Here a detail crop the image is still fuzzy despite then focus is right on the spot. Depth of field is not the issue.
Edge focus at f/8
And finally we close down the aperture to f/11.
Edge at f/11
Crop at 100%
Edge at f/11
So here we can see that the underwater interface provides already for the depth of field but moving the focus at the edges does not have such a good effect.
Why? Because this is likely to do with aberrations of the lens itself as shown in my previous post on the Sony 28-60mm.
The combined 28mm with WWL-1 at f/8 means 20/8-2.5 mm aperture when stopped down to f/11 this becomes small enough to cure aberrations (less than 1cm with reduced field of view is sufficient).
For the same reason ASPC and MFT will be able to shoot at wider aperture not because of depth of field but due to smaller lens aperture.
15mm fisheye at f/14 –> 1.07mm physical aperture
8mm MFT fisheye at f/8 –> 1mm physical aperture
Again it is not the depth of field but the aperture size to cure most aberrations.
Conclusion
All Nauticam port chart recommend the 140mm dome and not larger domes. This is aligned with the theory behind this post that dome size ultimately matters but not as much as stopping down the lens and that fisheye are naturally helped by dome port geometry.
This conclusion also extends to water contact optics which are composed by a fisheye like demagnifier and an integrated dome port.
As long as the rear element of the lens is big enough the increased size of the lens does not result in proportional improvement of performance.
To support the empirical evidence of this article you can read this review of the 140mm dome by Alex Mustard.
By coincidence Alex recommends shooting at f/14 or f/16 which means a physical aperture of 1mm which cures all sorts of aberrations.
Considering that the benefit of a much larger dome may be as small as 1/2 to 2/3 aperture stops you may consider going the opposite way and get a very small dome which will result in additional spherical aberration and will need to be stopped down more when shooting very close.
If you use the Nauticam system there are only two ports that are a full emisphere and therefore able to contain a fisheye lens field of view:
140mm optical glass fisheye port
4.33″ acrylic dome port
I happen to own both those ports and in a future article will compare and contrast the two. I will also revisit the topic of dome ports and rectilinear lenses which is obviously different from fisheye lenses.
When I got my A1 I looked at strobe triggering together with lenses housing and ports as for photography you will be mostly shooting with underwater strobes.
I got in contact with Shane Smith and Cindy Shaw and I asked them what they used and what their experiences were.
Shame has recently been highly commended for UPY and provided me a detailed breakdown of the Turtle TTL trigger. I recommend having a look at his website for great shots with Sony A1 here.
Cindy instead had a Nauticam manual trigger and we exchanged some messages on the burst functionality and the rear curtain sync.
Shane also owns a Nauticam trigger and both confirmed that this trigger only works with mechanical shutter and front curtain.
I use rear curtain on certain shots so I went on the lookout for a trigger that would support it that was not TTL.
I do not want to open a discussion on manual vs TTL however I shoot flash top side and even there I never use TTL unless I have to do a documentary/product shot and I have no time to prepare.
Strobe Trigger Options for Sony
I went on the lookout for options and my research included the following manufacturers:
Nauticam
UWTechnics
TRT Electronics
The following table is a summary of the various units I have directly or inderectly assessed.
Brand
Model
Price (€)
TTL
Rear Curtain
HSS
Burst
Multishot
Power
Programming required
Nauticam
Mini Flash Trigger
294
No
No
No
Yes
No
Battery
No
UWTechnics
11075- HSS/TTL Converter
485
Yes
Yes
Yes
Yes
No
Battery
No
Turtle Manual
Turtle Manual
299
No
Yes
Yes
Yes
No
Rechargeable
No
Turtle Smart TTL
Turtle Smart
387
Yes
Yes
Yes
Yes
Yes
Rechargeable
Yes
Strobe Triggers for Sony
Only Turtle triggers seemed to offer all the features I was looking for so I contacted Pietro Cremone at fotosub shop after a long discussion with Turtle electronics technical team who did some remote tests for me on an A1. The A1 can trigger flash with electronic shutter and this is something I was looking for.
Turtle Manual vs TTL
The turtle TTL trigger has all the feature of the manual in addition it offers TTL of course and a cool feature called multishot.
I personally do not have any interest in TTL but my main issue with this product is that in order to change for example from front to rear curtain you need to reprogram it.
I wanted a solution with no computer where I could control all settings from the camera and is not TTL. This is achieved only by the Manual Turtle Trigger.
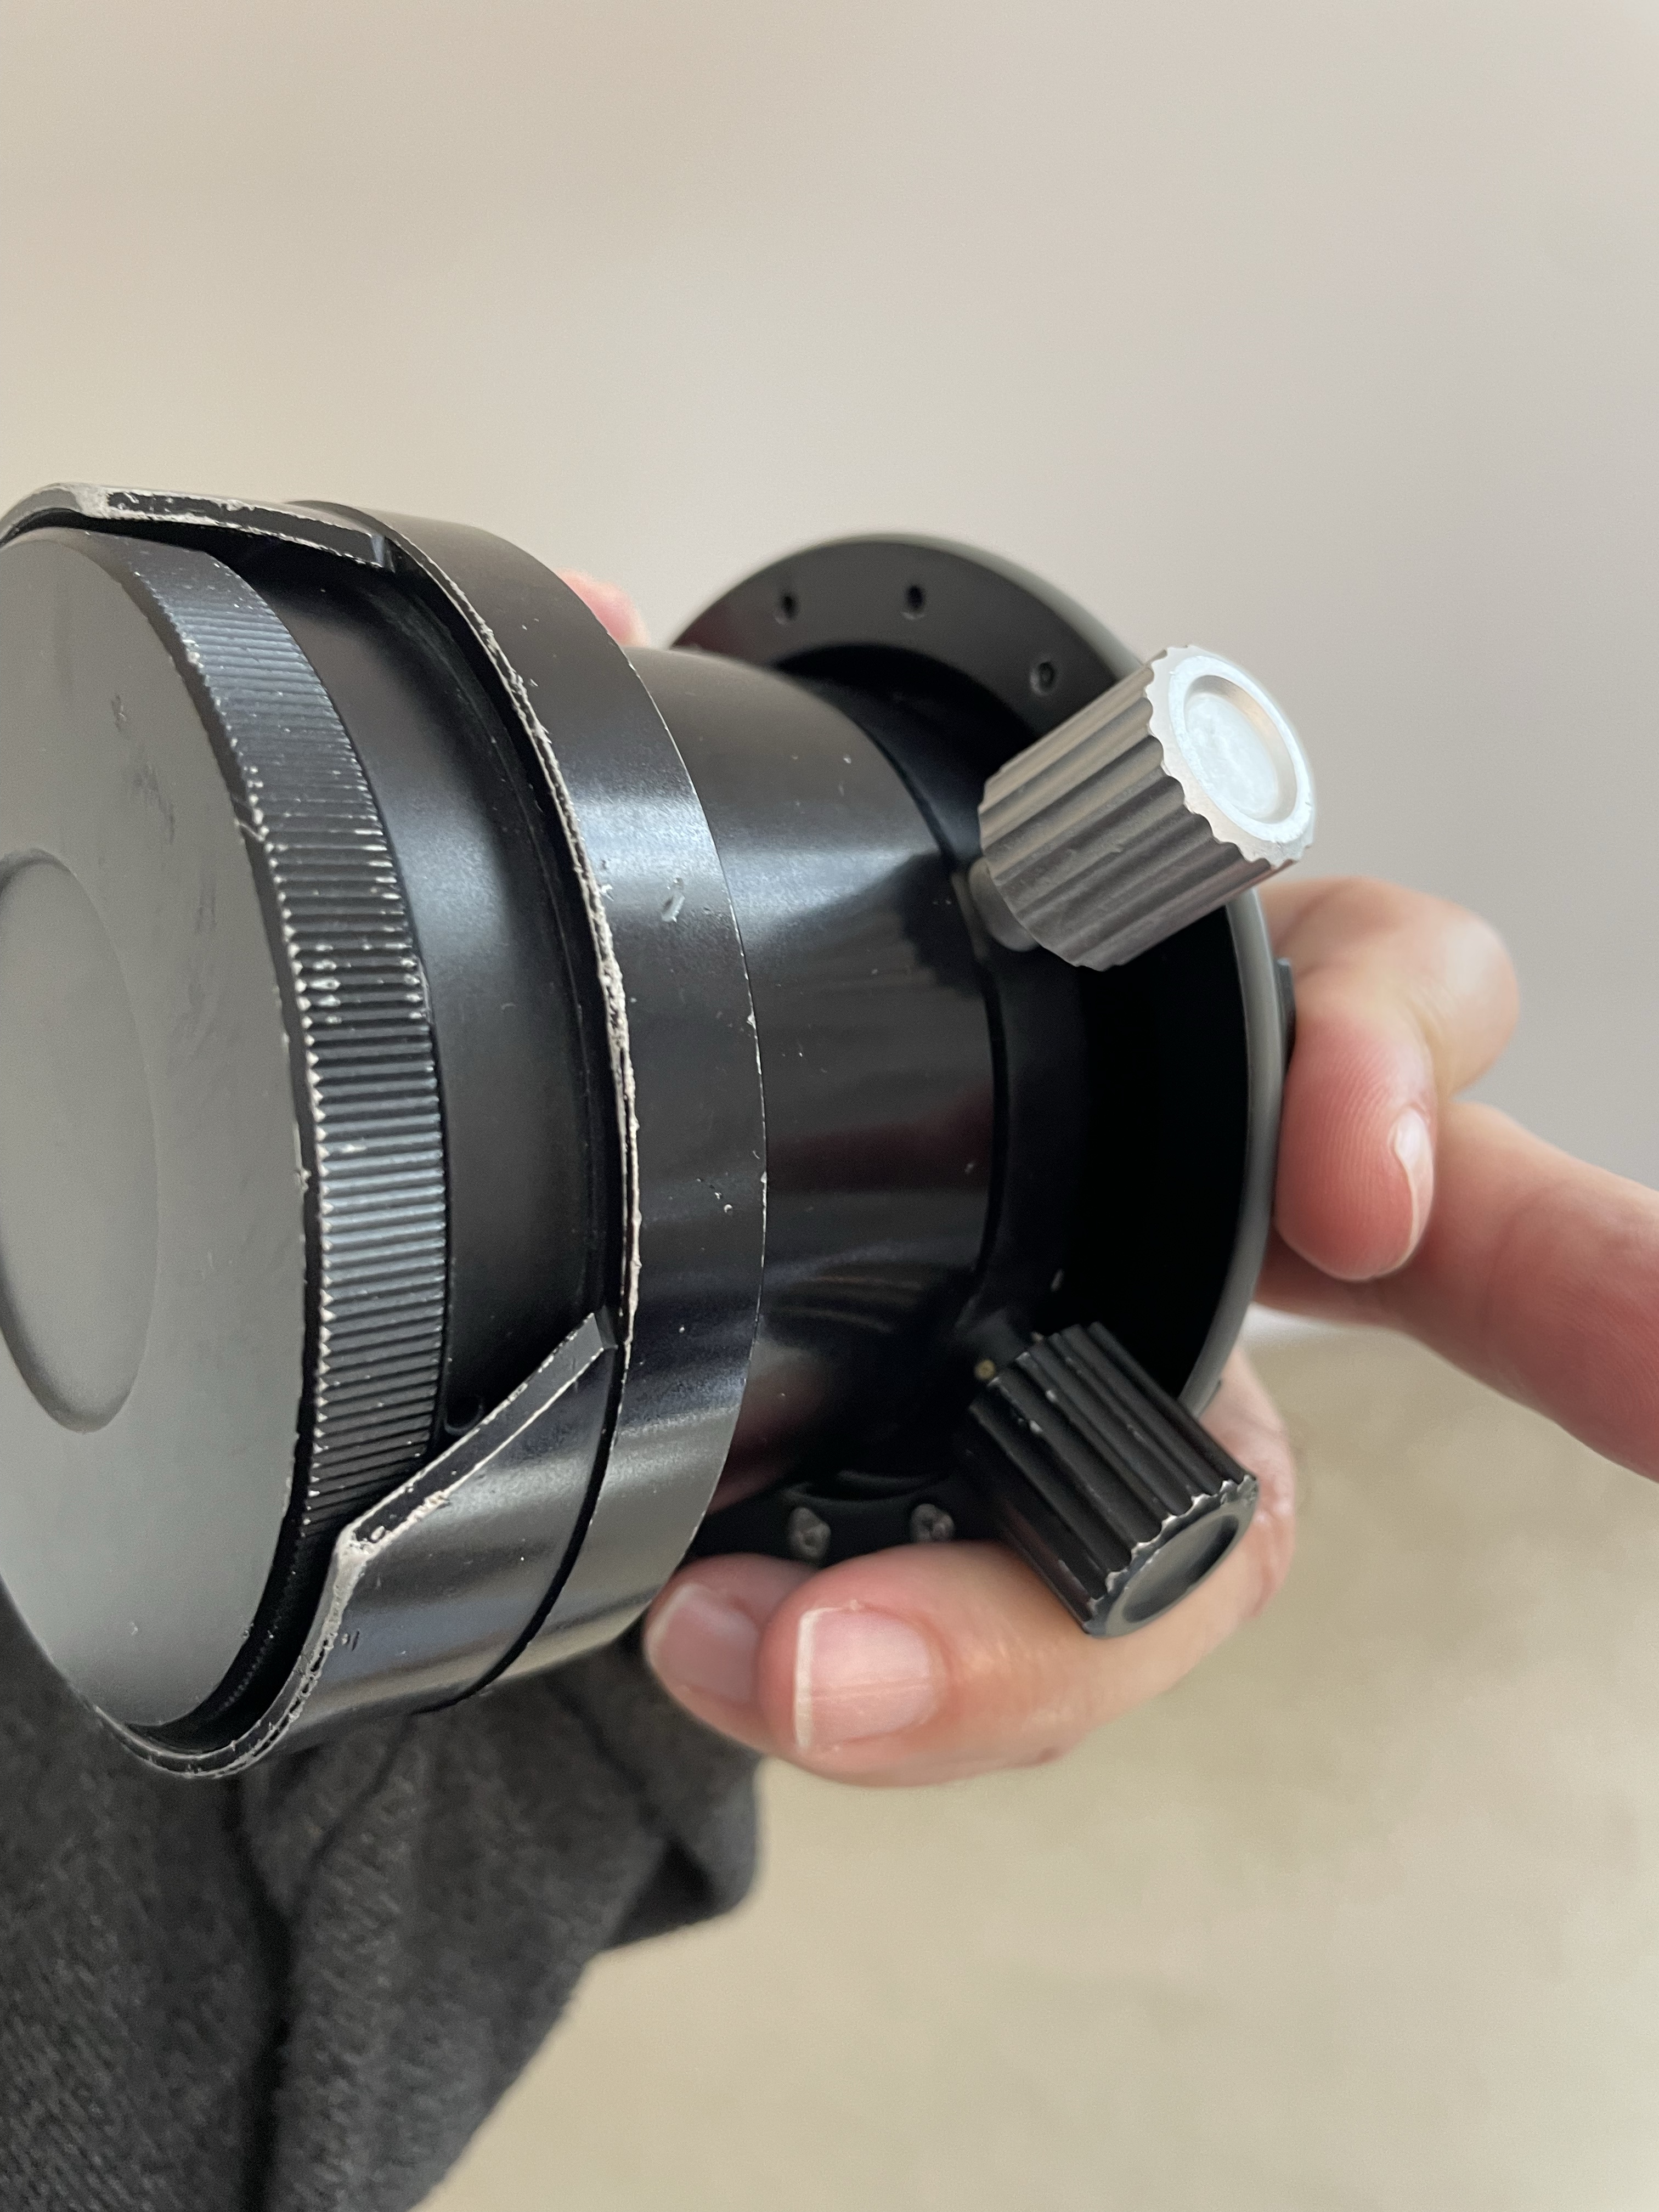
Turtle Manual Trigger In detail
The turtle manual trigger is really a joy to use and is extremely well built.
The first consideration is that it is housed with no electronics showing so an occational drop of water is not going to fry it. The second is that the battery is rechargeable. I have experience with Nauticam trigger that suddenly my strobes would stop firing consistently as the battery was low without warning. The fact that you can recharge the trigger each day or whenever you like is a great feature.
USB charging with standard micro USB
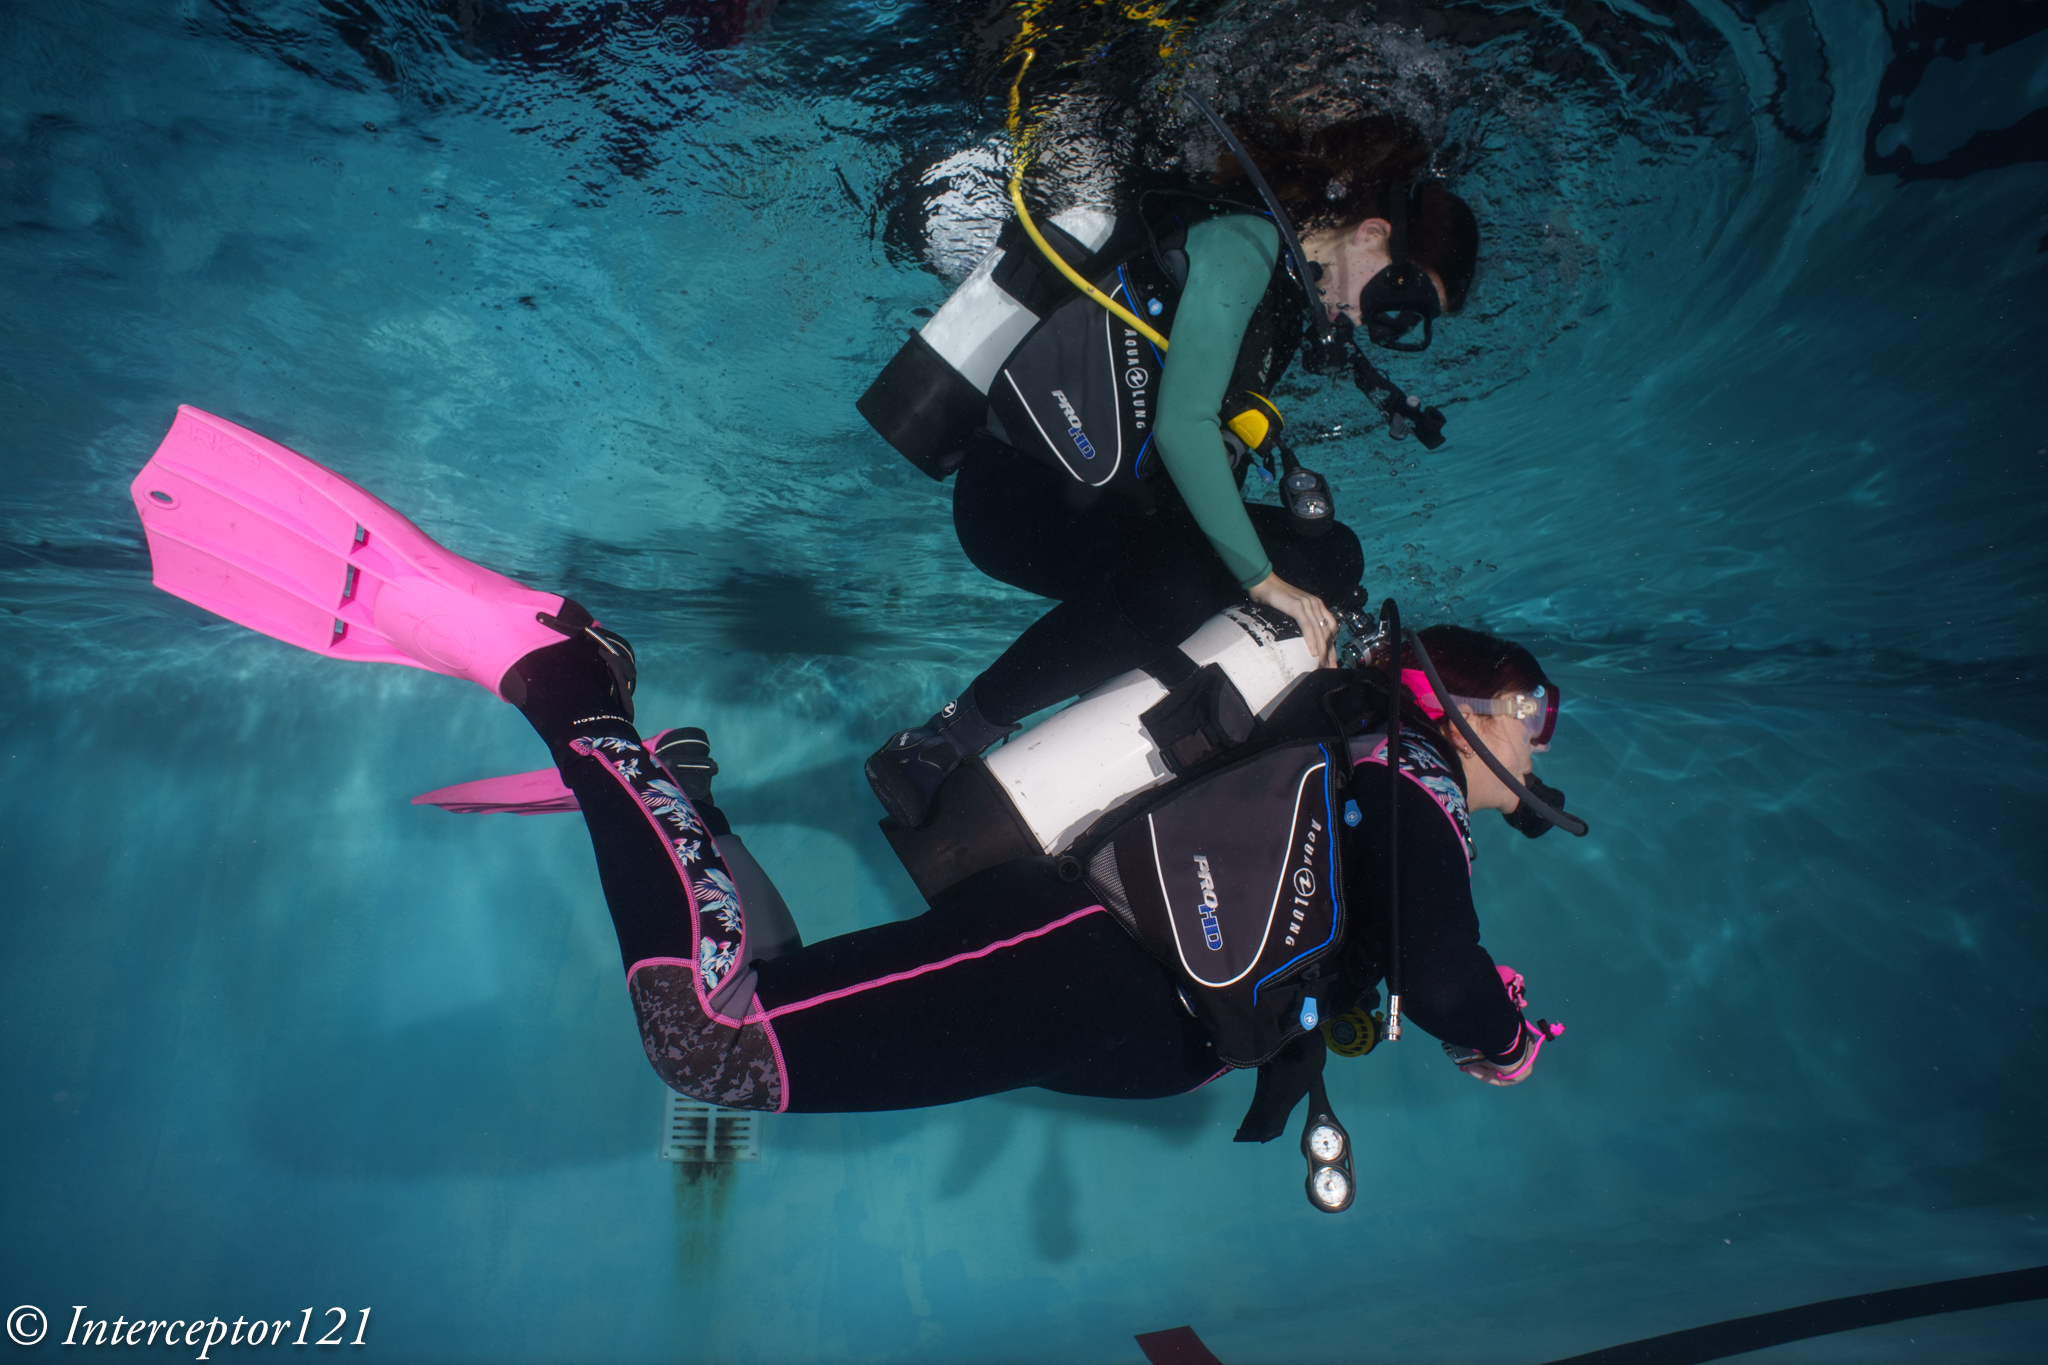
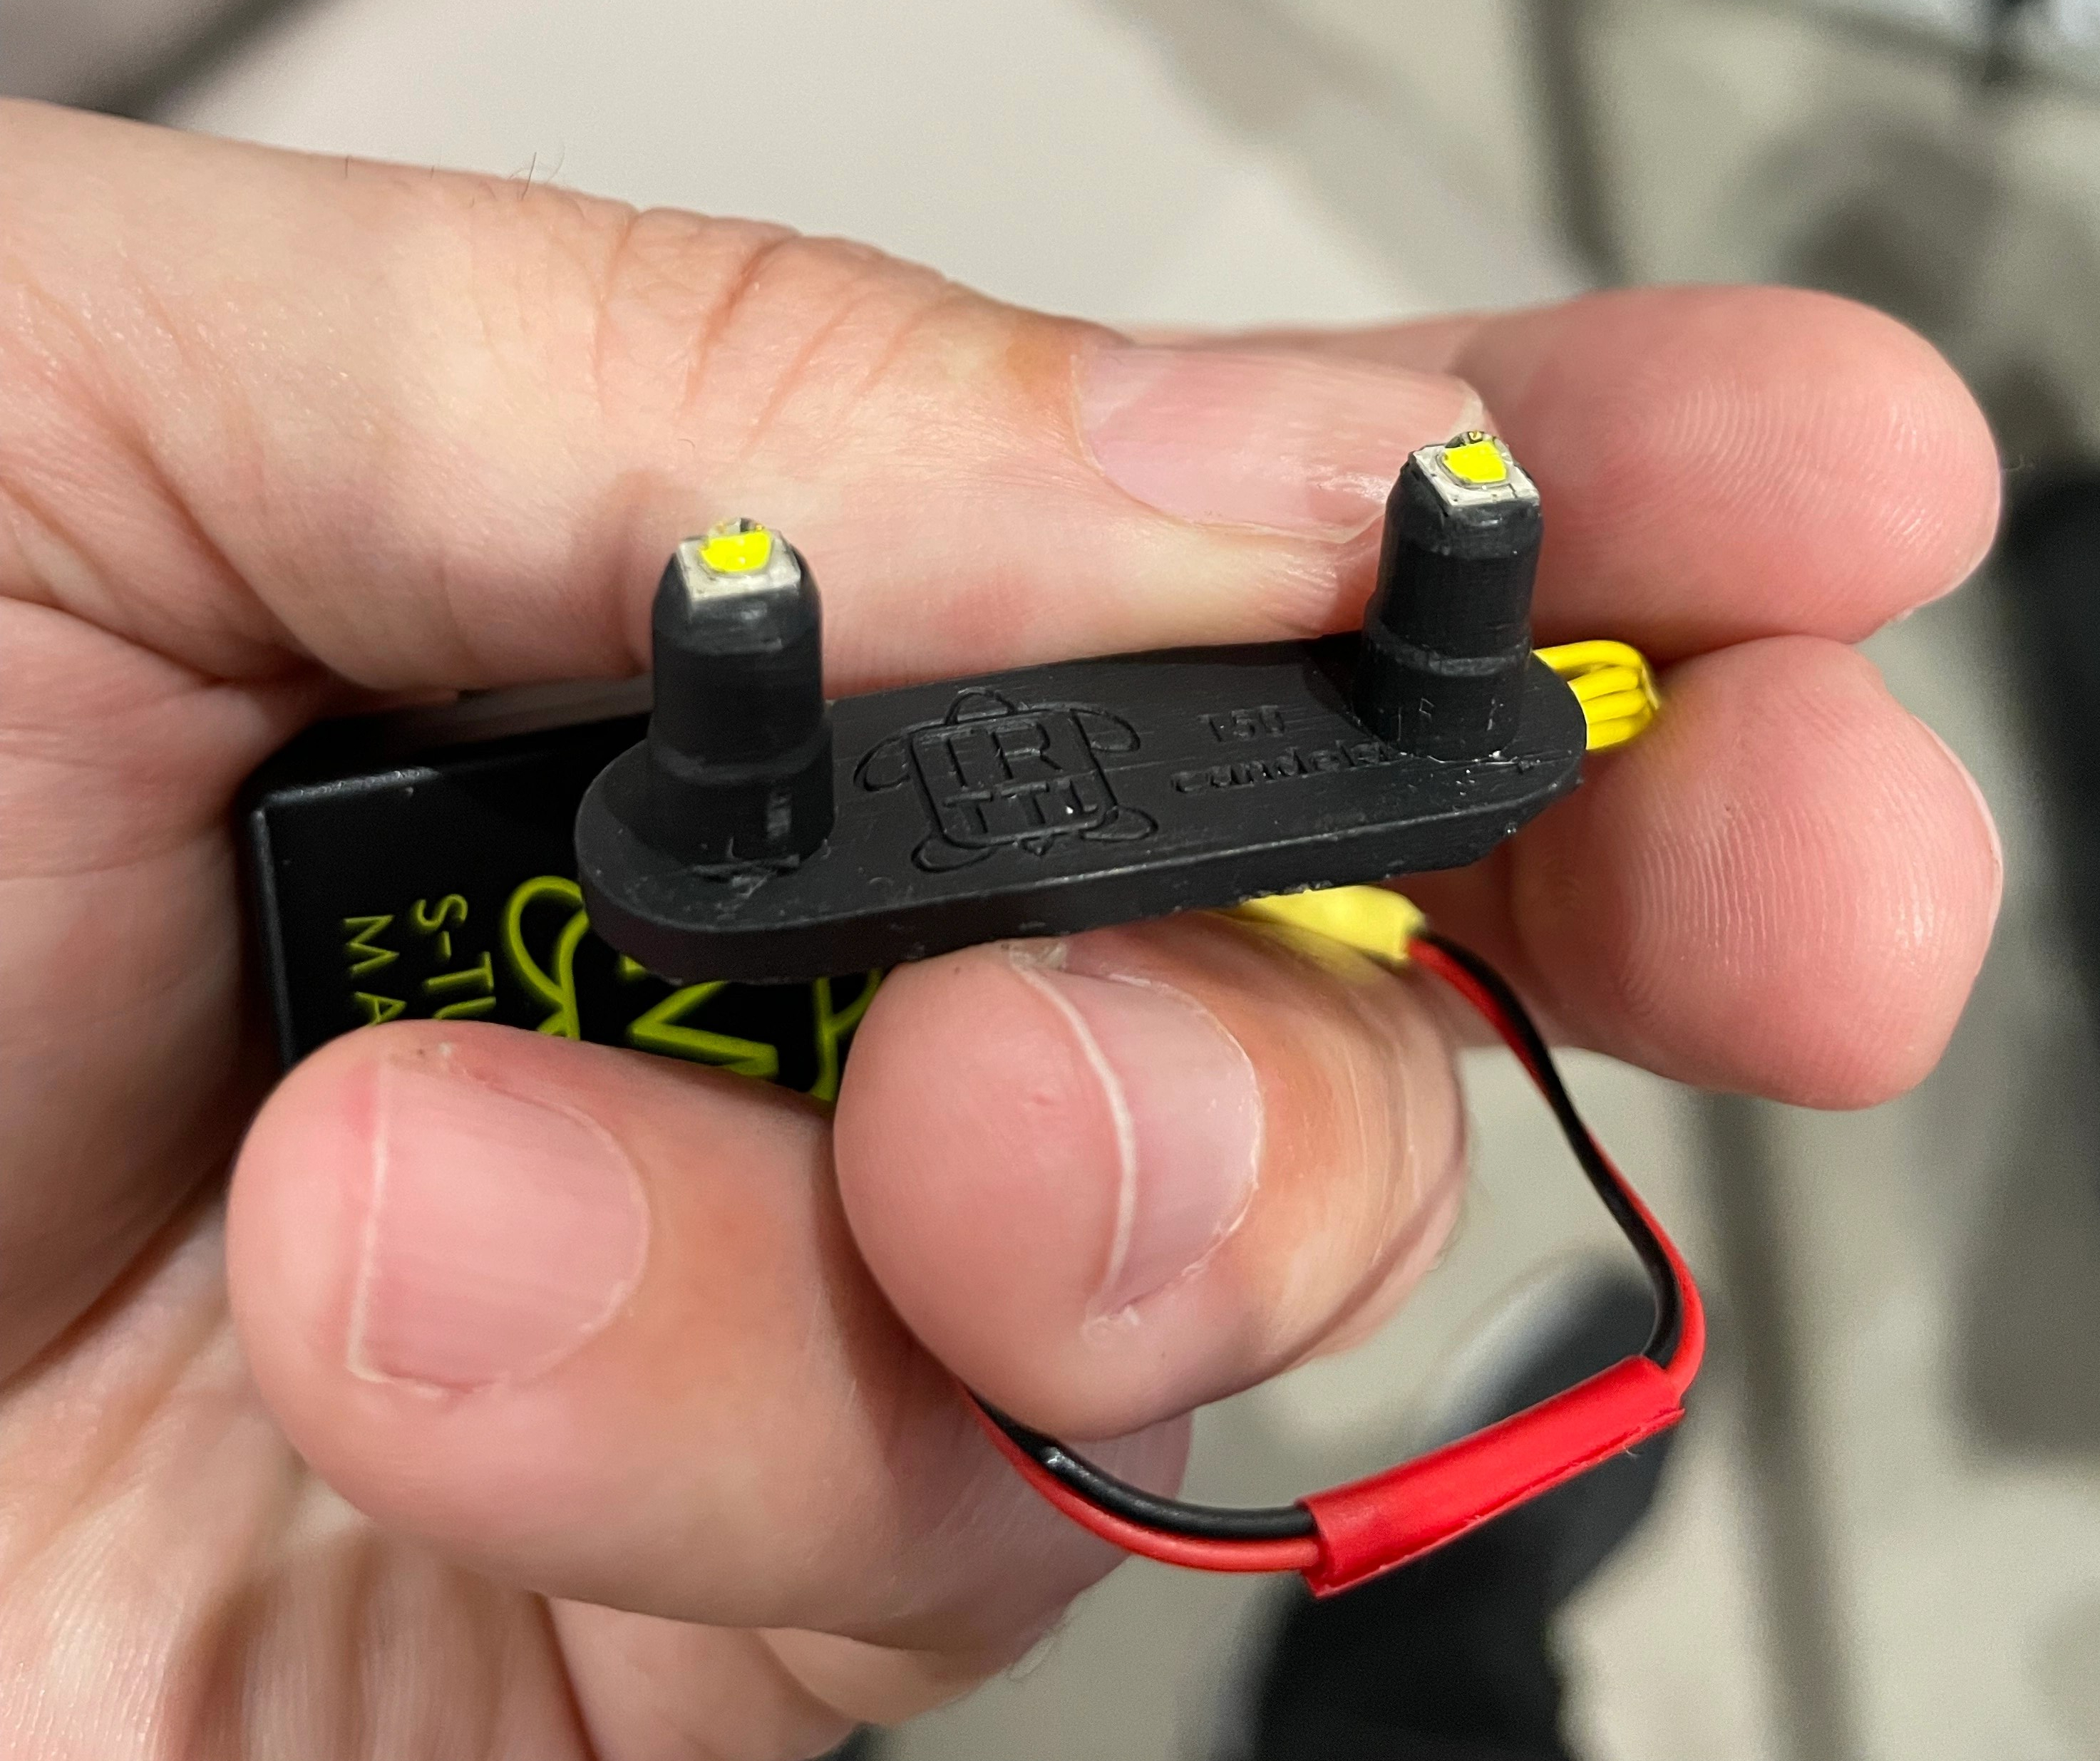
The second consideration is that the unit is really small and light.
In a hand
Finally the version I got had a convenient rubber part to inser in the housing strobe trigger sockets. This is a part from the TTL trigger that will allow to fire with cheaper cables and does not come as standard on the manual trigger, you need to request an upgrade which I warmly recommend.
So I set the trigger in my A1 housing and so far after around 1000 shots it has not failed once.
Installed
Turtle Manual controls
The good news is that well there are no controls everything is set in the camera menu. Here are the steps for my A1 but all Sony cameras are pretty much the same.
Fill-flash:The flash works every time you trigger the shutter. (Front Curtain)
Slow Sync.:The flash works every time you trigger the shutter. Slow sync shooting allows you to shoot a clear image of both the subject and the background by slowing the shutter speed.
Rear Sync.:The flash works right before the exposure is completed every time you trigger the shutter. Rear sync shooting allows you to shoot a natural image of the trail of a moving subject such as a moving car or a walking person.
This means I can set the flash mode each shot if I want to without changing any settings on the strobe or elsewhere.
In order to access the HSS mode you need to turn wireless mode on
MENU → (Exposure/Color) → [Flash] → [Wireless Flash] → [On].
This is not wireless mode but the trigger tells the camera HSS is supported and you get a indicator WL HSS. Your shutter speed is not capped anymore.
Unless you have an HSS capable strobe this setting should be left Off otherwise your photos will have the shutter in the image. I do not have HSS strobes but if you own Retra this is very useful.
Other positive points of the Turtle trigger:
Supports electronic shutter (only applicable to A9/A1 series)
Supports Speed priority with A1 (1/400 on mechanical shutter)
It works with SINGLE core and cheap cables when used with the upgraded LED unit
I had sourced two expensive multicore Nauticam fiber cables after my Nauticam trigger refused to shoot consistently and now with the turtle am back at shooting my 15 years old Sea and Sea cables.
Well seasoned Sea and Sea Fiber cables
It also works with ebay single core fiber home made cables.
Probably the only limitation for me is the burst speed. With electronic shutter the A1 goes at 6 fps the trigger would only fire once probably a limitation of the internal LED recharging circuit.
However in mechanical shutter it would work with the Low speed setting of 3 fps.
Take into account that the strobe will deplete its charge when you shoot continuously and the recharge time that are typical mean that when the capacitor holding the charge is empty the strobe will stop firing or fire at much lower power.
Consider the following Log2(burst speed)->minimal output power reduction required in stops for practical use.
In my case log2(3)=1.58 round up to 2 stops reduction of strobe power.
With Sea and Sea YS-D2 maximum power 32 maximum sustained burst rate 32 – 2 stops = 16 this is the maximum you can fire your strobes at.
Realistically you are not going to be able to shoot smaller aperture than f/11 with a diffuser before the strobe starts loosing power in the following shots unless you increase your ISO. This however is plenty for me and frankly it was more academic.
I want one how do I get it?
If you are UK based please send £285 using this link and one will be shipped to you within two weeks. This will ensure you have two years warranty and no paperwork import duties etc to deal with due to Brexit. The trigger will have the higher power LED as in this article.
If you are in Europe I recommend fotosub shop of the friend Pietro Cremone he deals in larger quantities and can offer great prices. Otherwise order directly from Turtle Electronics.
Nauticam makes some really interesting adapters and ports for Sony cameras, one of them allows you to use vintage Nikkor lenses on full frame mirrorless cameras.
I decided to source the UW15 as I am planning to use it for video after seeing the results on the movie Avatar.
The challenge of the Nikkor lenses is that they are entirely manual with aperture and focus knobs. This is generally not an issue for videography which is my intended use but I wanted to check how does this lens work for photography as many people still rave about it.
Lenses compatible with the adapter are UW 15, UW 20 and UW 85 full manual. Later autofocus lenses are not supported.
The Rig
My rig is a classic derivation from wide angle with 8″ and 12″ arm segments and my trusty (!) Sea and Sea YS-D2.
Nikkor 15mm rig
The Nikkor weights around 600 grams and gives almost zero lift so this rig was over 300 grams negative in fresh water.
Before using it you need to assemble the lens on the adapter.
Nauticam Nikonos Adapter
You have two parts that can be removed to allow the lens to mount depending on your preference. I set the lens with the display upright so I could try and see it while shooting.
Nauticam Nikkor adapter top side
The controls are located on the left side side and bottom which is where I normally have my levers.
Nauticam Nikkor adapter controls
On the right you will see the display scales.
Nikkor UW15 Aperture and Focus Display
I have to say I was a bit nervous setting this on my A1 considering that this is a lens that is 25 years old at least but the vacuum test was fine so ready to go to the pool with the friends at Rec2Tec Bletchley.
The UW 15 Construction
The Nikkor lenses were generally rectilinear. The 15mm has a field of view equivalent to 20mm so only 94 degrees on the diagonal.
The approach was to correct the water distortion until such point when the image becomes rectilinear and eliminate other aberrations.
I have to say that the amount of chromatic aberrations is practically non existant.
White balance slate
Rectilinear lenses have gone out of fashion since dome ports with fisheye distortion being the preferred look for wide angle in modern underwater photography. For video though straight lines have a value.
Pool Session
Using this lens on the Sony A1 proved challenging for photography. Nailing the focus using peaking did not feel particularly precise.
Not so sharp focus
Some shots may have been sharp enough on film resolution but with the 50 megapixels of the A1 even the slightest misfocus shows.
Is it in focus?
My productivity was quite low at the beginning as I was trying to get a hand of the lens.
The lens itself is by all means extremely sharp even for my camera.
Grid
I worked out that I could not do what I normally do which is to frame first and focus after as by the time I had nailed the focus things would have moved so I decided to set the focus and move forward or back until I thought I had my target in focus.
The situation started to improve.
DSD student with Instructor David Allen
I felt I had worked out how to use the lens so started looking for some subjects. During those sessions you see all sort of stuff as people practice their skills.
Riding
Considerations on the controls
I believe that the average underwater photographer shooting digital will find it very hard to use this lens and will end up shooting at f/8 or smaller apertures so that focussing becomes easier. The lens is especially challenging as it is not particularly wide so you do need strobe power.
DSD Student
I found really hard the lack of display of aperture and focus position. The lens is designed for much smaller Nikonos housing, with my A1 housing being more bulky you need to actually turn and look at the lens to check your settings so many times I did not have the right aperture of focus and it all was pretty laborious. In a video situation for wide angle this lens will work just fine with set and forget at 4K but to nail focus on a high megapixel camera is a hard task.
When you do get the focus though the image is outstanding.
Just married
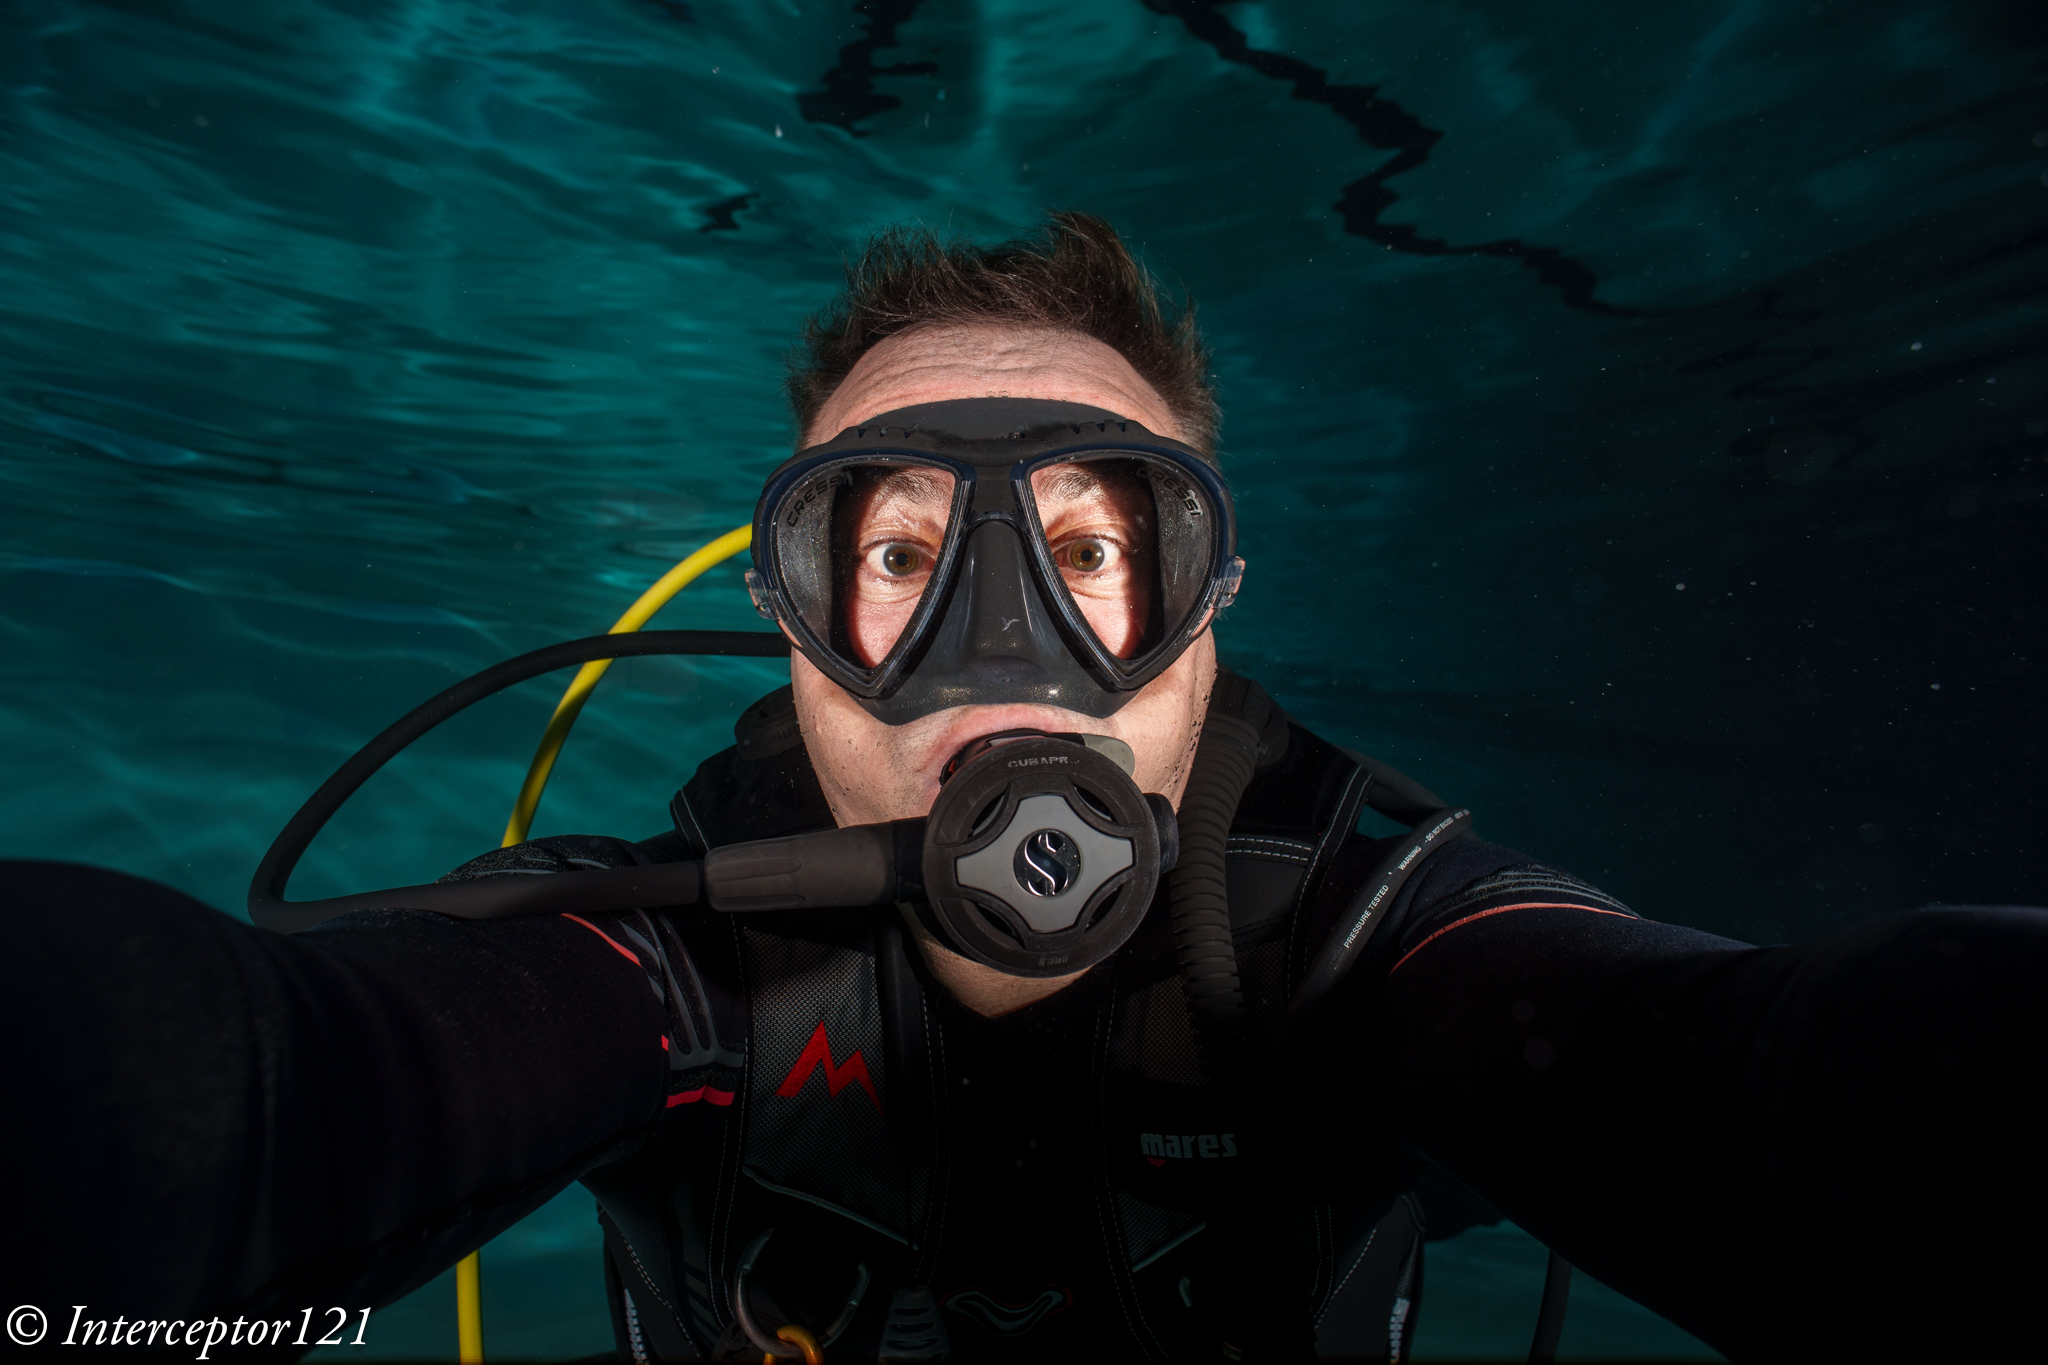
I tried a selfie to check the focus scale and it worked well.
Selfie
Consider that the most shots were at f/5.6 or f/8.
Dave
As you have no exif data it is impossible to remember what you shot unless you write it down on a slate.
Is it worth it?
The answer depends on your use case and if you already had the lens.
The following use cases fit the Nikkor UW 15 pretty well:
Videos of sharks or pelagic that do not come too close where ambient light is low
Photos at mid range with fairly static scenes where you want straight lines for example fashion models
The lens is definitely not easy to use for dynamic shots, situations where you need to get very close (as it does not focus very close) and where you need to continuosly adjust focus.
In terms of costs in GBP you are looking at:
£474 Nauticam Nikonos Adapter 37202
£300-500 Second hand Nikkor UW15
Obviously if you already have the lens and you are in one of the above use cases I would recommend you get an adapter and give it a go perhaps looking on the second hand market.
If instead you do not have the lens I would say not to bother unless money is no object, you are in the two use cases above and you have sufficent dexterity to control this lens.
Undewater photography has moved forward a great deal thanks to autofocus and although the Nikkor UW 15 is really sharp getting critical focus right is not easy. When it comes to video where you do not normally use autofocus for wide angle this lens is really interesting.
You can shoot at f/5.6 even f/4 subjects in the distance in ambient light with extremely clear and sharp detail at a fraction of the cost of other water contact optics. If you do not own any of the WACP or WWL I would say the UW 15 deserves some considerations but only if your command of depth of field and focus is very good otherwise it is better to pass.
The lens is nothin special mostly plastic but it is weather sealed. It has only 7 aperture blades so this is a lens for snapping around happily topside but not exactly a top of the range device.
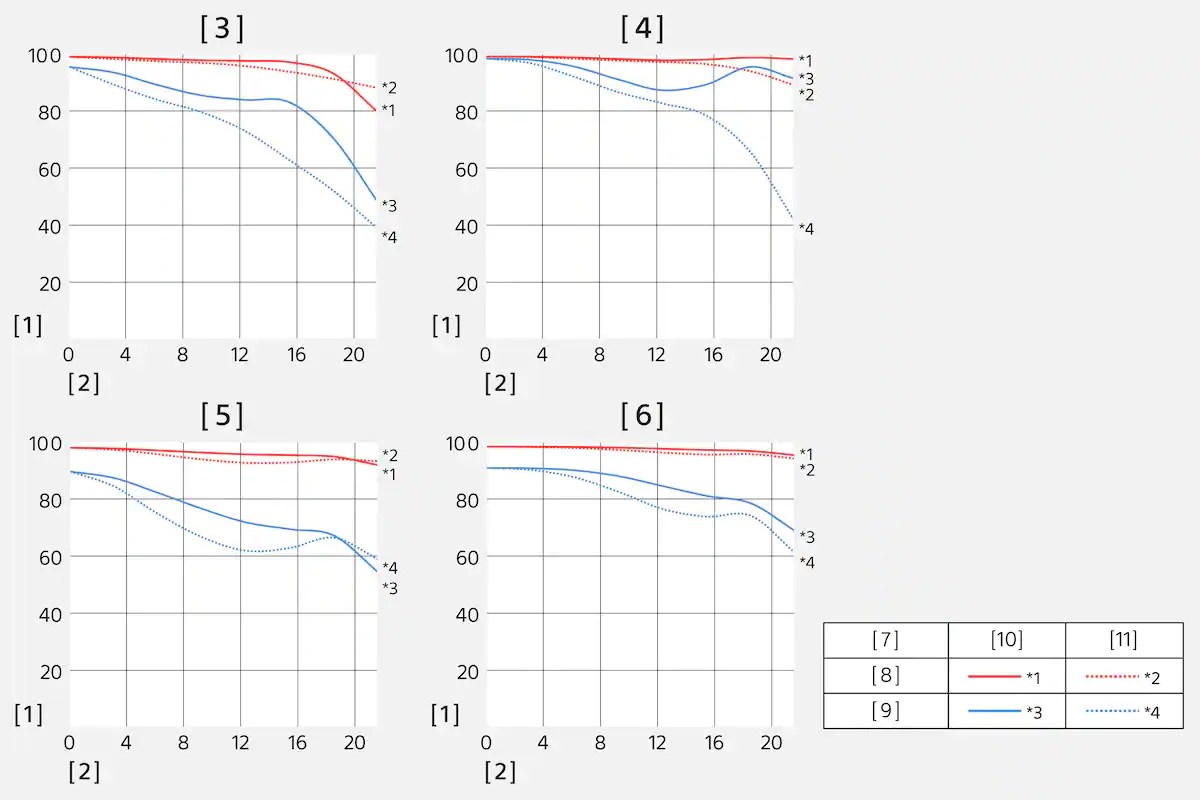
The construction comprises 8 elements in 7 groups. Sony publishes the MFT resolution chart for this lens on their website.
Sony has some strange nomenclature however for reference images [3] is at 28mm f/4 and [4] 28mm at f/8.
[5] and [6] are at 60mm less interesting for underwater purposes.
The red lines indicate a resolution of 10 lp/mm which is a really low value (the A1 sensor resolves up to 120 lp/mm). The blue lines indicate 30 lp/mm, The [10] indicates Sagittal and [11] meridional lines.
Read this excellent article from Nikon on MTF to understand how to read the graph.
What graphic [3] is telling us is that as we move away from the centre of the frame both sagittal and meridional lines drop in contrast.
Graph [4] shows that at f/8 the deterioration as we move towards the edge of the frame is more contained neverthless meriodional lines drop considerably.
While we cannot conclude how this lens will compare to other lenses what we see from the MFT is that the 28-60mm as tested performs better at f/8 than it does at f/4 when used at 28mm. In fairness it seems to be the same situation at 60mm but the gap between f/4 and f/8 is much less.
I found a good test here aligned to what you will read here to a good extent.
Practical Home Made Test
I sourced a cushion with a complex embroided decoration.
With the camera on a tripod a remote release and one off camera strobe I took shots at f/4 f/5.6 f/8 and f/11. I run tests with the camera poiting at the centre with field of curvature and off centre with the centre of the cushion at the edges.
Here are my findings.
Centre Performance
800% center crop
Left f/4 Right f/5.6
As anticipated the lens is not sharper in the center when wide open.
800% center crop
Left f/5.6 Right f/8
At f/5.6 the difference with f/8 is minimal
800% center crop
Left f/8 Right f/11
Stopping down to f/11 gives a mild deterioration.
Looking at centre I would say f/5.6 to f/8 is the way to go.
Edge Performance
Let’s see the situation at the edges.
400% edge crop
Left f/4 Right f/5.6
f/4 was not better in the centre and is pretty bad at the edge.
400% edge crop
Left f/5.6 Right f/8
Stopping down to f/8 sees an improvement the situation is not great though.
400% edge crop
Left 8 Right f/11
At f/11 the edges are ok.
So looking at edge performance I would use this lens between f/8 and f/11.
Looking at the lens in isolation I would think the starting point is f/8 with one stop up or down depending on the situation. This lens is not good wide open and beyond f/11 resolution starts to drop.
Alex Mustard has taken some comparison shots between the WACP-1 and the WWL-1 and his conclusion is that the performance of the WACP-1 at f/4 is similar to the WWL-1 at f/6.3. Based on my tests I would frankly not bother shooting this lens at f/4 the quality is just not there. The starting point would be f/8 and f/11 does not deteriorate edge performance that much but of course needs more light. Wider aperture like f/5.6 may be good for blue water shots.
My opinion is that this lens will not offer amazing sharpness no matter which adapter you use and is likely to stop at 26-28 megapixel in reality if not less depending on conditions, assuming your starting point is a camera with more than 40 megapixels.
it would be interesting to compare the water contact options at the aperture of f/8 and f/11 but we can safely conclude that the 28-60mm is not going to be a champion for ambient light shots in low light because the performance wide open is not great.
If I had to invest into the best image quality I would be looking at a different master lens and a larger water contact optic such as the WACP-1.
Additional Information
I have created some stir on the fact that this lens is quite weak but it actually is.
I took the same shots with my 24-70mm GMII and I can say that there are 3 stops difference at the edges between those lenses
The 24-70 at 28mm at f/4 is the same of the 28-60mm at f/11
This is a 200% crop of the edges
Left 24-70 GM at 28mm f/4
Right 28-60mm at 28mm f/11
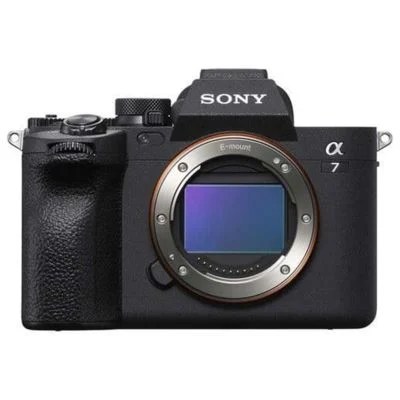
Sony has been the fist brand to produce a full frame mirrorless camera in 2013 with the Alpha 7. Ten years later Sony is a market leader in Digital Cameras and their division Sony Semiconductors is the market leader in sensor technology for a variety of applications, mobile phones, security and of course digital cameras.
It is not all rosy though, Sony ergonomics and menu system have been historically not intuitive with many people criticising or simply despising it.
In July 2020 Sony releases the A7S III a low megapixel camera completely focussed on video functionality with a strong performance in low light.
The A7S III offered a completely redesigned menu system and this was very well received by the public.
The ergononics were greatly improved and many video users started to convert to Sony, there were and are still some quirks but the useability had greatly improved from past model.
Since then the Alpha 1 announced in January 2021, the A7 IV and now the A7RV all have benefited from the new menu system and improved ergonomics.
An additional important detail is that Sony cameras are small and portable with weights between 650 and 740 grams this means underwater housing are also compact.
The Sony E-Mount system is the most popular full frame mirrorless format and is supported by many 3rd party lens manufacturers: Sigma, Tamron, Samyang and others.
It is also the most popular and more affordable full frame format for underwater photography with many housing options.
But what is more exciting is that the Sony E-Mount has extensive support of water contact optics from Nauticam and there is even an adapter to use Nikkor water contact lenses.
And finally the auto focus system of Sony full frame camera is market leading and Since the A1 sports subject detection with improvements trickling into the entire range.
So many DSRL users have been sitting on the fence waiting and keeping hold of their rigs but now in 2023 there really is a lot of choice and the Sony system supported by Nauticam housing and port system can offer options to all type of underwater photography shooters.
I have done myself a lot of research and tried many of those cameras before deciding what to get and I want to share some of my thinking with you.
The 2023 Line Up
As of today I would consider only 3 Sony full frame camera for underwater photography and those are:
A1
A7R5
A7 IV
This is a small comparison table with some key data points:
Solution
Camera RP
Housing Rp
Combined Price
Megapixels
Readout
Flash Speed
EVF
LCD
ILCE-1
5879
3497
9376
50.1
200
1/400
3.145
0.480
ILCE-7R5
3999
3324
7323
61
15
1/250
3.145
0.698
ILCE-7M4
2399
3180
5579
33
15
1/250
1.228
0.345
I will discuss the cameras from top to bottom. You can see that the price difference between the housings is not large but the price of the cameras are varying significantly.
Sony ILCE-1 aka A1
This camera sits on top of the current range of Sony full frame cameras and rightly so. The heart of the camera is a 50.1 megapixels stacked back illuminated sensor capable of a readout speed of 200 frames per second.
This means that the A1 is able to offer a black-out free shooting experience when the electronic shutter is used.
The other interesting characteristic of this camera is a flash sync speed of 1/400 s using mechanical shutter and the ability to trigger flash with electronic shutter up to 1/200 s.
The camera also offers a super high resolution viewfinder capable of 2048 × 1536 (QXGA) pixels although the best image quality is only available when the EVF is refreshed at 60 frames per second.
The A1 has many dials and controls including dedicated ones for exposure compensation and drive mode and generally feels compact and well built but perhaps not as robust as other premium models from Nikor or Canon.
It also offers 8k video up to 30 fps and 4k video up to 120 fps with a small crop. In general terms the A1 is still two years from its release the fastest camera on the market with a burst speed of 30 fps with autofocus.
Talking of autofocus this is simply the best AF on the market with subject eye detection and a very competent tracking mode for general purpose use.
I have the A1 myself if money is no object I would definitely recommend it if you are interested in a camera that is very fast to operate and has amazing video.
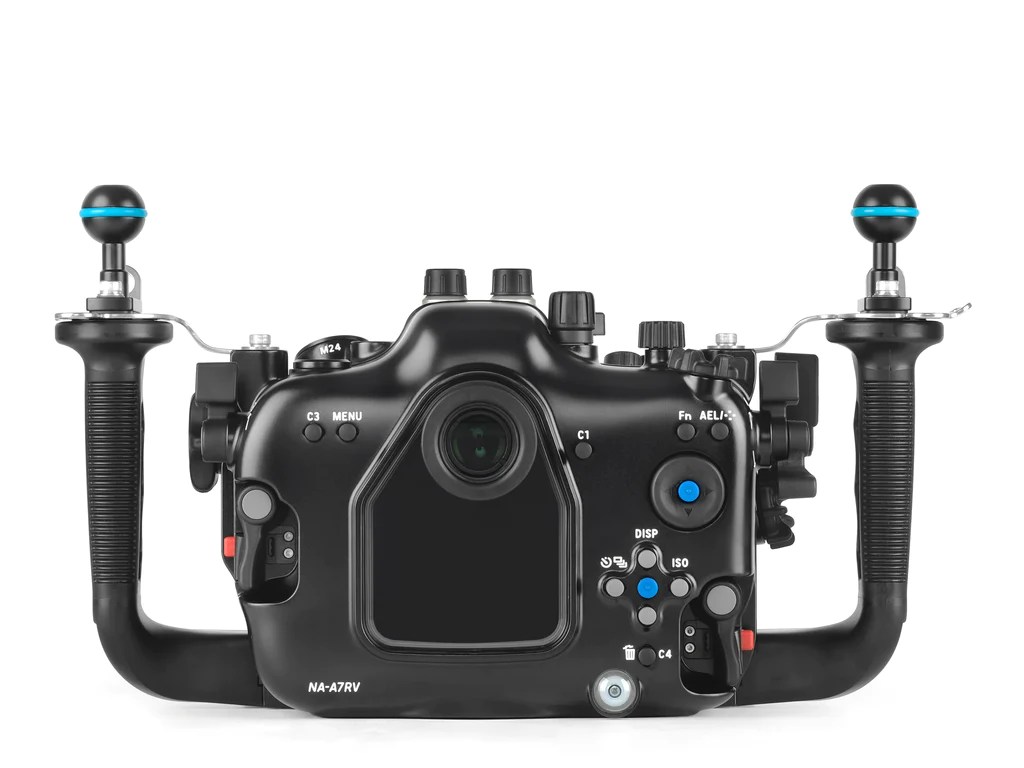
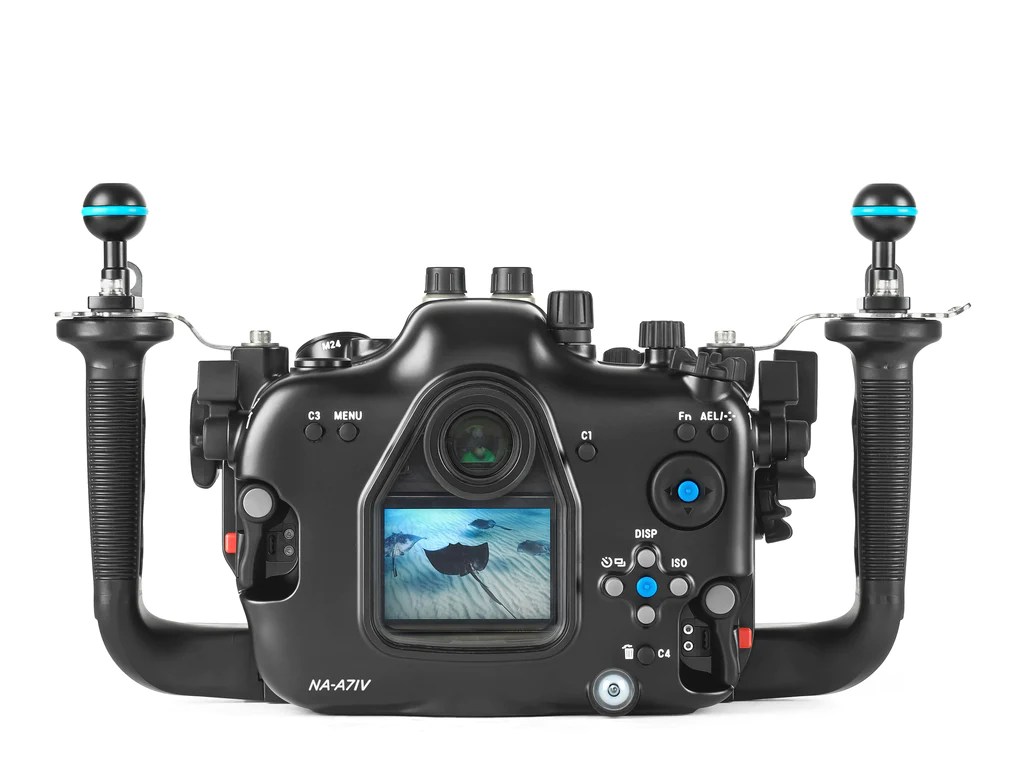
Nauticam offers an housing with all features available except touch screen.
Looking at the back of the housing you can see that even the multi function button is controlled by the housing.
Due to the compact size of the camera the housing itself is very compact for a full frame camera. A plus point is that the Nauticam housing can also be used for the A7S III with an adapter.
Sony ILCE-7R5 aka A7R5
This camera has recently been released and while the sensor is identical to the previous A7R4 the R5 offers the new improved menu system and a redesigned autofocus engine with subject detection.
The A7R5 has 61 megapixels and possibly the best image quality on the market for a full frame mirrorless camera.
The A7R5 has a single main dial with a subdial for movie and other modes. No dials exist for the drive.
The camera shares the same amazing EVF of the A1 but it has a fully articulated high resolution LCD.
The sync speed is a respectable 1/250 however the A7R5 has a very slow read out of 15 frames per second. This means video has a lot of rolling shutter and the burst rate is low as the camera reads slow and has many megapixels.
Nauticam has recently released the housing for this camera.
The housing is slightly simpler than the A1 due to the reduced number of controls and is very similar in size.
I believe the A7R5 will be a very popular choice for the underwater photographers and it is the perfect choice if IQ is your priority and in addition to underwater you also like landscape, architecture photography topside and video is not really your priority.
Sony ILCE-7M4 aka A7 IV
The A7 IV was released in fall 2021 and has marked a significant improvement over the very popular A7 III with a jump from 24 to 33 megapixels, improved EVF and autofocus and 4k video up to 60 fps with APSC crop.
The camera weakest point is the read LCD that has a very low resolution but otherwise this is a respectable camera with a price that has increased compared to previous models.
The camera body is very similar to the A7R5 and in general Sony cameras are fairly similar when it comes to a new release.
The housing is again very similar to the A7R5 due to the similar controls.
Although the EVF is ‘only’ 1280×960 this is perfectly adequate to check critical focus. Same cannot be said for the LCD and if you plan on getting this camera an underwater viewfinder is a must.
This camera like the A7R5 has a slow read out rate of 15 fps so it is not the best choice for fast moving subjects and burst but the AF is very functional so it will work well for your occasional kid running.
The A7 IV is a great choice is you like shooting in a variety of situation and especially in low light and you are not fussed by high megapixel count. In addition video quality is great and the APSC mode is very functional. It is a camera you can expand with accessories if you like.
Which camera is for me?
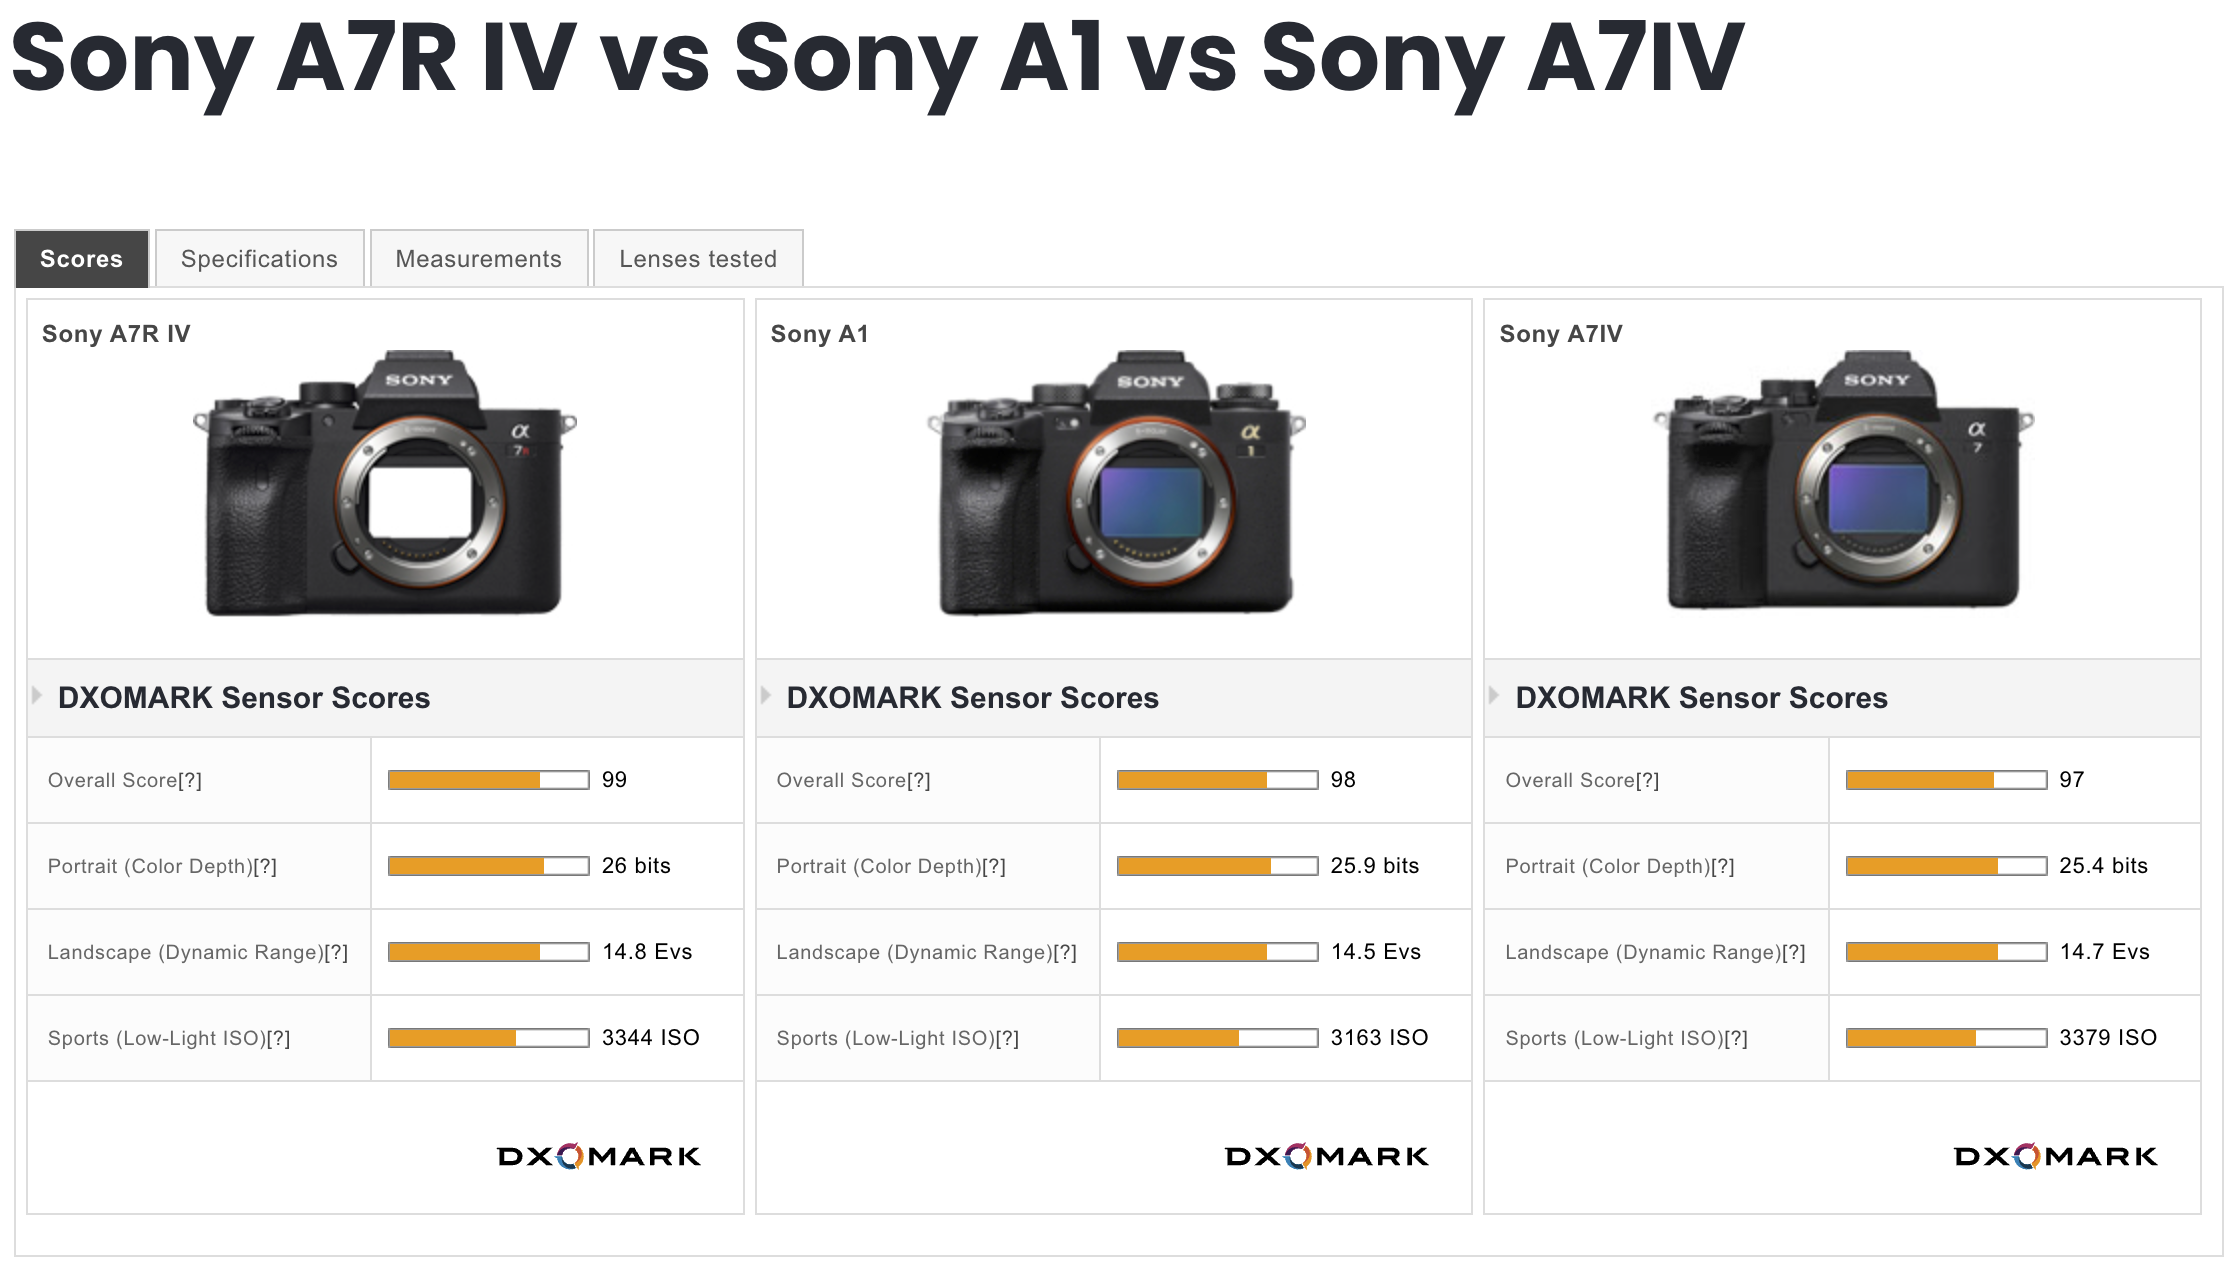
When it comes to choice this is mostly driven by your budget. While there are certainly differences in performance and functionality across the 3 models discussed all of them are perfectly capable of taking magnificient underwater images. Comparing sensor performance we can see we are splitting hair here. (The comparison is with the A7R4 that has the same sensor so it will be indentical)
I suppose it is somewhat suprising that the scores are so close but we need to take into account that those are normalised back to 8 megapixels.
In general terms I believe the A7R5 will be the most sought after model for underwater photography because of the high megapixel count, the high quality EVF and LCD and the functionality of the autofocus.
However if you can not or do not want to afford it the A7 IV is a very respectable choice. The LCD I believe is the key limitation of an otherwise very competent camera and frankly 33 megapixels are plenty.
The A1 will appeal to hybrid users that want the best photos and video and are most likely doing other form of wildlife shooting where speed matters.
Whatever you choose you cannot go wrong with the latest Sony models.
In the upcoming articles choosing the right ports for keeping your Sony full frame underwater system still portable.
The A1 and A7S3 share the same codecs and format for (4K) video. The cameras have been around a few years however I could not find a proper analysis of the codecs. You can find the usual YouTube doing some qualitative analysis mostly lacking rigour and based on static charts which is not really sufficient.
I did this analysis on my A1 but the results hold for the A7S3.
So I decided to give it my own attention and you will get my findings in this post. I do not shoot 8K and for this format the choices are limited anyway to XAVC HS so not much to go about.
XAVC Basics
Sony has like many other brands their own codec for in camera video recording and their version is called XAVC.
You can find some more detailed information on Sony Pro Site.
Take into account that the documentation does not consider the newest XAVC HS based on HEVC coding.
In general terms you have two options:
Intra frame -> each frame is self contained and does not depend on other frames, the clip is a collection of compressed images
Group of Pictures (GOP) -> frames are a combination of 1 reference intraframe for each group of pictures and multiple P and B frames which means respectively Predicted and Bi-directional predicted.
GOP video is temporally compressed and more efficient in terms of space however it takes more computing effort to decode and encode.
Depending on the number of reference Intra frame inside a GOP you can have more or less prediction errors which manifest as noise or artifacts. So if you want to make sure that you don’t get motion artifacts you need to use an intraframe which means using more space.
A1 Codec Options
As mentioned XAVC gives you both options and the A1/A7S3 can record Intra video up to 240,250,300,600 Mbps depending on the frame rate Sony approach is 10mbps per frame.
GOP is more compressed and has 140,200,280 Mbps respectively for 24/25/30, 50/60, 100/120 frames per second. Please note higher frame rate of 100/120 fps is only supported on GOP formats as it would otherwise reach 1.2 Gbps.
Higher compression does not mean at all lower quality, analysing all codecs using ffprobe you can see that the individual Intra frames within a GOP structure are larger than the Intra frames of an All-Intra clip at higher bit rate. However due to the nature of GOP there will be potentially motion prediction errors and more noise.
A1 Sample Video
I ran some tests of a music box both static and in motion using Slog3. I warmly recommend using Slog3 for all your video as it the log compression achieves less bit utilisation and makes the video compression even more efficient.
From what I can see (there is a small focus error on the XAVC S moving part) there are minimal difference in motion handling and minimal differences on noise.
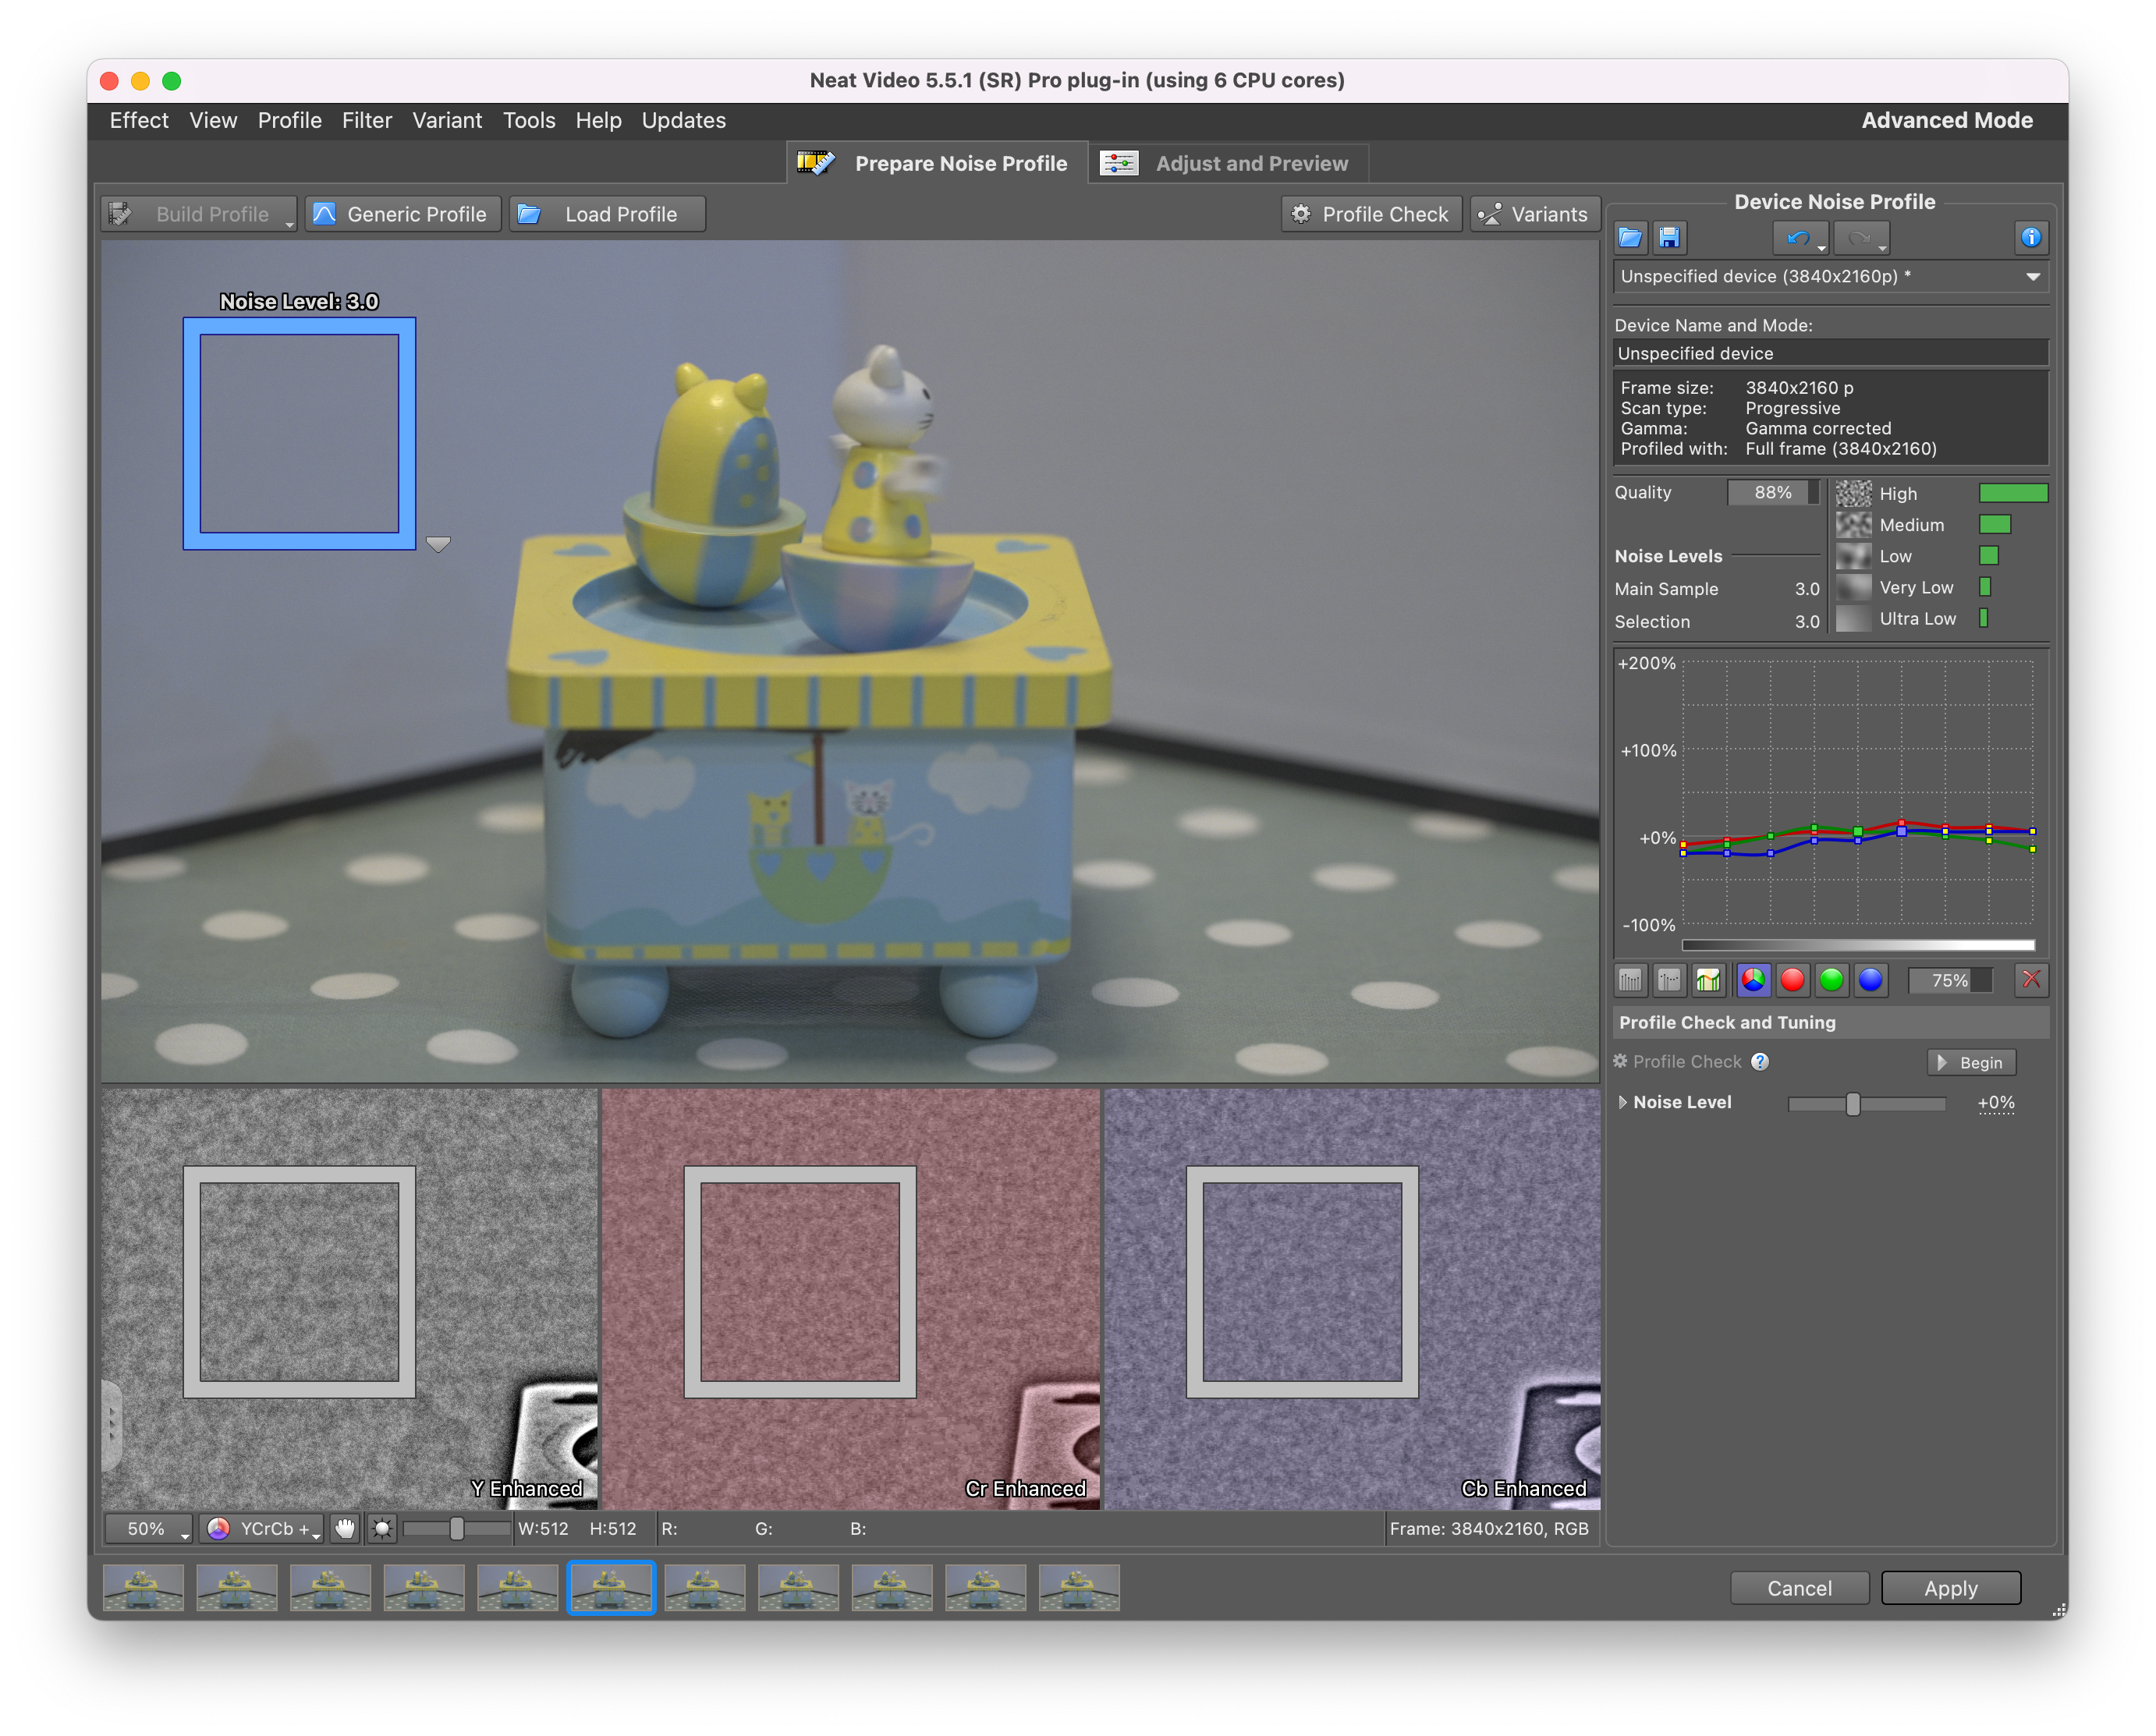
I checked each clip with Neat video using the same reference area. XAVC S and HS return the same amount of noise.
XAVC SXAVC HS
While All intra for some reason has less noise. I believe this is because the prediction introduce some small error themselves.
XAVC S-I
Considering those shots are taken at ISO 4000 there is not much to complain. ISO 4000 in Slog3 is the point where dual conversion gain goes into High gain. If you use a standard profile this would be 500. I do not recommend shooting the A1 or A7S3 in any other picture profile than slog3.
Visual Differences between Codecs
I frankly cannot see much of a difference between those codecs, I have also shot a few sequences in APSC in equivalence so at ISO 2000 and f/3.2 instead of f/4.5 and I could not see much difference except APSC has a bit more noise as expected.
Analysis
The following table shows some key data points and my observation based on a series of 50 fps video test shots with the A1.
Sony A1/A7S3 Codecs
You can see that the key difference between the codecs is the bitrate, the edit effort (how taxing is on your machine) and the noise.
What codec you will use depends mostly on practical considerations as the difference in image quality are intangible.
The HS format which is based on HEVC has a single reference frame each second which means this codec is really for static scenes as most frame are predicted. XAVC HS biggest limitation is the lack of 25/30 fps options it is a good choice for 24 fps and it does not completely stall your machine in the editing.
The S variation is good in terms of space saving as well as generally being effective for motion however it is the hardest one to edit. If space is a problem and you are happy to convert or edit natively XAVC S is a good option. If you need something that can go on for long and manages almost all situations the XAVC S should be your choice however unless you have a workstation that supports accelerated H264 10 bits 422 (and there are not many at all) you will need to convert to an intermediate codec spending more time in post processing.
Finally the S-I All intra is the one that has the least noise and is more demanding on your memory card but is the easiest one to edit and play despite the higher bit rate. If you shoot wildlife, actions, or use gimbals and your default is 50/60 frames per second, the All intra codec XAVC S-I is the best option but it does not support higher frame rate so you would need to switch to another codec for those situations and this should be the XAVC S as it manages motion better.
I have not done a test with a gimbal but those scenario where a lot of pixel move in the frame is much more taking than my music box test.
Conclusion
Although the choice of codecs is not as rich as Panasonic cameras and there are no formats other than 16:9 there are no quality issues with the A1 and A7S3 codecs as long as you shoot in Slog3.
Obviously there are options for external recording although this is not the best option for run and gun and that would give you ProRes 422 HQ or ProRes RAW with huge files easier to edit. In the future I will do a comparison between the internal intra codec and ProRes 422 as well as ProRes 422 HQ so stay tuned.
If you have any question leave a comment and I will follow up.
When you buy a new camera some time after the initial release date you are lucky to find all sorts of videos of other geeks like you that have been testing.
I was referred to this video that shows quite a few quirks of the Sony A1. Gerald has since confirmed the A1 video is binned not line skipped.
You can’t always rely on third party so here are a number of geek tests.
The first question was do you need to shoot ASPC or full frame. APSC is scaled while full frame is binned which means the first may look better than the second but will have more noise.
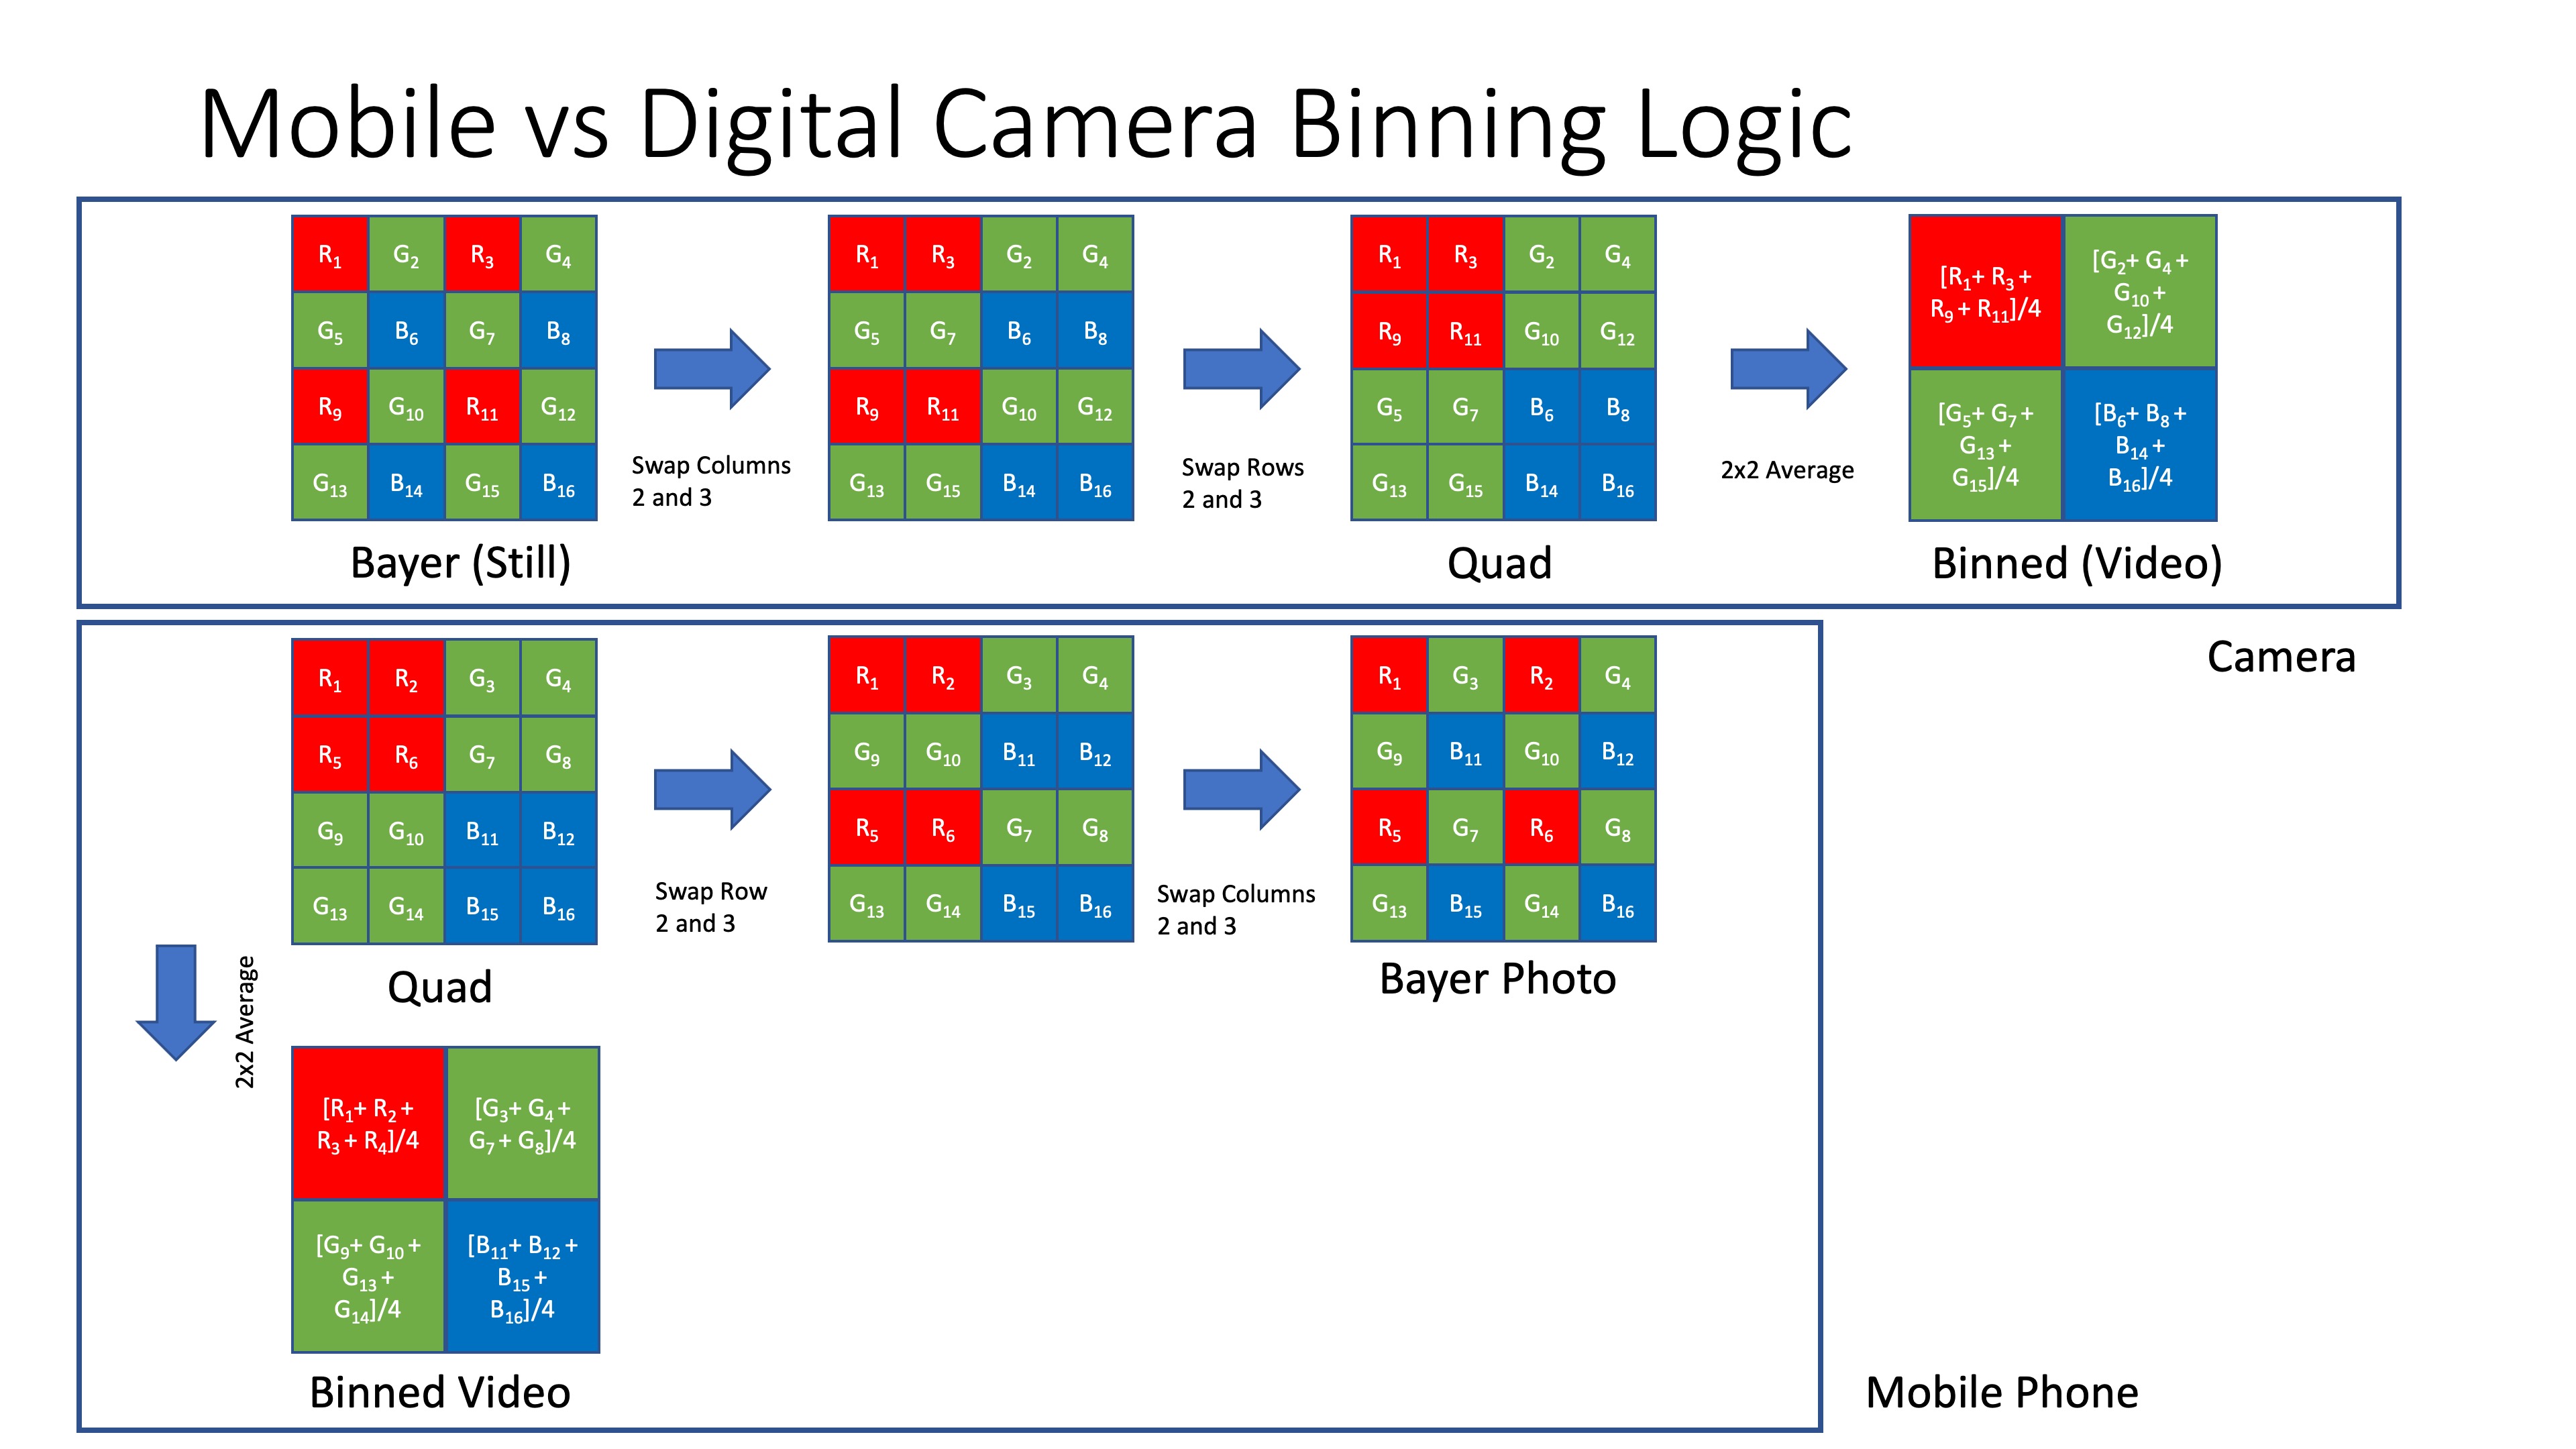
Pixel Binning
As usual there is no official documentation of the camera inner workings but this diagram should help explain a few things.
On the upstream the potential flow for a classic bayer filter camera to accomplish binning (it is a guess). On the bottom what a mobile phone may be doing.
In the first case binning results in a reduction of resolution and potential artifacts. In the second only a reduction of resolution.
Now one of the question is what if we just crop the sensor in APSC and then scale down will it look better?
I have done exactly this test and the answer seems to be no.
UHD binned vs APSC scaled
In theory the binning should look much worse but what I have seen is that moire kicks off for both at around 2x the focal length of the other. So if APSC gives moire at 50mm full frame will give it at 100mm. The full frame moire is more severe when it occurs but in most cases you cannot tell the APSC and binned UHD apart in conditions of good light.
other side by side of a dpreview sample shot cropped again there is moire in their situation on the full frame but in effect the image quality is identical.
So personally am not going to bother with APSC unless I need more magnification and I am not in low light. For all the rest I will use full frame binned.
ProRes RAW
The A1 also provides its pixel binning mode in ProRes RAW and it is identical to the internal recording when the lens corrections are off. ProRes RAW does not have a concept of lens profile so you get all the lovely defect of your lens. To my horror e-mount leses have many defects, all are distorted and have significant amount of CA.
ProRes RAW vs Internal
In short unless you have a DSLR adapted lens with zero defects those aberrations are troublesome so with native glass am skipping ProRes RAW altogether.
4K with External Recorders
If you have a Ninja consistent to what Gerald Undone says you can get a scaled down version of 8K setting your HDMI output to Auto or 2160. Auto generates 4k60fps while 2160 gives you the same frame rate of your 8K.
Interestingly if you do not record to card the HDMI output goes back to what you get in internal recording. So in short you need to record 8K to card which means eventually overheating. It is unclear what subsampling is being output howeverthe image does look a bit cleaner.
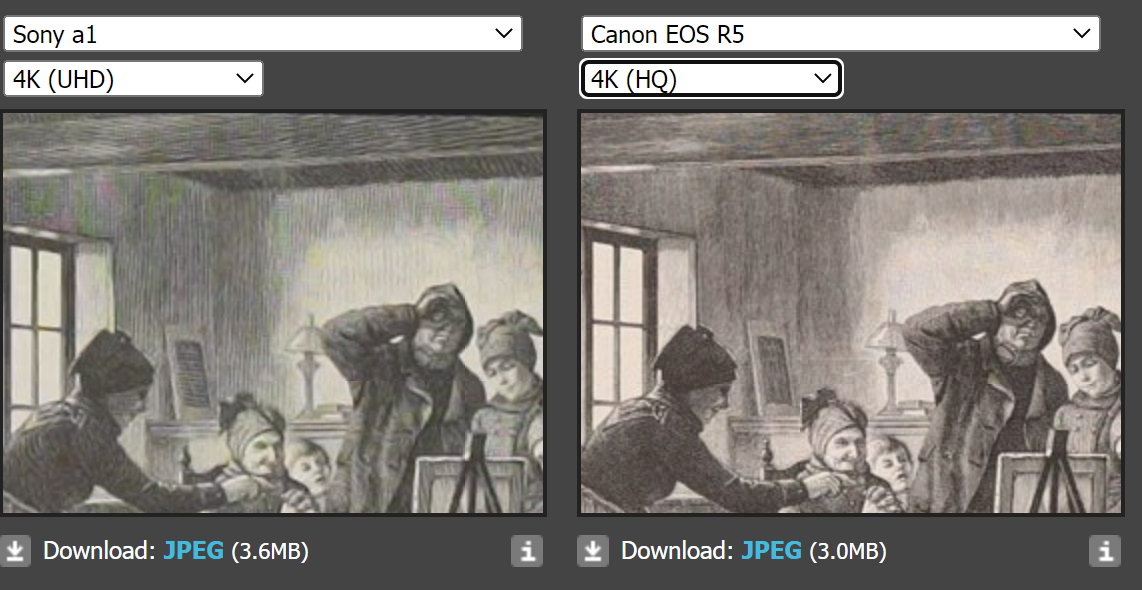
8K vs 4K
There is no doubt that the 8K mode although only available up to 30 fps is superior however editing the 580 mbps HEVC files is not that easy.
I personally shoot in 4K so I am set on the full frame binned 4K but if you have the hardware to process and the screen to watch 8K is the way forward. Gerald Undone trick of the HDMI 4K while shooting also works but be careful with overheating.
Coming Soon
Next article will break down the codecs available with the A1.
I have been looking for a camera that would be a significant upgrade from my GH5M2 for some time and I have narrowed my options to two choices: the Sony A1 and the Canon R5. As the A1 underwater port system can use most of my glass I have recently acquired the A1.
Did I get the upgrade I was looking for? For photos I would say the answer has been an immediate yes due to the amazing autofocus and EVF of this camera and the burst rate. For me 15 fps is enough but the fact the A1 can trigger a flash with electronic shutter at 1/200 of a second is amazing. But I still like the mechanical shutter (unlike the Z9) and this goes to 1/400 which is also a first.
Let’s have a look at the A1 and where it stands at the end of 2022.
The Sony A1 was announced in January 2021 and was at that time the fastest, high resolution (>42 MP) full frame camera on the market.
Capable of producing 20 fps continuous autofocus at staggering 50MP and 30 fps JPEG it still is the full frame camera producing the highest resolution at the highest frame rate as the Nikon Z9 has the same frame rate but lower sensor resolution.
As new cameras have come along we have seen some development especially on the video front and while the Sony A1 can produce ProRes RAW this is at half resolution (4230×2430) the Canon R5 is able to output 8192 x 4320.
Users have been curious on why the Canon R5 can do that while the A1 can’t and also why does the Z9 produce ProRes RAW internally at half resolution, so similar to the A1 and NRAW (that is likely not RAW) at full resolution?
Various tests on video show that both the Z9 and A1 outperform the Canon R5 in video on all formats.
Interestingly SNR improves 0.8 stops moving from 8K to 4K full frame which would not be possible if the camera was skipping pixels.
But of course neither the Z9 nor A1 can produce external ProRes RAW 8K and users have been screaming at Sony.
Investigations
I was quite suspicious of the fact that the Z9 can only record internal raw and I have noted that Nikon has pushed back on RED lawsuit on RAW recording and therefore I believe NRAW is actually demosaiced.
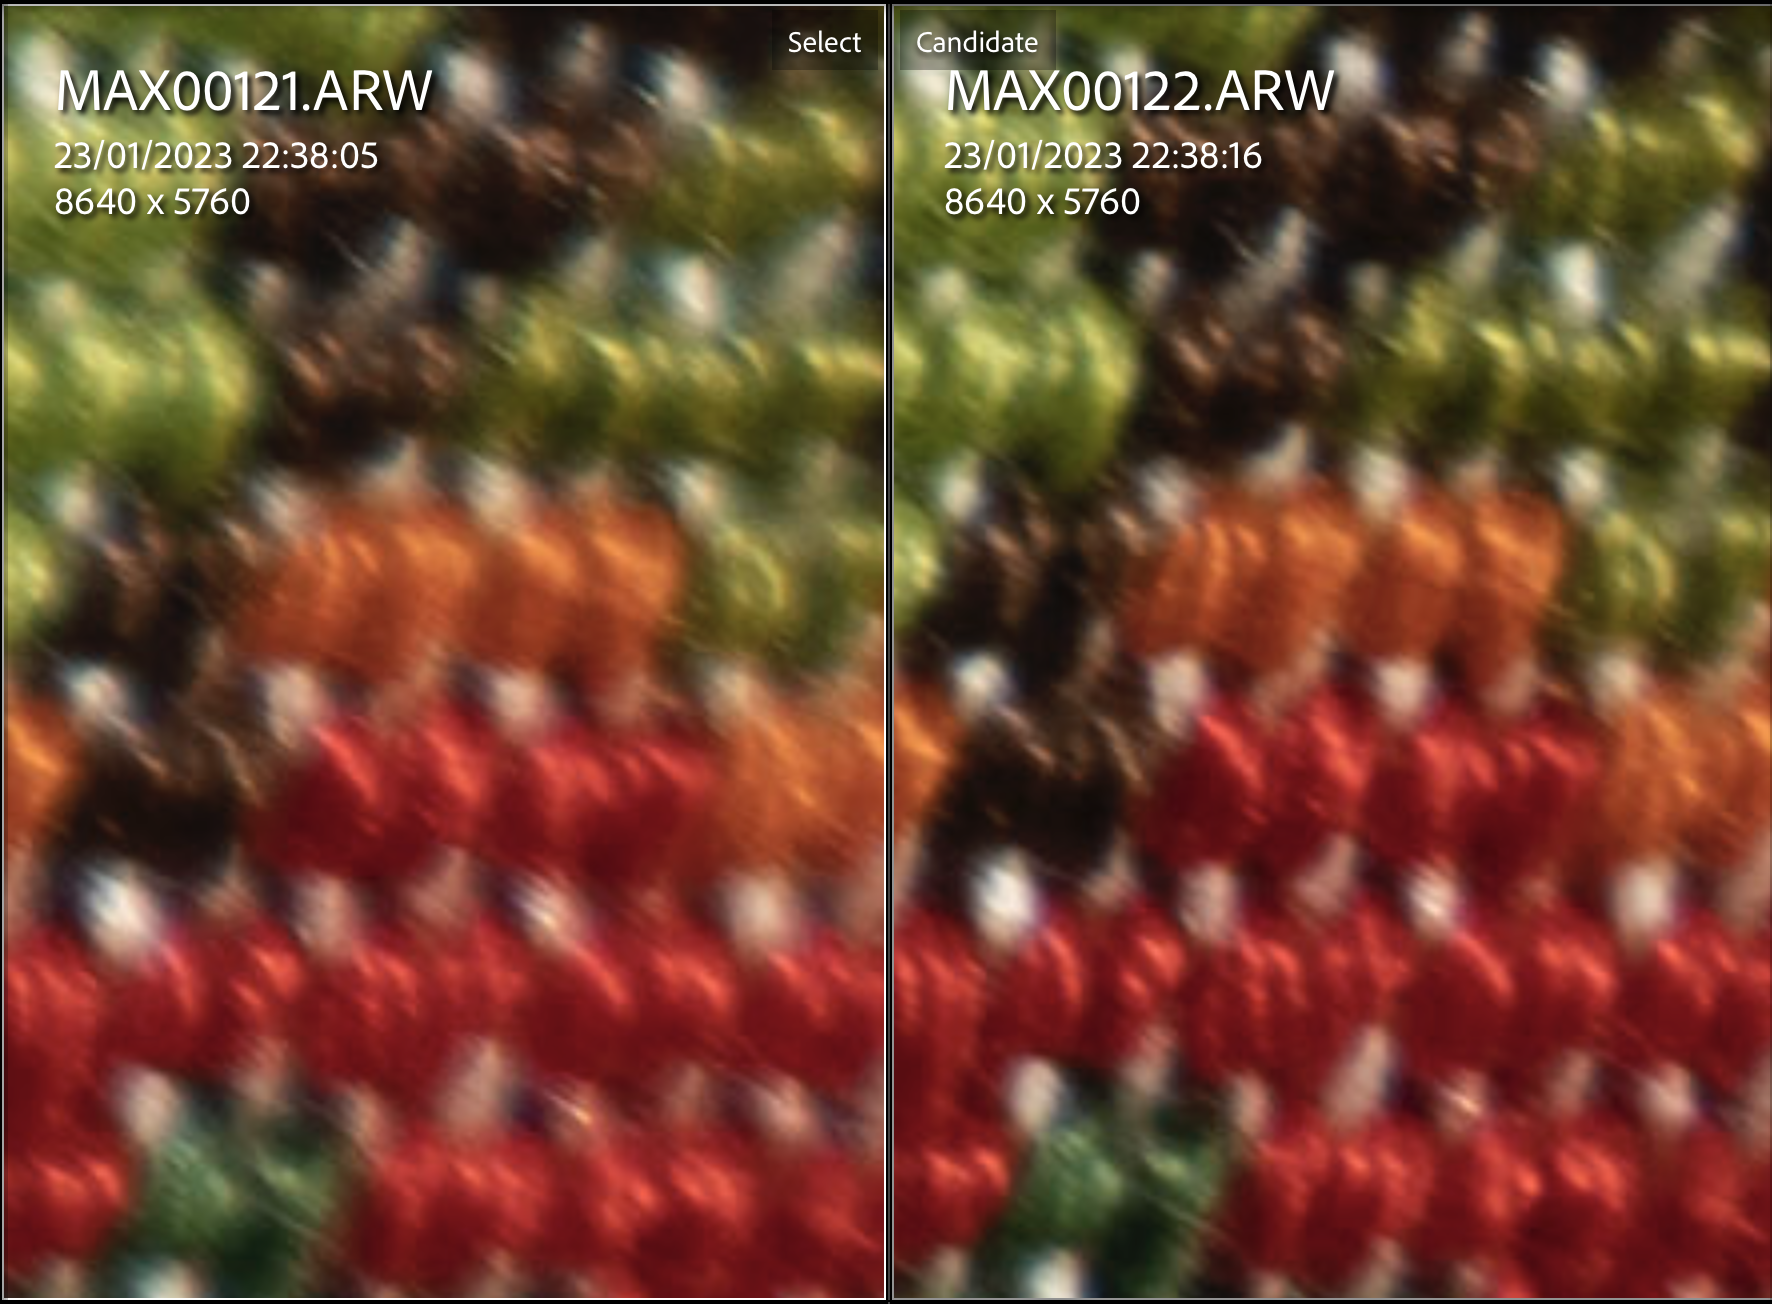
I looked at dpreview studio scene and compared those cameras and in addition added also the Panasonic SR1 to check the image quality.
You can see how all cameras are affected by false color artefacts, the A1 and Z9 much more than others.
Moire is not an issue
The other suspicious fact is that the A1 and Z9 produce ProRes RAW at half resolution. How can the camera produce RAW at half resolution with no false colour artefacts if the 2×2 cell is made of different colours?
If you follow mobile phone technology, you are familiar with the super high resolution claim of certain phones, this article on Sony semiconductors web page provides an insight
The actual pixels are arranged in cells of 4 of the same colour and to produce the high resolution image the pixels are re-mosaiced, which in turn could produce artefacts. This technology has been mainstream for at least 4 years.
If you look at this video you can see that ProRes RAW video no longer produces false colour artefacts but is prone to moire as the camera does not have a low pass filter.
Dpreview studio scene provides some additional insight looking at video grabs.
No false color in 4k video
Moire in 4k video due to low resolution generating aliasing
My conclusion is that the A1 as well as the Z9 are cheating. Unlike the Canon R5 they are based on a quad-bayer sensor cell and therefore will not offer the same color resolution at 1:1 pixel of the canon R5.
It has already been proven that the A7S3 has a quad bayer cell.
Measures like DxOMark color depth do not look at color errors so this will not be spotted but I believe the remosaic of pixels of the same colour is the issue here that is showing in the dpreview studio scene.
There has been additional debate then on why the A1 defaults to APSC mode when producing 4K video, this is counterintuitive however the APSC image does not have moire nor false colour.
If we carry on with the assumption that what I have written here is correct, we can have a look at the required bandwidth to read the sensor and produce video output at various resolution and frame rates
H
V
Depth
FPS
Bandwidth
RGB Bandwidth
Subsampled
8640
4860
12
30
15.116544
45.349632
22.674816
5760
3240
12
60
13.436928
40.310784
26.873856
4320
2430
12
60
7.558272
22.674816
15.116544
3840
2160
12
120
11.943936
35.831808
23.887872
2880
1620
12
120
6.718464
20.155392
13.436928
Bandwidth Gbps for various video resolutions
Considering a readout at 12 bits we can see that the highest bandwidth is for the 8K and the 4k APSC mode as the other modes have less pixels even the 120 fps does not get to that bandwidth however required a faster sensor scan and is cropped
When the raw data goes in the image pipeline it is converted into RGB signal and here we can see that after subsampling the ASPC format has the highest data volume due to the 422 subsampling.
This in turn produces the least artefacts in fact it is quite resistant to moire as anti aliasing can be performed in camera using different techniques. So this is why APSC footage from the A1 is smoother but not necessarily sharper in fact the opposite.
A different current of thought may say no it is a full resolution classic bayer filter array which is then binned for 4k video however
Such technology does not exist is not advertised there are no patents
The remosaic of quad bayer sensor has been mainstream in mobile phones for years now and is done on chip
So my take is Sony is just leveraging mobile phone technology for the IMX610 in the A1 but I am open to the challenge.
For clarity as some readers seem not to understand I believe the camera has a total of 50 megapixels arranged in a quad bayer cell and goes to 12.5 in video 4K full frame combining pixels in 2×2 cells. There are phones on the market with 108 megapixels so this is nothing new.
The A1 is produced on the Exmor RS line which has been developed for mobile technology so no suprise the same investement is leveraged for cameras.
Many commercially available phones already implement the same features of the A1 see for example the specs of the Xiaomi12
Video Format Choice
The other question is then what to shoot now that we know or think we know the inner workings of the camera?
8K suffers from similar false colour artefacts of still images and 8k displays are rare it is only available in 4:2:0 subsampling due to bandwidth issues.
APSC is cropped while the image has no defect this mode does not have a benefit on other cameras like the Panasonic GH6, it also does not support 120fps. Many other cameras offer cropped APSC 4k footage: you do not need an A1 if you want APSC video.
UHD has moire in certain situations due to the lower resolution being out resolved by the lenses used and the lack of anti aliasing filter however it does offer the highest dynamic range and no false colour artefacts
My approach is to use UHD and if I have moire, use APSC. Moire is visible in the EVF so you can then mitigate it by switching to APSC only when required.
I have done a full analysis of the codecs and frames which I will post in a later article.
The other consideration is that I did not get a full frame camera to shoot it in APSC and in fact the A1 APSC also looks the same as my Panasonic GH5M2 and offers minimal benefit of DR and SNR due to the smaller size of the cropped area.
Now that I know (or think I know!) What may be behind the A1 limitations, am I disappointed? Actually I am not. I did not buy this camera for 8K, I have no ability to edit or display 8k but I wanted an upgrade to 4k and I can say the A1 holds video footage at 12800 ISO in slog3. I have yet to see any moire and prores raw 4k@60 is amazing quality, surely there is distortion and chromatic aberrations and vignetting but especially underwater or topside long lens this is not an issue. I am a bit disappointed by the codecs on card especially as HEVC does not have a 30 fps mode however overall the camera delivers an extremely pleasing image quality in 4K with outstanding clean colours using slog3/cine.gamut. If there is one thing that is weak is the IBIS.
If you are a purist and want the best image quality in full sensor should you look at the canon R5? This is where it gets interesting. I believe the R5 has a cleaner image however Canon is behind in terms of sensor technology so at the end when you look at real life images in terms of IQ and SNR I do not see the Canon taking an edge. What the Canon is better at is ergonomics, menu systems but not ultimately image quality despite all the things discussed here.
Conclusion
Despite all the cheating the A1 remains an amazing camera, it is small, it has many lens options and has the best underwater ports option and I do not regret my choice in fact I look forward to using this underwater. And finally, all of this just made me reflect on what a great camera the Panasonic GH5M2 is and I will keep it for some time until I am happy with all use cases.
It was Christmas 2018 and my wife Helen hands me over an envelope with an unexpected gift: two hours tuition with Alex Mustard (on land). Alex was travelling and I was busy with work so I only managed to get the session arranged in spring 2019. At that time I had just returned from a Hammerhead expedition in the Bahamas.
Prior to boarding the boat I did two days diving at Blue Heron bridge. I must admit shooting macro is not my favourite discipline but the shots were very disappointing: they all looked flat fish ID style images of various critters on the sea bed.
I showed the images to Alex who gave me a session on inward lighting for macro and we took several shots of coffee mugs or other widgets on his kitchen table. I wish I had had that session before going on that trip, but things never quite work as you would think.
Since then, I have done mostly wide angle with the occasional macro or fish portrait. I have not really had the chance to give this technique a proper go. Inward lighting for macro requires to position your strobes behind the subject or in line with it and this is sometimes not exactly practical. The same technique, that had been initially introduced by Martin Edge, can be applied, with some changes, to close focus wide angle images.
Inward Lighting Diving in Italy
During this summer I had the opportunity to visit the Sorrento Peninsula again and dive with the friends at Punta Campanella Diving Centre. On day one of diving, the plan was to visit the dive site called Banco di Santa Croce, a group of offshore pinnacles ranging from 12 to 50 meters depth where there is abundance of groupers, rockfish, anthias occasional eagle rays and plenty of gorgonians. Usually, the visibility is terrible in the first meters and then clears up after the thermocline around 15 meters, however, on the day the visibility was pretty bad until around 30 meters. After a set of pretty deep gorgonian shots and seeing that the groupers were very un-cooperative, I went above the thermocline on the shallower pinnacle to see what I could shoot. Visibility was pretty bad with murky green water and a high number of suspended particles and I had an 8-15mm zoom fisheye on my Panasonic GH5M2 (similar to a Tokina lens on APSC). All of a sudden, I see a large “scorfano” (rockfish a variety of scorpion fish) swimming over the reef to change its resting location.
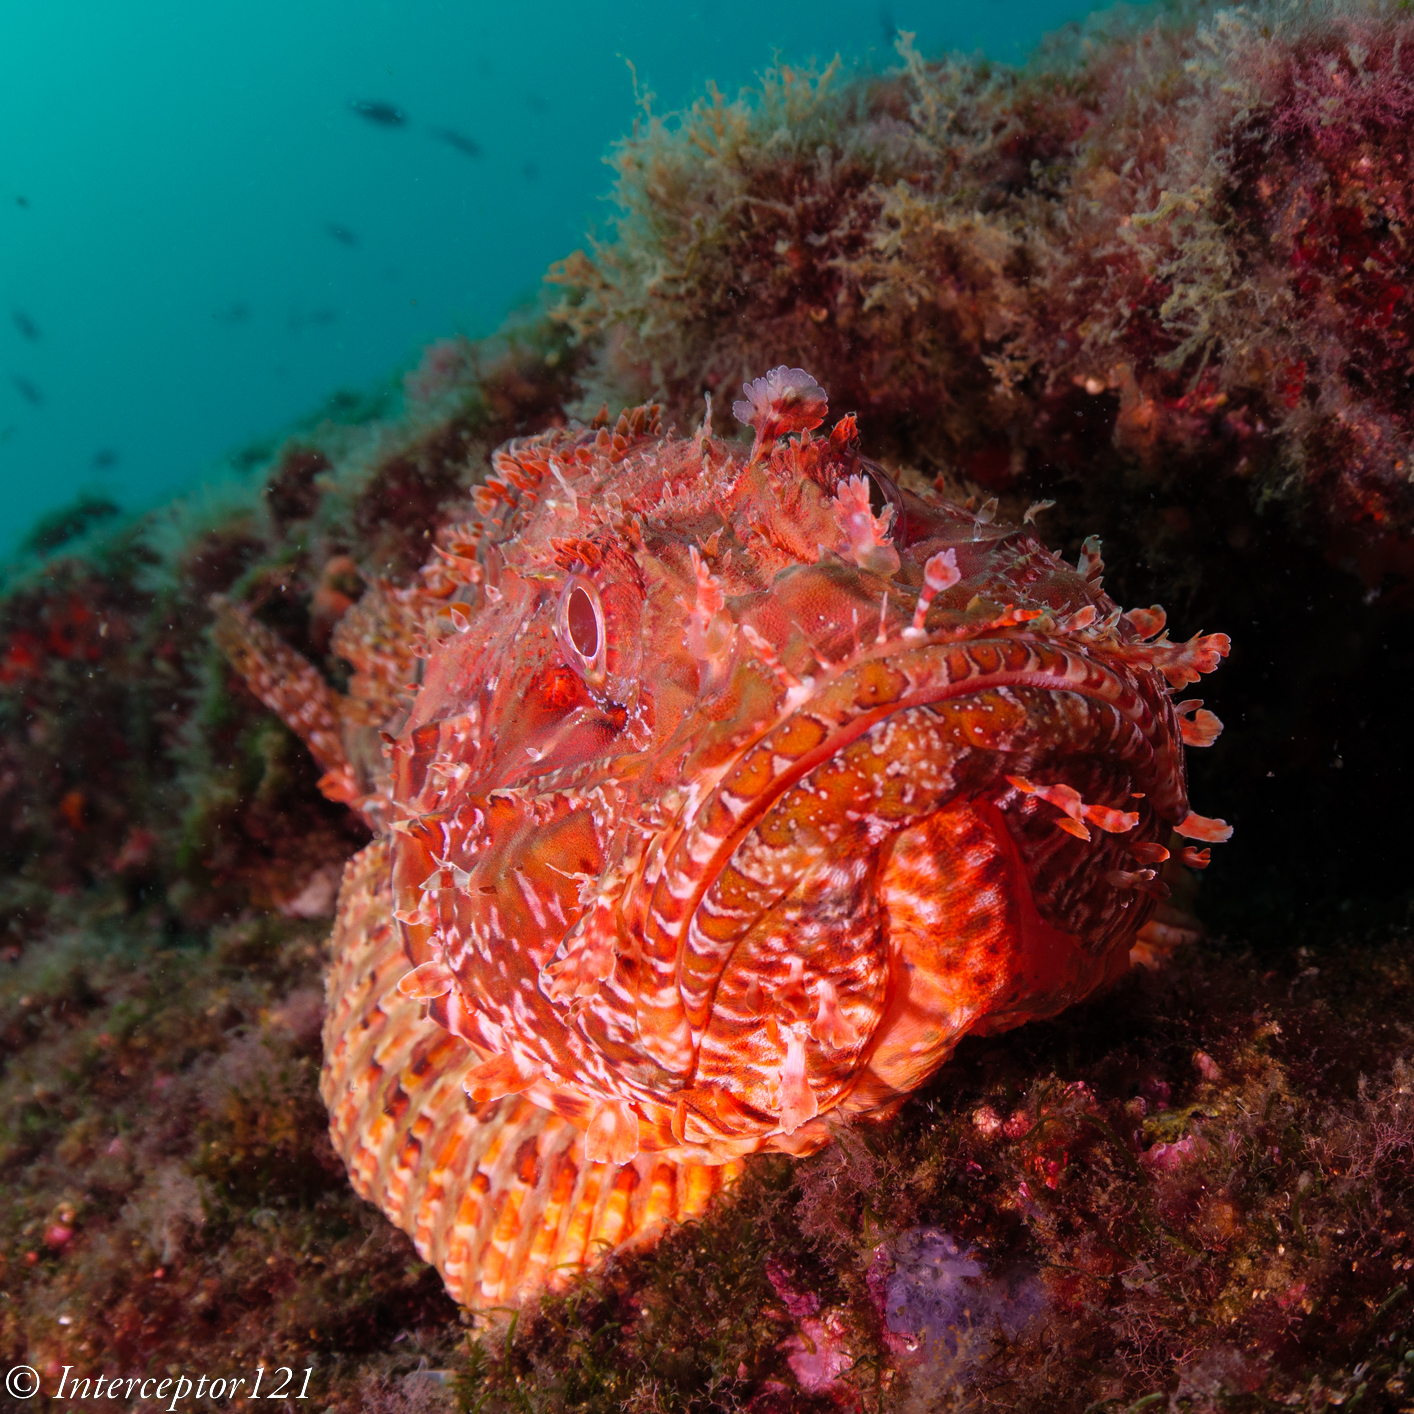
I take the first shot trying to minimise backscatter.
While the backscatter control worked reasonably well, I was faced with another fish ID style fish portrait with some ugly background: an overall anonymous shot, at least for my tastes. At this point I thought of giving inward lighting another go even though I had a zoom fisheye lens and was attempting some kind of fish portrait, with the ambient around the fish looking quite ugly.
I moved the strobes in line with the focal plane of the camera pointing right at the handles and started with the strobes wide, getting closer to the housing until I got the level of light I wanted.
First attempt was quite dark but the image started to look more interesting.
Eventually I got the light I wanted on the fish
now it was the time to make the image more interesting, trying to get some attitude out of this cooperative rockfish.
After a few attempts I managed to get the shot I wanted before the fish decided to swim away in a position no longer suitable for the composition I wanted.
Inward Rockfish
As you can see, I kept quite a low f/number I wanted to make sure only the fish head was sharp and limit the depth of field through the frame. This is a fisheye zoom at 15mm on micro four thirds so f/5.6 still has some depth of field but not too much. In my opinion the position of inward strobes works particularly well with subjects that have depth and are not flat on the focal plane of the camera like in this example. The lighting creates very strong shadows and texture that gives the fish an attitude.
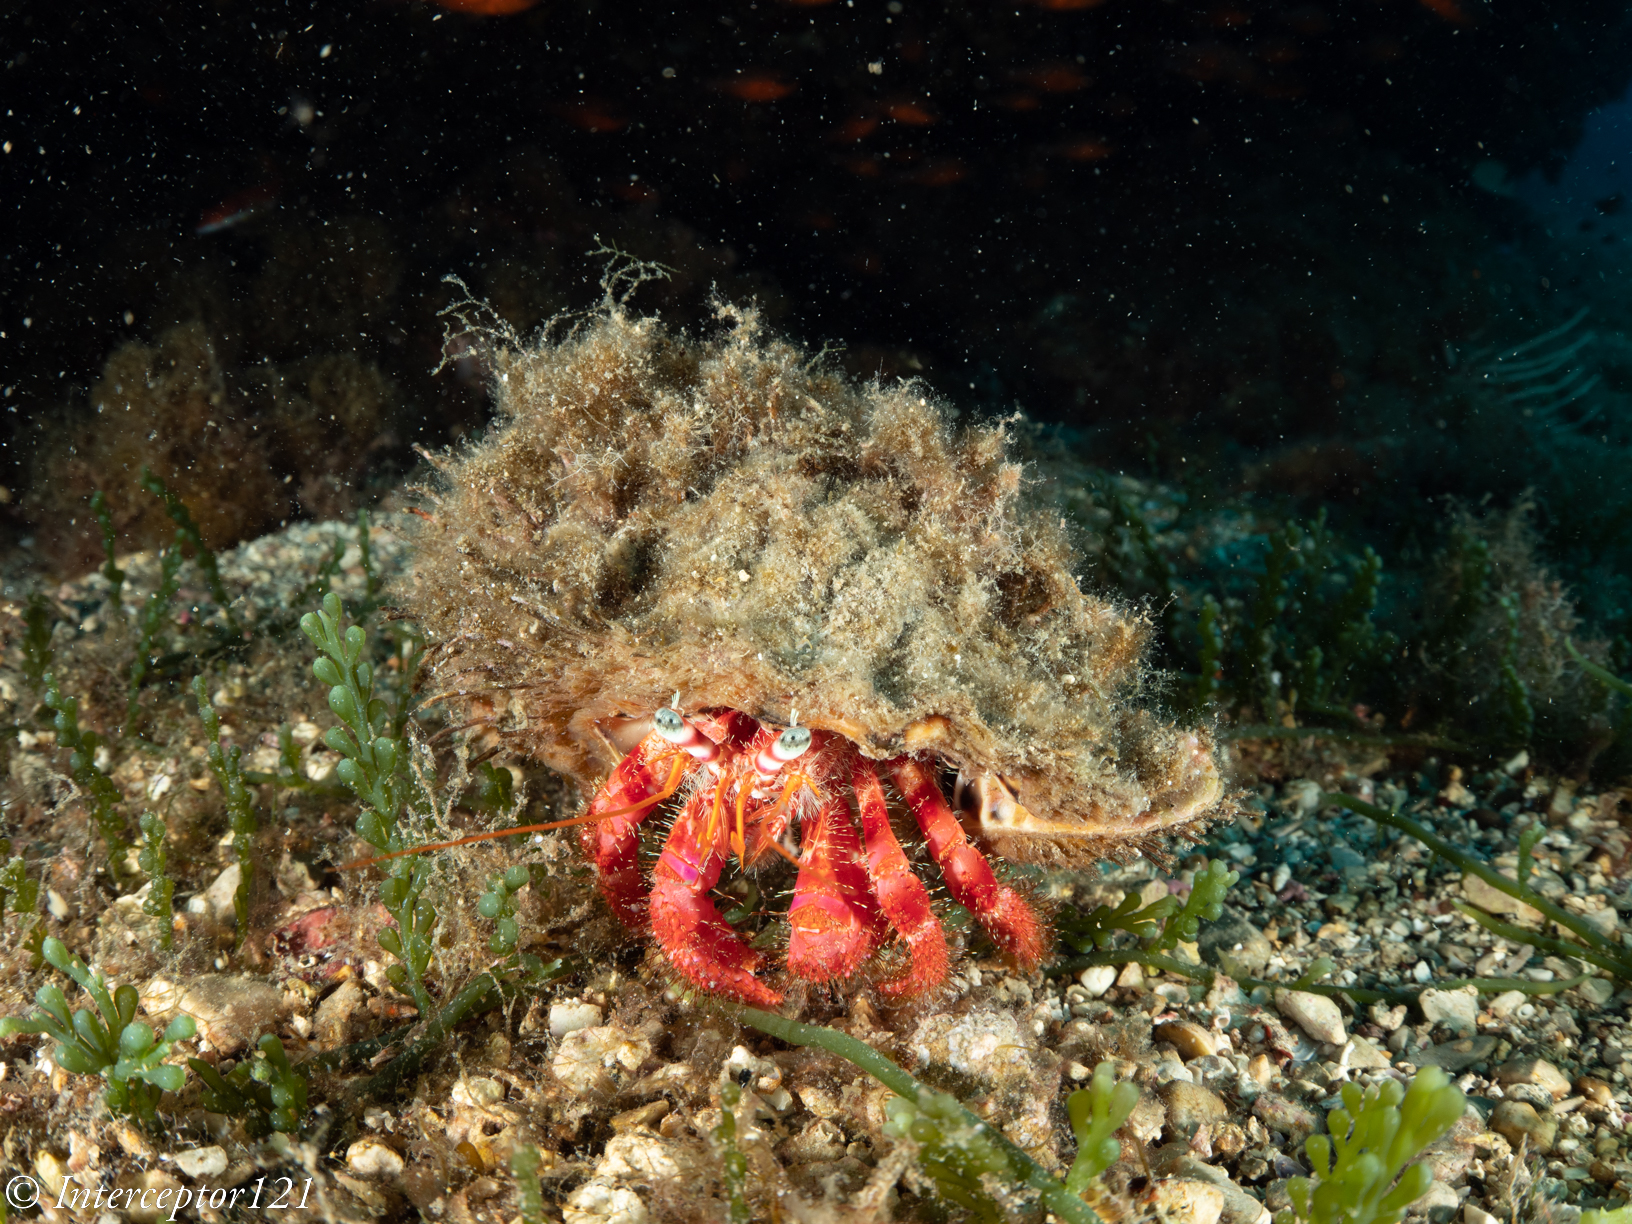
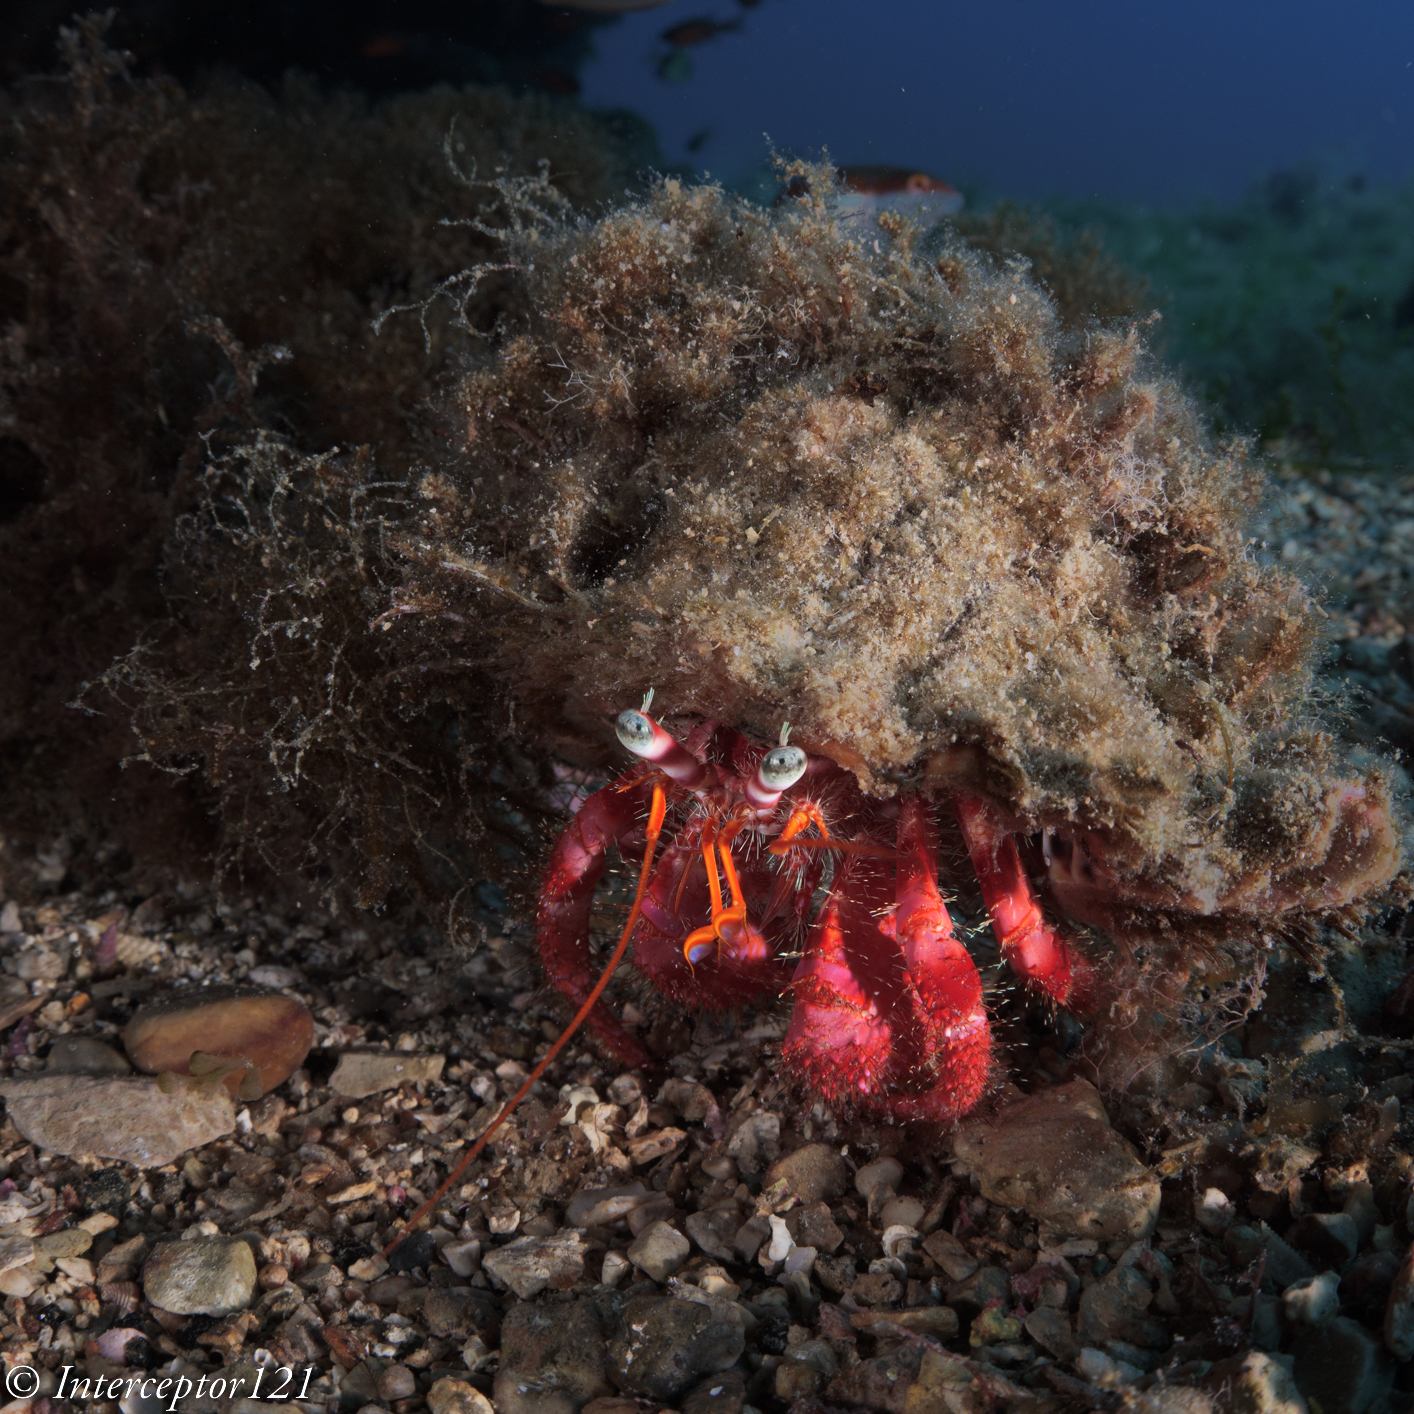
A few days later I am on another dive site shooting wide angle again and I notice a large hermit crab on the seafloor. I try a crossed strobe shot and with my horror I notice many large particles backscattering over the black background.
I change the strobe position for inward lighting wide angle and place myself so I would get some blue water in the background that would reduce the contrast of the particles.
The first repositioning works well: I get strong shadows and light more from one side as I wanted.
Then the hermit decides to go for a wander, first it is repositioned so that I get a more frontal shot.
Then it literally legs it so I get a shot that for me is quite funny, as you can see a group of breams swimming in the other direction against the blue water.
Hermit on a run
This technique has resulted in a few shots that are above average certainly not outstanding but decisively different that bring out the character of both critters in my opinion.
Technical Explanation
I want to try and provide some details and technical explanation of what I think is happening with the strobe positioning and the subject.
This is a standard position for close up frontal shots.
From the diagram you can see that the area where the lens and the strobes beams overlap can generate backscatter. As the strobes are aligned with the lens the phenomena can be really strong, as demonstrated in the first hermit crab shot.
There are two issues with this positioning: first if the subject is sitting on the sea bed and you cannot get water behind you will see the background no matter how fast the shutter speed goes. Moreover If you try to close the aperture you will need to increase strobe power which will result in more backscatter.
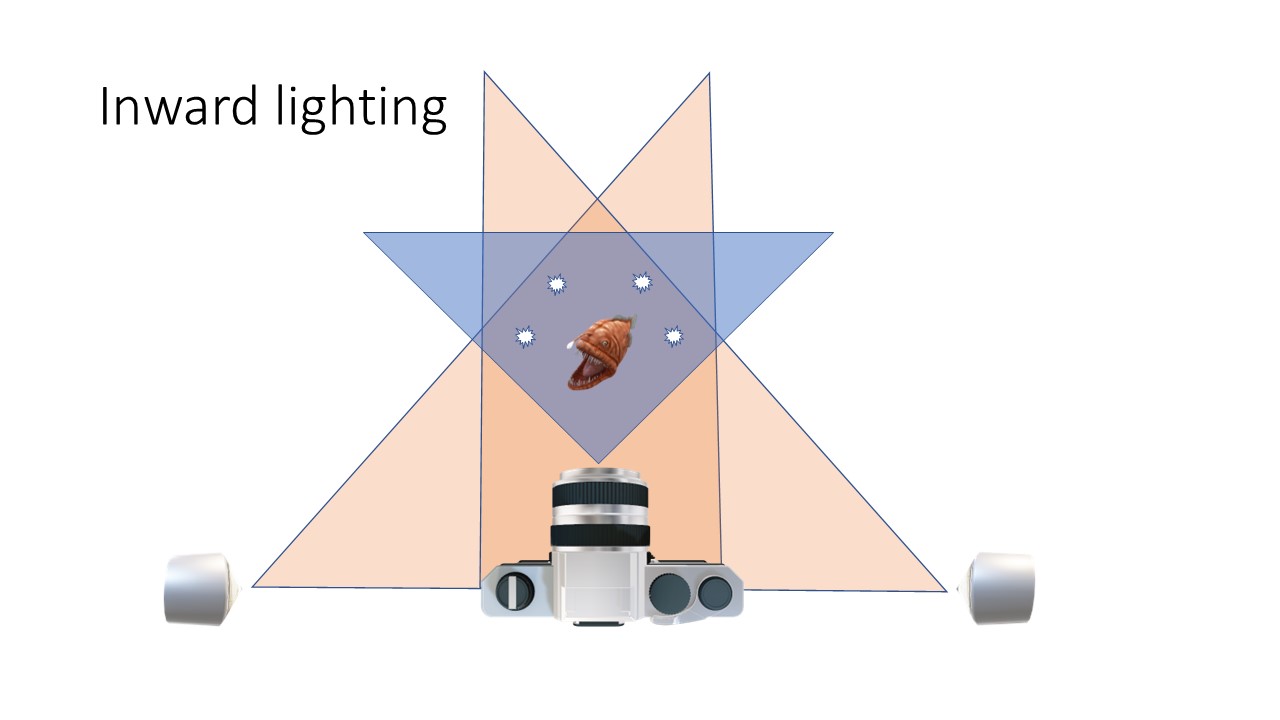
This is a position that I use for inward lighting when I use a wide-angle lens.
You can notice a few things. First is that the subject is only hit by the edges of the beam and only from one side of the strobe so the intensity of the light is greatly reduced. This can be a challenge if you have a true fisheye as you will need to have really strong strobes as you place them further away from you to cover a wider area.
The second Is that the light beams are pointed to each other which in turn means strong shadows and a lot of texture on your subject.
Thirdly any suspended particles will reflect away from the incident angle of the lens resulting in attenuation, but of course not elimination, of backscatter effects.
Finally, the area behind the subject is not covered by the strobes at all and lends itself to either dark background or ambient light as in my two examples in this article.
Here are some additional tips on the strobes; settings. I personally use diffusers in this set up otherwise the position of the strobes needs to go forward and this can create backscatter at the edges or you could even see the strobes in the frame. Second you need several attempts to work out the distance vs power vs aperture equation. If you are interested in a dark background you need to increase the shutter speed as far as you can but on the other end control the aperture so you get the visual effect you want, in my case open so that the background is not sharp in focus. If you want to have the blue water background in the shot then you need to reduce the shutter speed and increase the aperture so you get plenty of depth of field to show as much as possible of the environment, this may result in your strobes working at full power just to paint your subject enough to standout. It takes a while to work out how to proceed and it is better to decide at the outset how you want to compose the shot so that you do not spend too much time doing trial and error as your subject may decide to leave the scene and interrupt the cooperation.
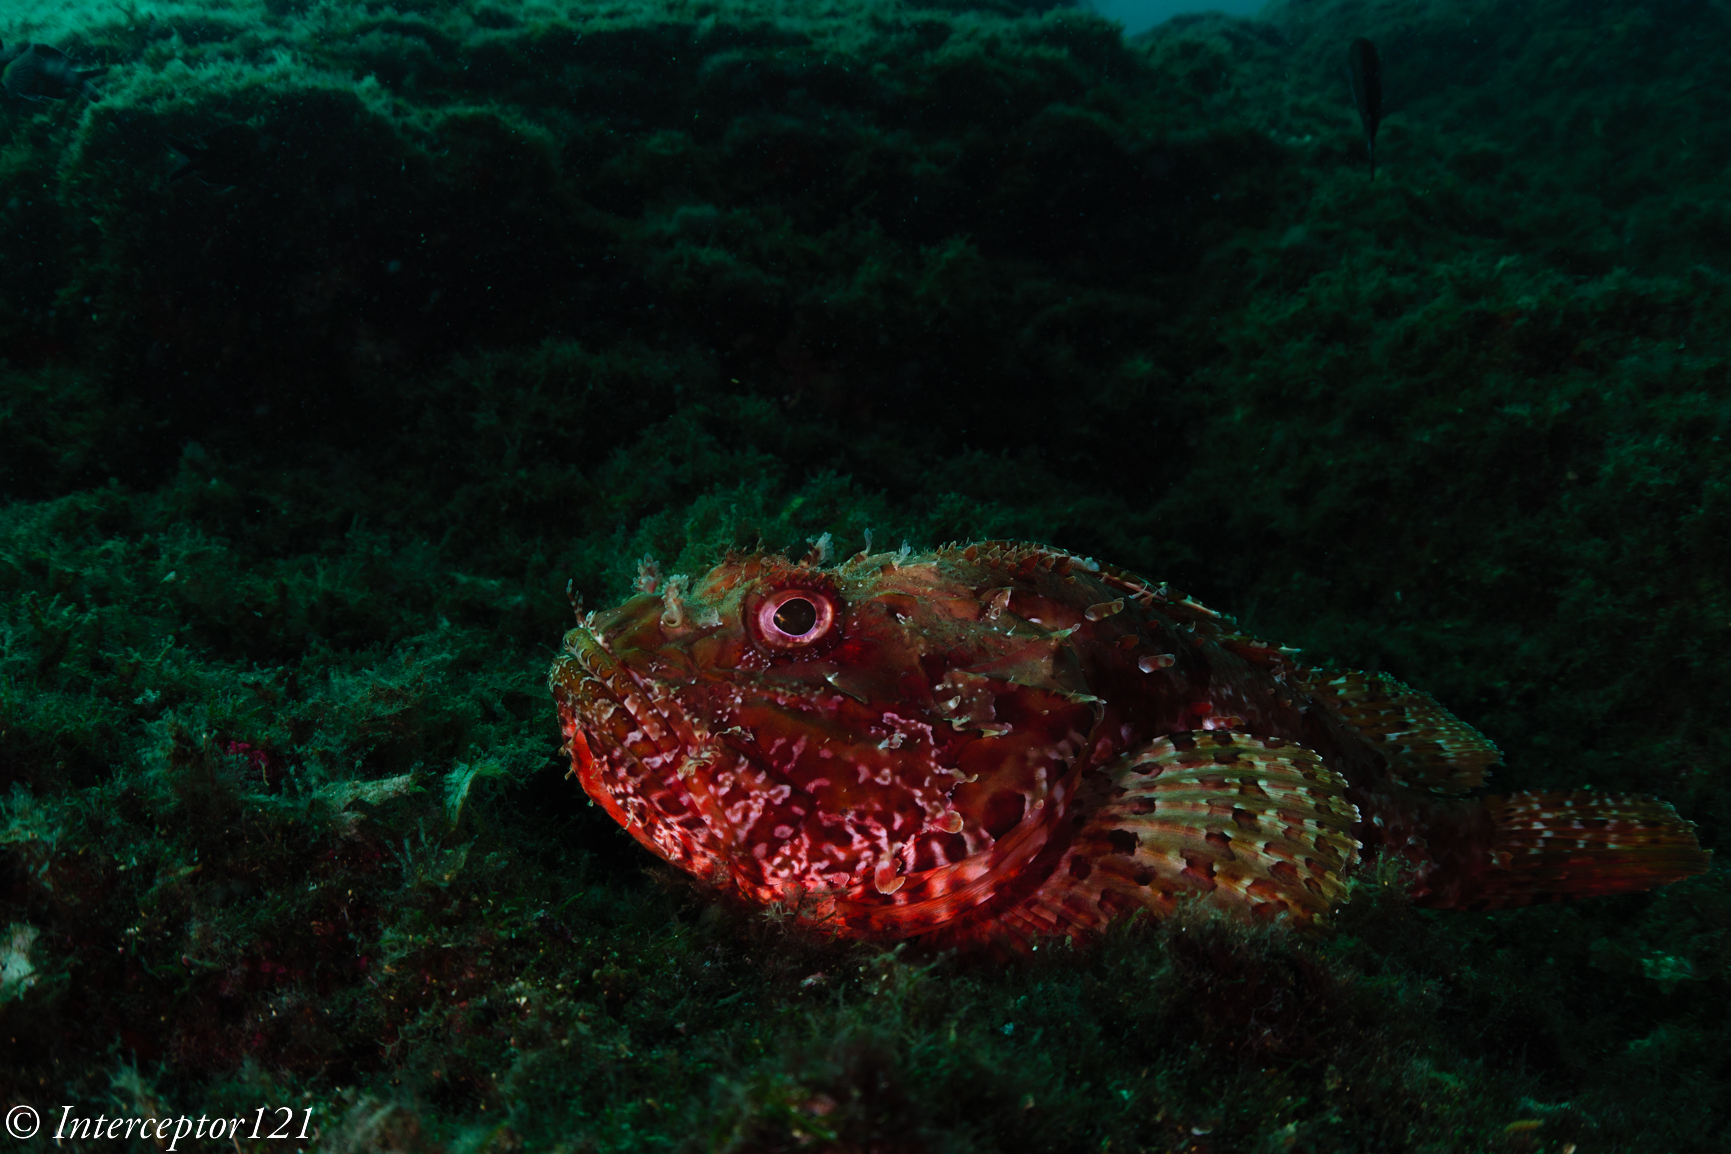
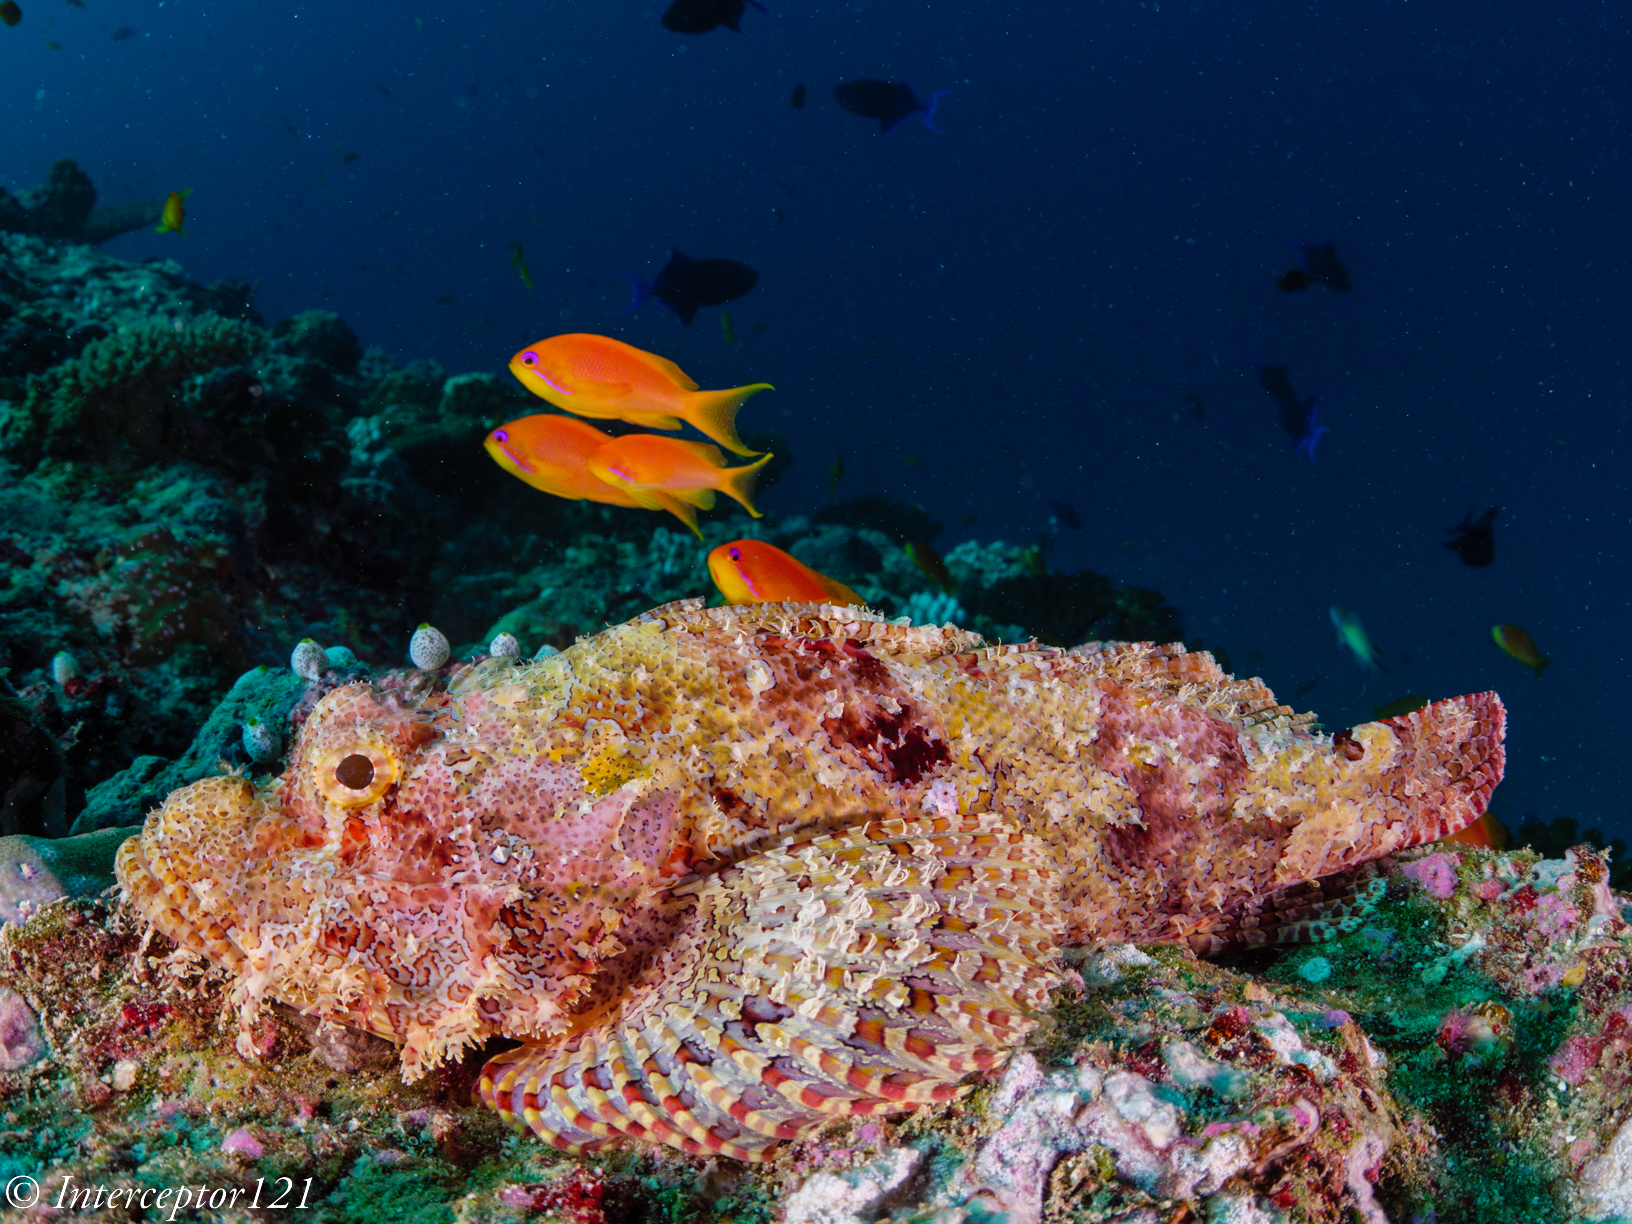
Another scorpionfsh this time from the Maldives
Post processing
I believe image editing is almost as important as making an image so I have included some post processing tips trying not to get too technical. To simplify, I will only say that the camera captures a lot more information than your image preview or your raw converter show when you import your images. Some of the inward lighting shots may look initially really dark, especially those at fast shutter speed. Do not despair if your camera has good ability to preserve colours in the shadows you still have an outstanding image potentially sitting there, so unless you did not get your focus right do not delete immediately images that appear underexposed.
The second suggestion is to avoid pressing the Auto button on your photo editing program because that will balance the exposure across the entire scene and take away any character from your image.
Generally inward images like the ones I have shot look fairly dark straight out of camera and you do not want to compensate exposure. My recommendation is to use a mask on the subject and adjust exposure very slightly and only if you got it very wrong. Instead pull up the whites and the highlights to make your subject stand out. I avoid any change of clarity, sharpening etc: the images have minimal, but selective, processing.
Another crucial consideration is that because you are using only the very edge of your strobe beams, the colour rendering index and warmth of your strobes may end up far away from normal conditions and using the white balance picker may result in strange effect as the lighting is not even across the frame. I recommend you increase the colour temperature and tint until you get something that you are happy with instead of going for recipes.
At the very end see if you want to clone out debris or some residual backscatter, this technique needs you to get very close to the subject and due to the strobe position backscatter on the focus point is minimised however it could still happen on the sides of the frame.
For what concerns cropping in a specific aspect ratio there is no hard and fast rule: I tend to shoot those close ups at 1:1 lately if the subject is somehow rounded but can go 16:9 if it is a fish sitting sideways on the seabed. Generally, I decide on the crop very early in the process but the good thing is that, as you will just make minor adjustment with masks on the subject, cropping will not change anything.
Closing notes
I have used a Panasonic GH5M2 with a Canon 8-15mm and Metabones smart adapter. My rig set up is described on this link. An APSC camera with a Tokina 10-17mm or a camera with a wet optics WWL-1 or similar or even WACP is adequate for shots like those described in this article. A full fisheye will have a much wider field of view and your subject may look very small or you may not be able to illuminate it correctly, a WAM (wide angle macro) solution may be better but that is an entirely different technique. I use a set of Sea and Sea YS-D2 despite the reputation for low reliability they have worked fine for everything I do until now. I am also convinced that shots like those described in this article can be taken with any camera type as long as you know how to and have adequate lenses and field craft, so if you have read up to now I recommend you give it a go and try and apply my suggestions adjusting the to your taste.


 (Exposure/Color) → [Flash] → [Flash Mode] → desired setting.
 Flash Off:The flash does not operate.
 Fill-flash:The flash works every time you trigger the shutter. (Front Curtain)
 Slow Sync.:The flash works every time you trigger the shutter. Slow sync shooting allows you to shoot a clear image of both the subject and the background by slowing the shutter speed.
 Rear Sync.:The flash works right before the exposure is completed every time you trigger the shutter. Rear sync shooting allows you to shoot a natural image of the trail of a moving subject such as a moving car or a walking person.