Disclaimer: there are many USB chargers out there and not all of them have performance level adequate to support your underwater photography needs. Make sure that each USB-Type A outlet is at least 10W and that the total power equals 10xnumber of outlets as a minimum or your USB charging will be slow. If you get an USB-C charger make sure that the power allocated to the USB-A outlets is enough or your laptop will charge very fast but your batteries will take forever. The product I am suggesting here have been researched and I have tested them on the field I do not take responsibility if you get something different because it looks cheaper or newer. In case of doubt happy to take questions.
Few months ago I booked a shark diving trip. Looking at the boat specs I realised the vessel was smaller than those I have travelled in the past and therefore I was concerned that with many photographers on boat it would have really been a struggle to have all my chargers especially as there were only shared cabins. Furthermore many boats do not allow anymore to charge batteries in your cabin to reduce the risk of fires,
I put my items on a scale and I realised how much this whole set up weights
Charger spaghetti and one strip
I contacted the boat that told me strips were available for power but of course US format so not good for me. 1.8 Kg for a single AA battery fast charger, laptop power supply, phone charger, camera batteries charger. 1.8 Kg without even including the back up AA charger in the image below. Of course I can find a lighter strip or have a number of US adapters but you can see this is not heading in the right direction.
Chargers for a typical underwater photography typical trip
I recently bought a new MacBook Pro that only has USB C ports this has made me realised how powerful USB has now become with USB C you can deliver power to charge a large laptop as well as transfer at light speed images and especially videos. I will write another post on how to make your physical media management more effective but for now let’s focus on power.
At the same time in our home there is competition for charging tablets, phones and all sorts of other portable equipment by USB.
I thought would not be nice to have a multi USB charger? Do they even exist and the answer is yes. See below a product I bought for home and travel use that can power up to 4 devices.
Wall Charger, RAVPower 40W 8A 4-Port USB Charger with iSmart 2.0, Travel Adaptor for iPhone XS/XR/XS Max/8/8 Plus, Galaxy S9/S8/Note 8, iPad, Tablet, Kindle, Power Bank & More – Black
£15.99 to end all our struggles seemed a great deal. You can directly click the image above to buy it on amazon.
In US this is $16.99 so even cheaper
RAVPower USB Wall Charger 40W 8A 4-Port Multi-Port Travel Charger Charging Station, Compatible iPhone Xs Max XR X, iPad Pro Air Mini, Galaxy S9 S8 Note 8 Edge, Smartphone, Tablet and More
From there I started thinking is there a way to charge AA batteries using USB after all the current requirements are quite low?
So I found this other product that did the job and can charge 4 AA or AAA batteries for £14.99 on Amazon. Note that despite the misleading description the two chargers are identical except one has micro USB and the other also USB-C. The USB-C version is slightly bigger (70x90x23 mm USB version vs 97x114x34mm USB C)
EBL 40Min Smart Fast USB Battery Charger for AA AAA Ni-MH Rechargeable BatteriesEBL 2-hour Super fast AA AAA Rechargeable Battery Charger with Battery Intelligent Auto-detection Tech for 1-4 NiMH Rechargeable Batteries
Links to Amazon.com
EBL 40Min Smart Fast USB Battery Charger for AA AAA Ni-MH Rechargeable Batteries AMAZON.COMEBL 2-hour Super fast AA AAA Rechargeable Battery Charger with Battery Intelligent Auto-detection Tech for 1-4 NiMH Rechargeable Batteries AMAZON.COM
From there I moved to camera batteries and I found another product that allows to charge two batteries at the same time as battery consumption for video is huge. £8.49 seems a bargain click and see for yourself!
Newmowa Dual USB Charger for Panasonic DMW-BLF19 and Panasonic DMC-GH3,DMW-GH4 (DMW-BLF19 Dual USB Charger)
When you hit the page you can also buy compatible batteries this is not recommended please buy original batteries there is a whole world of difference.
At this stage my travel charger was using 2 ports for AA batteries 1 for camera dual battery charger with one spare for the phone or other devices.
I though is there a charger that also has a UBC charging port so I can also get rid of the laptop charger and there is £27.99 on amazon click on the image to go directly there.
USB C PD Charger, RAVPower 60W 5-Port Power Delivery Desktop Charging Station with 1 Type-C PD Port up to 45W for MacBook, 4 iSmart 2.0 Ports for iPhone XS/XR/XS MAX-BlackAmazon.com Link
At this point streamlining was complete. As additional benefit the desktop charger has a removable power plug so you can get your cable for EU or US or any other country the device will work anywhere. The only item still to be worked on are video lights but with batteries of 99 Wh this is not yet possible.
I put all on the scale well it speaks for itself 1 KG less
Of course many people do not have USB C powered laptops yet but this is changing so I would recommend getting a charger with USB C however if you don’t want or need that there is also a charger without with 4 or 6 ports
USB Charger, RAVPower 40W 4-Port Desktop Charger Mains Plug with iSmart for iPhone XS XR XS MAX, iPad, Galaxy S9, Mobile Phones, Tablet -Black Amazon.com linkRAVPower USB Charger, USB Charging Stations with 60W 6-Port Multi Plug Charger for iPhone XS/XR/XS Max, Galaxy S9 – BlackAmazon.com link
Of course you have put all eggs in one basket now but frankly it was the same also before if one of the charger would fail and besides you will find USB chargers on a resort or a boat as anybody as a phone. Worst case you can bring two power suppliers however this looks unnecessary to me.
I hope you find this useful feel free to share this page with your friends and use the links on here. I have looked into products in details those are the best ones that have the features you need (2.4A current at least 45W USC B won’t bore you with details but trust me this is what you need).
The Panasonic GH5 is well known to be a great camera for video and I can confirm that see my latest videos
Clearly the camera is fantastic and with the right set up that I will cover in future posts it takes amazing video.
I wanted to start however from photography as the GH5 also takes great still images.
First and foremost macro. In general terms the lens choice of other micro four third also applies to the GH5 so my favourite lens is the Olympus 60mm. Alternatively if you don’t have that lens and you don’t have extremely small subjects you can get good results with a zoom lens I use the Pana 14/42 MKII but other work well too.
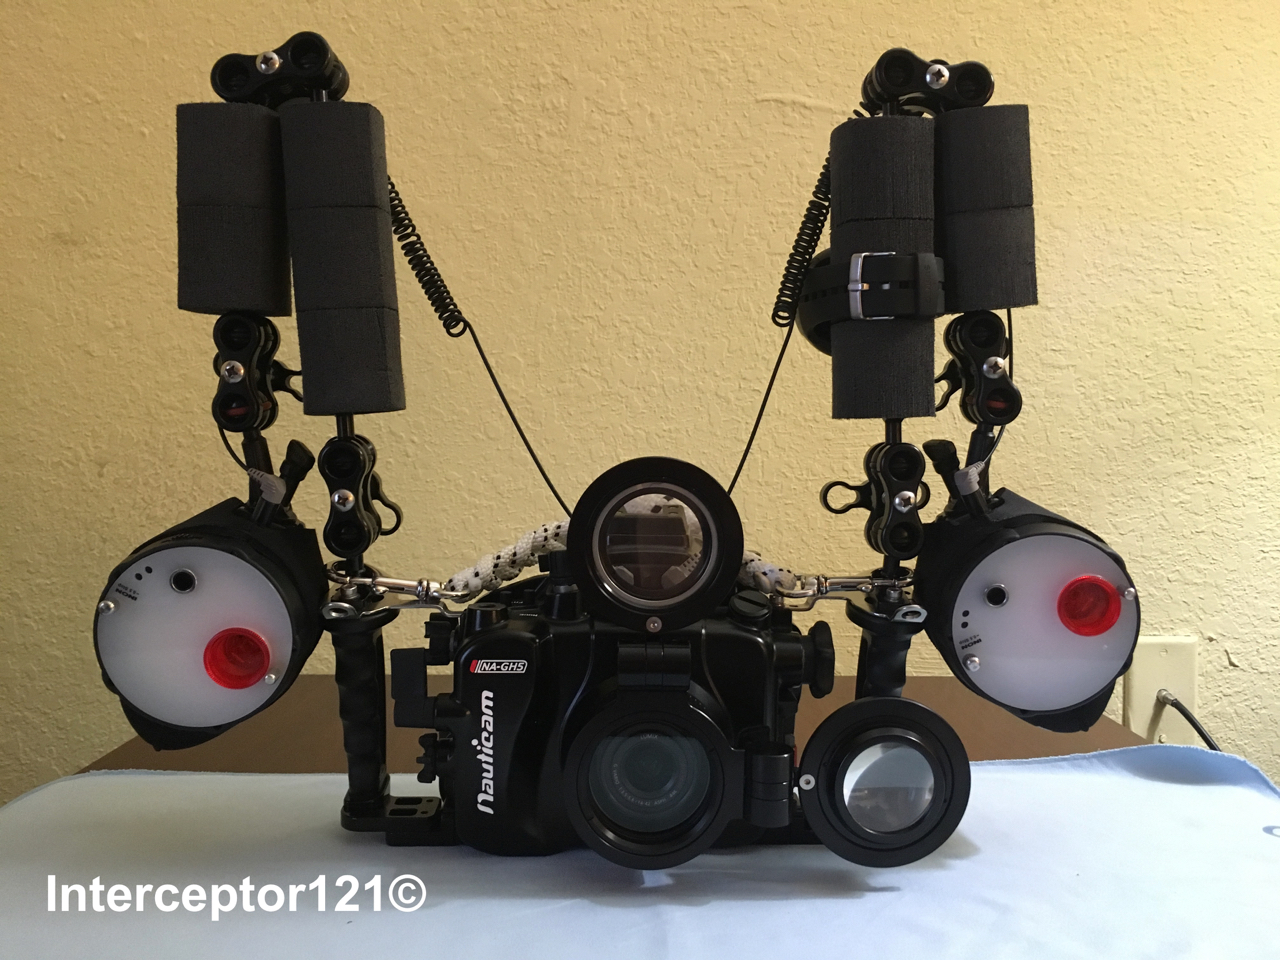
In terms of arms strobes nothing changes so my current rig is based on a Nauticam NA-GH5 housing and two Inon Z240. I have each arm set with 1x 8″ and 1x 5″ arm segments you will notice that the longer arms is closer to the camera this because in macro you will usually shoot above the sand so this makes it easier.
For wide angle the situation changes slightly as I use a 12″ arm segment as in the rig below.
GH5 with WWL-1 wet lens and 8+12 arm segments
For wide angle the arms return to a standard situation with shorter segment close to the housing. The same configuration applies if you shoot the 8mm fisheye.
In terms of floatation the GH5 housing is heavy with the 35 macro port is 720 grams and with the fisheye 620 grams. For macro I like my set up to be negative so less floats . For wide angle in case you take slow shutter speed shots I also use the tripod kit for the NA-GH5 this is not as good as a complete tripod but works well in wrecks
In the next posts I will talk about video as here there is a question about diopters and which ones do I use. Lights is also a topic of contention and will discuss few options there too
How many times you see practically new close up lenses being sold on eBay after sitting for years in a cupboard? Have you ever experienced the frustration of buying a close-up lens to find out it did not add anything to your set up?
There is a lot of confusion in terms of what is that you are really getting when you buy an underwater close-up lens. In most cases lenses are specified in diopters, in some other cases with a magnification factor, in few cases with the focal length.
The focal length is probably the most useful of those specification because in a traditional diopter the following formula is valid if you approximate the lens to converge in the rear element:
Working distance ≤ Focal length – physical length of the close-up lens
For example for a Subsee +5 diopter the focal length is 1000/5=200mm the lens is 32mm therefore the working distance is less than 168mm.
Now on its own this means very little. Depending on the camera we use a distance of 168mm may be a great improvement or no improvement at all.
To understand why we need to look on our camera and find the little symbol that indicates the focus distance reference mark.
While for DSLR the shooting distance is typically calculated from the front on the lens for micro four third you need to use this obscure symbol.
Once we locate the reference mark we need to identify the corresponding reference on the housing we can use the other dials as starting point. In this case the mark is approximately in the middle of the cold shoe.
When we put the camera in the housing we can then look up the specifications of the lens and calculate the minimum shooting distance. For example for an Olympus 60mm this value is 19cm.
We take note of this point and then measure the distance between the glass and the minimum working distance on land.
This works out to be around 9cm. We now need to consider that once immersed in water this distance will be multiplied by 1.33 to become 12cm.
It follows that any diopter with a focal length close to 12cm or longer is not going to be effective for our camera and lens combination. More likely we need something that can focus substantially closer or the benefit will be minimal. Assuming we half the physical working distance between the port and the subject we need something around 60-80mm focal length which considering the length of the lens itself could mean getting 2cm away from the subject.
There are a lot of videos on YouTube that suggest that there is not much difference among the various recording settings of the GH5 for UHD.
To recap we have 4 settings for UHD (I will refer to PAL system because it is easier but all applies equally to 24p, the 30p/60p format will be the same with worse results)
100 Mbps 420 8 Bits Long GOP 25p
150 Mbps 420 8 Bits Long GOP 50p
150 Mbps 422 10 Bits Long GOP 25p
400 Mbps 422 10 Bits All-Intra 25p
The difference between Long GOP and All Intra is that in the Long GOP what is encoded is a group of pictures (GOP) and not separate individual pictures.
Within a Group of Pictures there are different type of frames:
I (Intra coded) frames containing a full picture
P (Predictive coded) frames containing motion interpolated picture based on a prediction from previous frames
B (bi-predictive coded) frames containing a prediction from previous or future frames
It is important to note that frames are not stored sequentially in a GOP and therefore the GOP needs to be decoded and the frames reordered to be played, this requires processing power.
The reason why H264 is very efficient is that within a group of picture there is only one full frame and the rest are predictions clearly if the prediction algorithm is accurate the level of perceived quality of long GOP is very high and similar to All-Intra clips.
This is the reason why comparing All Intra and Long Gop using static scenes or scenes with repetitive movement that can be predicted very accurately by the codec is a fundamental error.
Incorrect example here:
The scene is composed of static predictable objects with no motion and after YouTube compression the (wrong) conclusion is that there is no absolute difference between the codecs. Instead what this shows is the effectiveness of Long GOP when the prediction is accurate which is exactly the point of the codec plus the fact that YouTube flattens differences due to heavy compression and use of Long GOP.
Another example is a bit better as it uses a fountain which is a good representation of unpredictable motion
In the 300% crop you can see how All_Intra performs better than Long GOP in terms of prediction despite the YouTube compression, but generally those tests are unreliable if you see the last section of the video where there is a semi-static scene you cannot really take the three examples apart.
So why is that and is there any point selecting different settings on your Panasonic GH5?
In order to understand the workings we need to dig deeper into the structure of the GOP but before doing so let’s evaluate the All-Intra codec.
AVC All-Intra explanation
This codec records at 400 Mbps so with 25 fps this means circa 16 Mbits per frame or 1.9 MB per frame and there is no motion interpolation so each frame is independent from the others. The implementation of All-Intra of the GH5 does not make use of CABAC entropy encoding as Panasonic does not believe this is beneficial at higher bit-rates making this AVC-Intra implementation very close to ProRes as both are based on Discrete Cosine Transform.
If you consider a Jpeg image of your 3840×2160 frame on the GH5 you see that it stores around 4.8 MB per image because there is no chroma sub-sampling so if you wanted to have exactly the same result you would need to use ProRes 4444 to get a comparable quality (this not even taking into account that Jpeg are 8 bits images).
Video uses chroma sub-sampling so only part of the frame contain colours at a given time. Apple in their ProRes white paper declare that both ProRes 422 and 422 HQ are adequate to process 10 bit colour depth and 422 sub-sampling however they show some quality differences and different headroom for editing. If you count 50% for 4.2:0 sub-sampling and 67% for 422 you get around 2.34 MB and 3.5 MB frame sizes that correspond to ProRes 422 and ProRes 422 HQ individual frame sizes.
In simple terms All Intra 400 Mbps would fall short of Apple recommended bit-rate for 422 10 bit colour for circa 92 Mbps is like saying you are missing 0.44 MB from your ProRes 422 frame and 1.6 MB from ProRes 422 HQ and you have 0.3 MB more than ProRes LT however I do not have the full technical details of ProRes to evaluate directly.
The real benefit of such codec is that it can be processed with modest hardware without conversion as the AVC Intra codec is edit ready and each frame is captured individually without any motion artefacts and therefore the computer does not have to do a great deal of work to decode and render the clips.
In order to record All-Intra in your memory card you need a V60 or higher specs card which in terms of $ per GB costs you more than an SSD drive however you no longer need a recorder.
Coming back to the other recording quality option we still need to evaluate how the various long GOP codecs compare relative to each other.
In order to fully understand a codec we need to decompose the GOP into the individual frames and evaluate the information recorded. If you look on Wikipedia it will tell you that P frames are approximately half the size of an I frame and B frame are 25%. I have analysed the Panasonic GH5 clips using ffprobe a component of ffmpeg that tells you what is exactly in each frame to see if this explains some of the people claims that there is no difference between the settings.
An analysis with ffprobe shows a GOP structure with N=12 and M=3 where N is the length in frames of the group of pictures and M is the distance between I or P frames.
So each Group of Picture is made like this
IBBPBBPBBPBBP before it repeats again.
A size analysis shows that B frames are in average 14% of the I frame and P frames are around 44% of the I frame.
I
B
B
P
B
B
P
B
B
P
B
B
Size
1648326
247334
237891
728777
231947
228048
721242
228347
227544
713771
236866
232148
Ratio to I frame
100%
15.01%
14.43%
44.21%
14.07%
13.84%
43.76%
13.85%
13.80%
43.30%
14.37%
14.08%
With an average video bit-rate of 94 Mbps each GOP has 45.3 Mbps which means an I Frame has around 13.1 Mbits or 1.57 MB per frame and an equivalent All-Intra bit-rate of approximately 328 Mbps however this codec is using CABAC entropy encoding that Panasonic states is 20-30% more efficient than CAVLC used in All-Intra so net of motion artefacts this codec is pretty strong.
150 Mbps 420 8 Bits Long GOP 50p Deep Dive
An analysis with ffprobe shows a GOP structure with N=24 and M=3 where N is the length in frames of the group of pictures and M is the distance between I or P frames.
So each Group of Pictures is made like this
IBBPBBPBBPBBPBBPBBPBBPBB before it repeats again.
A size analysis shows that B frames are in average 13.4% of the I frame and P frames are around 41% of the I frame. With an average bit-rate of 142.7 Mbps each GOP has 68.5 Mbits which means an I Frame has around 11.3 Mbits or 1.35 MB per frame and an equivalent all Intra bit-rate of approximately 566 Mbps. Again this uses CABAC entropy encoding so the equivalent All-Intra is higher.
One very important aspect of the 150 Mbps codec is that as the GOP is double the length of the single frame rate 100 Mbps codec there are the same number of key frames per second and therefore it is NOT true that this codec is better at predicting motion. In fact it is exactly the same so if you had acquired a 100 Mbps codec at 25 fps and then slowed down the footage to half speed asking your editor to interpolate intermediate frames it would come to the same result although with some more processing required.
150Mbps 422 10 Bits Long Gop 25 fps
An analysis with ffprobe shows a GOP structure with N=12 and M=1 which means this codec does not use B frames but just I and P frames so the GOP structure is as follows:
IPPPPPPPPPPP before it repeats again.
A size analysis shows that P frames are on average 53% of I frames so this codec is in fact less compressed however this has also some consequences.
With an average bitrate of 150 Mbps each GOP has 72 Mbits which means an I Frame has around 10.5 Mbits or 1.25 MB per frame and an equivalent all Intra bitrate of approximately 262 Mbps. So this codec in terms of compression efficiency this is actually the worst and this is due to the lack of B frames.
We can only think that the Panasonic GH5 processing is not strong enough to capture 10 bit and then write 422 Long GOP with IPB structure.
Codec Ranking for Static Image Quality UHD
So in terms of absolute image quality and not taking into account other factors the Panasonic GH5 Movie recording settings ranked by codec quality are as follows:
400 Mbps 422 10 Bit All intra 25 fps (1.9 MB per frame)
100 Mbps 420 8 Bit Long Gop 25 fps (1.57 MB per frame)
150 Mbps 420 8 Bit Long Gop 50 fps (1.35 MB per frame)
150 Mbps 422 10 Bit Long Gop 25 fps (1.25 MB per frame)
The 100 Mbps and 400 Mbps codec are marginally different (21% larger frame size) with the 422 10 Bits long GOP really far away.
Conclusion
If you want to record your footage to the internal memory card you are really left with two choices:
Use the 100 Mbps Long Gop codec it is very efficient in the compression and the perceived quality is very good. It does however require you to convert to ProRes or similar during editing if you don’t want to overload your computer as the codec is really heavy on H264 features. You need to get the exposure and white balance right in camera as the clips may not withstand extensive corrections. There is a risk with footage with a lot of motion of some errors in motion interpolation that can generate artefacts.
Buy a V60 or V90 memory card and use 400 All intra at single frame rate. This will give you edit ready footage of higher quality without motion artefacts, You still need to get exposure and white balance right in camera as the headroom is not so large to allow extensive corrections. The bit-rate and frame size is not sufficient to really give you all the benefits of 422 sampling and 10 bit colour but it will be a good stepping stone to produce good quality rec709 420 8 bit footage.
Generally there appears to be no benefit using the internal 422 10 Bit codec nor the 420 8 bit double frame rate due to the limitations of the GOP structure, here Panasonic has created a few options that to be honest appear more a marketing effort than anything else.
There may be some use to the 150 Mbps double frame rate if you intend to slow down the footage after the conversion to ProRes or similar but the extremely long GOP does not make this codec particularly robust to scenes with a lot of motion and in any case not more robust than the 100 Mbps codec.
A final thought if you are interested in 10 bit colour is that the FHD All Intra 200 Mbps codec has enough quality and headroom to allow manipulation. This is in fact the only codec that has bit-rate higher than ProRes HQ at least at 24 and 25 fps so if you want to check the real range of colours and dynamic range the camera is capable of you should try this codec.
In the previous post I described the HDR settings especially relevant if you have an external recorder. However there is quite a lot of discussion if it is worth shooting HDR underwater video with the Panasonic GH5 at all. This follows the discussions about using VLOG L underwater versus studio production: many people that start using VLOG L revert to a more normal setting something using standard profiles and not even Cine profiles because the workflow is just too much work.
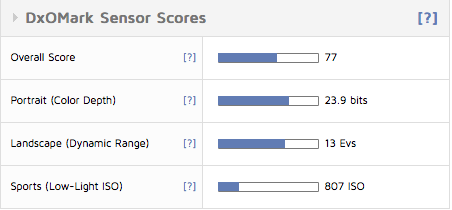
In general there are 3 characteristics that are important to underwater footage but more in general to any footage: colour , contrast and noise. This is the reason why when you look at DXOMark you have some measures of those 3 characteristics.
What DxOMark is telling us is that looking at a RAW image produced from the GH5 the colour depth is at best 23.9 bits, the dynamic range is at best 13 Evs and the Low-light ISO that still gives some decent colour depth and dynamic range is 807 ISO.
Let’s have some interpretation of those measures colour depth of 23.9 bits means 15.6 millions colours, this is actually less than true colour of an sRGB display. Considering the RGB scale the 23.9 bits per colour really mean 8 bit colour. OK so why does the camera have a 10 bit colour (equivalent to 30 bits per pixel no camera reaches that even full frame) option at all? We will talk about it in a minute…
Dynamic range for a RAW image is 13 Evs however Panasonic says VLOG L offers 12 stops compared to 10 stops of professional SDR footage. Now 12 stops require a display with a contrast ratio of 4000:1 which is beyond all commercial computer monitor and in the range of HDR devices. The new VESA DisplayHDR standard HDR600 is a minimum requirement to display this level of contrast ratio.
Finally the Low-light ISO of 807 (corresponding to 1600 on your GH5 as ISO values are always incorrect and geared towards higher values for marketing reasons) means that unless you are at the surface pretty soon there won’t be any colour or dynamic range to show (low-light ISO requires 18 bit colour depth 9 Ev Dynamic range and 30 dB SNR).
WHAT ABOUT THE GH5S?
The GH5s will give you 1.5 stops more of low-light performance and therefore your footage will look good until ISO 2400 or ISO 4800 looking at the camera settings which is quite a bump.
OK now coming to the main point of the post having seen those limitations why would I bother shooting in VLOG or HLOG?
First consideration: Noise
As we have seen both dynamic range and colour depth drop considerably when ISO goes up. In short unless you have abundance of natural light or you are shooting macro with a lot of artificial light is unlikely you will see any benefit shooting VLOG or HLG.
Considering that compression brings additional noise here we see why shooting with an external recorder at higher bitrate really helps fighting noise even if you don’t shoot log because you reduce the compression artifacts. If you don’t have a recorder consider setting a max ISO limit quite low around 1600 on your GH5 or you will see a lot of grain.
Second consideration: color depth
If the camera cannot even resolve 10 bits per pixel RGB why would you shoot 10 bits? When you shoot VLOG or HLG you are not operating in the REC709 colour space which is limited to 8 bits so it is possible that the colour that the sensor is capturing are not all the 16.7 millions of the RGB palette but some of them are outside in the Dci-P3 or even REC.2020 colour space. Clearly if you do not have a 10 bit screen (and almost all computer screens are 8 bits) or 8 bits with FRC to simulate 10 bits, this is a total waste of time and you won’t see those colours and nobody on a computer working in sRGB will see them either. So unless you have a proper screen to watch your clips there is no point working in 10 bits. When it comes to grading again if you can’t display those colours it won’t be possible to do your work properly so don’t waste your time and shoot in 8 bits.
You now understand why you can’t see any difference in all those youtube comparison that by the way have been encoded 8 bits!
A lot of people records in VLOG 10 bit to then produce in REC709 that has 8 bit colour and the reason is that they have proper grading monitors to see what they are doing.
Just to give you an example laptops with exception of some recent MacBook Pro and others like the Dell XPS can’t display 10 bit colour. An iMac displays 10 bit colour and some screens that support DCI-P3 also are capable any other RGB screen won’t work.
Conclusion don’t waste your time with 10 bit if you don’t have a decent screen and if you only produce for youtube.
Third consideration: Dynamic range
VLOG and HLG start at base ISO 400 (that really is 200) and this is where you have your 12 stops. Once you get to ISO 1600 (nominal 3200 on your GH5) you still have 9.5 stops but the colours are gone. Generally it does make sense to shoot LOG however the issue may well be that your editing display is not HDR600 and therefore you can’t really see what you are shooting accurately. Having a screen that can correctly display HDR is even harder than finding one that can display 10 bit colours. What you need to consider though that unless you are capturing a sunburst or a backlit scene or you are shooting the surface you will not have more than 10 stops in your scene anyway.
Conclusion
The settings you can shoot really depend on your editing and display devices.
If you have a laptop or just an 8 bit computer screen and no external recorder you can shoot at 100 mbps 8 bit colour with the picture profile of your choice, standard, natural, cine like whatever you like as you won’t be able to tell the difference at any point in the process from any other formats 10 bits logs etc.
If you have a DCI-P3 display or better for editing shoot 10 bit colour. Examples are iMac and MacBook Pro or some Philips or Acer screens on the market.
If you have an HDR display for editing and an HDR Tv set shoot HLG.
If you have an external recorder shoot in PRORES HQ (as the GH5 does not support camera RAW). Some of those recorders like the Atomos Shogun Inferno support HDR and can also be used for editing with some adapters so shoot in HLG to get the best results.
Generally VLOG L requires a lot of work and is best suited to studio production so if you don’t have a good grading set up don’t waste your time with it.
If you are one of those shooters that after a lot of trial and error ended up shooting 8 bits colour because you don’t have a recorder or shooting natural or cine-like because you don’t have a proper grading HDR monitor now you know why you are doing what you are doing….
We got our GH5 ready for HDR capture in the previous post so how do we make the most of it?
If you have an external recorder or monitor that supports HDR it is easy! Also if you do you probably have a fair bit of money and you are not reading this blog…
Currently Atomos recorders that can be housed all support HDR including HLG
Nauticam Atomos Flame
The Nauticam Atomos Flame available at list price of $3,650 will house the Shogun Inferno, Shogun Flame, Ninja Inferno and Ninja Flame
On the Atomos website you can see that for the GH5 the products recommended are the Ninja and Shogun Inferno there first is priced at $995 and the second at $1,295.
There is a difference of $300 between the Shogun and the Ninja however the Shogun provides an SDI video port that may turn out quite useful in grading phase. So if you got to the point of spending $3,650 for the housing I would definitely invest the extra $300 needed for the Shogun Inferno.
Once you get a recorder you can set up the GH5 to output 4Kp50/60 at 10 bit and be happy. The HDR screen of the Atomos device will provide the real time monitoring you need to expose footage properly in HLG. It is not my intention to start a debate about log vs HLG there is plenty of material out there.
A very good video is here
If you don’t have a recorder you are left to the GH5 screen that does not support HDR so how are you going to expose correctly? You have a couple of tools available.
The first one is Zebra Patterns that can be accessed in the Monitor subsection of the menu.
There is a great tutorial on YouTube
Now if you are working in HLG you will notice that the maximum value that can be set is 95% this is because luminance in HLG is limited to 64-940.
If you look on ITU website you can see that white ranges between 69 and 87 in HLG so using Zebra we can still attempt at exposing properly without an HDR monitor.
If you do have a reference white balance card you should set the Zebra to 75% as this is the reference for white if you are in the field without a reference your value should be set to max 90% to ensure you don’t blow highlights. Now you will find some website that tell you 95% is fine too but you do want to leave a bit of headroom. If you want you can set Zebra 1 to 75% and Zebra 2 to 95% so you cover all eventualities.
So once you have set the Zebra the next step is to decide if you want to use HLG View Assist or not. Here you have three options:
Off
Mode 1
Mode 2
Off leaves the display in REC709
Mode 1 gives priority to background areas for example the sky
Mode 2 gives priority to the main subject
The 3 modes are really a progression of brightness, when Off the image looks completely desaturated and Log like. In Mode 1 the image appears to have a preference to show shadows in Mode 2 the image looks the brighter and the most punchy making it easy to work on the foreground but crashes the black and shadows quite a bit.
No matter what you select the Zebra value remain unchanged.
The final setting that can be useful is the Waveform monitor which is accessible in the creative video menu. As the Zebra this gives you a real time display of the image within a diagram that on the horizontal axis represent the image left to right and on the vertical has the signal. This is practically a spacial representation of your image and has the same intensity of the Zebra from 0 to 100. So anything too dark on the bottom won’t be visible and things above max will be clipped.
There are several tutorials available on YouTube
So in essence you could try to expose correctly using Zebra and waveform monitors on the GH5 LCD display but let’s face it the screen is tiny and underwater you won’t be really able to use it effectively. If you have an external monitor or recorder this becomes more useful and something to effectively try.
If you are using the camera meter to expose remember that the GH5 as most cameras has only three settings for metering: multi area, center weighted and spot those influence how the camera calculates the average exposure, this is true also if you use manual mode the reading on the meter will change depending on the metering mode. However for what we have said here if your objective is simply not to clip highlights you have a long way to go before reaching 90% IRE with HLG.
In short you have three options to set exposure on your GH5:
1. Super lazy option trust your camera meter as this was a still image, most likely you will be exposing to the right and without further checks there is a chance to have dark area or clipped highlights.
2. Use Zebra and manual exposure in combination with the camera meter to ensure you stay within safe limits.
3. Use waveform monitor and completely ignore the other parameters as this gives you full control of what you are shooting and removes any dependency on having or not an HDR monitor
As a final note it is important to remember that performing a white balance adjustment is essential in order to expose correctly it is not just to get the colour right as the IRE values on what is white actually change and the camera makes assumptions on what is white to calculate the rest. This is especially true for environment in difficult light conditions.
Getting yourself familiar with waveform monitoring is essential for editing as majority of people will not have the possibility to grade on an HDR screen. In the next post I will explain how to get the lowest possible cost HDR screen that supports HLG.
It has been a while I have been busy with some personal stuff and to be frank not much has been happening the Underwater Video or Still scene that was of interest to me until pretty much September 2017 when Panasonic released the 2.0 version of the DC-GH5 firmware.
The link to the firmware updates is here and here is link to the full PDF
The section we are interested is this one
4K HDR video recording
– [HLG] (Hybrid Log Gamma) is added to [Photo Style]. HDR (High Dynamic Range) is a mode to reproduce both bright part and dark part in an image, making it look just as human eyes see. The camera records video with a designated gamma curve compatible with ITU-R BT.2100, and you can now choose Hybrid Log Gamma (HLG) in [Photo Style].
– A low-bit-rate recording mode 4K HEVC for HLG was added. This enables playback on AV equipment compatible with the HEVC compression format, such as Panasonic 4K HDR TVs.
In the PDF we read this additional information
Recording of HDR (High Dynamic Range) motion pictures in HLG (Hybrid Log Gamma) format is now supported. With this format, you can record bright images susceptible to overexposure with more natural colors than is possible with conventional formats. • “HLG” is a standardized HDR video format that converts and expands the dynamic range of
compressed high-luminance image data on a supported device. • The monitor and viewfinder of the camera are not capable of displaying images in HLG format. • HDR images appear darker on devices that do not support the HLG format.
If you have headache to understand what is HLG and how it differs from other HDR formats search on the internet the following short document from BBC may help.
Why does HDR matter and what can I do to record HDR?
HDR matters because the human eye is more sensible to contrast and colours than resolution. In majority of cases if you do a blind test of UHD 4K footage to anyone sitting at the recommended seating distance for cinema at home (look up SMPTE seating distance) nobody can actually see differences between HD and UHD and this is because the ability of the human eye to resolve pixels is limited by our visual acuity. So why does a YouTube video in 4K looks better than HD? Simply because the bitrate is higher and this means the quality is higher but if you look at your own 4K footage at home and scale it down to HD with good quality you are not able to tell the difference.
However try now some HDR material if you have Amazon or Netflix or even on YouTube and have a compatible Tv set the difference to normal content is staggering. This is because a normal REC709 (the standard for HDTV) display has 6 stops of dynamic range. There are no official figures of how many stops is REC2020 for HDR but good Tv sets are capable of around 10 stops. Now that is a big difference especially on the bright part of the image which is where the HDR displays really excel.
So HDR does matter more than 4K UHD in fact Sony has just produced an HD set HDR capable not sure there will be many of those but this gives an idea.
So how do I record HDR and why there are no HDR certified cameras but only certified displays? The answer is pretty easy you need a camera that offers more than 10 stops dynamic range in video and that is where our Panasonic DC-GH5 comes into the picture.
The camera is capable of 13 stops dynamic range but what is more important it can produce around 8 eV even at ISO 12800 so in essence the camera is well above what is required for REC709 and it can get to around ISO 3200 and still produce nearly 10 stops which is great. So if you have a Panasonic GH5 you have a sensor that is capable of producing the required dynamic range.
However this is not sufficient the camera needs to be able to product at least 10 bit colour depth, an image resolution of 3840×2160 and a colour palette aligned to BT.2020 specifications (wide colour gamut) and finally have the appropriate transfer function to deliver the signal. Majority of commercial cameras are not capable to deliver 10 bit colour depth and do not have a compatible transfer function. The GH4 predecessor of the GH5 was already capable of delivering 10 bit colour to an external recorder using the HDMI output now the GH5 makes this available in camera for recording on SD card at bit rate of 150 mbps IPB and 400 mbps all intra H.264.
HLG vs VLOG and why it matters
Before the firmware 2.0 the only way to produce HDR out of the GH5 was to buy the VLOG upgrade and then attempt to use the recording feature of the camera or an external recorder with Prores 422 or 422 HQ and then take a trip into grading. The reality is that once you crammed the VLOG dynamic range into a REC709 format you essentially limit yourself to 6 stops and therefore waste majority of your effort. So in order to extract real dynamic range you need to output in HDR that is possible but not so easy to do. In practical terms unless you are producing a documentary you will soon give up using vlog underwater because it is just too much work. Here now comes HLG so what is good about HLG and why this can make a real difference here my list:
It is free you don’t need to pay for an upgrade
It is backward compatible with standard dynamic range
Requires a less intensive workflow compared to Vlog
You can produce a decent file recording in camera without external recorders
If you do have an HDR capable external recorder than it shows things are they are and not the washed out version of vlog
This is just my personal list of reasons there may be more.
How to set the Panasonic GH5 to record in HLG and UHD
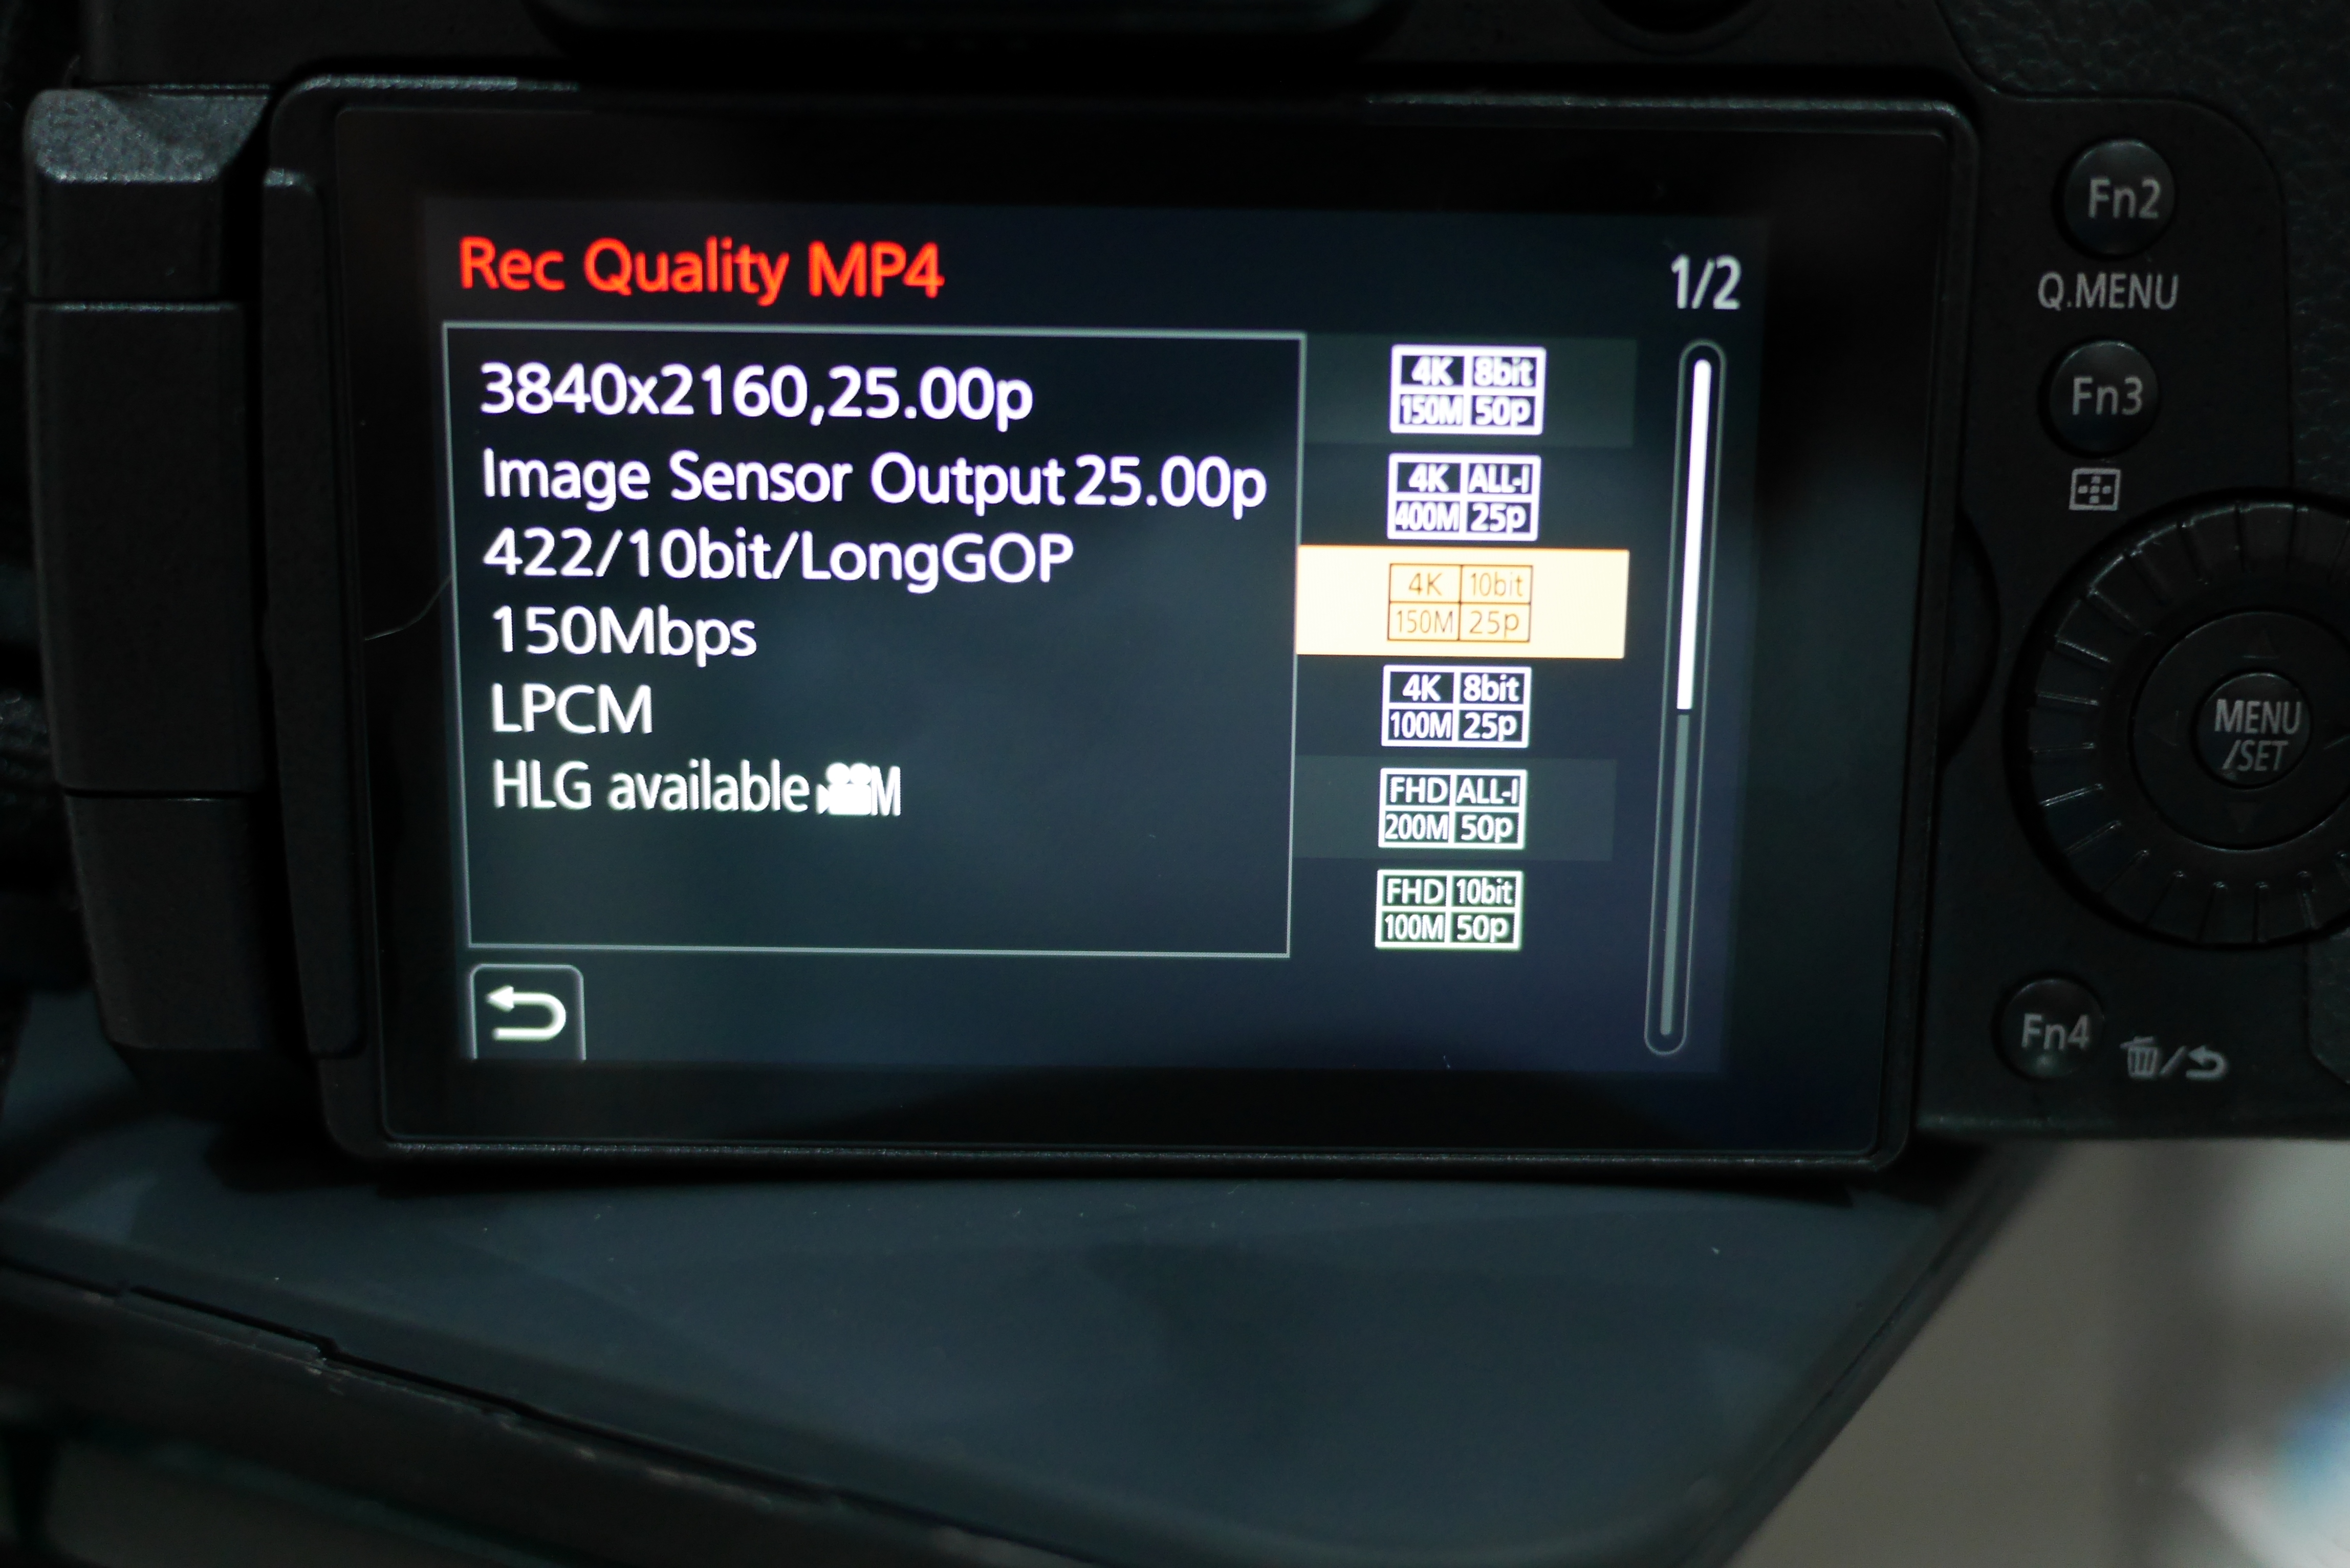
There are 3 settings that give you the possibility to record HLG HDR compatible files, two are available in MP4 (LPCM) and MOV and one in MP4 (HEVC).
MP4 (LPCM) and MOV
400 mbps ALL Intra
150 Mbps LongGOP
There are not many cards that can work at 400 mbps and they are expensive. In any case do not assume that 400 mbps ALL-intra is better than longGOP as longGOP is fairly efficient and if you look into the various YouTube videos you will see it is very hard to see any difference unless you do pixel peeping.
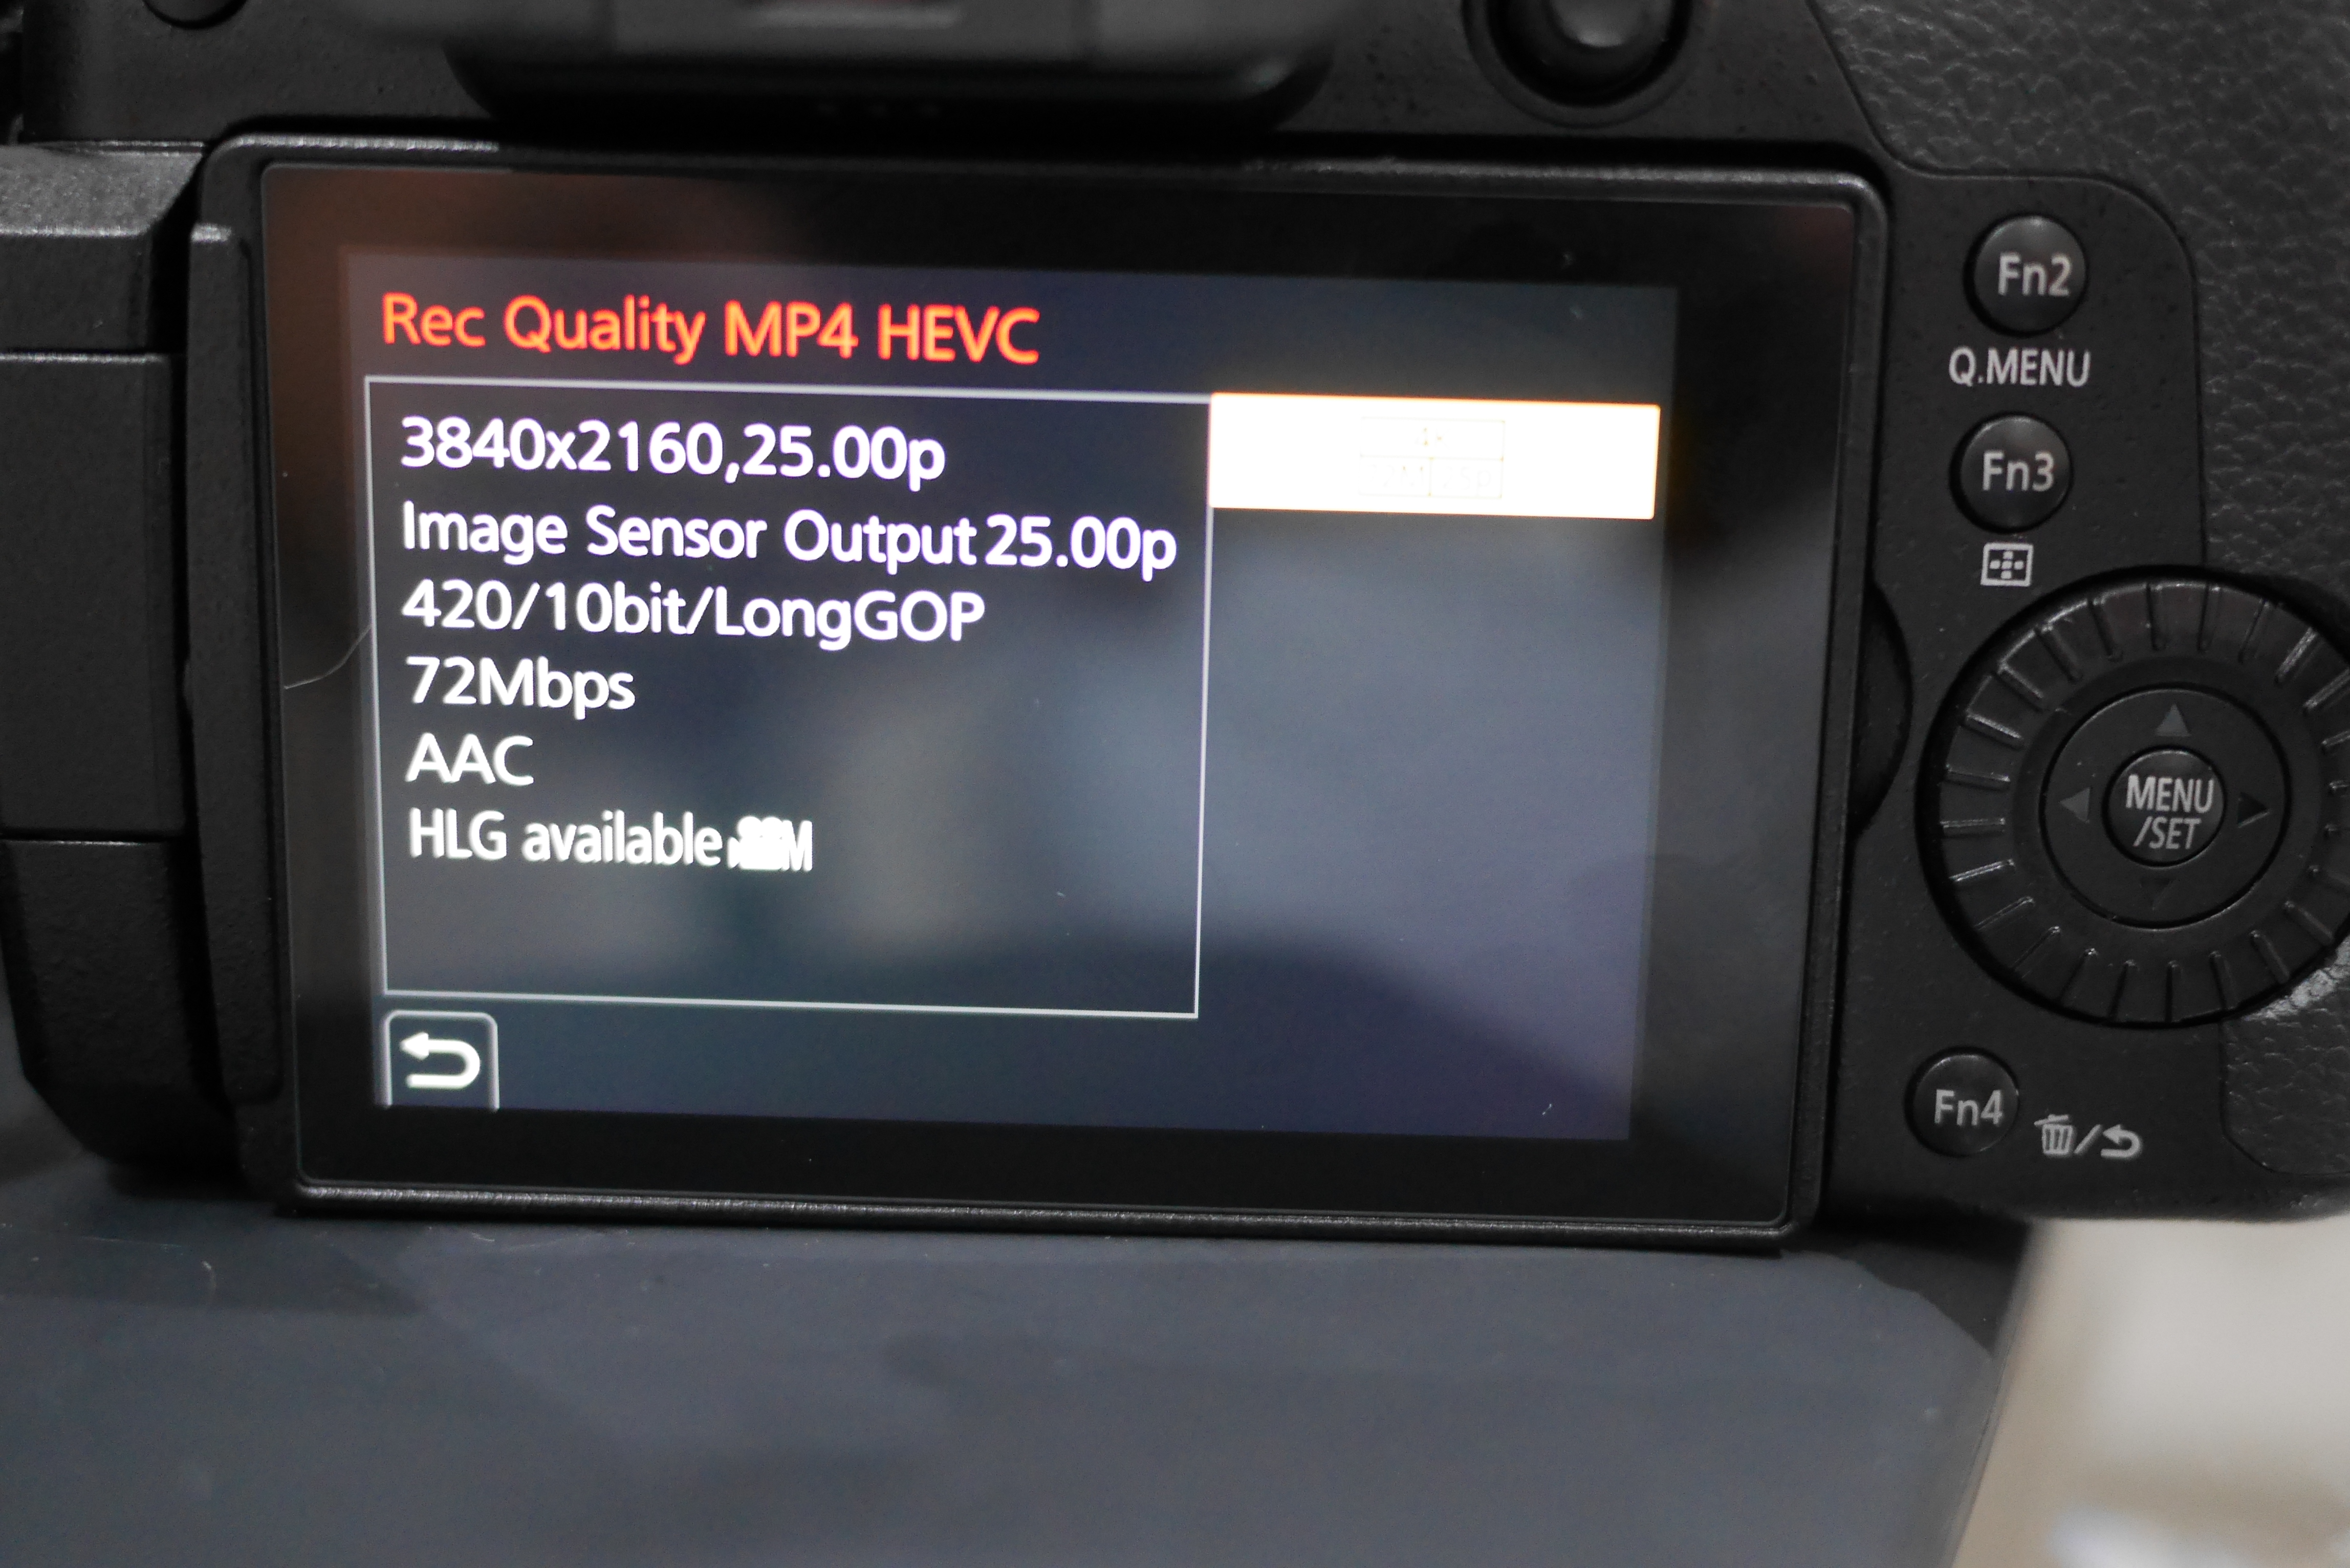
MP4 (HEVC)
There is also a convenient low bit rate format available that uses HEVC in camera you can access it selecting MP4 (HEVC) in the REC FORMAT menu
You then have this option available
Tests show that when done real time HEVC produces files 50% of H.264 so the bitrate makes sense however unless you want to play the files directly on your Tv this is not such a good choice as the files are too hard to edit with any computer as there are no H265 hardware accelerated display widely available.
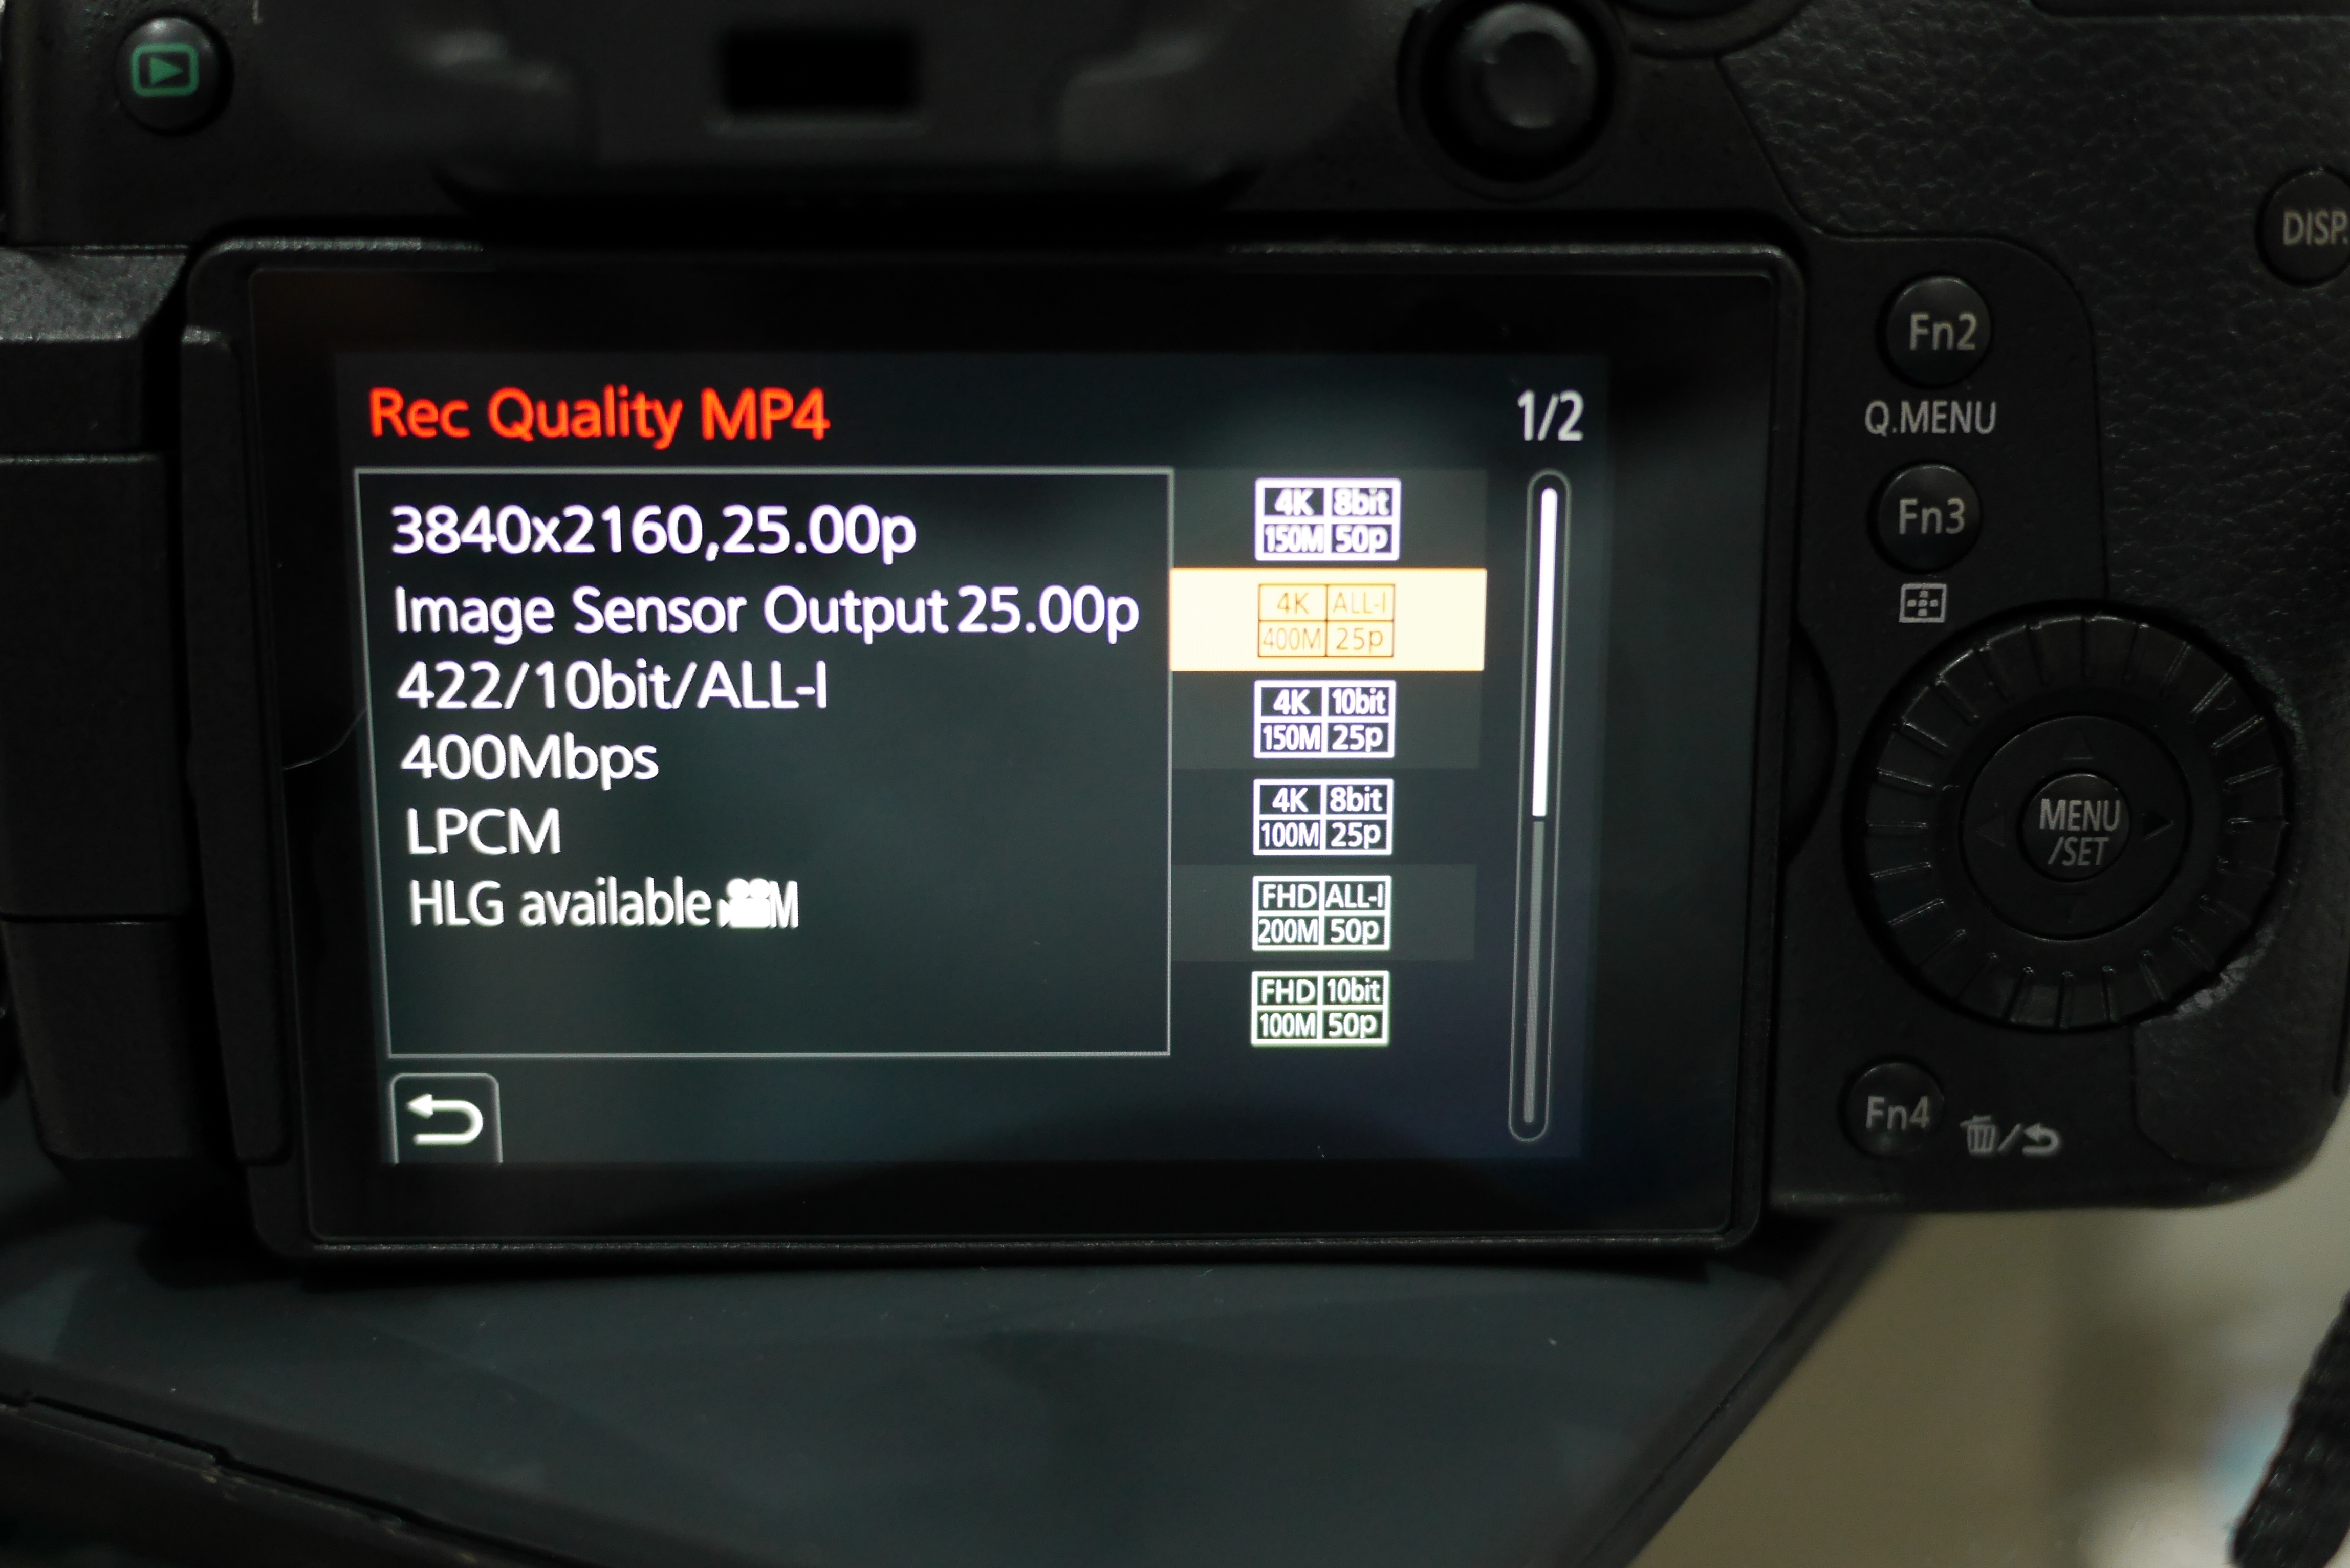
So the format of choice is as follows:
REC FORMAT: MP4 (LPCM)
REC QUALITY 422/10 bit/LongGOP 150 mbps
Please note the format at 50/60p does not give HLG in camera only the HDMI output is HLG compatible this is because the output is 10 bit as required by HLG. 8 bit colour does NOT qualify for UHD HDR so if you use this format in camera the HLG photo style will be greyed out.
How to convert 150 mbps HLG LongGOP files
At time of writing only programs like VLC play the H264 10 bit files produced by the GH5 and on my computer they play badly. So when you will go and edit those files your NLE program will most likely convert them into a format that is easier to digest and still supports 422 10 bit colour, this format is Apple Prores.
Unfortunately unless you have a paid software the files will only be unreadable if you use DaVinci Resolve or iMovie. However you can use a command line encoder like ffmpeg and convert all those files for free.
The command once you have the executable and you have the files in the right directory is something like this:
This tells ffmpeg to transcode the video to prores 422 and to just copy the file as is (prores uses linear PCM for audio) here you notice that the source file has mp4 and the destination mov that is the default for prores and the reason to set your GH5 to record mp4 and not mov.
I have developed an automator script that is able to convert all selected files in the memory card and place them in a location of choice on the hard disk or else.
Ffmpeg will convert using prores 422 that in my case bumped the files from 150mps to 474 mbps as prores is an all intra codec this is reasonable and there is no reason to use higher version like 422 HQ starting from a 150 mbps longGOP. Obviously if you use an external recorder feel free to use the higher bitrate available.
How to produce your HDR video clip for free
DaVinci Resolve is able to use your prores files converted from the GH5 and produce HDR compatible files.
You need to go into project settings and select colour management and change your settings as shown here
Colour Space Rec.2020 and Gamma Rec.2100 HLG will produce a file that on a compatible Tv will trigger HDR.
Now the bad news if you don’t have an HDR monitor it is very hard to grade properly on a standard monitor although you can look at luminance curves and chroma curves to see if you have situation of bad exposure or saturation this can be tricky with underwater footage so the trick is to try and get it right in camera.
Of particular interest is the HLG View Assist setting on the GH5: as the screen of the camera is not HDR this should help exposing the scene properly but I have to yet determine what is the setting that I prefer.
It was time to go for a second trip with the RX100 Mark IV
I decided last minute to use the UWL-H100 LD however I managed to forget the M67-LD converter so ended up taking footage holding the wet lens with my left hand.
This created some flare issues in some scenes anyway judge for yourself.
I used the Picture Profile PP6 modified with some small changes around color matrix (I used the Pro setting) and some increased saturation.
As always the RX100 cannot white balance underwater so I used a filter (deeproof), this gives a magenta tinge and sometime the water looked a bit purple.
I have two versions of this clip the first one uncorrected and the second where I tried to remove the purple water. Look for yourself which one is best.
First version with minimal to no editing is here
The second version has some colour correction mostly to remove the cast but I have also done some minimal correction in some scenes at the surface shot without filter.
The other settings were shutter speed 1/50 fixed, Auto ISO with max ISO set to 800, auto white balance.
Generally I am very happy with the RX100 however the snorkeling footage was affected by one episode of fogging of the glass port. This was during a dolphin trip so very disappointing. The camera got extremely hot and I think the fact I was holding my hand close to the port to hold the wetlens created the problem as this had never occurred before.
Upon reflection I think I will go back to the UWL-100 M67 type two as the colours I get with the magic filter were superior in my opinion and more natural.
For those wondering about the dugong dugong it was dark as I was free-diving to 12 meters with the camera and the wet lens hand held so not the easiest job.
Let me know which version of the video you prefer!
It is not a mystery that even the new Mark IV version has issues with custom white balance.
The ergonomics have not changed and you need to go into photo mode to set custom white balance but generally underwater results are poor. Using filters is therefore a necessity also on the new 4K version.
RX100 Mark IV Video Behavior
The RX100 offers now a 4K 100 mbps mode and can use picture profiles.
I have used a modified version of PP6 that use the cine2 gamma curve, I have however changed the colour to the Pro mode and changed a number of other settings in my last video in Puerto Galera.
The water was green and murky but this gives you an idea of what you can get.
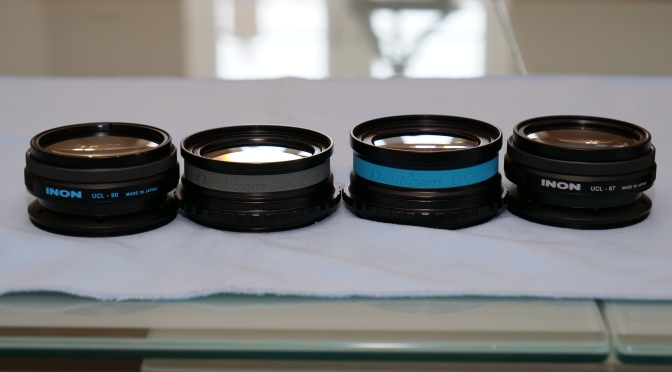
Filter Options and Wide Angle
Although the Nauticam WWL-1 is the best lens for the RX100 it does not take filters and therefore is not adequate for video.
In this review clip you can see the options available on the market.
In terms of wide angle you have two options for 4K:
Inon UWL-H100
Inon UWL-100
Both lenses work fine in 4K however the older UWL-100 achromat does vignette in photo mode.
The UWL-H100 offers a very wide field of view also in HD mode with no vignette and accepts the mangrove/deeproof filter.
This filters is loaded with magenta so I suggest adjusting the tint in the auto white balance mode to +2 green.
The UWL-100 works fine in 4K and is wider than the UWL-H100 however has only the M67 mount. If you have one of those lenses you can use the Ikelite 6442 filter. This filter required you to remove the rubber ring on the lens and does work quite well except has a yellow cast to it you can reduce by changing the tint to +2 blue and increasing also magenta to +1.
For flexibility purposes probably the UWL-H100 is better as it takes the bayonet but the UWL-100 is really wide and has a little less fringing. Some people do like the UR/PRO filters better.
I hope you find this post useful and good luck with getting the best colours from your Sony RX100 Mark IV
The UHD alliance is a working group that includes a number of well known brands.
In the board are directors of the following major players:
Fox
Sony
Netflix
Panasonic
Dolby
Technicolor
Samsung
LG
Universal
Warner Bros
Walt Disney
Direct Tv
The members include companies like Sky, Amazon, Intel, Thx, Dts and others.
The key purpose is specifications mostly for high end use and the key pillars are:
High dynamic range video (SMPTE ST2084 EOTF)
Wide colour gamut (BT.2020)
4K resolution
10 bit colour depth
This is obviously a large improvement compared to the current specification of HD Video:
BT.709 colour
1920×1080 Resolution
8 bit colour
Probably the most interesting feature is high dynamic range video as the human eye is more sensitive to contrast than it is to colour and resolution although surely the 10bit colour depth will make a difference.
Currently all professional recorders that manage 4K use 10 bit colour but none uses the BT.2020 colour gamut and the dynamic range is left to the sensor quality and has no minimum specifications.
So what will UHD premium mean to us? Well currently not much!
The key is that UHD alliance has also stayed clear from the major issue for distribution that are the video codecs.
Currently HEVC or H.265 has got royalty challenges but is the most efficient codec on the market and the widest in terms of diffusion in hardware.
To give an idea two minutes of 100 Mbps H.264 become 76.5 Mbps once you push the H.264 to the limit but the corresponding H.265 is only 13.6 Mbps only 18% of the size.
Google does not support HEVC and are distributing 4K using VP9 and H.264. From my tests VP9 is not as efficient as HEVC the same file came at 17 Mbps. The key issue of VP9 is playback that does not even work on a powerful home computer although some new Android TV have accelerated VP9 and so has the new Nvidia box.
Whilst this gets worked out it is likely that cameras will continue to record in H.264 and the key here is higher bitrate as H.264 is clearly inefficient with 4K.
If you are in the 4K space and you want to produce semipro or pro footage you need to have an external recorder working in Prores HQ or your device needs to be able to record higher than 100 Mbps.
Sony has just introduced the XQD memory cards that write 800 Mbps
Carlton Bale was on the scene few years ago when HD came about and the conclusion was you need 55″ or more at 8 feet to ‘see’ HD as your eyes can’t resolve more.
This distance becomes 120″ at 8 feet which is essentially the size of a projector screen.
Essentially UHD seems to be more for computer freaks watching clips very close to the screen that for the average user.
I did several test on my Tv with clips I had produced in 4K downscaled to HD and at my normal viewing distance I could not see any difference what so ever!
Essentially I have determined that 50 Mbps XAVC from the RX100 Mark IV looks actually better than 4K on my Tv.
I guess we will have to wait for HDR to see some real benefits meanwhile the clips from you tube look better simply because they have more information. There is a factor of 6x for UHD compared to HD and this shows a higher quality clip.
I don’t see a large future for UHD in TV broadcast it could die as 3D just did.