So the LX100 gets the highest score for a compact camera on dpreview with a staggering 85%
Full details are here
http://www.dpreview.com/reviews/panasonic-lumix-dmc-lx100
Of particular interest are the video grab comparisons
http://www.dpreview.com/reviews/panasonic-lumix-dmc-lx100/8
In my opinion the 4K mode of the LX100 is as good as the GH4 there are however fewer options and control and rolling shutter seems to be an issue with the LX100.
Nevertheless the 4K video mode blows the Sony RX100 series away in any version so I guess for land use the Panasonic DMC-LX100 truly is the camera to beat.
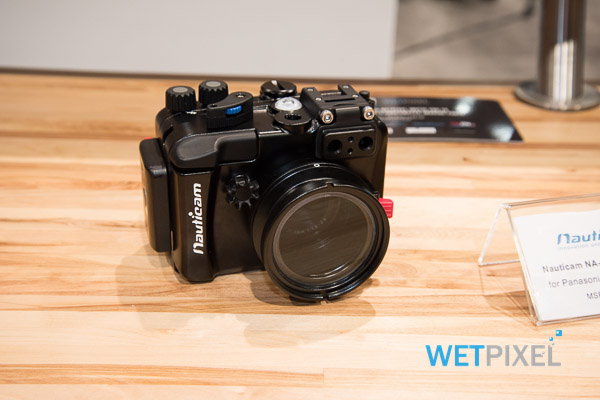
I have been waiting patiently for housing and now is confirmed that Nauticam will come up with a housing in early 2015. Wetpixel has a special on Dema on their news section and this has images of the LX100 housing prototype.
http://wetpixel.com/articles/wetpixel-coverage-dema-2014/P1
The housing has a changeable port system similar to a micro 4/3 and 3 ports were shown at Dema

The rectangular flat port is very similar to the Recsea housing for the Canon G series.
Many people get very excited to read that the LX100 has a minimum focussing distance of 3 cm at wide end but this is as such not so exciting as it seems. Due to the wide field of view of 84º diagonal this means that the area captured at the minimum distance is somewhere in the region of 1:1.25 reproduction ratio. So this is not real life macro. This compares to the much smaller area of the older LX7 that had a 1.25:1 and as such offered super macro out of the box (though nobody would shoot macro at wide end or be 1 cm away from the subject).
Which means that the LX100 will need diopters with this flat port to achieve macro and more specifically a close up lens with power in water of 10 to achieve macro. This corresponds to the Subsee 10 or the Inon UCL100 or the Nauticam SMC.
The flat port is nothing to get very excited as in water the camera will behave as a 32-100mm equivalent lens camera and a field of view of only 68º.
The other option displayed was a mini dome port.

This looks around a 4″ dome, if this is the case the camera will not only maintain the land focal length 24-75mm but also potentially be compatible with a flip diopter as the one used with the micro 4/3.
This is a hope more than a guess, Nauticam please ensure you can apply a flip diopter to the dome port as that would be the best all round option for this housing. As previously noted 24mm is wide enough for reef scenes and with a +10 diopter, and possibly an additional +5 or +6 this becomes a great solution for underwater video. At 4K the focal length changes to 26-81mm which is still acceptable.
24mm is not enough for wreck dives or whale sharks so here it comes the wide option.

I am not sure if this port will work at all with the zoom but it is declared to offer 110º and therefore a 0.63x magnification.
Nauticam has declared that standard wet lenses do not work with the LX100 and hence they have come up with this specific port system.
Looking at the G7X housing this seems to be just a special adapter with a set of wet lenses more than real ports
Anyway we will have to wait but my favorite option would be the mini dome especially if the flip diopter holder for 4″ dome can be used.
If this is not the case I would have a major problem with this housing as the lens out of the box is not good enough to be used as is. I am slightly confused also by that weird rectangular port considering that 32mm is not wide enough for anything I can’t comprehend the reason for its existence.
We will have to wait and see. I have contacted Nauticam asking if the dome can have a flip diopter holder. Will keep you posted
Final Note: the Panasonic LX100 is not an option for stills as the RX100 Mark III, a 24-75mm lens is not good enough and the lack of fisheye options combined with the short zoom is definitely a no go.
Right now for stills I would still consider the Sony RX100 Mark II as the winner until we get confirmation of that lenses can the Canon G7X use.