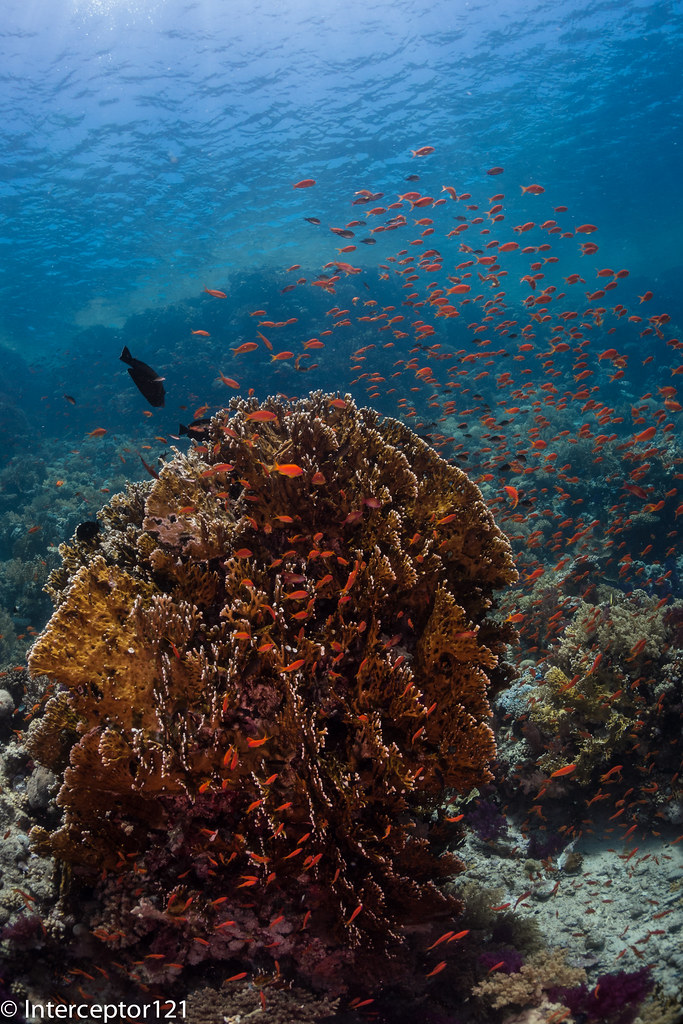
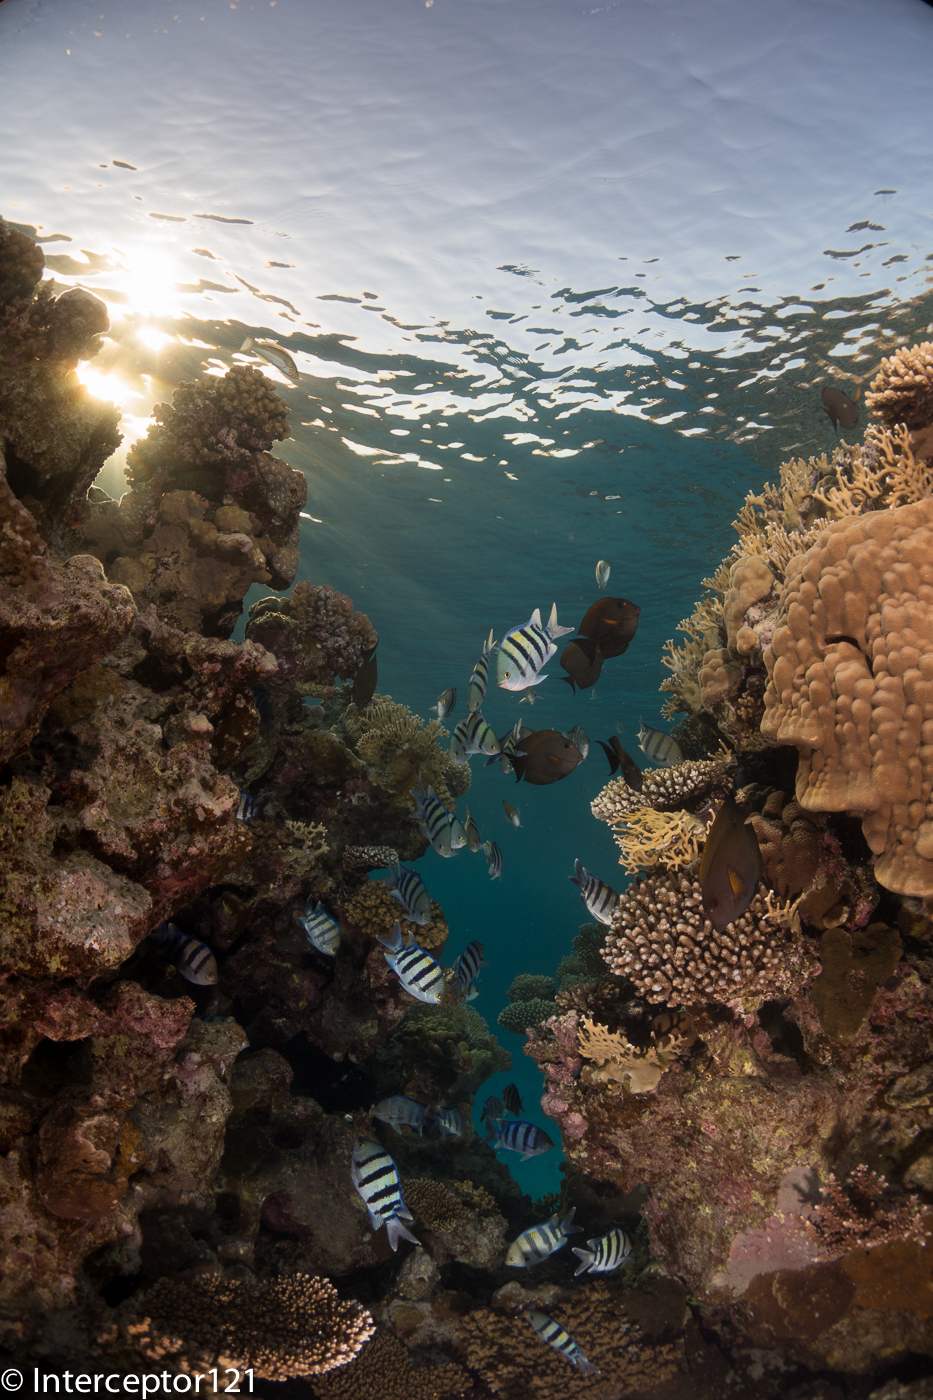
After the first 3 days of workshop we got into the core of it and Alex talked about schooling fish and how to take shots.
We had 4-5 varieties to choose from:
Batfish
Surgeonfish
Barracuda
Jacks
Snappers
Detailed information was given in terms of how to best approach the fish depending on their behavior and also about the etiquette in terms of letting other people best positioned taking their shot first.
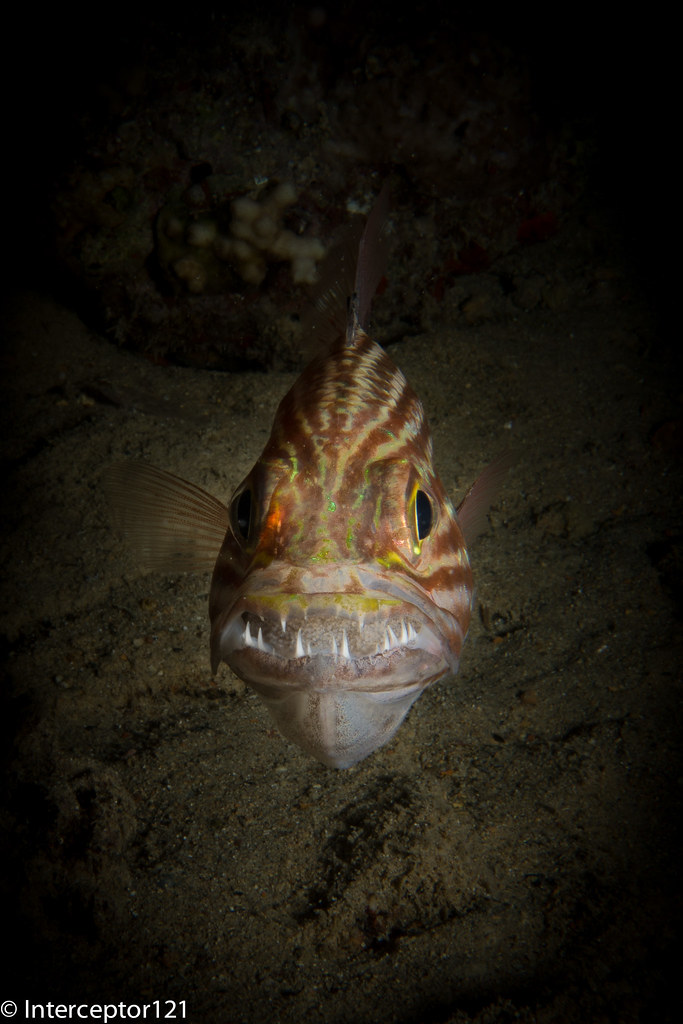
The surgeon fish are not that photogenic and actually quite messy I tried to take some shots when the current was pumping and they were all aligned close to the bottom at Yolanda however to me this is not that exciting as a shot. Other people got better results but I frankly was not that bothered about Surgeons. Probably as the fish is pretty dark and does not reflect the strobe much. The featured image close to the title shows what I mean.
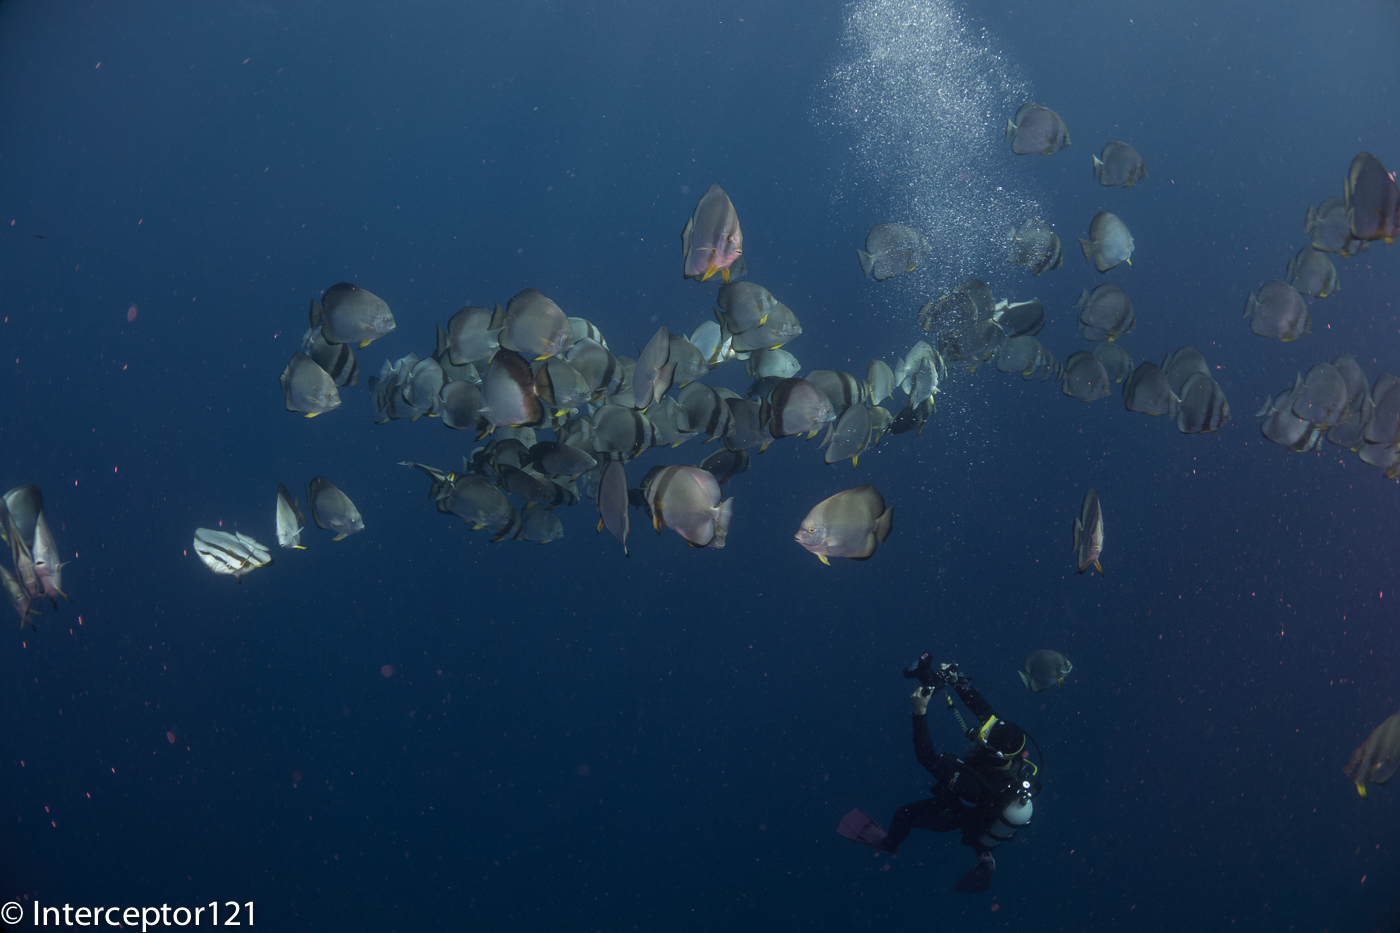
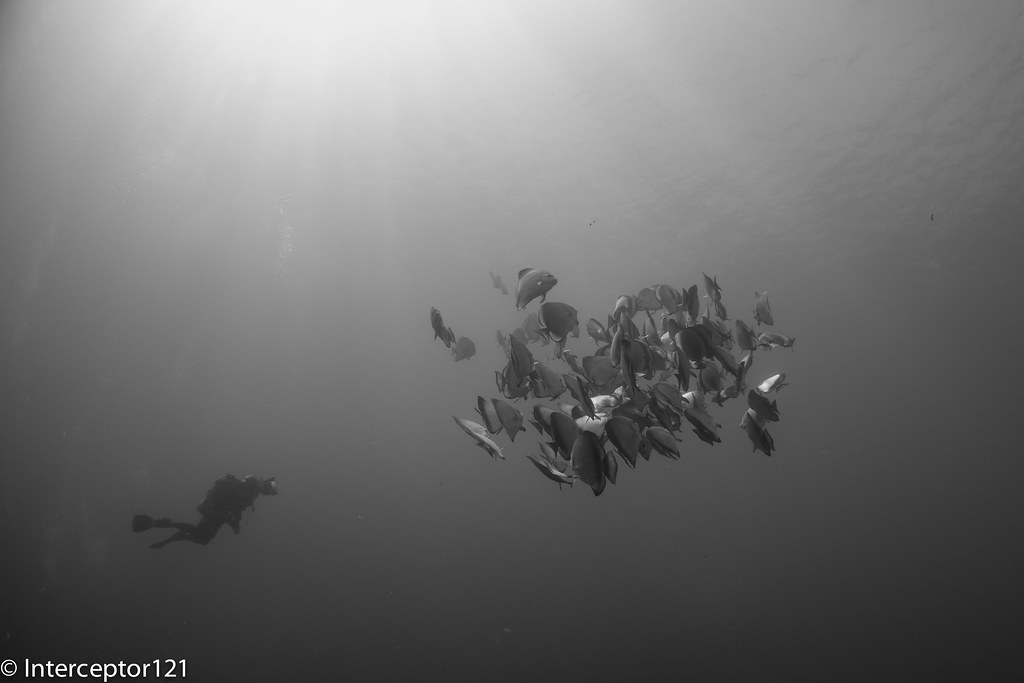
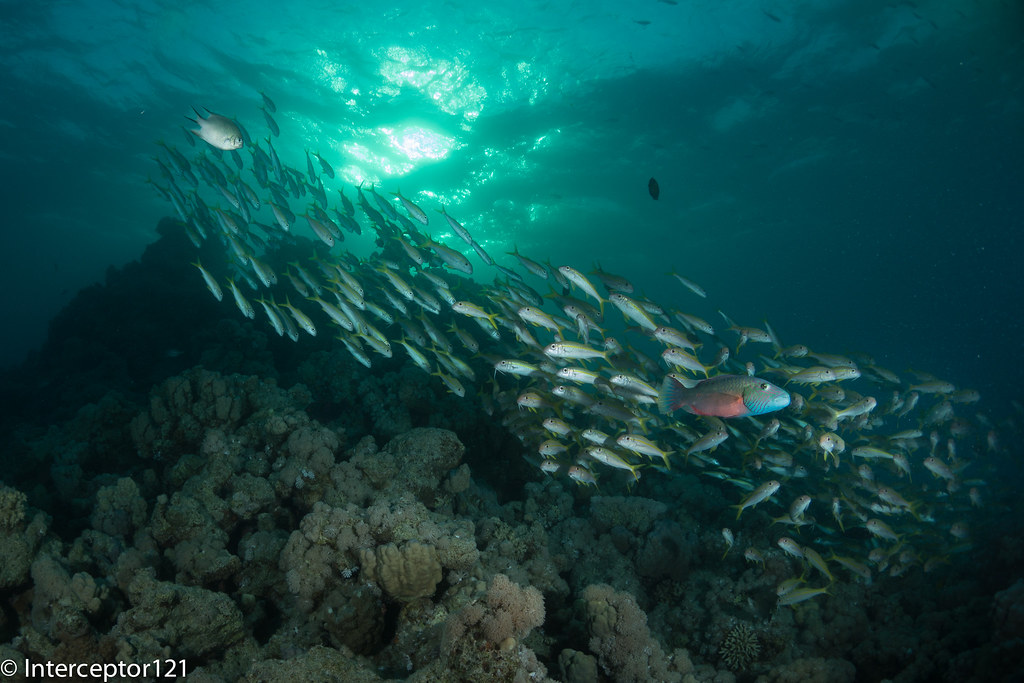
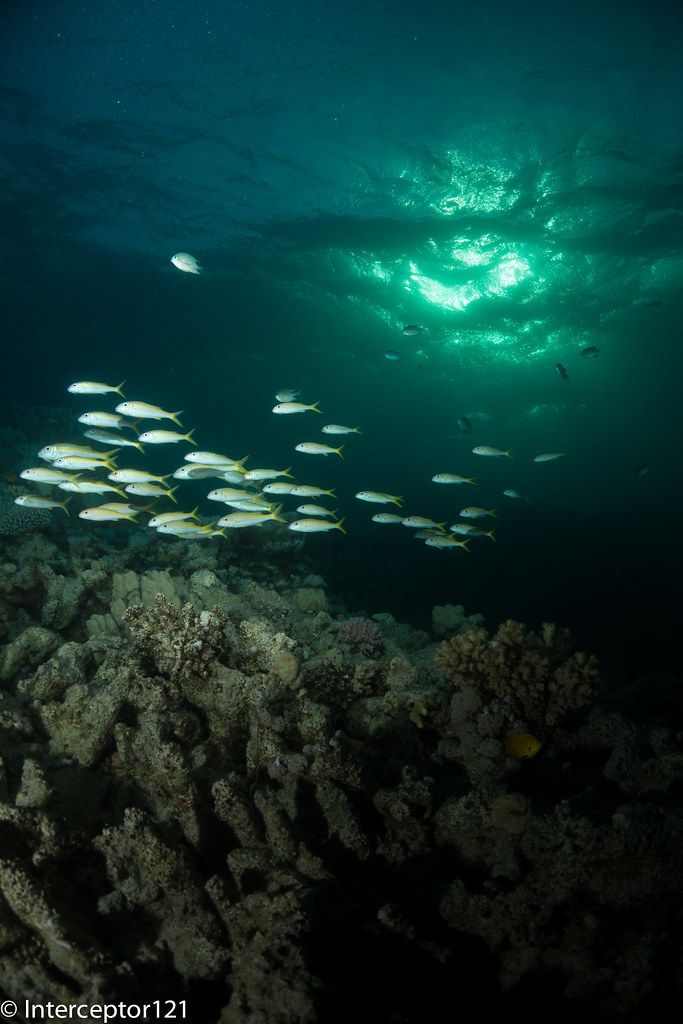
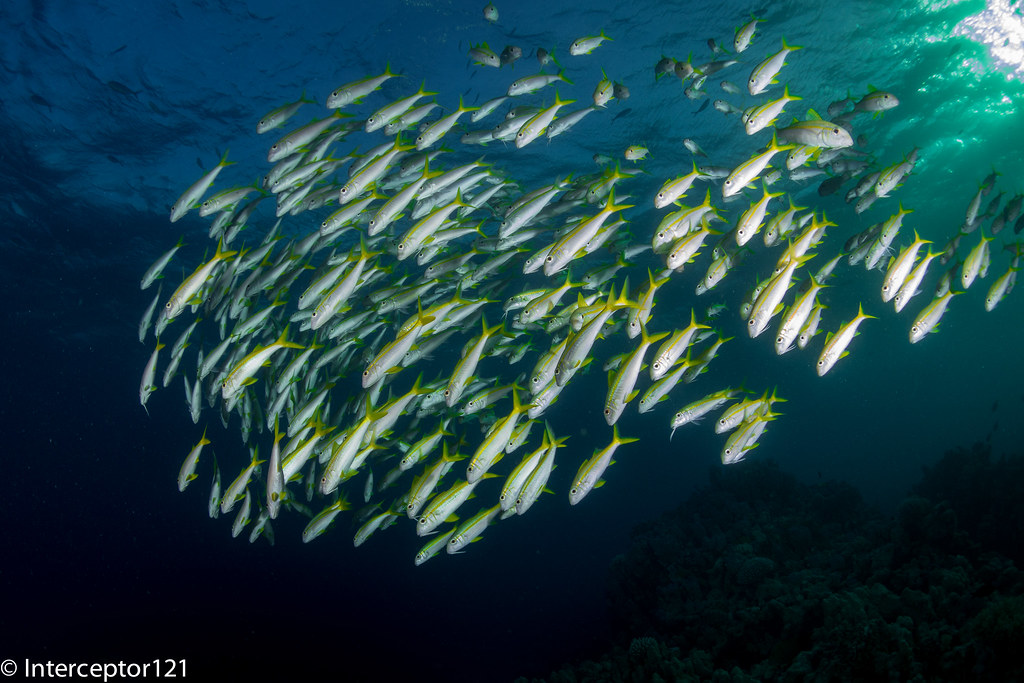
During this trip the current was not going north to south as usual but there was near to no current at shark reef and current going outward at yolanda corner. This means the snappers that usually sit at the edge of shark reef were not out to play.
We were left with barracuda, batfish and jacks to choose from. On day 4 I only see few giant trevally but not many schooling jacks so had to focus on barracuda and batfish.
Unfortunately the barracuda were far from the reef and a bit too deep and did not really want to entertain chasing them so I tried with the batfish. Obviously there were not only us but also other boats so it was a bit of a competition for fish.
Encirclement
Also you always managed to get someone in the frame or bubbles
Shooting Batfish Below
So I focused on trying to get the best backgrounds for the pictures to come like in this case.
Also had some fun taking images of the others and the batfish one or two came out pretty good.
Creative angles
It is quite hard to have the discipline to respect rules when you are with other 18 photographer on the boat so the competitions had to be expected and I was not that bothered.
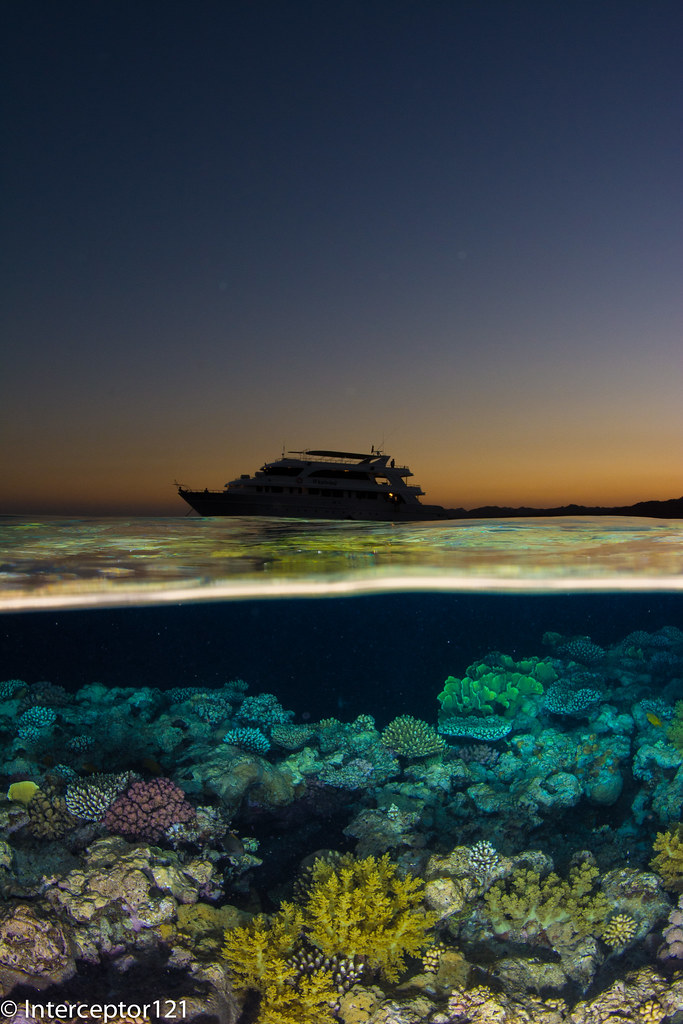
In the evening we headed back to Ras Katy and I borrowed a Nikon D7100 from Nauticam UK. I asked to have a 9″ dome for the split shot and jumped in the water with the idea of just doing that.
This is my best shot
Personally I do not like split shots where the surface line is very distorted to avoid that you need to make sure your lens is near to rectilinear and it is better to shoot portrait as there is little distortion on that axis. What I wanted to capture in this shot is layers, the reef, water under and over, the boat and sunset colors.
I think it came out pretty good but it is painful to take 100 shots just to get one right and I wish I had some fish in the frame but never mind is good enough like this. The water was not really flat so that was an additional challenge as you can see the wave breaks on the lens creating a little thicker line but overall a good shot.
Once again Sony has updated their RX100 camera with a stunning new release that will surely be a market leader at least until the release of the new promised Panasonic large compact sensor with 4K video recording.
So the question is again is it worth throwing our hard-earned money to this new model and housing or should we stay with what we have got? The Mark I and II are still available at reduced price though it is becoming harder to find Mark I housing as new.
The answer to the question is: it depends on what you are planning to do with your RX100, for some users an upgrade may not be required or even not advised let’s see why. no don’t waste any time with the Mark III.
Every time a new camera is released and reviewed I get a bunch of emails with subject: New Camera XYZ what do you think?
The best reviews you find online are made by sites that specialize in land photography and no consideration is given to underwater use. So not necessarily a camera that is a top performer on land will remain such underwater as this depends on specific characteristics that may be different or even opposite to land requirements.
So those reviews cannot be taken as they are they need interpretation. Personally I use two sites for camera reviews imaging resource and dxo mark I use the first to understand ergonomics, performance and to compare images with other cameras side to side, and the second to check sensor quality and lenses. Imaging resource has made a good article to compare the various RX100 on land read it here
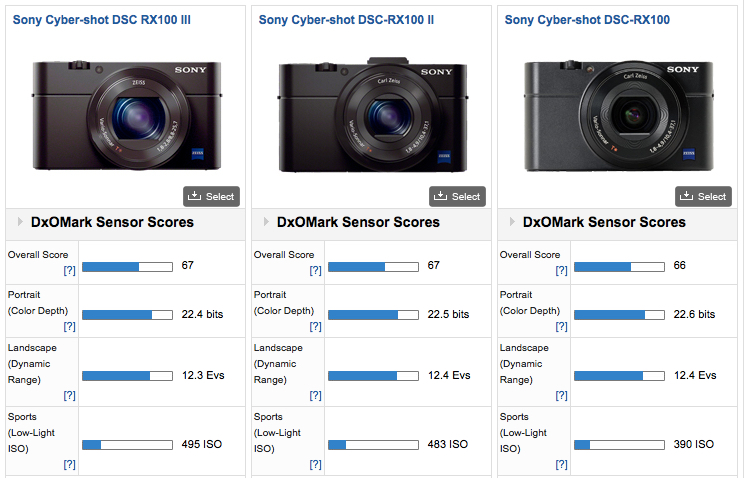
If you look at a sensor comparison on DXOMark you would conclude that there is no need to upgrade at all if you use your camera primarily for still pictures as the sensor are practically identical in performance as this table demonstrates:
RX100 Sensor Ratings
As you can see the differences in dynamic range, color depth or ISO are pretty much intangible.
However there are other metrics that are also important let’s see which ones and why.
Flash Recycling
We want our camera on board flash to recycle quickly after a full dump as the RX100 has only TTL flash and the flash can’t set to a minimum manual setting without consequences. Those are the flash recycling times at full output (a full dump will always occur when you don’t aim strobes directly at the subject for example wide angle)
Mark I: 7.2 seconds
Mark II” 4.4 seconds
Mark III: 3.3 seconds
The Mark III is pretty quick and the Mark II is acceptable the first release is definitely too slow.
Minimum Capture Area & Zoom
What is the smallest area that can be captured at wide end at the closest focus distance? This gives you an idea of out of the box close up performance
I do not have precise metrics yet but looking at comparable images on imaging-resource seems like the Mark III is worse than the Mark I and II of at least 20% with a capture width around 90mm versus the already not very good 76mm of the Mark I and II.
To fix this issue we use close up lenses in water that fix to a great extent the focal length and then zoom in to achieve magnification which means longer camera lens more magnification I roughly estimate that the Mark III will be worse of a factor of 0.7x so things will look 1.4x bigger with the Mark III this is terrible news for macro shooters as it means you need to be on top of the subject to fill the frame, this is in some cases not possible.
I have estimated that you need 11 diopters to achieve 1:1 macro so the Subsee 10 and Inon UCL100 that gave real macro on the Mark I and II won’t be sufficient. With two UCL-165 or Dyron 7 you are looking at 2.58″ or 6.5 cm from the back of the first close up lens that means you will be right on top of the subject which is not really an option.
Update July 18th: Nauticam has confirmed that even with their SMC lens the most powerful diopter on the market the capture area is 38mm wide so does NOT achieve 1:1 macro as I suggested…
Lens Focal Range
The new mark III has a 24-70mm lens compared to the 28-100mm of the Mark I and II what does this mean?
Less magnification with close up lenses and no real 1:1 macro
Vignetting or even not possible to use fisheye lenses designed for 28mm lenses
This means that with the Mark III your scene selection will be restricted compared to the 150 to 24 of the mark I and II.
Update 23 July I have done some tests that confirm my suspicions please look at the following frames. The Mark III once zoom to 28mm actually works fine with the Mark II housing except the power button.
RX100 Mark III with Inon UCL-165 Close up lens
With a single Inon UCL-165 (+6.06 in water) the minimum capture area width is 5.4 cm which is bigger than the Mark II 4.8 cm. Not only that the distance from the top of the lens is only 9cm.
With stacked UCL-165+UCL330 total power 9.09 diopter we get this
Stacked UCL-165+UCL330
4.4 cm width however we start running into problems as the minimum distance from the lens is only 4cm.
We finally achieve 1:1 with two stacked UCL-165 however the distance from the top of the lens is 3cm definitely too little
two UCL-165 stacked
I have also tried the Mark III at 28mm and it still vignettes with the Inon UWL-H100 in air until around 30mm. Instead the old UWL-100 28AD is fine at 28mm either way image looks narrower than with the Mark II but this may be an issue with the old housing.
So basically no macro with the Mark III and no decent fisheye as expected.
Underwater Photography Conclusion
Due to the reasons above the best camera for the job is the RX100 Mark II, with the Mark I coming close but being penalized by the strobe recycle time, the Mark III really is not an option for the serious shooter due to limitations of the lens.
Let’s have a look at some other features of the Mark III that are not relevant for stills as much as they are for video.
ND filter
Shooting at the surface with plenty of ambient light or on land can create problems if you want to follow the 180 shutter rule, the ND filter of the Mark III ensures your footage will be smooth on land and in water. Take into account that on land you can apply optical ND filters (I have it for the Mark II) so this is really for underwater use when you are shooting at 1/50 or 1/60 shutter speed and the scene is too bright when you hit f/11 and the lowest possible ISO. Having now tested this feature I confirm it is really valid on land on a bright day to keep the aperture wide.
Clear Image Zoom
This is a special digital zoom with edge enhancement that only worked on JPEG stills on Mark I and II but is now available on video on the mark III. This means an additional 2x zoom is available bringing the focal length to 140mm that is more than adequate for macro. This is not an option on RAW images so irrelevant for still users.
23 July update Having done some tests for macro video (as stacking two diopters is not an option) the image quality suffers but anyway this is all you are left with lacking any other options.
Clear image zoom 1.5x on single UCL-165
Image stabilizer
The Mark III adds a further stabilizer mode with additional crop that takes the lens to 96mm equivalent in video mode. This is well worth for super macro hand-held footage and effectively provides an option where you can either use the super steady shot and no clear image zoom when hand-held or leave on only the optical stabilizer and use clear image zoom. If you shoot macro on walls and not on flat sand this is a well worth feature.
Update 23 July 2014
Following a side by side comparison you can find on this link
It follows that there is really no 5 axis stabilisation and only an additional mode with more crop with correction for rolling shutter that anyway does not really work!
Full Sensor Readout Video
The mark III reads the whole sensor not just alternate lines when capturing video this increases should increase the resolution to a great degree and increases the perceived resolution and clarity of your videos. However this does not seem to correspond to real life tests. See this sample with a side by side comparison the Mark III looks visibly worse than its predecessor even on the higher bitrate XAVC!!!
Video Formats
The Mark II introduced a well welcomes 24 Mbps 24/25 fps mode now the Mark III introduces a 50 Mbps mode in XAVC (that can be rewrapped into normal MP4) that produces even better footage although it will be quite demanding on your workstation and most likely some of your home devices will struggle playing the files (my Apple Tv 3rd generation only plays up to 25 Mbps) when uploading files online this will downgrade to 8 Mbps so won’t matter unless you have a good player at home. improves nothing and requires manipulation as the files are actually not MP4 compliant as they have WAV audio (!) they are also inside the AVCHD folder which is painful. As seen above seems like the encoding has got worse on the AVCHD files and only the higher bitrate compares but still does not match the mark II at the lower 24 Mbps!!!
HDMI connection
You can now connect the Mark III to an external HDMI recorder if you are into that kind of semi pro usage. For the normal user this is not relevant: if you are into spending that money probably you have already a DSLR or a Panasonic GH4.
Video Auto Focus
The auto focus in video has got worse you can see an example in the stabiliser test, and actually plenty of frames are blurred on the mark III. Awful!
Underwater Video Conclusion
The Mark I with only a 28 Mbps 50/60p mode is definitely a poor choice, the Mark II is acceptable to most users. and the mark III promises even better performance if you are a serious video user and have another camera to take pictures the Mark III may be well worth it.
The Mark III despite some useful feature is actually a let down and perform worse in practical terms than the mark II that remains my camera of choice.
Summary
If you have a Mark I camera and are frustrated with flash recycling you should be looking at a cheaper upgrade to the Mark II.
If you have a Mark II and your priority is photography upgrading is NOT recommended.
If you don’t have any RX100 get yourself a Mark II or wait for the new Panasonic as the Mark III is pretty much a pile of crap.
Is it the first time I am actually sending back a camera and invoking consumer rights but when I spoke to the camera shop they told me they had other returns and this is not really an upgrade!!!
The above image was shot at 100mm equivalent with one diopter with the RX100 Mark II. You won’t be able to fill the frame with the same close up lens and the Mark III camera
On the early morning of Day 3 we left the Thistlegorm for Ras Mohammed.
Dive number one would have been on Ras Zahatar, this dive site has some great opportunities for sunburst shots in the early morning but generally not a lot of fish as the location is quite sheltered and there is never too much current that I recall.
There are also some very nice gorgonian fans around the 22 meters mark however as soon as we jumped in it was clear it was going to be a competition to have some of it. Besides not having made clear arrangements for modelling with anyone it was going to be a quite technical session.
Since the arrival of digital sunburst shots have proven to be problematic for DSLR and mirrorless users. The issue is with the sunball itself there is an issue of highlights when you try to shoot a coral reef with the sunball in the frame and you are using a shutter speed of 1/250th or 1/320th that are typical DSLR sync speed.
Mirrorless cameras do even worst as usually the base ISO starts at 200 that makes it really difficult to capture this shot.
So the key is to put the sun behind something or have the rays in the frame but not the sunball. Something like this to give an idea
The sunball just behind the soft coral gives a nice glow so even with a 1/250th shutter and f/8 at ISO 100 is possible to capture a captivating scene.
Few meters away there is a gorgonian with a red soft coral on top that is really exciting to see at naked eye. To me this reminds of a frogfish head profile. It is impossible to capture this scene at 1/250th f/11 ISO 100 it is just too bright you need to reduce at least two stops to get the sun properly however if you did that on a DSLR you would be shooting at f/22 and it is near to impossible to properly illuminate the coral with your strobes at the distance required.
That is where our RX100 compact comes to help as you can sync your strobes at 1/2000th this should give a black background around the coral, the coral properly lit in the foreground as I had the strobes at full power and the sunball in the frame as well without too many glowing highlights, this is the resulting shot
Note that a model would not be visible in this shot and fish would be colorful only in front of the coral or close by anyway as discussed there was not fish to model for me and this was just technical entertainment. The image is quite strong but the lack of fish makes it less interesting.
I found some cooperating clown fish on this dive however they are those with the dark eyes so despite the eye contact the shot is not as strong as it would be with a better subject
This is taken with a single Inon UCL-165 a luxury of having a compact and being able to wide and macro on the same dive.
Anyway I was happy with the sunburst in the frame so that dive was well worth it.
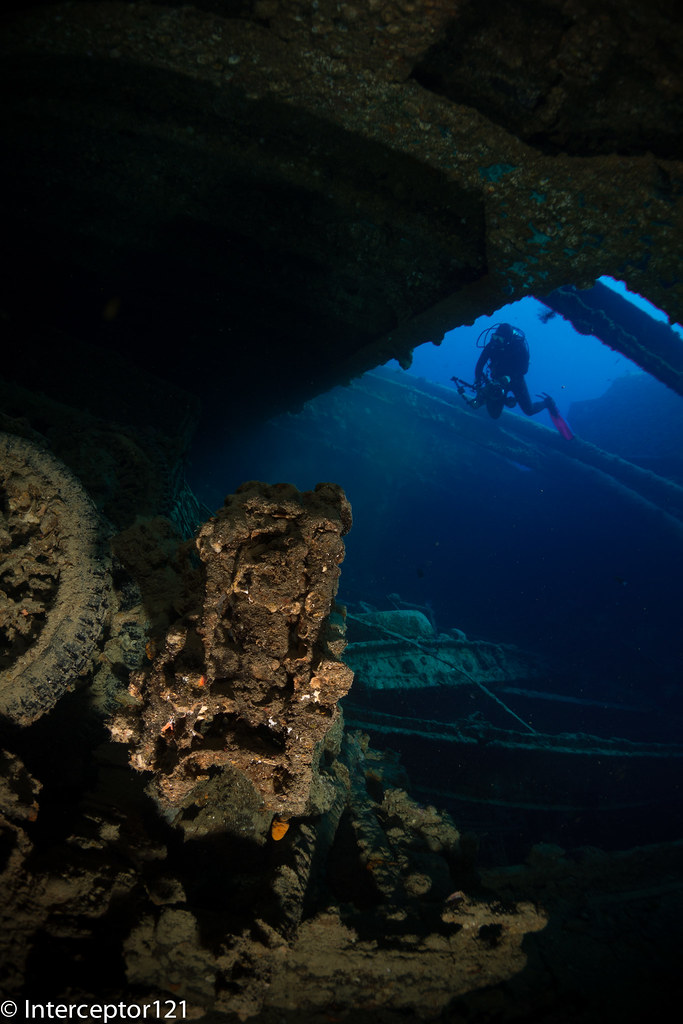
Dive two was at Jackfish Alley, and proved to be the most entertaining of the day. Who knows this dive sites knows that there are two caves, the first is wide but very dark and at certain times has turtles inside. The second is really narrow but has few cracks the provides a cathedral light effect best experienced in other site of the Southern Red Sea. Anyway we got the briefing and Dr Mustard was going to be marshaling the queue of photographer in cave number 2.
Being familiar with the dive site I knew that cave 2 is quite narrow even for normal diver let alone this big troupe of photographer so I mounted my tripod legs on the tray with a view of working in cave 1 and then move to cave 2 after the chaos was over.
Well it was real chaos as you can see from the feature image divers in the way, bubbles silt, in short it was a mess.
So I spent some time in cave number 1, this cave is really dark and you can’t really shoot handheld. In cave number 2 you can use speeds of 1/25 or 1/30 up your ISO and put the camera on a rock whilst you take the shot, in cave 1 this results in darkness unless you go to 4 digits ISO.
So my shot on cave 1 is taken at 0.4″ f/4 ISO100.
The shot is taken with the camera on the tripod using self shoot so that there is no shake from the hand pressing the shutter, this means the picture is sharp as it can be and due to low ISO also very noise free. Unfortunately fish did not feature in the shot so this is again a fairly technical shot that is not as strong as it could be.
There were other interesting opportunities in smaller cracks like this one that I like quite a lot though is not a sensational shot.
I like the fact that the two snappers are one silhouette and the other full color.
After the shambles of dive 2 we moved to Shark Reef where the first dive was really more to acclimatise with the site so won’t bore you with the pictures for that dive.
In the evening the sunset dive was at Ras Katy that would have been our regular evening spot from there onwards.
On day one I was playing with dapple light and reflections
Dapple at Ras Katy
This is me taking the shot above
Interceptor Shooting Dapple
As you can see I am nearly at the surface thanks to Damo for this picture.
Near surface can also be interesting like in this case
Test Shots dapple Reflections
Here you can see part of the Snell windows together with the reef and the sunball. This shot can be made much more interesting if you focus on the reflections.
Anyway this was the end of day 3 of diving next post will be about Shark Reef and the schools of fish.
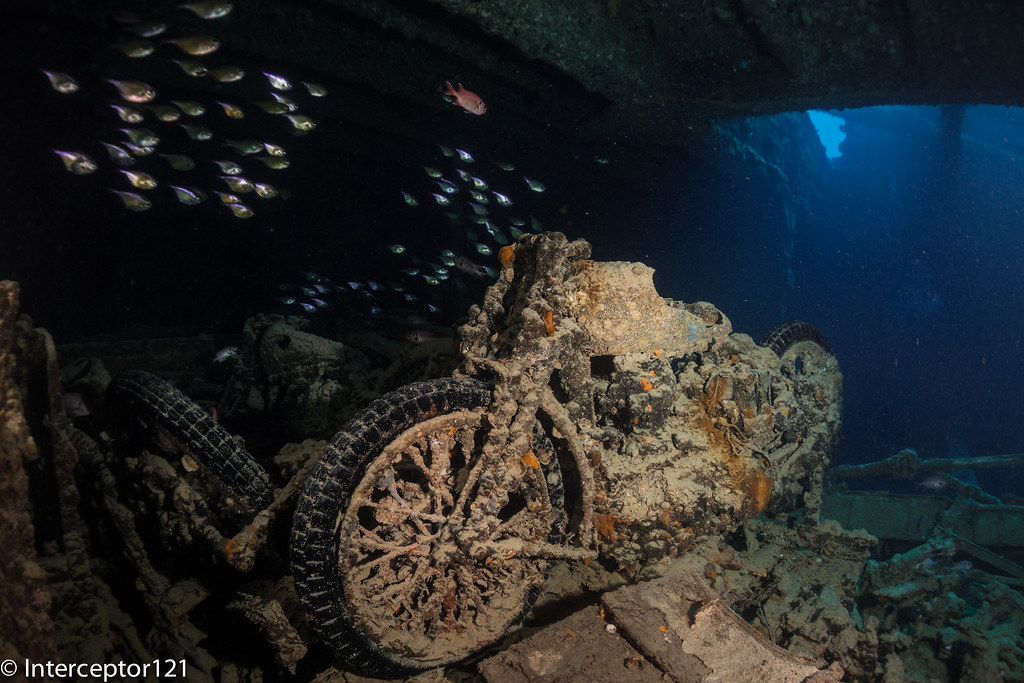
After the first day of fish portraits it was time to go and dive the Thistlegorm, this can be an amazing dive site but also very challenging as the wreck is not sheltered by any reef formation.
We got there early in the morning and attached to the wreck using the classic 3 point method: anchor, line on the bow and line on the stern we were all ready to go.
I have to say Dr Mustard prepared this very well and had a wealth of information on the wreck and the specific features.
The first dive was suggested to be a guide tour of the wreck from the outside with a limited penetration, the second would have been a penetration and the third dive a play with remote strobes (that I did not have).
As I had dived the wreck a number of times I decided to change the order so on dive number one went for a penetration of hold 2 and played a bit with the motorbikes.
There were already some others surrounding the bike as I went down so I played a bit with the divers themselves before being able to get in position.
It is amazing how much more interesting is a picture once you have a person in it. Eventually I got hold of the Bike in hold 2 also known as Elle’s bike. I looked around and there were some hatchet fish that I thought would have made the picture more interesting compared to the usual single fish in front of the bike.
I love the reflection on the fish that the strobe produced.
On dive 2 it was time to take some ambient light shots and I was expecting some divers to be around the stern that I could capture. Unfortunately the day boats had gone and the Thistlegorm was pretty empty so dive 2 was a bit of a waste as the boat itself says very little without a diver or a school of fish.
Thistlegorm Stern
It could be the size of a RIB but you could not tell from here the massive size of the boat. It is quite dark at the 28 meters I took the picture so there is not a lot of color.
On dive 3 people that had them were playing with remote strobe. I fired a few shots when my cabin mate was placing his strobe, funny enough his remote strobe fired and I blackened him in lightroom so he is actually still there!
The remote strobe creates the blue in the truck glass that would not be there otherwise.
Next trip I will take my third Z240 and the gorillapod, I have to get a remote trigger but I think this is relatively straightforward.
The briefing from Dr Mustard included map of all the bikes and trucks and suggestion for shots and strobe positioning really impressive detail there.
After 3 dives on the wreck we moved to Beacon Rock where the Dunraven rests not to dive the wreck but to experiment with dapple light.
This was a very productive dive for me I had some of the best shots in relatively poor conditions.
The surface was not flat but this made it even more dramatic as the waves were breaking through.
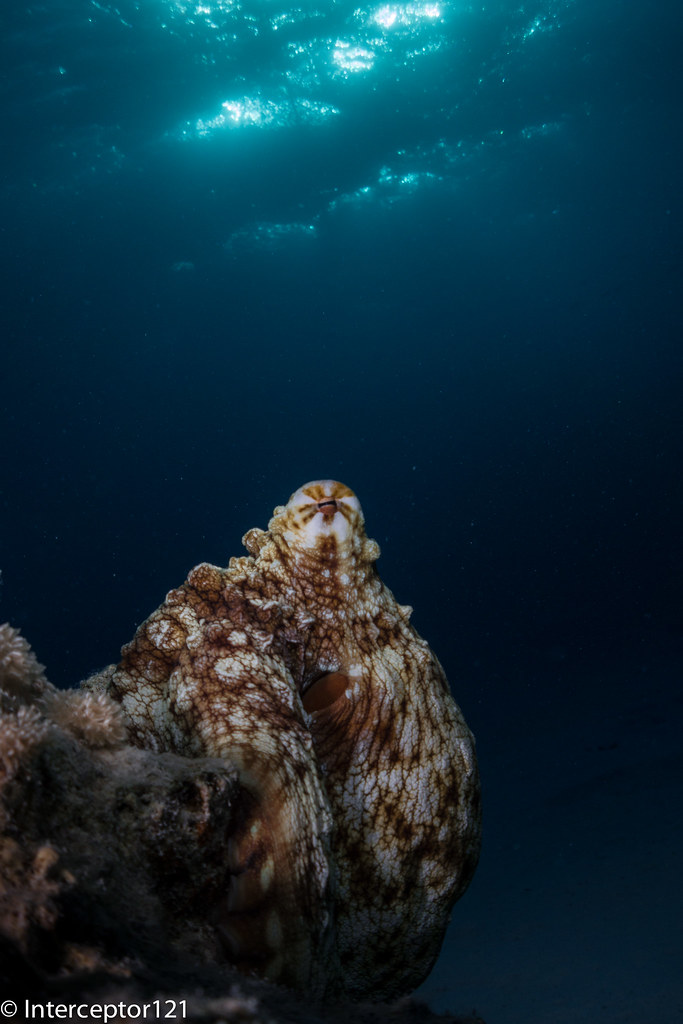
There were also barracuda and goat fish shoals. The barracuda were not really cooperating so I focused on the goat fish
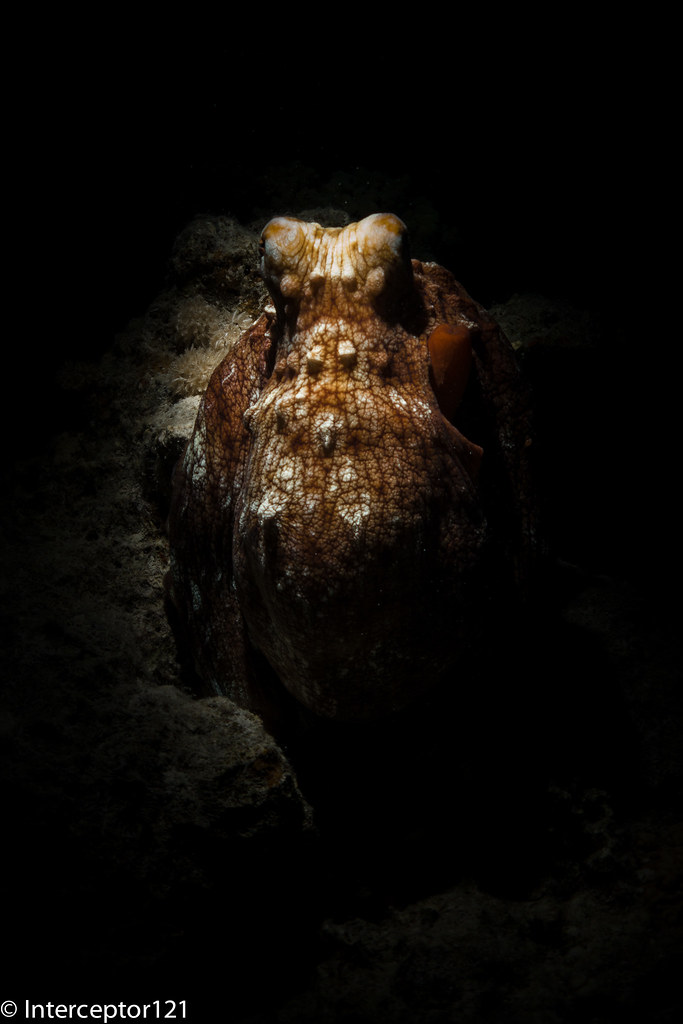
I also had a 26º snoot this time so I played a bit with an octopus
The good thing about the Inon snoot is that you can remove it and take normal shots with two strobes
This is the same octopus as before just to give you an idea
I was very happy with the performance of my RX100 Mark II one of the only two compact on the trip especially comparing to micro 4:3 that did not really look that much better.
Part 3 will be out soon with the first shots from Ras Mohammed
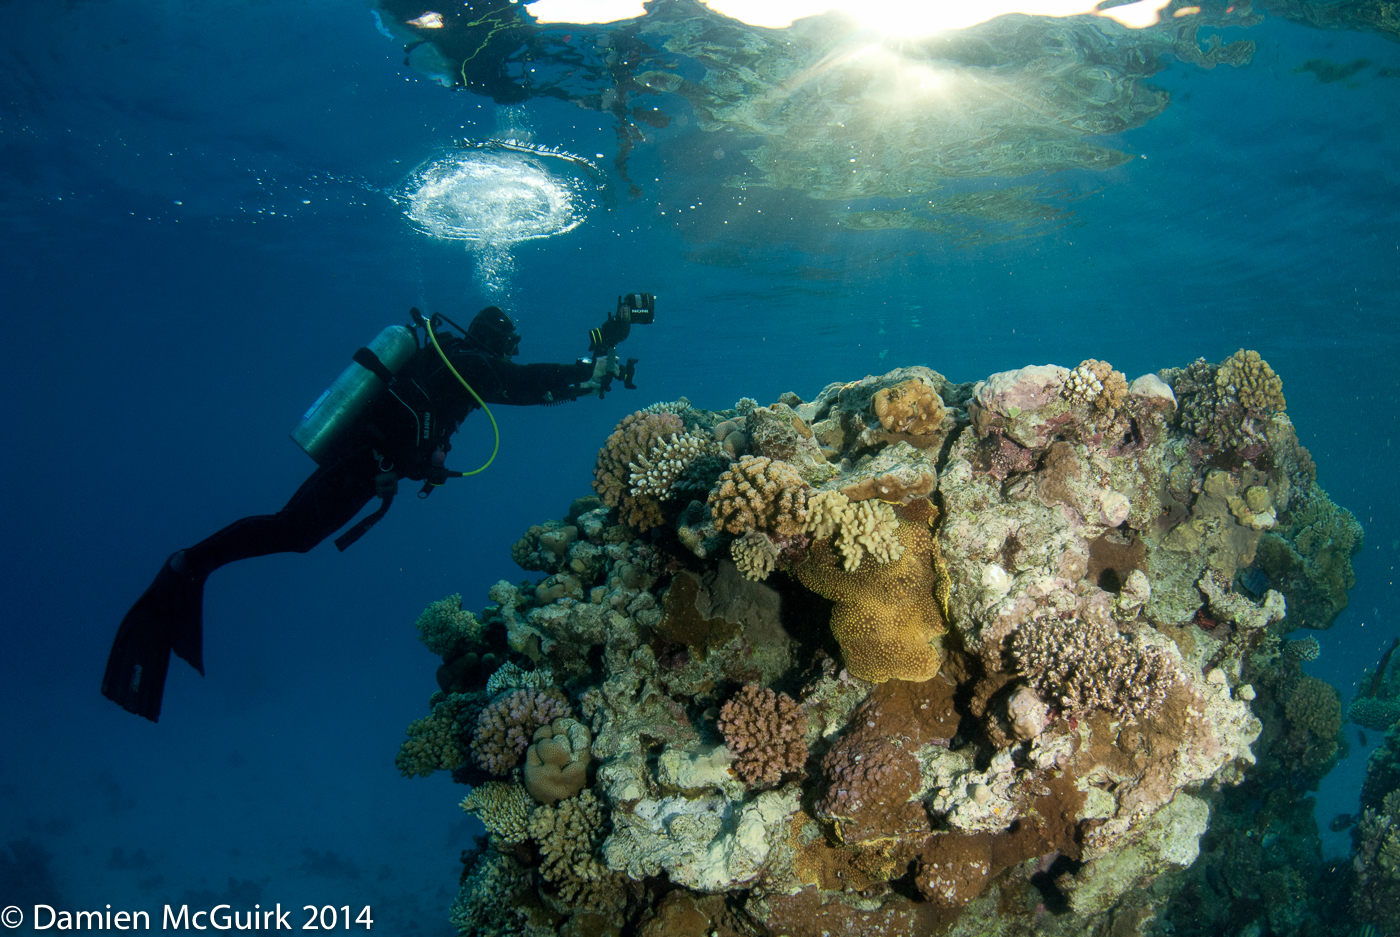
So finally the time had come to attend the Nauticam Try out with Alex Mustard.
If you have never done any of those workshops I would definitely recommend you one. It is not just the outstanding tuition but the fact that the boat will go to specific dive sites at specific times to take advantage of conditions and light for photography.
If you are keen to see the pictures this is the link to the set with the 30 images I like the most
I used the RX100 for stills for the whole trip but then on the last dive I shot this short clip just to give an idea of what it was like. Note that I used the auto magic filter on the lens and by then I had ruined it a bit so the image is softer than it should be and not up to my usual standards, the purpose is to illustrate the diving style not the quality of my set up for video.
The trip started with a preliminary explanation on how things were going to work and after a static first evening on the boat we departed for Abu Nuhas the early morning after. Unfortunately the conditions were really rough so we ended up aborting and after a check dive at alternatives we went to the barge.
The objective was to shoot fish portraits, cardinal fish had eggs in their mouth, at least some of them were carrying them, so you could find yourself your fish and try to take some shots. It was apparent that due to the level of comfort of the fish I could not get close enough with my diopters to take a shot to fill the frame so I needed to crop quite a bit as in this shot.
Hopefully the eggs are still visible. Anyway the rest of the gang had for 90% DSLR and were happily shooting portraits with their 100mm macro lens I was struggling getting anything decent so I decided to try something alternative as it was clear that if I was shooting fish mid water I would have been too far away to fill the frame.
This shot from Alex Tattersall gives you an idea of what should have come out with the right level of magnification that I could not achieve.
In some cases I did find more cooperative fish like those two.
So I put on the snoot and started looking for different things like in this shot taken with the Inon at 20º.
Those little gray moray are endemic of the red sea and look quite cute. I then found a giant moray and took a series of shots this one being my favorite.
The Inon snoot is a great piece of kit especially because you can go from 20º to 100º depending on the parts you combine. There are fiber optics snoot on the market that are sensational for macro but do no wide angle, the Inon snoot can do wide angle with 86º 53º 46º coverage and narrower beams of 26º and 20º for smaller things or special effects.
This is a picture of the snoot set that I would recommend to all Inon strobe users.
Wide angle Snoot20 degree snootInon snoot kit
Obviously I could only capture semi static subjects with the snoot and the issue of fish portraits remains. The RX100 at 100mm equivalent requires 50cm focus distance that becomes 66cm in water. At this distance the capture area is rather large and unsuitable for smaller fish like the cardinals in the example so a solution would be to use an Inon UCL330 diopter to reduce distance to around 25-30 cm and therefore have a 2x magnification but I don’t have this lens anymore so can’t confirm. I will buy it again and do some more tests in a future trip.
I will post part II in the next days with some shots from the Thistlegorm so stay tuned
I have recently received a number of messages asking me why I am not upgrading to a micro 4:3 set up.
There are several reasons why I am not doing that even if my photo rig is nearly as heavy as a micro 4:3 or even a DSLR and have to do mostly with video not with stills.
I will try and touch on the key points in this post, please remember those are subjective and by no mean a criticism to other people that use 4:3 set up for video.
Note: my perspective is one of a typical non professional user that has limited time to get the best shots. This is not an absolute point of view it is clear that if you are a ‘pro’ and have much more time to spend to get few seconds of footage many considerations do not apply.
Composition
The way I have learned to love underwater video is the composition opportunities that it gives. My main source of inspiration is John Boyle and his book that remains the only valid handbook for what I am concerned even if it is a little old.
One of the classics of underwater video is the sequence: wide-medium-close-super close. On a micro four third in order to have good quality you would choose a macro lens or a wide angle lens, both those choices will prevent a number of shots you either do close and super close or wide and medium and maybe close but not super close.
With a camera with a fixed lens with a range of 28-100mm and wet lenses you can cover the whole spectrum of shots although you may need to swap lenses during the shot the possibility is there.
Optical Quality
Some users try to use one lens to catch all, usually the choice is a Panasonic 14-42mm or an Olympus 12-50mm. However this is not as exciting as it seems in the first place. I have run some comparisons on the optics on DXOMark assuming the 4:3 are on a Panasonic GH3 that really is a mini SLR you can see the results by yourself
Comparison Panasonic 14-42 vs RX100II vs Olympus 12-50
The RX100II gives better quality than both those lenses and especially it does it at f/1.8 versus the f/3.5 of f/4 of the other lenses.
The RX100 does have issues of distortion and chromatic aberration at the edges because of the extensive correction but is overall sharper at wider aperture. This is very important for video that is shot at ambient light.
Wet Lenses
You can add M67 lenses to the Panasonic 14-42 and the 35 macro port (am talking about Nauticam ports here) the results will be worse than the RX100 as the starting point is worst. There is no M67 mount to use the Olympus 12-50mm lens, I will try to see if the flip diopter can do that without vignette but still this gives only 24mm against the 18mm of the RX100 with an Inon wet lens.
Video Quality
The only cameras that are decent are Panasonic as Olympus video is pathetic. However only the GH3/4 have anything better than a compact in terms of recording formats. The new Sony RX100 Mark III with 50 mbps 24/25p seems almost equally interesting.
Stabilisation
Micro 4:3 cameras do not have in camera stabilization in video mode and most of the lenses (the 14-42 is an exception) do not have optical stabilizers to contain costs. It follows that close ups are shaky and even wide angle has jumps.
Conclusion
With all the considerations above it follows the only real set up would be a lens with a stabilizer, the only available that can also shoot close up with a wet lens is the 14-42mm Panasonic. However this lens seems to have worst optical quality than the on-board lens of the RX100II (I have checked some real life shots myself). The only benefit left is the higher bit rate recording format and this is only if you go on a GH3/GH4, with higher recording formats available for the RX100 Mark III and with an announced Panasonic LX8 with potential 4K I personally do not see a reason to jump on the 4:3 wagon for video. I do believe though that if you take mainly stills there is a compelling reason for 4:3 as you can have one camera fitting almost everything and smaller to pack than a DSLR (but not that much and forget about 200-400mm f/2.8 tele lenses).
Snell’s window is a phenomenon by which an underwater viewer sees everything above the surface through a cone of light of width of about 96 degrees [From Martin Edge: Underwater Photography].
During my last Gapapagos Trip there was a bit of an issue in terms of photography subjects, in essence most of them were fairly big like sharks, turtles, eagle rays and of course divers.
After a while shooting or trying to shoot those uncooperative models I had the idea to try and do different things such as silhouettes and Snell windows. You can also combine both as we did in this case.
So what do you need to shoot image of a Snell window:
1. A lens that is wide enough, you need a bit more than 96º field of view to take the whole window
2. Something interesting on the surface (if you have calm water you can see right through)
3. An interesting subject as silhouette to contrast the clear water if there are waves and you can’t easily see through.
A normal flat wet wide angle lens for our compact camera is not sufficient to capture the snell’s windows as in this example
Divers at Safety Stop – taken with Inon UWL-H100 at wide end
Take into account that even with a fisheye lens on an SLR you can’t capture the Snell’s window on the vertical axis as the field of view will fall short a few degrees.
With a compact camera a semifisheye lens will capture the edges of the window if correctly aimed on the diagonal and horizontal dimensions and will fall short on the vertical.
Snell window divers exiting the water or ascending – UWL-04 semi fisheye lens Canon S95
I am reporting some of the calculated field of view for the most popular lenses at present for compact at 3:2 image format
Wet Lens
Diag FOV
Hor Fov
Ver FOV
Flare/Ghost
UWL-04
151.95
123.22
79.85
Ghost Possible
UWL-100 28AD
149.01
120.97
78.48
No
UWL-28
160.56
129.75
83.81
Both
UWL-H100
157.85
127.71
82.58
No
All those lenses will take a good Snell’s window I have not tried the UWL-28 and I have some concerns this lens may flare as it usually does but I do not know for sure.
Both the Inon lenses produce sharp images with no defect.
In general small sensor cameras like the Canon S series will work fine with the fix/idas lenses and should produce good results also of normal shots through the water.
Using the UWL-04 or UWL-28 with large sensor cameras like the RX100 there could be a sharpness issue a larger apertures so make sure you close that at f/8 or smaller instead of using the shutter speed to balance exposure if you want to go through the water.
Snell’s windows are uncommon with compact camera shooters as they are considered an advanced subject but they can be taken. I will be taking more in a next trip to Egypt I hope for calm surface conditions so I can go through the surface with the shots. Failing that this is very easy to practice in a swimming pool.
I have mentioned the conditions we found in Galapagos in the previous post so no need to repeat myself.
One of the things I was told before going is that the last dive of the day tends to be pretty dark so not good for video, therefore I used this for photos were I was expecting to use strobes at all times.
I made a mistake as I should have taken the still rig also on the second cousins rock dive anyway I am quite happy on how things turned out considering I did only 4 dives and took 117 photos I am pretty happy I could pick 20 that I consider decent.
The whole set is here
The rig I decided to pack at the end had 6+8 inches segment so it looked pretty cumbersome on land.
Photo RIg on Land
In water the setup looked like a glider with a significant wing span
Photo Rig Underwater
The reason why I took arms so long is that I was expecting sharks to be 4-6 feet away and quite a bit of particles in the water.
I was right. Just have a look at the following two shots, the first taken with a Canon S95 and a single 8″ arm.
Turtle with single strobe 8″ arm
You can see the considerable amount of backscatter despite the 1/1600 shutter speed.
This is another turtle on the same dive
Turtle with twin strobes
This time two strobes on the longer arms are used, even at 1/320 this looks neat. The turtle looks bigger as the lens is not as wide as the previous, shooting distance is the same.
The arms proved to be good for the sharks as expected, I used aperture of f/4 for most shots, ISO 100/200 and shutter 1/60 to 1/125
This is emotionally the best shot
Galapagos Shark Watching me
Later on in the snorkeling trips I took couple of split shots.
Unfortunately the weather was not good and the sky cloudy so I had to play with the graduated filter.
Galapagos Penguin Split Shot
The purist will notice that the water line is not neat, as I am shooting with a wet lens the back of the lens has water as well so to avoid to see that I shoot portrait with the back of the lens in the water, which is a limitation but on a good day will produce interesting shots regardless, also the lens is only 9cm diameter and is flat (Inon UWL-H100)
I took some close ups but even the sea horses were huge so no need for close up lenses.
Giant Pacific Seahorse
Funny enough I took this at f/5.6 1/60 after reading on DXOMark that the RX100 resolution is actually better at f/5.6 than it is at f/11.
The lens is at 35mm equivalent at the shooting distance I used the depth of field is only a couple of cm and as the background is quite plain I did not bother trying a black background that I could possibly not even achieve. This was a TTL shot whilst all the sharks and wide angle were taken with the strobes in manual.
Another great feature on land of the RX100 is the panorama, which I used in Bartolome and other places
Bartolome Panorama
In general the conditions were very difficult and I am happy with what I could achieve in just 4 dives.
I will be taking the same arms and strobes configuration to the Red Sea in a few weeks but with the Inon UWL-100 with dome. I expect better results as the conditions are usually fabulous in comparison, probably I could do with shorter arms but once in water the set up is not heavy so I will keep it like that
After the various Backscatter, Bluewater photo, and other shops compact cameras reviews I thought of putting my 10 pence in as well.
Most of those reviews you find are written by people who shoot DSLR and then occasionally go and take a compact in water to see how it goes. For what concerns underwater use I only shoot compact and I believe I know how to navigate into features and limitations of compact camera quite well so here is my view on the subject.
The first hint when you look at a high-end compact camera is to check if Nauticam makes a housing for it. If not maybe your camera is not as good after all. There are some exceptions of course.
Categories
I have ranked compacts according to the following shooting categories:
Movie
Ambient Light
Macro
Portraits
Close Focus Wide Angle
All purpose cameras
When possible there will be a top 3 in each category.
The Compacts
I have considered only the following cameras
Canon G16
Canon S120
Olympus XZ-2
Panasonic LX7
Sony RX100II
The Fuji X20 is a potential addition but I have not found anyone that actually shoots it underwater so I abstain from judging here.
Best Cameras for Movie
In order to score in this category the cameras need to have full manual exposure control in movie mode and be able to shoot double frame rates for the system of choice PAL or NTSC.
This is my appraisal:
Sony RX100II
Panasonic LX7
N/A
Canon cameras do not offer exposure control in movie mode, Olympus video is pathetic. Not possible to even consider a number 3 here.
Best Cameras for Ambient Light
Here I consider shots without strobes with a view angle of 100º diagonal you need a wet wide-angle lens to take those shots.
Here are the rankings:
Sony RX100II
Panasonic LX7
Canon S120
Olympus lags behind in image quality and the Canon G16 does not have any wet lens that allows to take those shots without strobes.
Best Cameras for Macro
I am looking here at shots are real 1:1 reproduction ratio and how easy is to take those shots in terms of autofocus and depth of field. In order to achieve this level of magnification a close up wet lens is necessary for all cameras. No compact camera achieves real macro with the bare port underwater.
Here are the results:
Canon G16
Canon S120
Panasonic LX7
The Canon G16 in virtue of a 140mm focal length at telephoto end gives the highest magnification ratio, the Canon S120 follows closely same image quality less magnification. The Panasonic LX7 has only a 90mm equivalent lens however the autofocus is incredible so you can use +10 diopters very easily and it is the only camera to really offer Bokeh.
The Olympus XZ-2 lags in terms of image quality, the RX100II has great image quality but little magnification, you need a +10 diopter to give a 1:1 reproduction ratio and focus is difficult because of shallow depth of field due to the large sensor.
Best Cameras for Portraits
Here we are considering shots with the bare port at 35mm focal length using strobes. Here is the ranking:
Sony RX100II
Panasonic LX7
Canon S120 & Canon G16
Whilst the RX100II has the best image quality it comes a bit as a surprise why the LX7 gives better images than the Canon. The reason is that Canon tend to have a very unbalanced color range with over saturated red. This does not go away with RAW images as it affects the whole spectrum. It is possible to correct this using blue diffusers for strobe but this is just a patch, the LX7 tend to give much better balanced images.
Best Cameras for CFWA
Close focus wide-angle is shot with a fisheye like lens, using strobes typically at small apertures here are the rankings:
Sony RX100II
Canon G16
Canon S120
It is quite clear that the RX100II with the widest choice of fisheye lens and the highest dynamic range is the best camera for the job, but the addition of the Inon Zoom lens helps getting the G16 in this category, the S120 follows with similar results. The LX7 does not offer a fisheye options sadly and the XZ-2 lags behind in image quality compared to the two canons.
Best Versatile Still Cameras
Here I look at cameras that can shoot all type of shots from macro to ambient light.
Sony RX100II
Canon S120
Olympus XZ-2
The lack of fisheye options cuts out the LX7 and the poor performance of zoom wide-angle lens at wide end kicks the G16 out.
Best Overall Camera Still and Movie
Taking the previous list and eliminating the cameras that do not offer exposure control in movie mode this is the result
Sony RX100II
NA
NA
So the Sony RX100II is the only real all round camera and this explains why it beats the other in terms of sales.
During the London Dive Show I attended a talk from Martin where he covered a number of shooting situations and how to deal with them in terms of composition and settings.
There was a promotion for a two for one tuition day with him that my buddy was keen to take so few months later we made our way to Dorset for a day of underwater photography with Martin.
This will be my first day of shooting with the RX100 Mark II albeit in a pool with my new arms and lenses so I was looking forward to it.
We arrived in Poole the night before and got ready for an 8.30 start with Martin.
We started off with a review of some basic exposure concepts and then looked at competition winning pictures and trying to identify what makes a wow picture. It was extremely useful!
Afterwards we went through our trips pictures so he could see what needed improving. Then look at what was needed for the next trip.
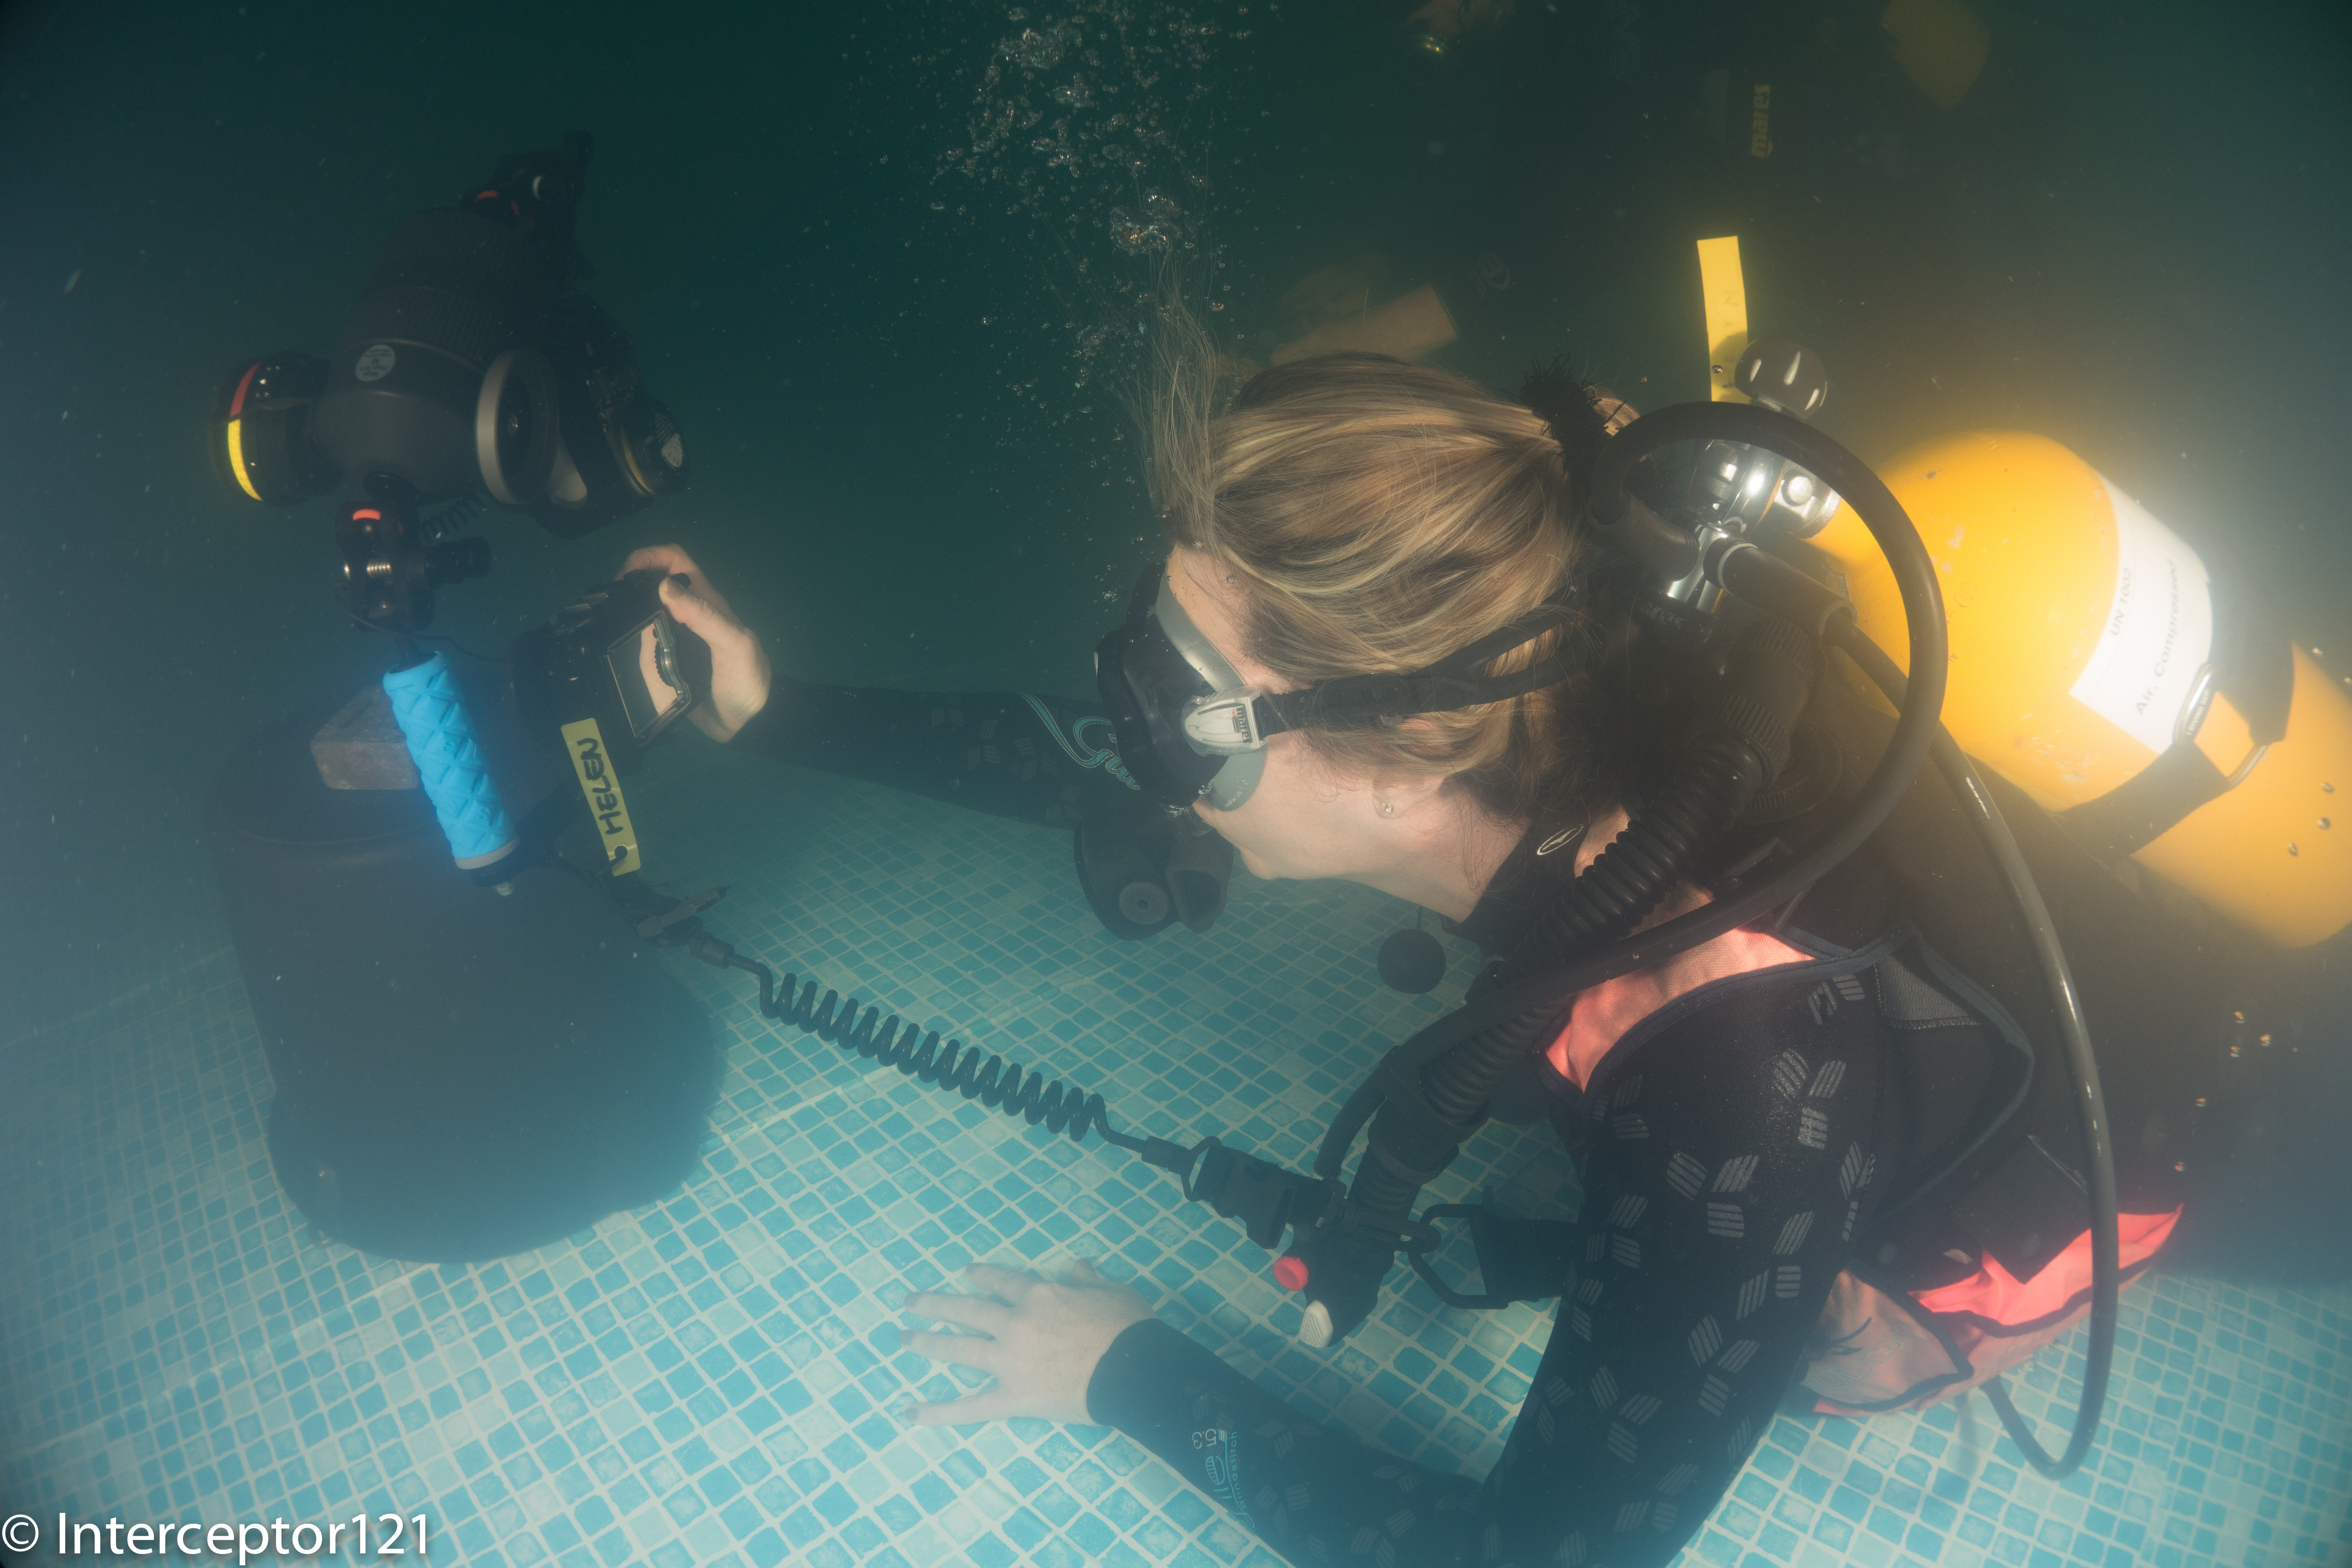
With that in mind we set up to jump in the pool to take some pictures the objective was to improve my buddy close ups and portraits as apparently her wide angle is as good as it gets with the Canon S95 used see featured image on this post.
Pool conditions were low visibility and plenty of suspended particles as the pool is used for kids swimming lessons let me give you an idea!
Pool Conditions
The first task was to shoot a frog with a view of eliminating shadows in its mouth. Start with one strobe and finish off with two.
Frog at 28mm
The frog with the bare port gives you an idea of the size and the complexity of the task with one strobe. There are shadows in his mouth.
Frog at 50mm
I then shot a portrait at 50mm, the reason why you see shadows more on the left is because I set the strobe at different powers.
Frog single diopter
The magnification of the RX100 is little so I went on with a first Inon UCL-165 and full zoom at 100mm equivalent. Note that everything is pretty much sharp at f/11.
Frog Double Diopter
With two Inon UCL-165 focusing on the mouth will result in this and the eyes being in focus and the rest blurred because of lack of depth of field.
Octopus fisheye
I then moved to an Octopus rich of textures. I took the first shot with my Inon UWL-100 28AD with dome.
Octopus at 28mm
The same octo at 28mm fills the frame much more of course.
Octopus at 50mm
The Octopus at 50mm looks even better. I have topped up the lighting on this one.
Octopus single diopter
I then took this guy with a single UCL-165 note the depth of field insufficient to keep the back of the head in focus, results though are exceptional.
Octopus double diopter
With two close up lenses we go back to the depth of field problem even at f/11.
I thought I had at that point nailed all focus and strobe issues, especially considering I shot with single auto focus, I did not bother using manual focus at all with exception of some double diopter shots.
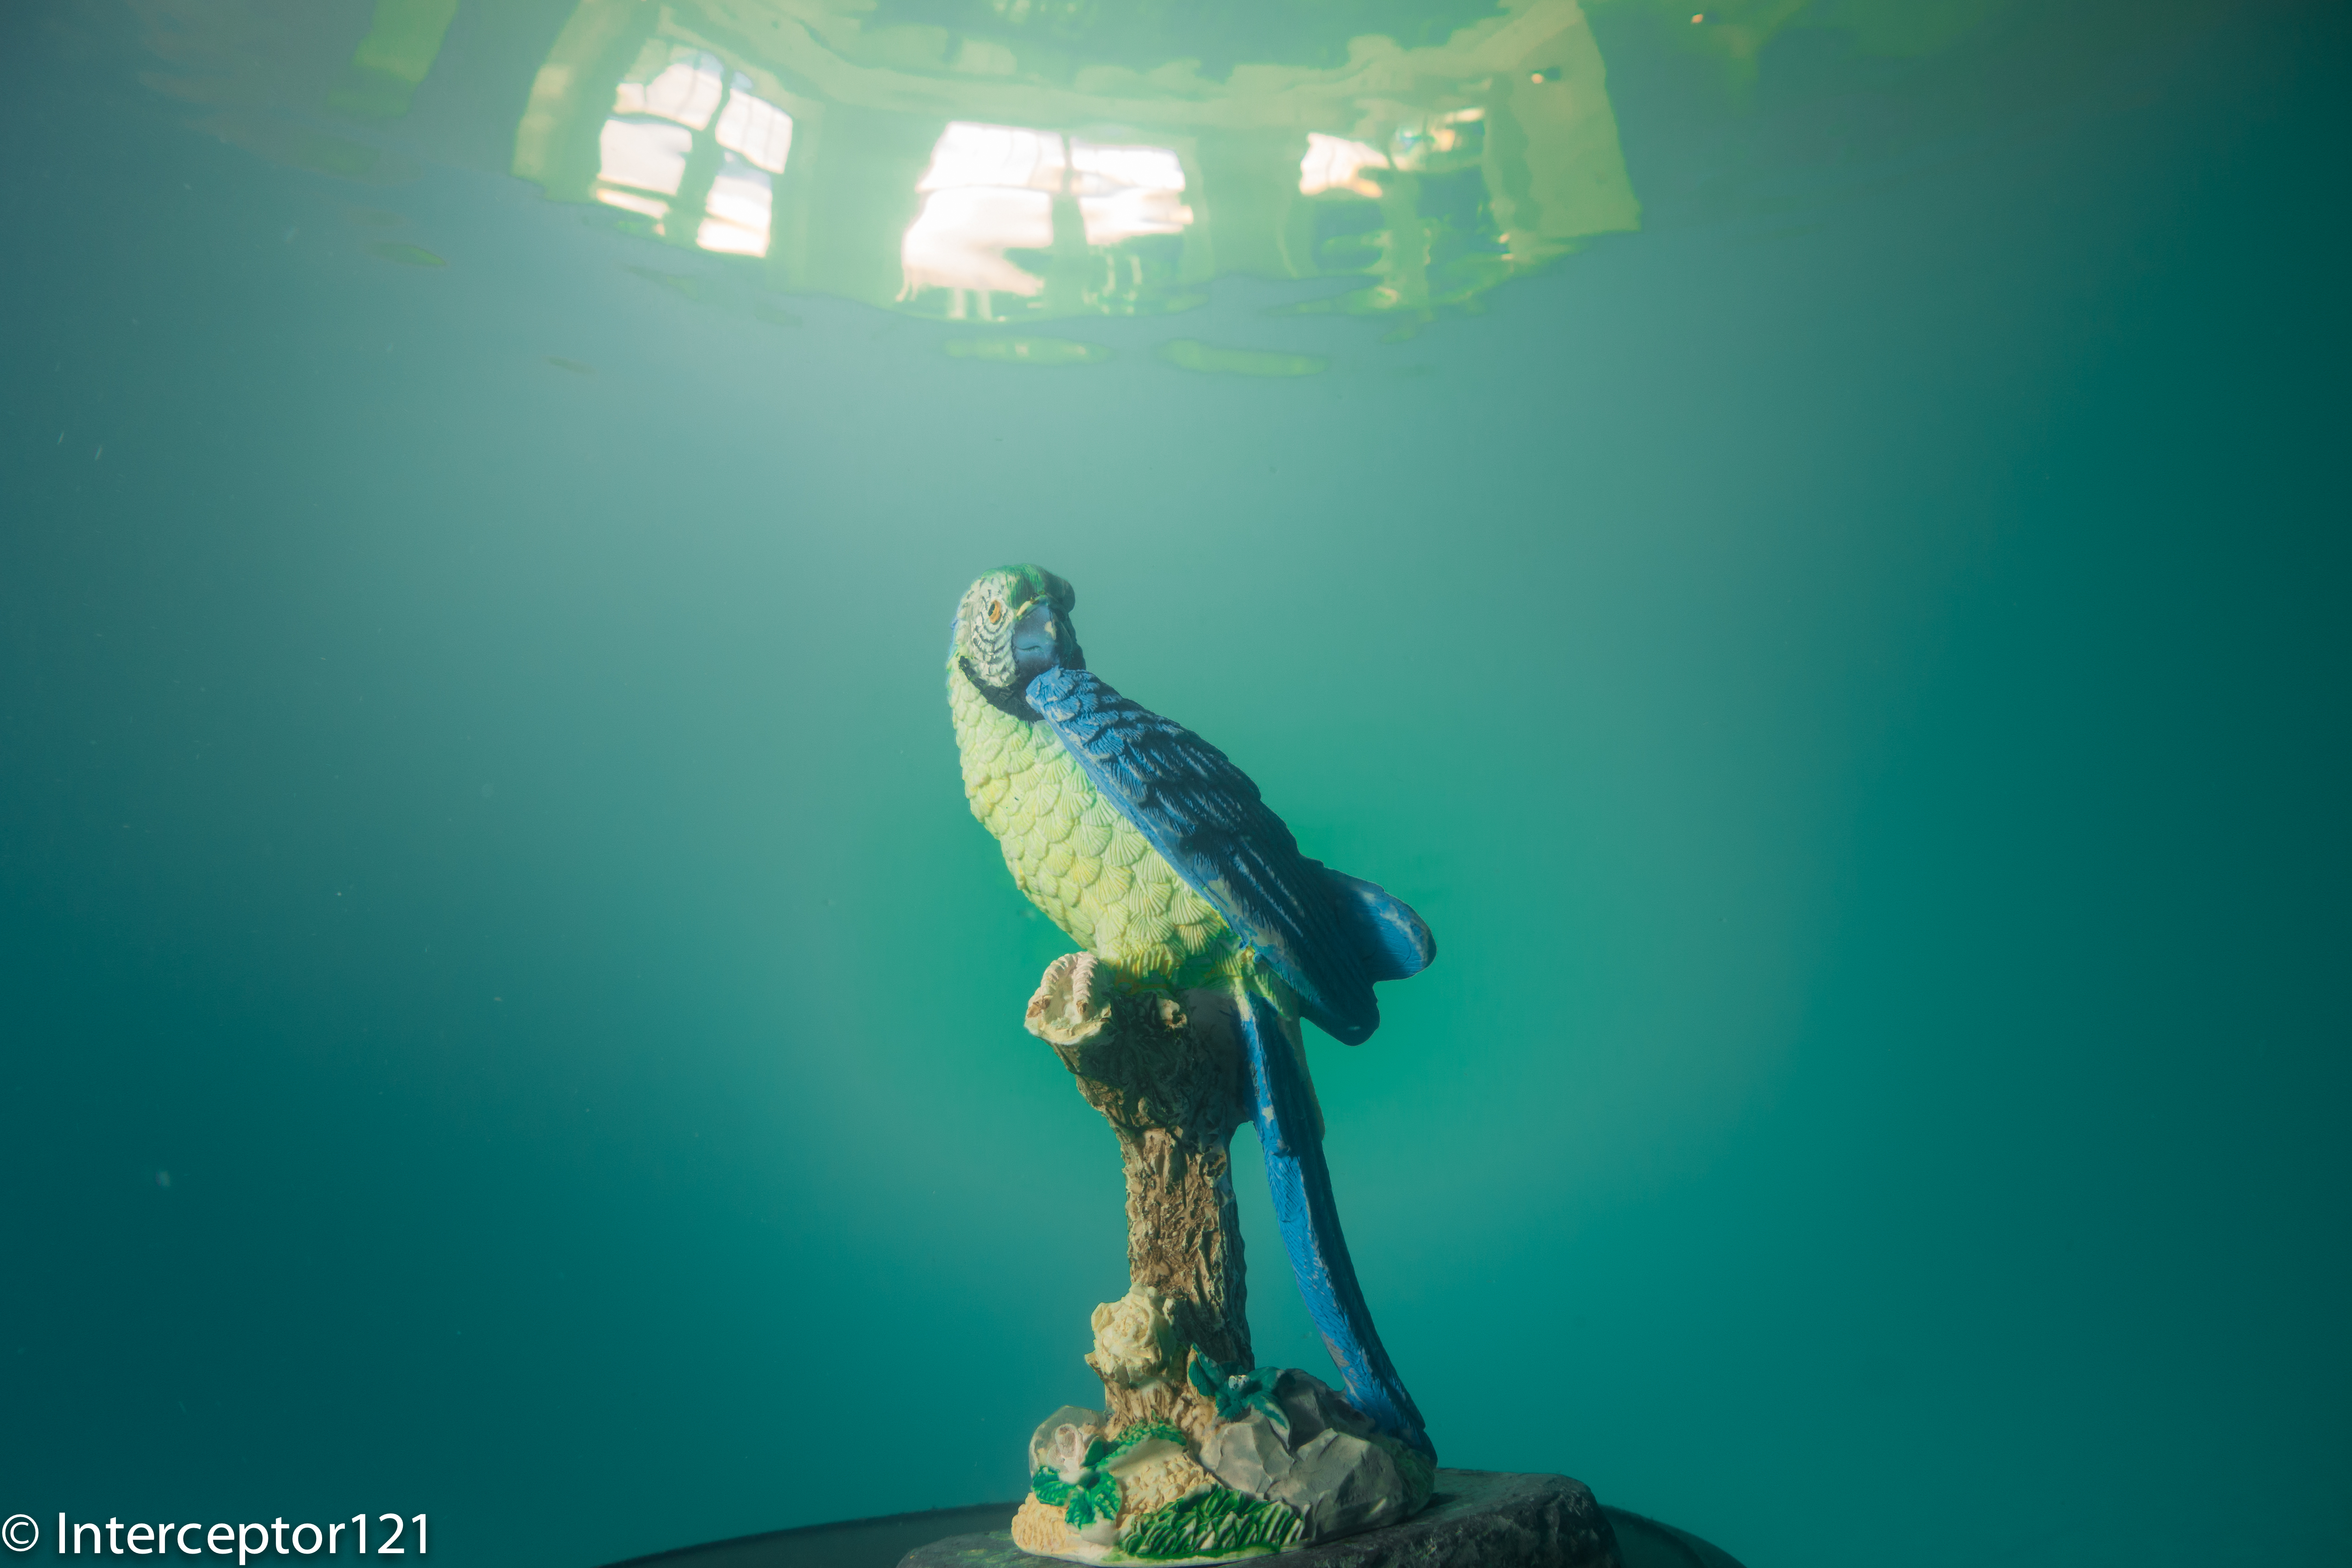
I then tried a few surface reflections with the fisheye this being the best.
Falcon Fisheye
You can see the outside of the pool and the windows on the top.
Family Fisheye
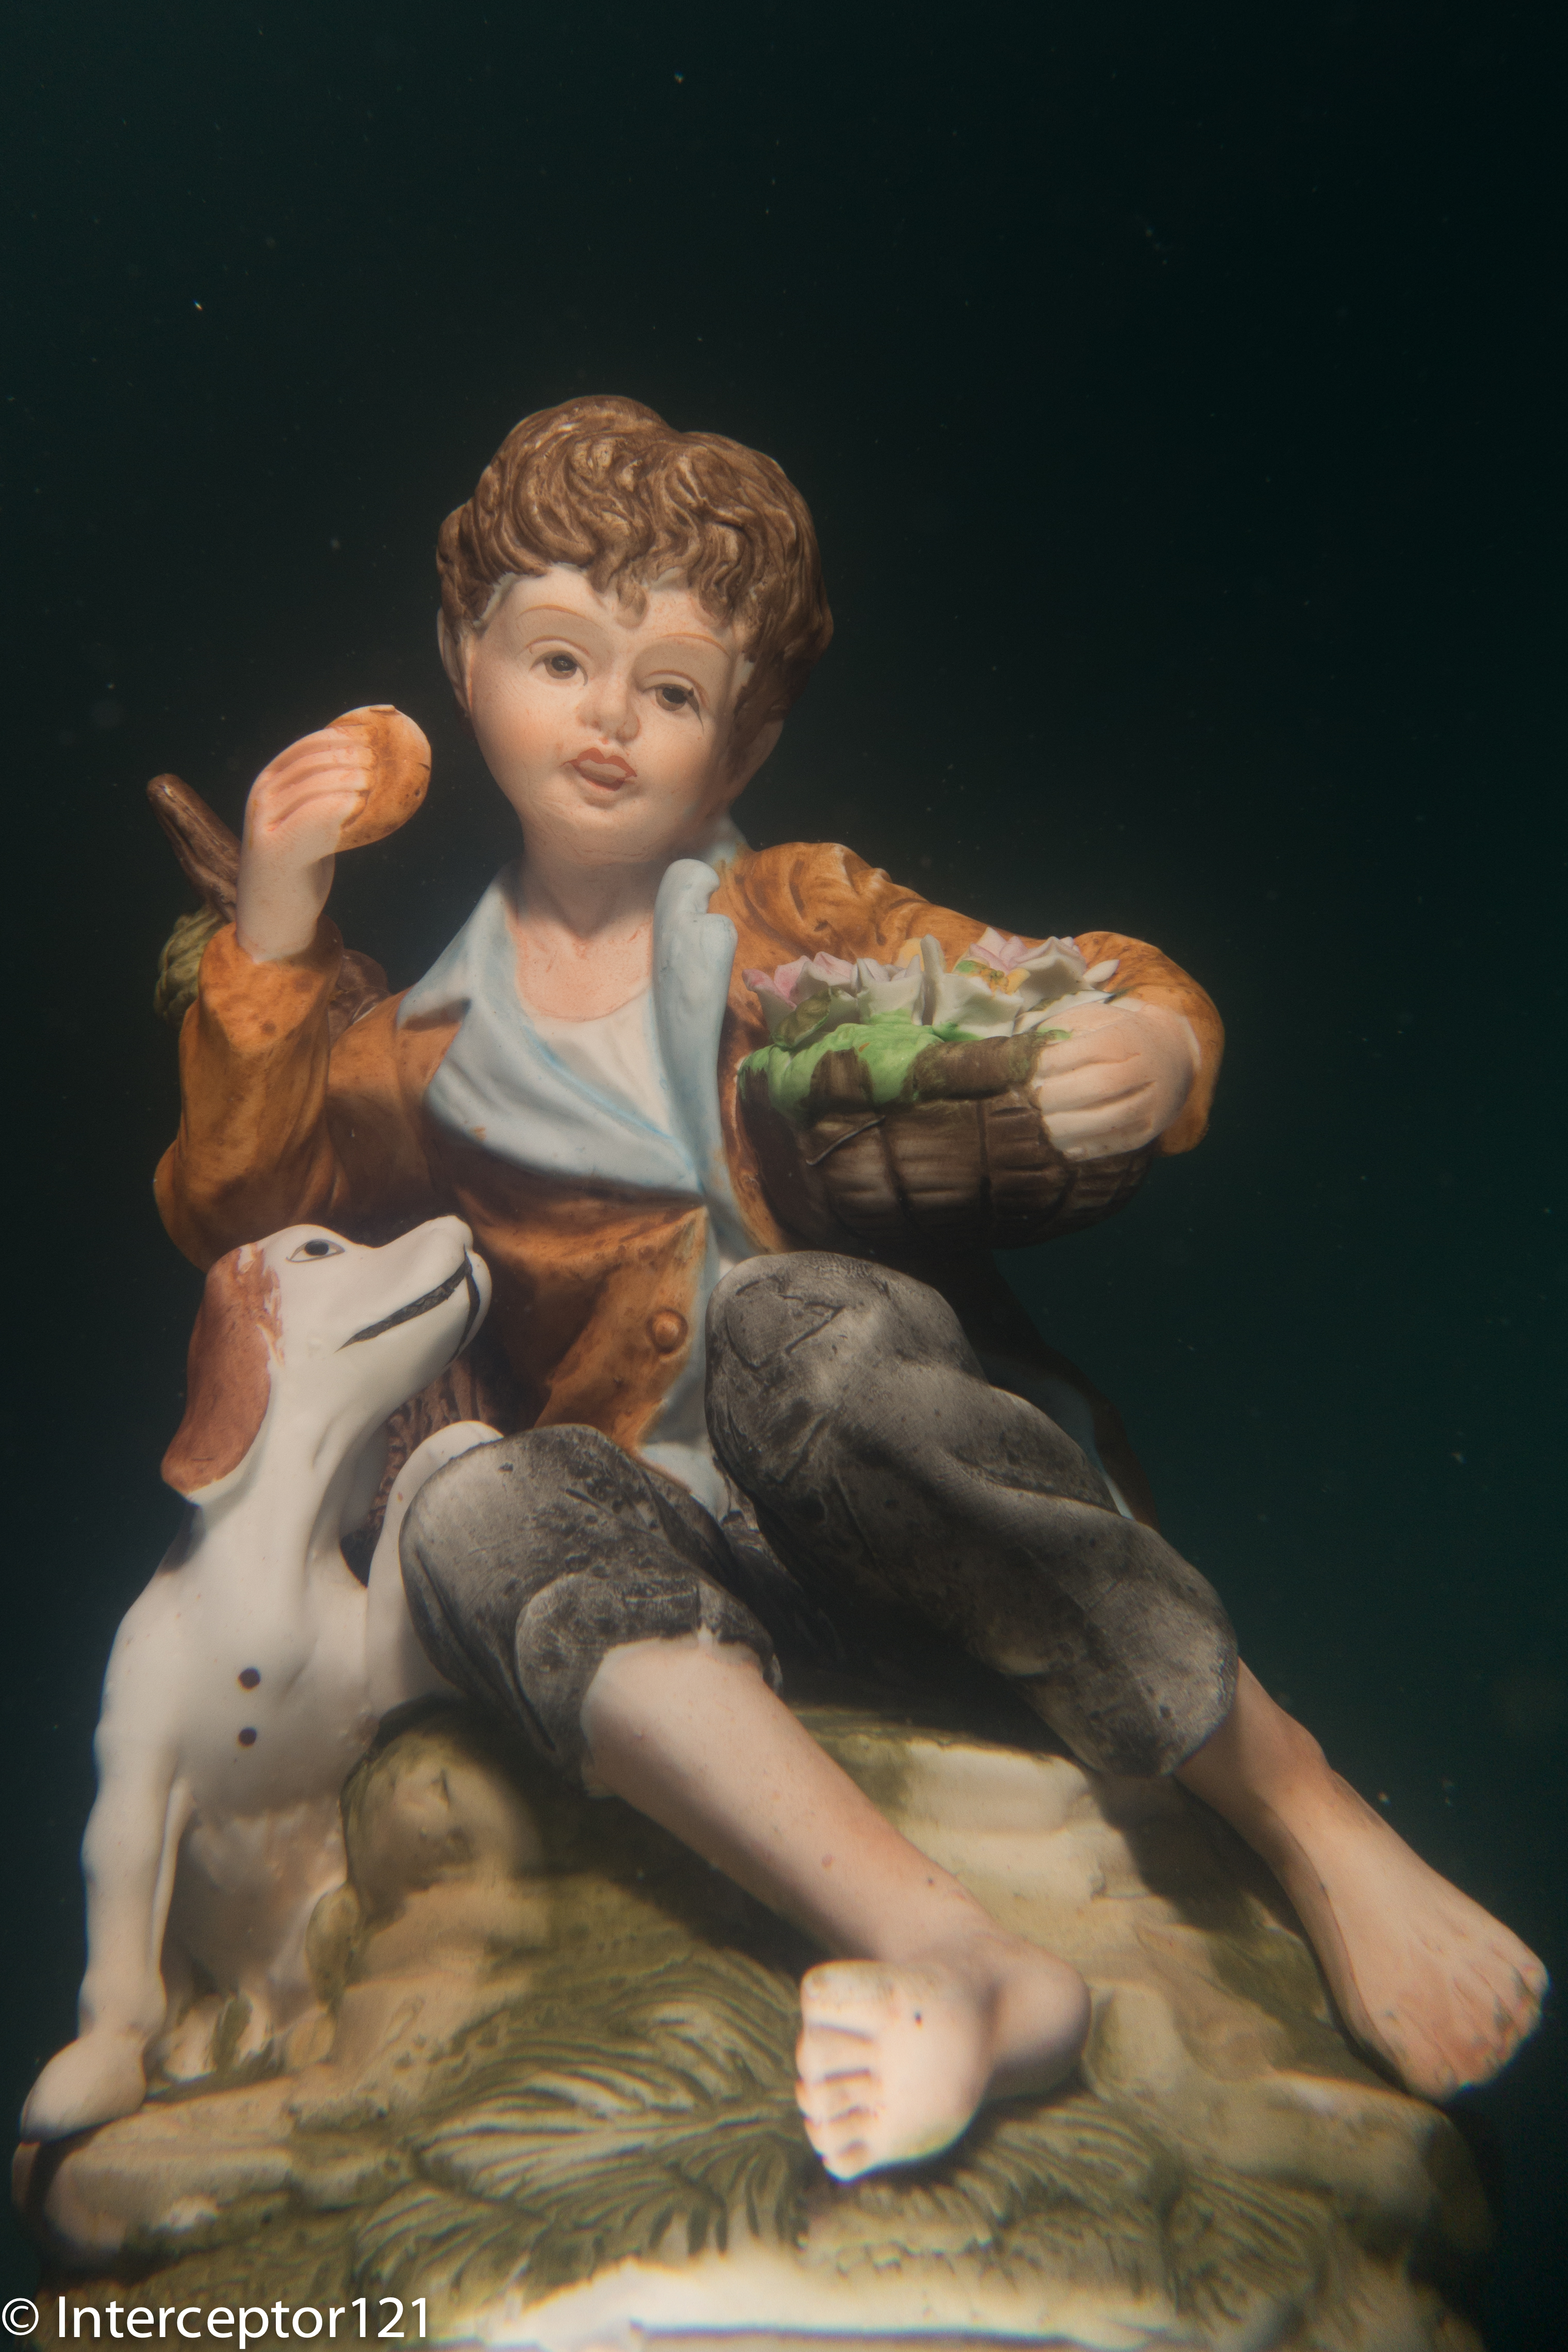
Afterwards made my own composition of statues for a fisheye shot that I think came out very well. The Z240 performed extremely well in both TTL and external auto as well as manual.
Child with dog
Martin asked me to have a go at the child with the dog as it is extremely difficult to lit up properly.
I went for an alternative strobe placement with light from the bottom as if it was in a gallery. He was impressed with the results.
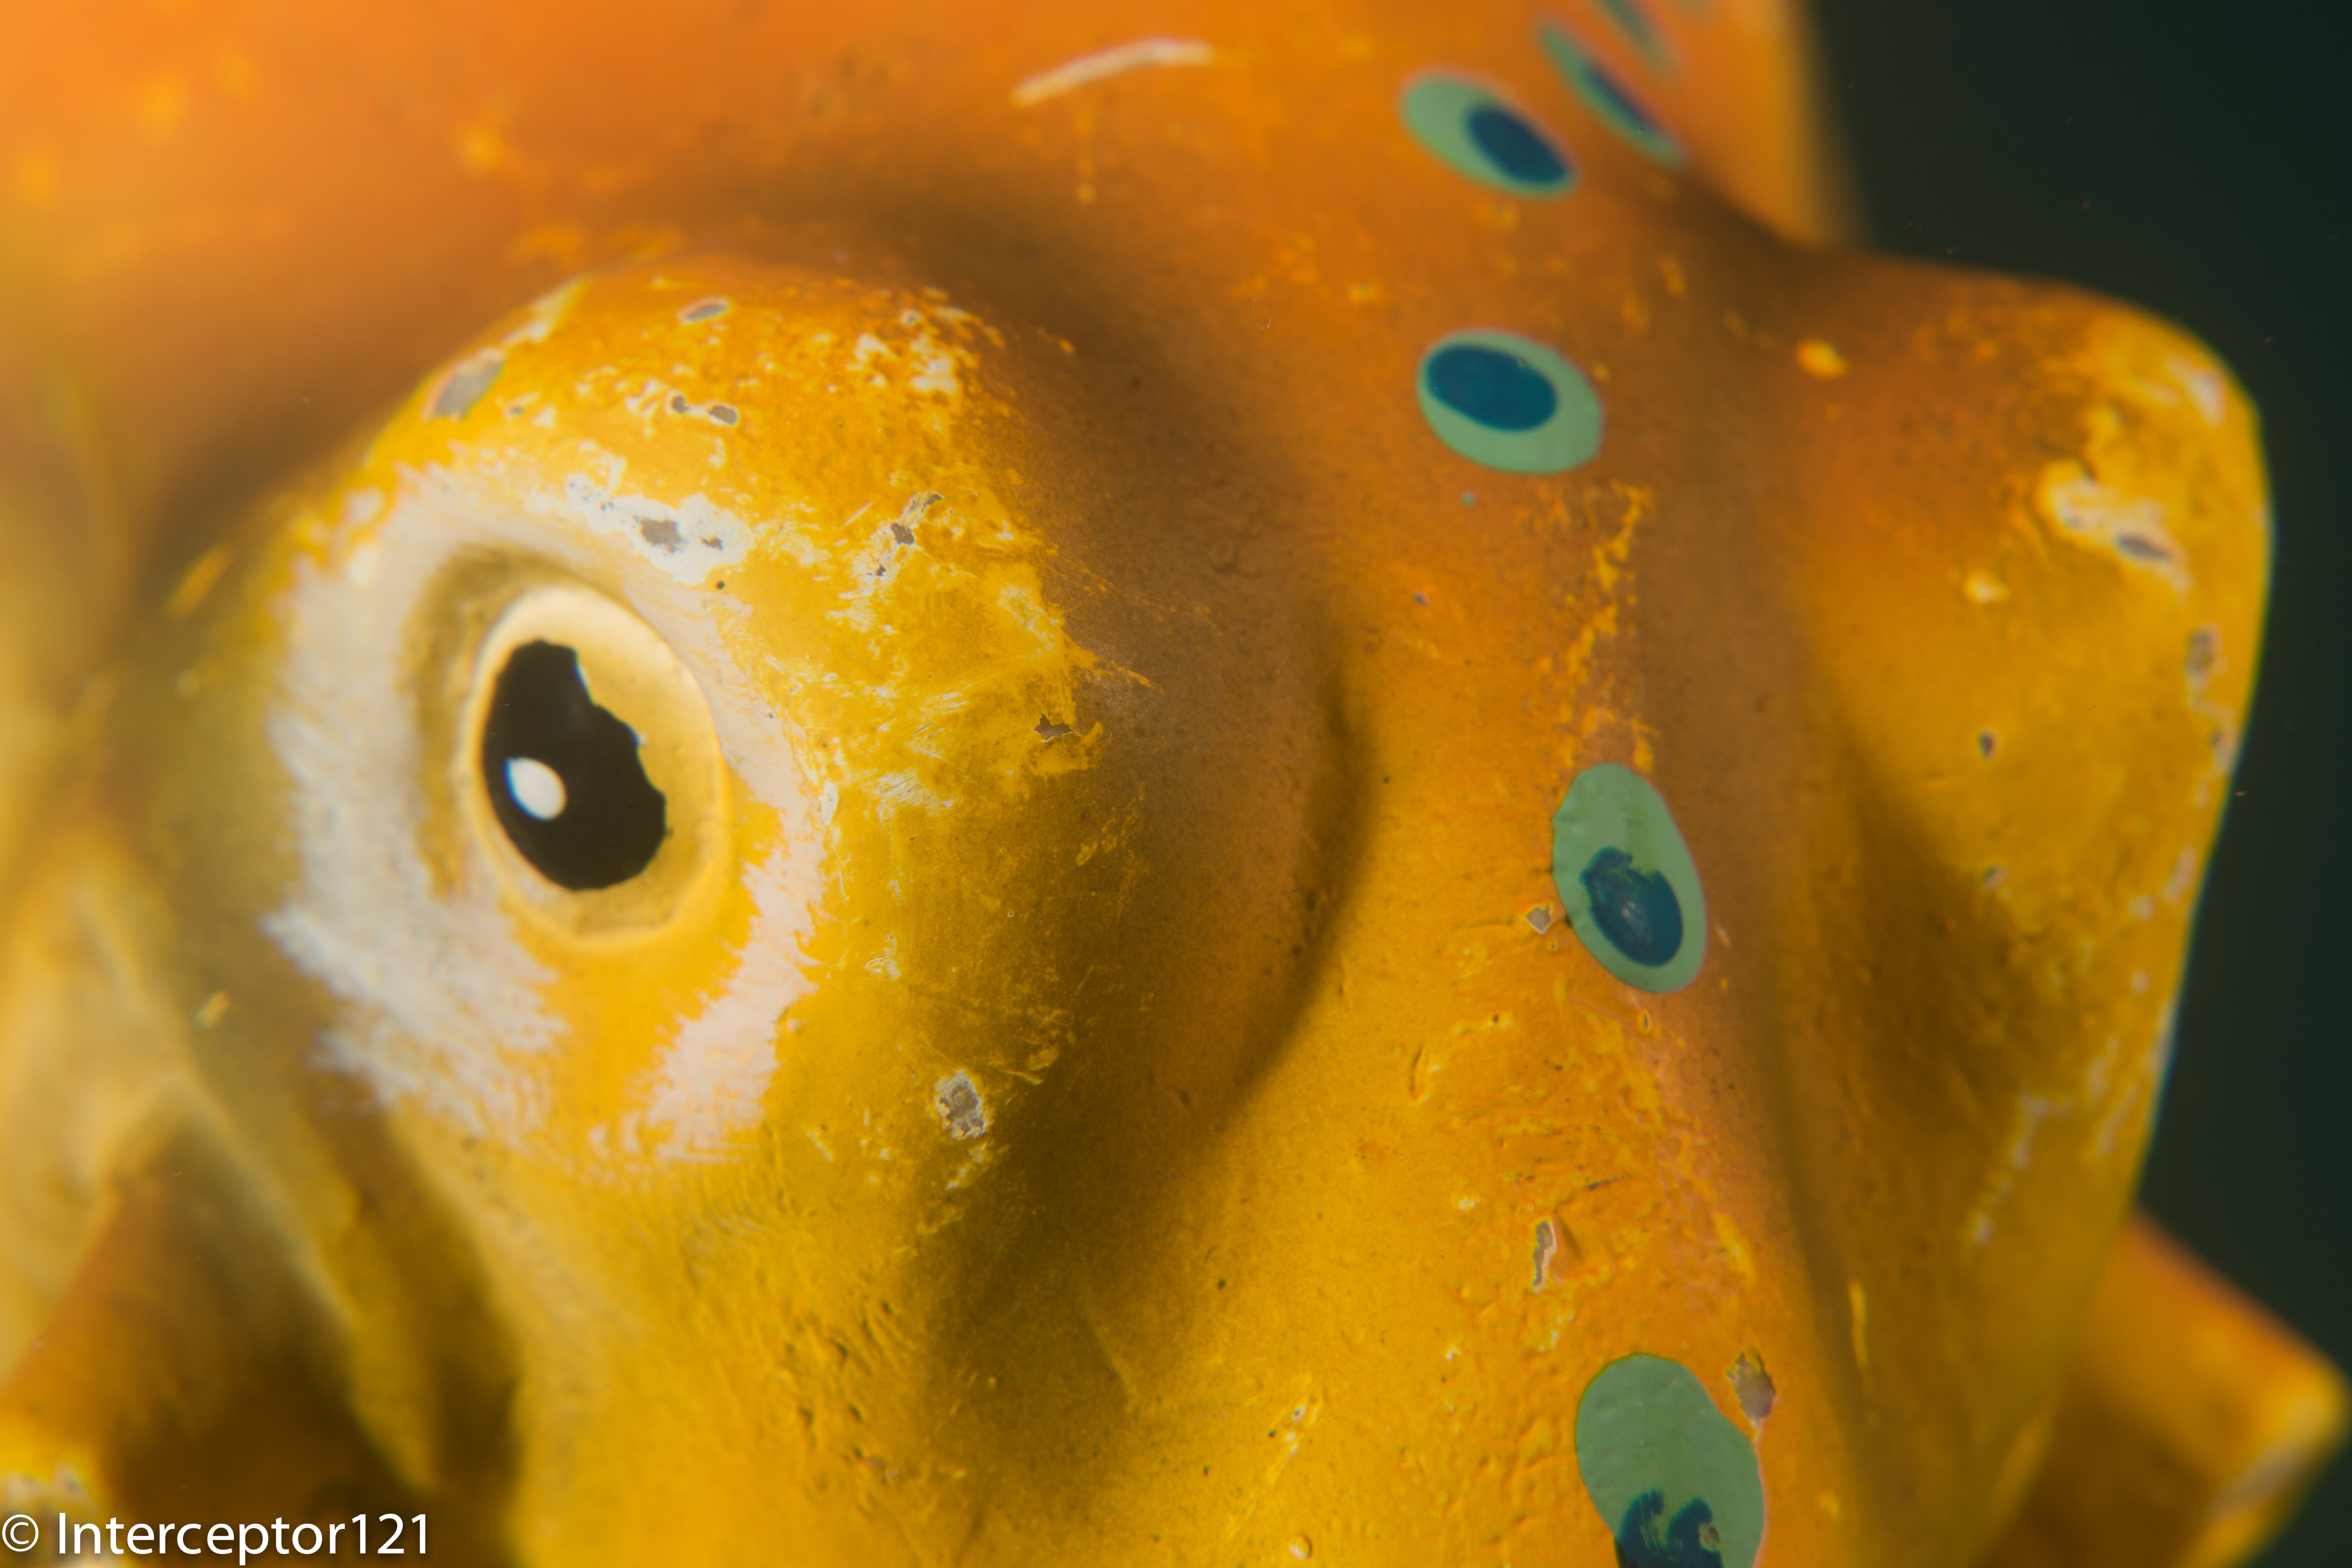
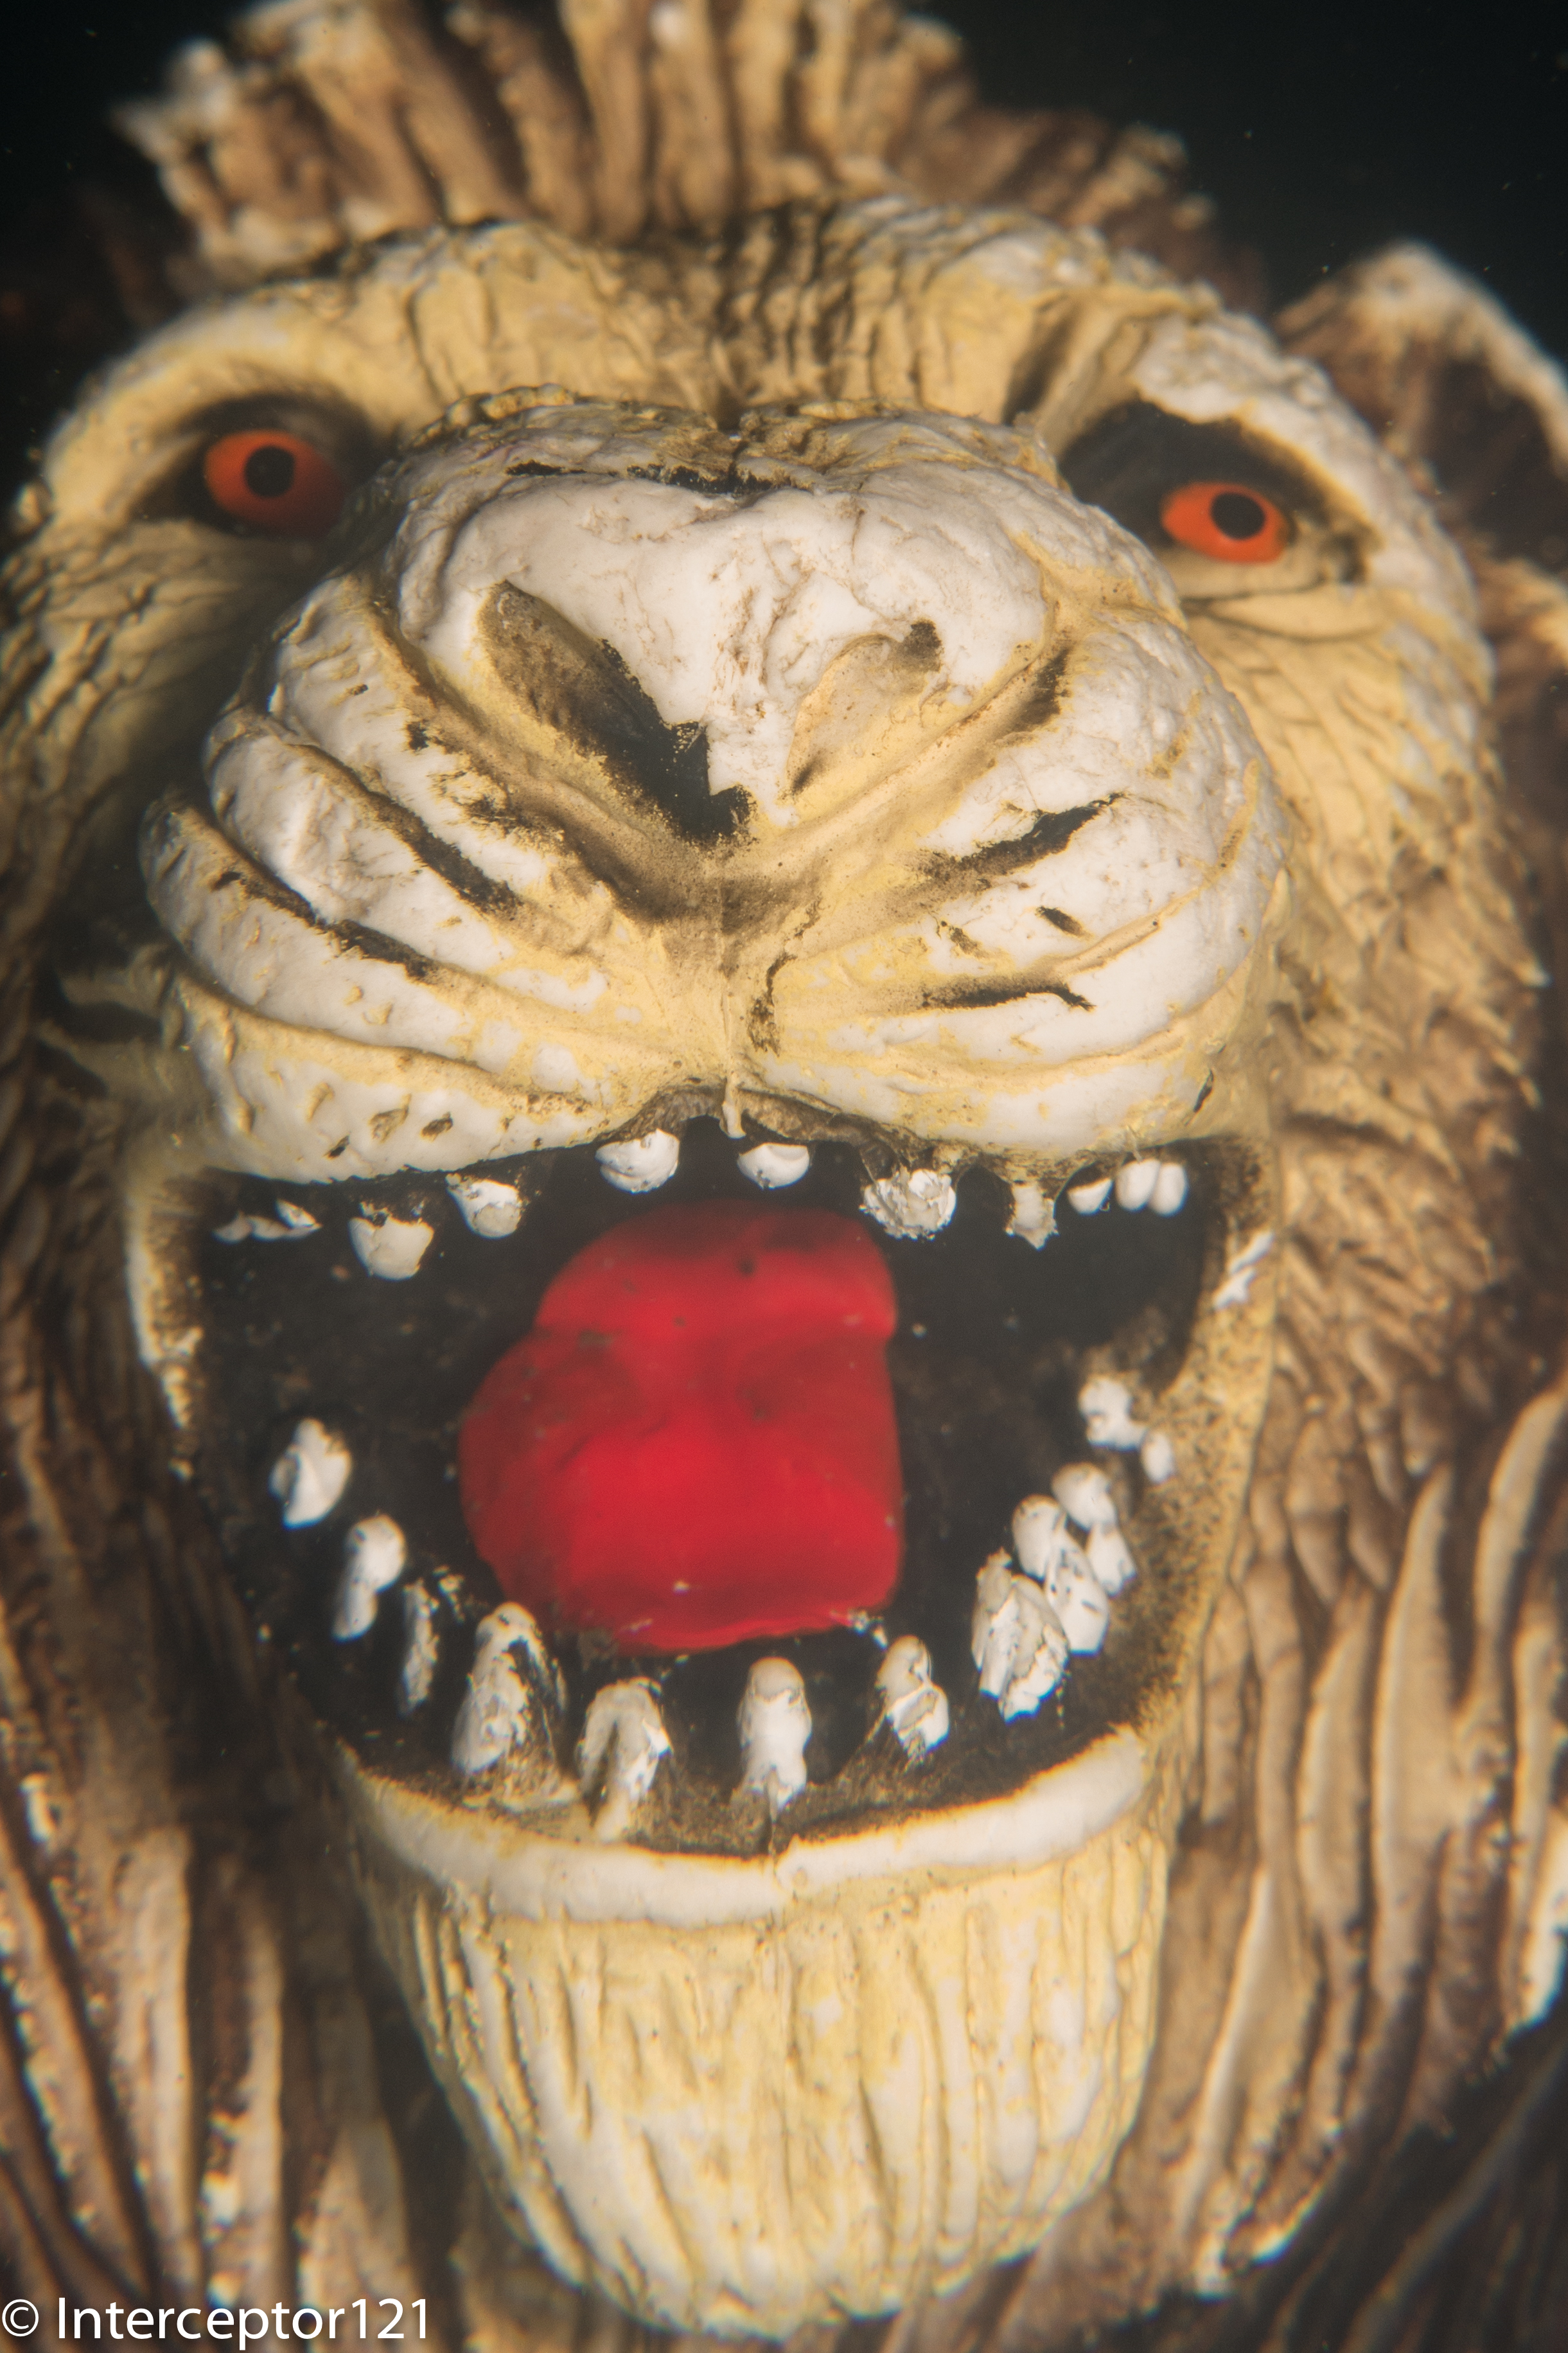
Lion Mouth Single Diopter
To finish off my last task was the tongue and eyes of a lion that I shot with a single UCL-165.
Overall a great day and I definitely recommend you the tuition day with Martin. He is a great person and extremely good at teaching I can see the benefits my buddy had right away.
Lessons learned on the RX100
There were a few things that I learned about my RX100 still rig mode that I want to share with you.
The autofocus is incredible. I even used this for macro. If the camera does not focus is because you don’t have enough depth of field and that is it.
Best macro performance is with a single diopter and also had a benefit of an increased working distance, this means the shots will need cropping for extremely small critters
Two diopters resulted in near bokeh with less than 1mm in focus and difficult to autofocus (though the LCD is great and I could see if things were in focus or not I think this is personal and I would recommend DMF to others)
Performance at wide angle with the UWL-100 28AD with dome is stellar
Inon float arms (I used two 6″ segments) were perfect with lens holders on it.
Inon Z240 twin set with one in TTL and the second in external auto delivered creative lighting without headaches, remember to buy the AUTO diffuser that does not come with the strobe
Strobes in manual allowed for even more creativity and the level of precision compared to sea and sea was staggering
Despite pool conditions the RX100 focused well in low light and much better than the Canon S95 that was returning focus error on the same exposures. I will not bother having a focus light with this camera and only have a single sola on night dives
That’s all for now any question just drop a comment